Rat's Nest
From Halopedia, the Halo wiki
Template:Multiplayer Map Infobox Template:Article Quote Rat's Nest[1] is a Halo 3 multiplayer map released through downloadable content on December 11, 2007.[2] Rat's Nest is a large indoor vehicles map that resembles an area from the campaign level Crow's Nest, with internal vehicle accessible roads, tight corridors, walkways suspended above areas and vents. In the distance, Pelicans and Hornets pass by. It was used by the UNSC as a weapons, fuel and ammunition storage facility up until the Second Battle of Earth.
On November 19, 2007, Microsoft released information regarding the first Halo 3 Heroic Map Pack. [3] Rat's Nest is one of the maps included in this bundle. The map pack retails for 800 Microsoft Points ($10 USD), and was released on December 11, 2007. However as of March 25th 2008 the Heroic Map Pack is free of charge to all Xbox Live Members.
Description
This map is, essentially, a big figure 8 track (note, a digital 8, meaning vehicles must turn 90 degrees to cross straight from one side to the next). The map is extremely open and vehicle-based around its perimeter and center, with close combat and medium sized rooms everywhere else. It has two Warthogs and Mongooses parked outside of both bases, and small rooms connecting each base. On the edge of the road there is a small outdoor road. On the upper road there is a Ghost and Sniper Rifle, below that Active Camo, then a Gravity Hammer and a machine gun turret above that, providing a commanding but exposed view, then the Rocket launcher by the cliff. A Pelican is positioned on a landing platform visible from the track, but it is unusable and inaccessible due to death barriers. Pelicans and Hornets fly by in the distance (which can be shot down with a Spartan Laser).
Strategies
- On the first floor entrance to the center from your base, there is a wall that will have a Battle Rifle resting on it. This wall can be climbed on to help get a better view of incoming attackers on foot and make you a less like victim to grenades in that area. You may also pick up the Battle Rifle there to aid with this tactic, allowing you to lower an opponent's shields as they come in and drop down and beat them down.
- At the beginning of the level, it will be of no surprise that everyone will want to get a hold of the Shotguns and Gravity Hammer, but near the Shotguns are Bubble Shields, picking this up and used correctly can help you get at least one of the Shotguns and possibly the Gravity Hammer without risking attack from Battle Rifles or Needlers.
- A good form of defence for Assault and Capture the Flag is to stay up on the first floor of your base with a Shotgun, this allows you to pounce any attackers on the ground floor, Plasma Grenades are nearby for attacking vehicles, and you are normally at very little risk.
- Another good form of defence is to have a Shotgun and the Rocket Launcher; the Shotgun to deal with the on foot opponents and the Rockets to deal with vehicles before they can get in, provided you are on the first floor instead of the ground floor.
- Yet another useful trick in CTF is to jam the lower doorway into your base with a Warthog.
- In Team Slayer, CTF, and Assault, the Ghost is one of the best ways to help your team dominate. Due to the Ghosts high speed, splattering opponents is easy. Since Rats Nest's main road doesn't consist of uneven terrain and sharp turns, controlling the Ghost, and fleeing opponents with heavy weapons are a blessing. Another thing to keep in mind, each of the teams spawn points are outside the bases, which means each team will usually spawn on the main road. So, with the Ghost, you can boost right through their spawn points, and wreak complete havoc.
- In a game of Team Slayer if you gain the lead and have all members of your team pile in behind the fence using the aforementioned mongoose fence glitch, you are safe until the match is over. The only catch is that someone must guard the sealed door to assassinate any potential intruders.
- Use both your Warthogs in the beginning, put them on each opening of the hall in the middle so that if any body walks through they'll be barraged with machine gun fire.
- In CTF, have 2 snipers standing in the part where a player can go to any base, while having a person with plenty of grenades and a flare throw those inside the opposing base. Get the flag and get out before the other team respawns. Have the snipers cover you on your way out.
- On either side of the main opening to the outdoor area, there are fences with generators in them. You can get on top of these, and the barbed wire will camouflage you. Better yet, you can hop off of this to the top of the street lamp, and then to the next lamp. Most people don't look up, therefore providing you with chances to drop down and surprise or assassinate the enemy.
Forge
- On the turns in the "track" that goes around Rat's Nest, place shield doors there, this will allow a vehicle to "bounce" off them around the turn.
- Placing a Portable Gravity Lift directing vehicles outside the map will be challenging for everyone.
- If you place multiple barricades on top of each other spaning the main veichle route you can crash through and make a great machinima clip.
Trivia
- This map is perfect for a 8-figure race track.
- If you listen closely to the big green pipes, you can hear Drones flying and bumping into each other inside the pipes. This is no doubt a reference to Crow's Nest where you first hear Drones passing through the pipes, before breaking out and engaging the player later in the level.
- Bungie stated in an update that the level includes actual rats. There are rats, but they are dead. If they were alive, they may have confused players by showing up as tiny blips on their radar, even though this is present for the Monitor on Cold Storage. Strange enough, as they could have been edited to remove the blips like the Sentinels in Isolation, although they might annoy players with their squeaking and distracting movements.
- There are Hornets and Pelicans seen flying in the background of the outdoor area.
- Rooster Teeth, the producers of the popular machinima series Red vs. Blue, made their D.I.Y video here and in the two other maps in the Heroic map pack.
- Rats Nest's code name was 'John Carpenter's Prince of Dorkness'.
- This level was first announced on the Bungie Weekly Update of October 12, 2007.
- It is possible to get vehicles next to the Pelican, but players will be killed if they get too close.
- It is possible that Rat's Nest once belonged to NATO (Northern Atlantic Treaty Organization). This might be as in campaign a Marine states that the Crow's Nest was "built for some 20th century war". If you look closely above each of the symmetric main entrances, there is a faded NATO star next to the big A2.
- The venting area beneath the Ghost spawn can be accessed through the turret glitch and used to store weapons.
- Along with Avalanche and Sandtrap, it is the only map to feature the Trip Mine equipment by default.
- It is possible to get behind a small fence on the side of the base that opens out into a cliff. To do this, drive a mongoose with its left side facing the sealed door in the fence and get out. You will jump through the fence into a little caged area.
- Beyond the Hornets and Pelicans flying around the base, pillars of smoke can be seen in the distance, a hint that the Battle of Earth was happening.
- On the open area side of Rat's Nest road, there is a secret room above the road that you can enter by performing the turret glitch, but you cannot spawn Teleporters inside. Respawn points however, can be placed in this room.
- It is possible to shoot down the flying Hornets in the distance with a Spartan Laser, although this is very hard since the hornets move abnormally fast.
Gallery
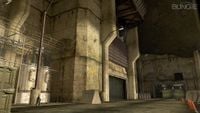
The main road along the cliff.
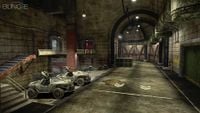
Outside red base.
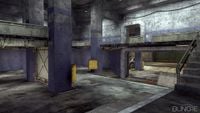
Inside blue base.


References


