
Guardian
From Halopedia, the Halo wiki
| Guardian | |
|---|---|

| |
| Map overview | |
|
Game: |
|
|
Map file name (?): |
|
| Lore information | |
|
Location: |
|
| Gameplay overview | |
|
Terrain: |
Jungle, giant trees around suspended Forerunner structures. |
|
Map layout: |
Asymmetrical |
|
Recommended number of players: |
2-6 |
|
Recommended gametype(s): |
|
| “ | Millennia of tending has produced trees as ancient as the Forerunner structures they have grown around. | ” |
Guardian is a Halo 3 multiplayer map that was also included in Halo Online. Reminiscent of Halo 2 multiplayer maps Lockout and Ascension, Guardian is a medium-sized level comprised of catwalks and small rooms, which make the level feel smaller than it actually is. Its asymmetric layout makes it great for Slayer and Team Slayer gametypes, while its central platform makes for interesting games of King of the Hill.
Universe and lore[edit]
Guardian is set in an ancient Forerunner complex on Installation 00[2] surrounded by a lush, dense jungle. The multi-level map is split into four key areas; some of these areas connect to each other with catwalks and man cannons, and all of these areas connect to each other at the center of the map. Quadwings fly around the outskirts of the map.
Overview[edit]
Layout[edit]
Guardian's central area and size are reminiscent of Ascension, while its layout and weapon spawns resemble those of Lockout. Unlike Lockout, the scenery between areas of the map changes noticeably, so players do not get lost as easily. The changes in scenery and the simplicity of the map's layout lead to a short learning curve. It is a very good map for free-for-all multiplayer games.
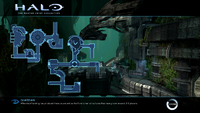 Guardian Map.
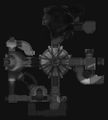 An overhead view of the map.


Sniper Tower[edit]
The map's Sniper Tower is a three-floored structure that features a winding circular ramp. The eponymous sniper rifle spawns on the bottom level of the tower. A Covenant carbine and an overshield are tucked into opposite corners of the tower's second-floor room, and a needler spawns nearby at the base of the tower's circular ramp. The top of the winding ramp features two plasma grenade spawns, and gives players a view of the entire upper portion of the map. A plasma battery also spawns here, to balance the location and prevent camping.
Each level of the sniper tower offers direct access to the center platform and a clear view of the opposite side of the map. An L-shaped walkway (referred to by some as "the Elbow") connects the sniper tower's second-floor room to the map's more forested area.
Rooms in the sniper tower are commonly called out as "S1", "S2", and "S3", going from bottom to top.
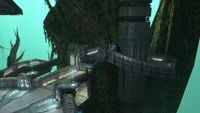 Sniper Tower Overlook with Elbow in background.

Blue Room[edit]
The Blue Room, named for its soft lighting, is adjacent to the yellow lift and the center platform. It contains two plasma batteries, a flare, and a Mauler.
An archway allows players to jump from the blue room into both the top and bottom floors of the yellow lift. Adjacent to that archway, an L-shaped hallway (with explosive power cores built into a wall) offers direct access to yellow lift's top level and bottom blue's shotgun spawn. Across from these paths, a walkway (featuring an SMG) connects the blue room to the central platform, and features impenetrable glass to shield players from enemy fire.
Bottom Blue[edit]
The area beneath the blue room is known as "bottom blue," and features a man cannon that leads to the sniper tower, a dead-end hallway (that can be dropped into from the blue room), and walkways that lead to the yellow lift's bottom level. A shotgun spawns in the dead-end hallway.
Using the bottom blue man cannon at the start of a Team Slayer game is unwise, as the other team will have control of the overshield that spawns at Sniper Tower.
Yellow Lift[edit]
The yellow lift, also known as the gold room, is a two-floored structure that lies directly across from the Sniper Tower. The area closely resembles Lockout's blue lift: the eponymous gravity lift allows players to travel from the bottom floor to the top, and holes on either side of the lift allow players to drop back down to the bottom floor.
Yellow lift's top floor features a battle rifle and four doorways. The first doorway leads to an L-shaped hallway that connects yellow lift to blue room, while an adjacent doorway opens up to a gap that players can jump across to enter blue room through its archway. A doorway at the front of yellow lift opens up to a gap that players can jump across to reach the center platform. The last doorway is directly opposite the first two, and leads to a curved walkway that features an active camo spawn, two Plasma Grenade spawns, and a man cannon that leads to the center platform.
Two walkways directly connect yellow lift's bottom floor to the central platform and to bottom blue; the walkway to the center platform lies directly under the gap between central platform and yellow lift's top floor. Both of these walkways contain plasma rifle spawns.
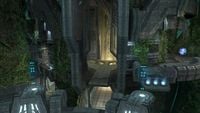 An overlook of the Yellow Lift.

Green Area[edit]
The forested green area does not see as much action as the rest of the map, due in part to its weapon spawns. A short bridge connects the green area to the central platform's lower level, and an L-shaped catwalk (sometimes called "the Elbow") connects the green area to the sniper tower's second floor. A man cannon provides direct access to yellow lift's active camo spawn. A bubble shield spawns atop a small, ramp-like tree stump at the center of the green area; this tree stump can be used to jump up to the top of the central platform.
A Brute Shot spawns at the base of the stump, and a plasma battery is placed past it, against the green area's outer wall. A plasma pistol spawns nearby on the bridge to the central platform, and pairs of Spikers and frag grenades spawn on the elbow.
Center Platform[edit]
The circular center platform acts as the main pathway between all of Guardian's four outer regions, and therefore sees quite a bit of traffic. The large top floor is completely devoid of cover and weapons, while the smaller, closed-in bottom floor contains a gravity hammer spawn.
A decorative Forerunner structure hangs above the center platform, and can be reached through various means:
- a grenade-jump from the elbow with help from a plasma battery.
- a Brute Shot jump from the top of sniper tower's curved ramp.
- a gravity hammer bounce.
- a precisely-placed grav lift in Forge.
Strategies[edit]
- You can access an effective sniping perch by standing atop the plasma battery at the Sniper Tower, jumping, and then shooting the Plasma Battery at the height of the jump. This will propel you up the tree, granting a view of almost the entire level.
- As you run up the ramp to the overshield spawn, you can jump off of the right side to land downstairs where the sniper rifle spawns. This can sometimes allow you to avoid the overshield player and get