H3:The Storm
From Halopedia, the Halo wiki
|
Prev: |
|
|
Next: |
|
| The Storm | |
|---|---|

| |
|
Game: |
|
|
File name (?): |
|
|
Player: |
|
|
Date: |
|
|
Location: |
|
|
Objective(s): |
Destroy all Covenant anti-air threats |
|
Par Time: |
00:15:00 (Master Chief Collection) |
|
Par Score: |
15,000 (Master Chief Collection and Halo 3) |
 |
Halopedia has a walkthrough guide for this level; see H3:The Storm/Walkthrough. |
| “ | Reclaim the city. Make a hole. | ” |
The Storm[3] is the fifth campaign level of Halo 3.
Upon completing it on Normal, Heroic, or Legendary the player will unlock Assault achievement, worth 20 Gamerscore. If a player gets more than 15,000 points in the meta-game he or she will unlock the Askar achievement, worth 10 Gamerscore.
Background[edit]
It begins with a UNSC Warthog convoy moving to Voi, its objective to punch through the Covenant anti-aircraft defenses that surround the supposed Ark and allow Lord Hood's small fleet to launch a direct strike against the Prophet of Truth's Dreadnought in hopes of killing Truth and stopping the firing of the Halo rings. UNSC Marine forces, led by John-117, fight through several pitched skirmishes through the industrial zone of Voi.
After breaking through the industrial area, John meets up with a group of approximately five Mongoose ATVs and commandeers one with a Marine riding 'pillion' using a rocket launcher. They immediately engage a squadron of Anti-Air Wraith tanks to secure a landing zone as Brute Choppers and Ghosts attack. Covenant forces are being continually reinforced by Phantoms. Hornets and Banshees fly above, vying for control of the skies. Although they manage to take the landing zone, the victory ends up being short-lived as a Scarab arrives to crush the UNSC forces. After John destroys the massive walker, remaining UNSC forces prepare to push into a Jiralhanae-controlled warehouse.
With reinforcements led by Thel 'Vadam along with the Voi Factory Workers, the Chief and his allies push onwards, engaging nearly a dozen Jiralhanae armed with spikers and brute shots, a pair of Mgalekgolo, and a Jiralhanae Chieftain wielding a Gravity Hammer. They finally press on to the anti-aircraft battery, engaging a small Covenant force defending it, including a Jiralhanae War Chieftain. Eventually, they succeeded in destroying the gun, enabling three UNSC frigates to attack Truth's ship. Unfortunately, the assault fails to damage Truth's ship. The artifact opens and activates a massive portal, which Truth and the rest of the Covenant fleet use to escape. Before the UNSC can figure out what to do next, a badly damaged Covenant cruiser enters Earth's orbit and crashes into a nearby factory. An even deadlier enemy has arrived...
Transcript[edit]
Ghost Town[edit]
Military Operations Urban Terrain.
{Gameplay}

A convoy of three Warthogs: two M831 TT Warthogs and one M12 Chaingun Warthog roll down a tunnel of Tsavo Highway, with the Chief riding shotgun in the LRV. (On co-op, Thel 'Vadam and N'tho 'Sraom ride shotgun on the TTs, but Usze 'Taham uses the turret of the Warthog the Master Chief is riding on).
- Commander Miranda Keyes (COM): "Chief, the Prophet of Truth has found the Ark. Our only chance of stopping him is a surprise aerial assault. Clear this sector of Covenant anti-air defenses. Make a hole for the Admiral's ships. Good hunting. Keyes out."
The Warthogs emerge from the tunnel in a parking lot scattered with destroyed Warthog chassis and Marine and Unggoy corpses. The Warthogs roll to a halt as the Marines and Master Chief walk out, and the Marines form a perimeter outside the locked door. (On co-op, Thel 'Vadam and N'tho 'Sraom will also get off their Warthogs, but Usze 'Taham will remain unless he chooses to get off.)
- Gunnery Sergeant Reynolds: "Ready when you are, Chief. Open the door and take point. We’ll cover you with the .50."
or
- Gunnery Sergeant Stacker: "Ready when you are, Chief. Open the door, take point, we'll cover you with the .50!"
The Master Chief opens the door into an empty factory section, moves up a flight of stairs, and heads out onto a catwalk overlooking an area with a few Unggoy and Kig-Yar, who are listening to another of Truth's sermons.
- Prophet of Truth (Hologram): "With my gentle encouragement, our Lords' holy relic springs to life. It is unfortunate that our enemies also bear witness to its glory. But their dull eyes will soon be closed; seared by the Rings' unforgiving light."
The Chief opens fire, taking the Covenant by surprise.
- Reynolds/Stacker (COM): "Chief, open the door; we can roll on through!"
The Chief finds the door controls on the upper level and activates them. The doors open and an M12 Warthog LRV and a squad of Marines enter.
- Marine: "That did it, sir! Push forward!"
The Marines wipe out any remaining Covenant troops in the immediate area. Three more Unggoy enter the room, but they too are killed.
- Marine: "Open her up, sir. We've got your six."
The Chief heads back down to the ground floor, and opens a second set of doors, leading to a factory tunnel full of Jiralhanae, Kig-Yar, Unggoy and even a pair of Ghosts. Beyond that is another door leading outside to Lake Bed A. After cleaning out resistance in the tunnel, the UNSC forces open the next door, revealing a massive expanse with cruising Ghosts and a heavy Covenant garrison, along with an Anti-Air Wraith which fires at Hornets overhead.
The Chief can take a Ghost, the Warthog, or proceed outside on foot.
- Fleet Admiral Lord Terrence Hood (COM): "Kilo 023, this is Forward Unto Dawn. I need a sit-rep, Commander."
- Commander Keyes (COM): "Atmospheric disturbance is intensifying above the artifact, Admiral."
- Lord Hood (COM): "And Sierra-117?"
- Commander Keyes (COM): "Moving as fast as he can, sir. I know he’ll get it done."
If the player stalls:
- Marine (COM): "Let's get going, sir. Admiral's waiting for us to clear the anti-air."

A team of Marines are forced to retreat from a small dock office in the center of the lake bed as a Phantom dropship drops Covenant troops directly on top of the structure. The Master Chief and accompanying Marines rendezvous with the displaced team and together they assault the dock office, clearing it of Covenant. The Ghosts attack the UNSC force, but are repelled. A Phantom drops extra Ghost reinforcements, but the Chief and company destroy these too. Another Phantom deploys a standard Wraith at the opposite end of the lake bed.
With most of the opposition destroyed, the Chief destroys the Anti-Aircraft Wraith.
- Female Marine (COM): "Hell yeah! Boom! The Fly Boys are gonna love us for that!"
- Sergeant Major Avery Johnson (COM): "That-a-way, Chief! Target destroyed. Move to the next area, over."
A pair of Banshees swoops down to attack the UNSC forces. A friendly Hornet arrives and destroys the Banshees. The Chief and the remaining Marines cross the lake bed and neutralize the Wraith guarding the entrance to the factory. Another lance of Covenant attempt to stop the UNSC force, but fail.
If the player stalls:
- Johnson (COM): "Chief, keep moving around the crater."
If the player further stalls:
- Johnson (COM): "Hurry, Chief! You need to find all the tanks!"
Inside the factory, a sizable contingent of Jiralhanae, Kig-Yar and Unggoy led by a Jiralhanae War Chieftain have pinned down a pair of Marines manning a mounted machine gun in the adjacent section.
- Marine: "They just keep coming!"
- Female Marine: "Check your fire! It’s the Chief!"
The Chief engages the Covenant.
- Female Marine: "Flush 'em out, sir. We'll nail them with the .50!"
The Chief goes upstairs and flanks the Covenant troops, forcing them out into the open where the mounted machine gun can cut them down. The Covenant soldiers are soon wiped out.
- Marine: "Hurry, before any more Covenant show up!"
If the player brought the Warthog from the last section:
- Marine: "Hey! We got a hog!"
The Chief meets up with the Marines operating the mounted machine gun.
- Female Marine: "We're down to our last mags, sir. Thought those last ones had us."
The Chief heads downstairs and opens a heavy door (or a Marine does it for him), giving him access to the next section of the factory.
A Phantom hovers overhead above a glass roof.
- Marine: "We've got a Phantom, overhead!"

The glass roof shatters and a horde of Yanme'e descends. The Chief and the Marines stand their ground and fight off the swarm. The Phantom eventually leaves and any remaining Yanme'e flee. The Master Chief and Marines proceed into the next factory tunnel section.
- Cortana (Cortana Moment): "I have defied Gods and Demons..."
At the end of the tunnel are four Mongoose vehicles, next to a rack of weapons. Marines rush to man the ATVs.
- Female Marine 2: "Mount up, Rockets in back!"
The Chief (or a Marine) opens the tunnel's door, leading outside to a neighboring lake bed.
- Female Marine 2: "We gotta move fast, and punch hard!"
The Chief takes a Mongoose (or any other vehicle of choice) and heads outside with other ATVs. A small squad of Marines has taken refuge on the boardwalk on the northern side of the lake bed. They are shortly engaged by a Covenant lance. Multiple Jiralhanae Choppers and Ghosts mill about in the center, guarding two more Anti-Air Wraiths. In the sky above, Banshees and Hornets are engaged in a fierce dogfight.
- Johnson (COM): "We’ve got Anti-Air Wraiths in the next lake bed, Chief!"
The ATVs quickly take out the first Anti-Air Wraith.
- Marine: "One down, one to go!"
Enemy Phantoms deploy additional Ghosts onto the battlefield. The Marines on the northern boardwalk use a pair of mounted Missile Pods to support the Chief from a distance.
The Chief takes out the second Anti-Air Wraith. The ATVs, Hornets, and Missile Pods eventually clear the lake bed of remaining Covenant resistance. Pelicans arrive to deliver reinforcements.
- Johnson (COM): "Both AA Wraiths have been neutralized...standby. Something big, closing in on your location."
Judgement[edit]
Scarab. BFG. End of World.
There is the booming of the anti-aircraft emplacement in the distance, but also an ominous mechanical grinding noise.
- Private First Class Chips Dubbo (COM): "What's that sound?"
The booms and grinding get louder.
- Dubbo (COM): "It’s getting closer!"
- Marine (COM): "Oh, this can't be good man..."
- Johnson (COM): "Scarab! Find some cover. Now!"
A massive Scarab walker lumbers down from the roof of the factory onto the lake bed, and dust rises as its legs slam into the ground, destroying a Troop Transport Warthog in the process.
- Marine: "We'll try to draw its fire."
Marine-operated vehicles and a pair of Marine-manned Missile Pod turrets open up in volleys.
- Marine: "Use rockets! Target its joints!"
If the player waits around:
- Johnson (COM): "Its armor's too thick!"
or
- Johnson (COM): "Aim for its legs, Chief!"
The Chief, Marines, ATVs, Hornets, and Missile Pod emplacements eventually take out one of the Scarab's joints, forcing it to lower itself and consume all power into getting back up again, deactivating its primary weapon in the process.
- Marine: "Now, while it's down! Find a way inside!"
If the player wastes more time:
- Johnson (COM): "Jump on top of it Chief, just like New Mombasa."
The Chief boards the Scarab.
- Johnson (COM): "Look for a weak spot, Chief. A power core, something like that."
On the upper deck of the Scarab, the Chief neutralizes several Jiralhanae, Kig-Yar and Unggoy trying to stop him.
If the player stays on the Scarab for a while:
- Johnson (COM): "Look for the core, Chief. You'll know it when you see it."
The Chief goes to the rear of the Scarab, where he finds and destroys the power core.
- Dubbo (COM): "Get away! It's gonna blow!"
The Chief jumps off the Scarab and runs for it. With a loud roar, the Scarab detonates violently in a blinding flash of light.
Alternatively, the Chief can use one of the missile pods to destroy the Scarab from a distance.
- Keyes (COM): "Well done, Chief! I’m sending in a few Pelicans."
- Johnson (COM): "One more target, Chief. There’s a Covenant AA gun in the next area. Take it down and Lord Hood can start his attack run."
A Pelican lands and drops off Thel 'Vadam. A fresh squad of Marines lead 'Vadam and Master Chief to a locked door leading to the factory's warehouse.
- Arbiter Thel 'Vadam: "There was honor in our Covenant once...and there shall be again!"
- Female Marine: "We've got this area locked down, sir. Follow us, we’ll get you through."
The door opens up, leading to a dirty tin-walled section filled with wounded Marines and civilians lying on the floor. Several grim-faced Marines are standing behind sandbags, tending to the wounded and operating the sole UNSC field radio available.
- Cortana (Cortana Moment): "I am your shield. I am your sword."
- Wounded Marine: "Ahh! Somebody, get me some morphine!"
Voices begin to play through the radio and are attentively monitored by a pair of Marines operating it.
- Naval Officer (COM): "All Brute cruisers are pulling back to Truth's ship. Winds inside the storm just hit 200 kilometers per hour. Energy cascades all over the artifact!"
There is a moderate pause within the radio conversation, before another starts between Commander Keyes and Lord Hood. This conversation foreshadows the very end of the level.
- Keyes (COM): "Admiral, a single Covenant ship has slipped in-system."
- Hood (COM): "Just one? What's its range and disposition?"
- Keyes (COM): "Above the artifact, inside the orbital line. Seems to be holding steady."
- Hood (COM): "The attack proceeds as planned, Commander. We’re not going to get another shot at Truth."
- Keyes (COM): "Sir. Yes, sir."
The Master Chief and Thel 'Vadam pass through a stained area of bolted tin plates until they reach the periphery of the warehouse, where a trio of Marines are pinned down under sandbags as spiker projectiles fly through the air. Farther forward is a steel bridge where a pair of Marines frantically open fire on Jiralhanae all around them with a mounted machine gun.
- Marine: "We’ve got company!"
After the Jiralhanae between the sandbags and the bridge are killed by the UNSC forces, another group of Jiralhanae charges from the next section, chasing two Marines.
- Jiralhanae: "Don't let them escape!"
A surviving Jiralhanae from the previous wave tries to warn the charging Jiralhanae of the impending doom but is too late.
- Jiralhanae 2: "No, fall back!"
They then run towards the bridge and a Marine fires the bridge-mounted turret.
- Marine: "Hold the line! Enemy charging!"
After the last wave of charging Jiralhanae is killed, the Master Chief, 'Vadam, and the surviving Marines make their way into the next section, where behind a mass of stacked crates a Jiralhanae violently throttles a construction worker. Three other workers armed with pistols flee from the Jiralhanae and his pack. The throttling Jiralhanae roars out.
- Jiralhanae: "Kill them for honor!"
- Construction Worker: "Get to safety!"
The Chief and his allies kill the Jiralhanae.
The next section is littered with civilian corpses, while a few live Factory Workers cower in the corner. A door leading to the outside of the factory is nearby. The door opens up, and a group of four construction workers runs in. However, they are cut down by two massive green beams of energy blowing up the fusion cores next to the workers.
A pair of Mgalekgolo charge in over the worker corpses and after the Master Chief, Thel 'Vadam, and the awaiting Marines. The cowering workers get up and are relieved to see fellow humans.
- Construction Worker: "I thought we were the only ones left-"
Their celebration is cut short when they see the Mgalekgolo and retreat behind the approaching Marine forces.
If the fight continues for a while:
- Stacker (COM): "Gotta get around 'em, Chief! Look for gaps in their armor!"
After a firefight, the Chief and company manage to take out the Mgalekgolo pair. The Marines, Master Chief, and Thel 'Vadam run through the open door to a series of low-roofed buildings where a Jiralhanae Chieftain awaits with his Bodyguards and several Unggoy. The Prophet of Truth sermonizes from a holographic pedestal behind them.
- Prophet of Truth (Hologram): "Take heart, my brothers! Only our enemies should fear this raging storm!"
After the Unggoy are wiped out, the Chieftain retreats with his Bodyguards back to the pedestal, where a larger force of Jiralhanae, Kig-Yar and Unggoy wait. After a protracted struggle, the assault force finally defeats the Covenant troops and continues on ahead. Truth continues preaching.
- Prophet of Truth (Hologram): "Darkened skies and lashing fire are all that remains for them when we, the worthy, have passed beyond."
The Chief, 'Vadam, and the surviving Marines and civilians move around the remaining buildings and reach the hill where the massive anti-aircraft emplacement stands. Weapons can be found among the Marine corpses lying behind sandbags at the base of the hill. The Covenant AA gun opens fire on a surging UNSC Longsword and scores a direct hit on its engines. The damaged craft plunges into the cliffs below.
- Keyes (COM): "Chief! Hood's ships are closing fast! Destroy that gun; we're out of time."
The Chief, 'Vadam, and the remaining Marines and civilians push up the hill. Unggoy tentatively run down the slope to face the onrushing UNSC forces. The Chief eliminates them and presses forward. Mid-way up the hill, he encounters a Jiralhanae War Chieftain wielding a fuel rod gun. The War Chieftain is backed up by his Jiralhanae Captains and Bodyguards, as well as an Unggoy Heavy manning a plasma turret, and Unggoy and Kig-Yar infantry. Numerous Banshees patrol the sky above (on higher difficulties, they will occasionally swoop down and strafe the player).
Eventually, the Chief and his allies take down all the Covenant ground defenders.
- Johnson (COM): "Chief, that gun’s been firing non-stop: it’s gotta be running hot!"
If the player delays:
- Johnson (COM): "It’s gonna be opening up its access panel!"
If the player still delays:
- Johnson (COM): "Wait till it opens up, vents its excess plasma. Shove some lead down its throat!"
The anti-aircraft emplacement's lower section opens to reveal a white sphere. Steam vents as the panel continually opens. The Master Chief destroys the sphere.

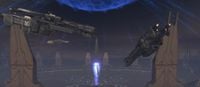
The AA Gun explodes in the background, sending the upper section flying down the cliff. The Master Chief joins 'Vadam on the cliff side of the crater. They look up as multiple squadrons of Longswords streak overhead, followed by three UNSC frigates, including the UNSC Forward Unto Dawn, Lord Hood's flagship. The Covenant fleet hovers before them, with the Forerunner Dreadnought positioned below at the center of the artifact.
- Hood (COM): "All ships: fire at will!"
The frigates engage the Forerunner Dreadnought. Their Magnetic Accelerator Cannons discharge in volleys, and explosions coat the Dreadnought's surface, but the ship remains unscathed. The Forerunner structure begins to open like a starfish. The Dreadnought is lowered into the structure, an energy beam being focused through it. The storm intensifies. A powerful wind knocks John and 'Vadam backward. The beam of light grows thicker and expands, sending out a shockwave. Everything blacks out.
- Cortana (Cortana Moment): "This...is the way the world ends."
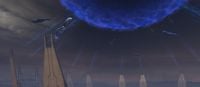
Scene fades in on the Chief, dazed and kneeling on the ground. He gets back to his feet and stares up. A large glowing sphere of blue light, centered by pitch darkness, hovers in the sky above the artifact. The large fins of the artifact focus energy on the sphere. UNSC and Covenant ships alike drift in the air, disorganized.
Truth's Dreadnought rises from the ground and approaches the sphere.
- Keyes (COM): "No, sir. But he certainly did something..."
Thel 'Vadam roars angrily as the Forerunner Dreadnought disappears into the sphere. The rest of the Covenant fleet follows.
- Hood (COM): "Evac wounded and regroup. Wherever Truth went-"
- Naval Officer (COM): "Sir, new contact - slipping in!"

A damaged Covenant battlecruiser emerges from Slipspace to the east of Voi, and hurtles just over the Chief and 'Vadam. It is smoking with rancid fumes and its underside is covered in a sinister, fleshy growth. The ship soon loses altitude and crashes out of sight. There is a flash of light and a deep rumbling is heard, followed by silence. The sky darkens as smog rises, veiling the sun. An omen of ancient evil is in the air.
Scene cuts to a close up of John-117.
- Thel 'Vadam: "What is it? More Brutes?"
Fades to black.
Level ends.
Achievements[edit]
The following achievements can be unlocked on this mission on the Xbox 360 edition of Halo 3.
| Icon | Name | Description | Gamerscore |
|---|---|---|---|

|
Assault | Finish the fourth mission of the Campaign on Normal, Heroic, or Legendary. | 30 |

|
Catch | Find and claim this skull. | 10 |
Production notes[edit]
Design of The Storm was initially led by Rob Stokes, one of the Campaign Design Leads for Halo 3, while one of the Environment Leads Mike Zak and Environmental Artist Frank Capezzuto were responsible for the environment art and visual design. Campaign Designer Niles Sankey took over mission design after basic layout took hold and they started adding encounters while further developing the geometry. The setting of Voi was selected since it was the midpoint between Mombasa—to explain why the city was targeted in Halo 2—and Mount Kilimanjaro—the initial setting for Halo 3—while providing a location to showcase how civilians are impacted by the Covenant invasion.[4]
The opening of the mission was designed around escorting the Warthog to the first lakebed; this posed as a challenge initially, as players, having started the mission in the Warthog, gravitated towards driving the Warthog rather than staying on foot. Subsequently, players were deliberately placed in passenger seats of the Warthogs at mission start, while the door buttons served as objectives that can only be completed while on foot. The Warthog's driver was scripted to drive to specific locations during the interior sections, with these command scripts triggered by the door buttons, while the standard AI sandbox behaviour takes over in the lakebeds. However, if the player enter the gunner seat, the driver AI will instead follow a scripted path around the lakebeds. According to Sankey, he designed each vehicle encounter as an opportunity to be fun and rewarding to contrast with infantry encounters, which would typically be more challenging for players. Mike Zack designed the lakebed terrain to offer open paths and spaces to create driving routes or a figure-eight circuit; the terrain design was also intended to minimize spaces where the Warthog could flip over which may frustrate players.[4]
The anti-air Wraith served as the sub-objective in the first lakebed to reinforce the overall theme of the level, as signified by a main objective being an anti-air artillery. Friendly Hornets hover above the lakebed to create the impression of a larger battle in the background, and adds to the world reactivity; the Hornet is scripted to move closer to the lakebed and engage with enemies, including the Wraith, after the anti-air Wraith is destroyed.[4]
 This section is a stub. You can help Halopedia by expanding it.
Trivia[edit]
Glitches[edit]
- Main article: Glitches
- If the player takes a few of the Marines from the first lake bed to the second factory complex using a Troop Warthog, then a couple of the Marines will disappear after the Cortana Moment, right before the player regroups with Mongooses.
- It is possible to fly a dumpster on this mission by getting a second player and have them both jump rapidly to make the dumpster ascend. It is possible to steer if both players jump in the same direction.
- If one uses a Power Drain or an over-charged Plasma Pistol shot, one can take down a Hornet but the player can not fly it or use the passenger seats. If the player do this while fighting the Scarab the player can stand on top of the Hornet and jump on to the Scarab after the Hornet can fly again and gets close enough to the Scarab.
- The Banshees at the anti-air defense gun fly around for no reason. They can be shot down for some points. But sometimes one or two will shoot at the player for a second. If one manages to catch one in a Power Drain, or use a Plasma Pistol on one of them, they can be boarded and the player can fly around the place. The player will, however, die if they pass beyond the map borders.
- When one first sees the Anti Aircraft Battery's "legs" keep going straight, then left onto a small cliff. One can jump onto the other side of the big crack in the earth and go on the other side. Doing this one can walk through some buildings and some of the trees to the right of the road do not have bottoms (assuming Bungie did not plan this)
Mistakes[edit]
- Despite entering the city from the Southeastern edge, the turn off to Arusha calls for a right turn, while in reality the city of Arusha is on the other side of Kilimanjaro with respect to Voi. This would logically place the turn off on the player's left.
- If one looks at the name of the UNSC frigates firing on the Forerunner Dreadnought, they all say UNSC Forward Unto Dawn and the ships' numbers are the same as well. Furthermore, on close observation of the cutscene, one can see that one Frigate actually fires its MAC gun twice, however, this frigate may be similar to the UNSC Pillar of Autumn with a MAC gun capable of multiple firings per charge.
- When the player leaves Lake Bed A and enter the area with the marines on the machine gun, the female Marine cries "We'll nail them with the .50". However, the gun that the marine is using is the AIE-486H Heavy Machine Gun, which, in fact, uses 7.62×51mm SLAP ammunition.
- The Halo 3 official game guide doesn't show a gravity lift being on this level, however there is one in a dark area near the marines manning missile pods.
Easter eggs[edit]

- Main article: Easter eggs
- The boat at the second lakebed resembles the MJOLNIR Mark VI helmet.
- If one manages to get into the boat either in Theater or somehow in actual gameplay, there is a blurry picture of a pirate with writing under it in Swahili that says "Pimps at Sea", a reference to Bungie's April Fool's joke about the made-up game.
- The Catch Skull can be found on this level.
References[edit]
- The construction workers may occasionally say, "I'm a cowardly fool!" during combat. This line was originally said by the Pillar of Autumn's crewmen in the level Halo from Halo: Combat Evolved.
- The phrase "make a hole", in the level description and spoken by Miranda at the beginning of the level, is a common phrase said by dwarves in Bungie’s Myth games when they’re about to throw a grenade near friendly units.
- The last portion of the level is called "Scarab. BFG. End of World" on the level selection menu. The BFG is a weapon in the Doom and Quake games whose name is short for "Big Fucking Gun".
- The last cutscene of the level has clear resemblance to the Halo 3 Announcement Trailer, including the music.
Gallery[edit]
Concept art[edit]

Concept art for an earlier iteration of The Storm, in which the Mantis cannon would have been placed inside the town.

Concept art of the lakebeds.
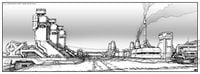
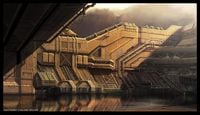
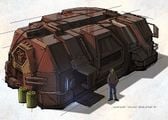
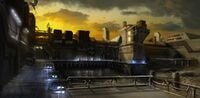
Concept art of the factory.
Concept art of the factory.

Concept art of the factory.
Colour study for the level.
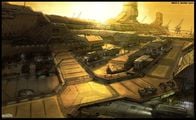
Concept art of a small market town, which was later cut from the level.
Concept art of a modular building for the worker town.

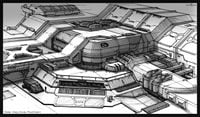
Finalised concept art of the interior of the level.
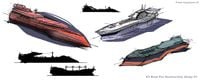
Concept art of boats in the level.
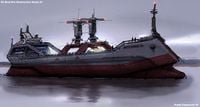
Concept art of the boat in the lakebed.
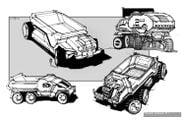
Concept art of worker trucks.
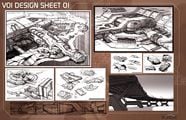
Voi design sheet 1.
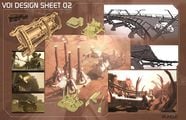
Voi design sheet 2.
Concept art of the facility's south entrance.
Concept art of the docks of Traxus Factory Complex 09
More concept art of the docks.
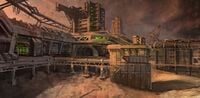
More concept art of the docks.
Near-final concept of the docks.


Design Documentation[edit]

An early paper sketch for the level.
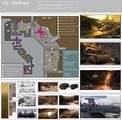
Early paper sketch titled "(Voi) Refinery".
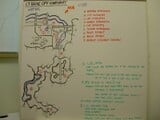
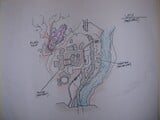
Whiteboard mission design titled "1.3 Drive Off Covenant". At this point Tsavo Highway and The Storm seemed to have been the same level.
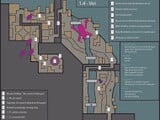
Digital design document titled "1.4 - Voi".
Revised digital design document titled "040 - Voi".


Storyboards[edit]


Screenshots[edit]
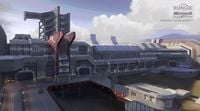
Preview of the level in Halo 3 menu.
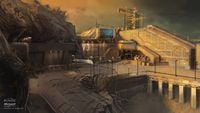
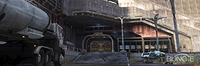
A UNSC Warthog convoy en route to the Traxus Factory Complex 09.
John-117 leads Marines and a Warthog on the attack against Covenant forces.
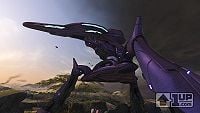
An AA Wraith fires on an AV-14 Hornet.
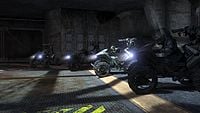
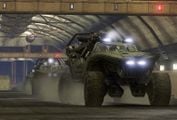
Marines prepare an assault on the second lakebed with Mongooses and rocket launchers.
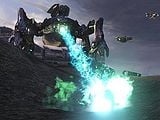
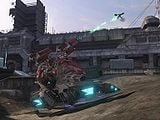
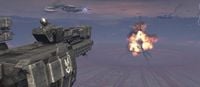
The Scarab fires its main cannon at UNSC vehicles.
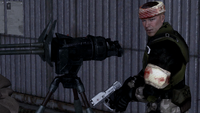
A marine with bandages.
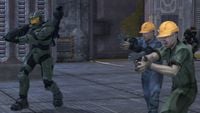
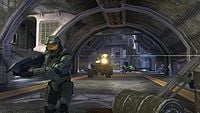
Factory workers join John-117 in battle inside the factory.
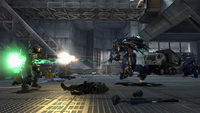
John-117 encounters a pair of Mgalekgolo in the factory complex.
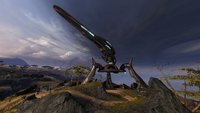
The Mantis AA gun at the end of the level.
An early model Mantis AA gun at the end of The level.
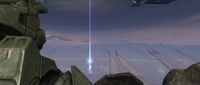
The UNSC initiates an attack on the Forerunner Dreadnought.
The Prophet of Truth activates the Portal structure.
With UNSC frigates disabled by the blast, the Forerunner Dreadnought escapes into the portal.
Truth's Fleet follows the Forerunner Dreadnought into the Portal.


Sources[edit]
- ^ Halo 3 Editing Kit, game file
H3EK\tags\levels\solo\040_voi\040_voi.scenario - ^ Bungie.net, Bungie Weekly Update: 01/23/09 (Retrieved on Nov 12, 2025) [archive]
- ^ Electronic Gaming Monthly, September 2007 (Issue #219) - Halo 3: Single-Player/Co-op - Campaign Trail, page 62
- ^ a b c YouTube - Niles Sankey, How we made Halo 3: "The Storm" (Retrieved on Mar 19, 2026)
| Preceded by Tsavo Highway |
Halo 3 Campaign Missions The Storm |
Succeeded by Floodgate |
| ||||||||||||||||||||||||||||||||||||||||


