
Narrows
From Halopedia, the Halo wiki
| Narrows | |
|---|---|

| |
| Map overview | |
|
Game: |
|
|
Map file name (?): |
|
| Lore information | |
|
Location: |
|
| Gameplay overview | |
|
Terrain: |
Forerunner outpost bridge |
|
Map layout: |
Symmetrical |
|
Recommended number of players: |
2-8 players |
|
Recommended gametype(s): |
|
| “ | Without cooling systems such as these, excess heat from the Ark's forges would render the construct uninhabitable. | ” |
Narrows is a multiplayer map created for Halo 3, and also featured in Halo Online, where it is known as Bridge.
Universe and lore[edit]
The 'conveyor belt' brings the chilly water from beneath the level to an as of yet unknown place where it is used for cooling down the Ark.
Overview[edit]
Layout[edit]
"Narrows", is a fully symmetrical map, with two opposing bases on each end connected by a Forerunner Causeway. The weapons in each base are identical, with a few minor changes. A man cannon exists on one side of each base, and propels the player to the opposing base on the other side of the canyon. If players are to enter opposing man cannons at roughly at the same time they will collide in mid-air and both fall to their death. The main bridge features two different levels for players to combat each other. The upper level is vaster, allowing players to be hit from multiple sides and angles. The lower level, connected by a "lean" light bridge is more discreet, and often less hazardous.
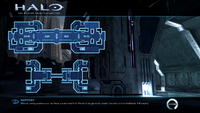 Narrows Map.
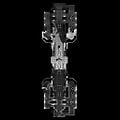 A birds-eye view of Narrows.


Base Spawns[edit]
Each team spawns at opposite sides of the map, and must cross the bridge or jump through the man cannon to engage the enemy team. The two bases have been nicknamed "Blue Base" and "Yellow Base" by players, due to the blue and yellow tinting of each base. From Blue Base, players can access the man cannon to their right, while Yellow Base players will find the man cannon to their left.
Each base features identical weapon spawns and placement. The main differences in each base are the aesthetics, equipment, and power-ups. Yellow Base players have a power drain placed in front of their man cannon, and Blue Base players have a bubble shield. Each base features a low point, which is even lower than the "Low Bridge." Blue Base players have an overshield power-up available, and Yellow Base had active camouflage, though it was replaced with an overshield in an update. In addition, this low point contains a Brute Shot (available on both sides).
Upper Bridge[edit]
This bridge connects the two bases, and is generally the area where most of the fighting occurs. The upper bridge features a lot of open areas and not a lot of room for cover. The rocket launcher used to be found at the center of this level, but this was replaced by a bubble shield. Separated from the top, but accessible via ramps on the four corners of the bridge, you can find the lower bridge.
Lower Bridge[edit]
This lower bridge offers more protection than the upper level. A rocket launcher replaced the shotgun spawn in the center of the light bridge, which connects the two bases. Players can also find the sniper rifle on each side of the bridge. Taking the lower bridge may be a safer and quicker route to each base, but can leave the player vulnerable to rocket or sniper fire. It is also possible to fall off the bridge and land on the cooling core below, though you will be killed by The Guardians after 5 seconds. Careful players can jump down onto a covered ledge and hide on this cooling core without dying.
Strategies[edit]
- In Capture The Flag games, players can actually "throw" the flags with the man cannons and stay behind to defend them. This can be especially helpful because the cannons "throw" the flag very close to a player's return point.
- At the start of the game, rockets should be top priority; at least two people should go straight for them. If one dies, the other can hopefully take them.
- At the beginning of the game, there will normally be a sniper shootout at the sniper spawns; a second player on your team can take advantage of this and not only help their sniper with a battle rifle, but also take the rocket launcher in the fray.
- The Brute Shot is invaluable on this map; one grenade and one melee attack can dispose of surprised player quickly.
- The man cannons are the quickest way across the map. People will use these often to catch you off guard, so make sure someone keeps an eye on them. Use these with caution, as when you are fired through the cannon a very distinguishable sound can be heard across the map and all eyes turn to the cannons and the arcing path that connects them and the bullets will fly. If you are targeting anyone on their way across the arc, using a battle rifle is extremely effective. The easiest way to kill someone using the man cannons is to be at the receiving end of the transit. As they get closer and closer you will be able to land a lot of shots on the incoming enemy. If you are the enemy in transit it is surprisingly difficult to hit targets waiting for you at the end, so be sure to check your landing zone with a scoped weapon to make sure you aren't setting yourself up for an ambush.
- An easy way to combat this is to pick up a bubble shield and throw it across with a man cannon. With luck you will land just inside the shield and give you a second or two to react to any ambushers. This could take some practice however, so try it alone in Forge first.
- If someone is camping on the other side of the map, deploy a power drain or throw grenades into the man cannons.
- Shooting across the man cannon at the beginning of a Team Slayer match will allow you to take out the opposing sniper, who is probably focused on somewhere across the map.
- The power-ups are under the sniper spawn. Remember, they can be useful against the sniper or the rocket user on the other team. The overshield is more practical against the rockets, in case they notice you, and invisibility is best against against the sniper, because they will often be in scope, with no motion sensor or target to see.
- As a sniper, a good place to be sniping would be right at the back in the center, where you can see your half of the bridge at a distance, and go for a view on the man cannon. Another a good sniper space is a raised walkway just to the left and right of the start of each side of the bridge that can put you high up to see the entire bridge, and you cannot be sneak attacked from behind while in zoom view.
- If you jump on the boundaries on the far ends of the upper level of the bridge, you can leap to the bottom levels of the respective bases. This makes for a quicker route to the flag or bomb return points, or, in death match, a quick getaway.
- Right next to your flag spawn, opposite of the wall, a little bit before the explosive barrels, is small little ledge against the pillar that you can go up a few feet and be concealed from most viewpoints. It's a good place to camp with a Mauler when guarding your flag or to hide when you have the lead in a Team Doubles game, for there is a little ledge on both bases in the exact same point, so they are opposite of each other.
- While flying from one of the man cannons, or jumps, it is worth trying to grenade enemy players on the bridge as you pass in hopes of getting a kill and/or softening them up for your team-mates.
- If you collide with an enemy player in midair from the jumps, try to melee them, because your enemy will fall and you can get the point for killing them if it is a Slayer gametype.
- Beware of the new spawn system. Your opponents often spawn behind you.
- Although the map seems very small, it would be smart to get a sniper rifle at the beginning of the match.
- It is also a very good strategy in Team SWAT to get people on the main top level from the mancannons.
- On a Team Slayer match, have one group of people make their way up the middle on the top, and another on the bottom, and one last team at the man cannon to make sure no one can escape.
- Watch out for other man cannon users; if you get hit by them, the lower one will most likely perish. Meeleing others in mid-air also results in this.