HW2:Under the Dark
From Halopedia, the Halo wiki
|
Prev: |
|
|
Next: |
|
| Under the Dark | |
|---|---|

| |
|
Game: |
|
|
Date: |
|
|
Location: |
|
|
Objective(s): |
Optional:
Bonus:
|
 |
Halopedia doesn't currently have a walkthrough for this level; could you write one? |
| “ | In part two of Isabel's plan, Jerome and Isabel infiltrate a Banished compound and prepare to enter the belly of the beast. | ” |
Under the Dark is the ninth campaign level in Halo Wars 2.
Transcript[edit]
CORE / ENDURING CONVICTION GRAV-LIFT
UNDER THE DARK
Mission Briefing
- Jerome-092: "Alice, this is Jerome. Isabel and I are making our approach on the Banished base beneath the carrier."
- Alice-130: "Roger that, Jerome. My team is standing by and ready to roll on your say so."
- Jerome-092: "Good to hear. Once the carrier's shield is down we'll only have a small window of time to board it the via grav-lift. I need your team to standby in case we run into any problems.
- Alice-130: "I've got your back, Jerome. You just worry about getting there. Good luck."
Mission Summary
Infiltrate a Banished compound to board the carrier Enduring Conviction.
Scouting Report
Use your snipers to spot targets for your long range Kodiak artillery.
{In-game Cutscene}
Jerome's Team are approaching the Enduring Conviction's grav-lift.
- Jerome-092: "We're approaching the LZ for the grav-lift now. Are you ready for this, Isabel?"
Suddenly Reavers, Turrets, and a Blisterback appeared on the grav-lift.
- Jerome-092: "Wait, we got hostiles!"
The Reavers and Turrets attack the Pelicans. The Pelican carrying Sergeant Allieri and his team's left wing is clipped out.
- Jerome-092: "Hold on, we're going down!"
- Isabel: "No, no, no..."
At Allieri's Pelican, four Snipers survive the crash. (Eight if on Co-op)
- Jerome-092: "Getting to that grav-lift isn't going to be as easy as we hoped. We better call in a base drop."
- Anders: "Jerome, I'm picking the chatter over comms, the Banished are on their way."
Allieri leads two Snipers while one Sniper is already scouting ahead, following four already cloaked Snipers (Co-op).
- Allieri: "Sniper team, this is Sergeant Allieri. The Banished defenses got the drop on us and grounded Jerome and Isabel's Pelican on the way to the grav-lift. Get to the crash site and rendezvous with them for new orders."
{Gameplay}
Banished infantry start coming to investigate the crash site. Allieri and his Sniper team gets into the garrison and hold them off. After awhile of holding them off, the Banished send in Suicide Grunts.
- Allieri: "Suicide Grunts! Take them out from range!"
The Snipers take the Suicide Grunts down first before focusing on the other infantry.
After they are cleared out, the Banished deploy cloaked Plasma mines.
- Allieri: "Watch out, the Banished are deploying cloaked mines. Step carefully and clear them out as you go."
The Snipers use drones to detect any cloaked mines to destroy them.
- Allieri: "We know the Banished are using cloaking technology, but your detectors should be able to spot any hidden units."
The Sniper Team continue to advance carefully while taking out any Banished patrols they spot. They clear Plasma Mines along the way and even capture Power Nodes.
Once capturing the Power Node, the Sniper Team proceed to take out any enemy infantry and another line of Plasma Mines set near Jerome's Pelican.
- Allieri: "Jerome's Pelican crashed just up ahead, team."
The team clears out the Plasma Mines and finally reaches Jerome's Pelican while Banished's dead bodies are scattered around his Pelican.
Upon rendezvousing with Jerome, he uppercuts and smacks down a Jiralhanae Warlord before executing it (Solo), while the squad of UNSC Marines kill another patrol (Co-op only).
- Allieri: "Aw, and I thought I was going to get to rescue a Spartan today..."
- Jerome-092: "Glad to have you with us. We're going to need your eyes to spot any more Banished surprises. Let's move out."
They start to move out, clearing any infantry as the Snipers scout ahead.
After clearing them out, they reach a location from which they can see Banished's base beneath them.
- Isabel: "Now that we're on foot we're going to have to deal with the Banished base between us and the grav-lift."
- Jerome-092: "Captain, we're going to need support to fight our way through to the lift. Appreciate the help, sir."
Cutter sends three Kodiaks and a 2-slot minibase is available.
- Isabel: "Increased Banished comms chatter, Jerome. They know we're here."
- Jerome-092: "You heard Isabel, let's make sure we're ready for them. If we lose our base we won't have the reinforcements to take the grav-lift."
Once the base has been set, Allieri and his team go to scout ahead to clear out infantry, mines and coincidentally, a Jiralhanae Warlord.
If a Kodiak is taking fire.
- Kodiak: "I won't last long without support, over!"
- Kodiak: "I'm taking fire, need support ASAP!"
- Kodiak: "I'm under attack from the enemy! Need support!"
Once the area ahead is clear, Jerome leads the team to the Banished's base, but a Spirit arrives and drops infantry. They quickly defeat them.
Once the Snipers are in range of the Banished's base, the Kodiaks are ready to fire.
- Kodiak: "Acquiring target. Firing cannon!"
The UNSC takes out any infantry that are coming, holding the position as the Kodiaks fire on the base. The base is finally destroyed.
- Jerome-092: "Good work, everyone. Captain, the Banished base is clear."
- Isabel: "Jerome, let's get to that grav-lift before I have second thoughts!"
{In-game Cutscene}
Jerome and the UNSC arrives near the grav-lift, but the defenses around the grav-lift has yet to be eliminated.
- Isabel: "Those turrets are still active around the grav-lift, Jerome. We're going to need some heavy armor to destroy them."
- Jerome-092: "That's what Alice is here for. One-Three-Zero, do you copy? We're ready."
The view changes to Alice's side where she and three Kodiaks are defending a base from Banished's infantry and Rangers.
- Alice-130: "I copy, Jerome. It's about time too. I was beginning to think you wanted to win this war on your own."
- Jerome-092: "Wouldn't want to spoil your fun, Alice. The Banished are defending their grav-lift with anti-air turrets. I have Isabel with me so I can't risk a frontal assault and a Pelican won't make it past those guns. I need someone to flank them and take them out."
- Alice-130: "Ok, we can station Kodiaks at these three points so we can hit those turrets simulatneously. You'll be able to get across before the Banished have even noticed."
Two Choppers approach the base but quickly retreat and the barrier shield immediately activates after the Choppers are past it, blocking Alice and her team.
{Gameplay}
- Alice-130: "They're setting up more defenses. Kodiaks, target those generators and fire at will."
The Kodiaks set themselves to Artillery Mode and attack the Shield Generator, destroying it.
- Alice-130: "Roll out, team. I'll jump in if you get into any trouble. Let's protect those Kodiaks."
Alice and Snipers capture the Power Node ahead, giving them steady stream supplies of Power while assembling forces to escort the Kodiaks.
Upon finishing assembling units, the Banished Camp to the east is getting in their way so they decide to destroy it. Once clear, go ahead and find a turret stationed there.
When engaging, the UNSC encounters a Jiralhanae Warlord along with some Marauders and Hunters. Snipers quickly take the Warlord out while Alice uses herself as a shield to give enough time for the Snipers to take out the Hunters and the Kodiaks destroy the Marauders and Turrets.
Advancing ahead, the UNSC captures another Power Node and continues forward until they find Banished 2-slot minibase. They quickly take it out and the UNSC calls in a minibase to set up a Forward Base once the Banished's structures are destroyed.
North from the 2-slot minibase, Sangheili Rangers are protecting the first deployment point. Alice and Snipers take them out while escorting a Kodiak to the deployment point. Some UNSC forces are defending against the Banished's attack from the east.
- Alice-130: "That's the first location. Let's get one of our Kodiaks deployed there."
The Kodiak moves into position and deploy itself. Once it's in position, Alice quickly regroups with UNSC forces east of the minibase to advance to the second and third deployment area.
- Alice-130: "Now move out on the second and third locations. Keep those Kodiaks protected, they know we're coming."
The UNSC encounters another barrier shield, but it's guarded by two turrets. Snipers move into line of sight range and give a target for the Kodiaks to fire at. Once both turrets are down, the Snipers and Kodiaks move forward to position themselves to fire on the Shield Generator while Alice watches their backs. The Shield Generator is destroyed and UNSC once again rolls out to the next destination.
Moving to the second deployment area, the UNSC encounters two turrets to the east and a group of Banished units to the north. The UNSC holds position, letting the Kodiaks destroy them while Alice and UNSC infantry defeat Banished units that are attacking the Kodiaks and Snipers. After both sides are secured, the UNSC moves northward and discovers a battalion of Wraiths defending the second deployment area. Using the Snipers as spotters for the Kodiak, they take them out smoothly, one by one.
Once clear, the second Kodiak moves into position.
Moving to the third deployment area, Snipers scout ahead and find the barrier shield protected by turrets and Plasma Mines. The Snipers clear the mines while the Kodiak takes out the Turrets.
Once the Turrets have been destroyed, a Banished Shroud appears in front of the Banished's base and cloaks nearby Banished units. The UNSC regroups again and once settled up, the Kodiak destroys the Shield Generator.
The fight starts as the UNSC advances to the base, but a Jiralhanae Warlord steps in. Alice and the Snipers quickly take it out while Kodiaks destroy the base and UNSC infantry kill the Banished troops that have just emerged from the base. Once the base is destroyed, Alice and the UNSC move the Kodiak into the final position.
- Alice-130: "That's the final location. Deploy the Kodiak and stand by on my orders."
{In-game Cutscene}
Once the final Kodiak is in position, Alice orders them to open fire.
- Alice-130: "Kodiaks, fire!"
The Kodiaks open fire on the Turrets and Reavers around grav-lift, destroying them. At the same time, Douglas has just finished his job.
- Douglas-042: "Jerome, this is Douglas. The carrier's shield is down and you are good to go."
- Jerome-092: "Roger that, Douglas. Now get your troops clear. You don't want to be down there when Isabel and I are finished. That goes for you too, Alice. This is it, Isabel. Are you ready?"
A Pelican carrying Jerome and Isabel arrives on the grav-lift platform, dropping Jerome, who walks to the grav-lift. Meanwhile the UNSC forces in the area dismantle the UNSC bases set up around the grav-lift and evacuate from the area.
- Isabel: "As I'll ever be."
Jerome hovers upwards into the Enduring Conviction.
{Cinematic Cutscene}

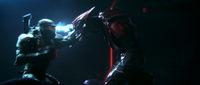
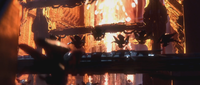
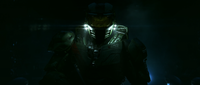
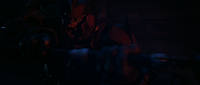
Three Sangheili Rangers are in the grav-lift chamber, deactivating the holotank. Light on the grav-lift suddenly goes bright and black, alerting them as Jerome suddenly attacks them with his handgun, firing a full magazine to drop the Sangheili's energy shields and kill it. One of Sangheili attacks Jerome with an Energy Sword, but the Spartan dodges it and punches the alien aside, causing a Sangheili to crash on the wall, knocking out its shields, killing it. Jerome fires two more shots from his handgun, dropping an already beaten energy shield, and draws his knife, latching himself on the back of the last Sangheili and stabbing it in its neck, killing it. Jerome then sheathes his knife on his waist.
- Isabel: "Whoa."
- Jerome-092: "Problem?"
- Isabel: "No... I've just never had Spartan ringside seats before."
- Jerome-092: "Let's get to work. Our entrance wasn't exactly subtle."
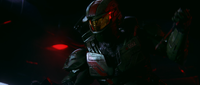
Jerome removes the chip from his helmet and places it into a holotable. Isabel appeared inside the Enduring Conviction's systems, looking for something.
- Isabel: "Okay, I just need to find their..."
Isabel finds the firing system and opens it.
- Isabel: "Got it."
Isabel locates the target and sees that the UNSC troops, bases, turrets, and equipment are withdrawing to the Spirit of Fire.
- Isabel: "Troops below are clear. I'm starting now."
Isabel closes her eyes, ready to initiate the firing sequence.
- Isabel: "Promise you won't leave without me."
She opens her eyes, moving herself upwards and downwards. Sighing a bit, she moves her hand around to initiate the firing sequence.
Outside, the Enduring Conviction's energy projector is activated and starts gathering power.
Isabel continues her work, creating a line system from one way to another and she stops them, spinning it as the energy projector is ready to fire at any moment.
Grabbing two Orbs, Isabel looks at both of them and closes her eyes, remembering the Banished attack that killed the scientists of the Henry Lamb Research Outpost.
- Female Scientist #1: "Unidentified vessel. Who are they? Isabel."
- Male Scientist #1: "What do they want? Isabel!"
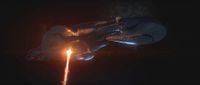
Isabel fires the energy projector, destroying the Banished base directly below the carrier and obliterating the units directly around them.
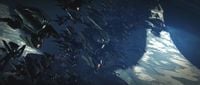
The energy projector pierces through the surface as Sentinels awaken, alerted. Thousands of Sentinels make their way up while the glassing continues. On the surface, swarms of Sentinels emerge from the canyon gaps and head towards Enduring Conviction.
Inside the ship, Isabel prepares to unleash her rage into the energy projector, the grudge that she held for three months because she was unable to save the UNSC scientists from the Banished attack, as she continues to glass Installation 00.
- Male Scientist #1: "ISABEL!"
- Female Scientist #1: "What do we do?"
- Female Scientist #2: "Oh my God!"
- Male Scientist #2: "No, please no!"
- Female Scientist #1: "No! Isabel, what do we do?!"

Millions of Sentinels are gathered on top of Enduring Conviction. One of Sentinels takes the lead by ramming itself into the ship to take measurements first. Since the ship's shield has already been downed by Douglas, the Sentinel directly hits the ship and other Sentinels follow, crashing themselves into the ship.
Inside the grav-lift room, Jerome hears a loud thud and knows that the Banished are trying to force open the door. Jerome readies his shotgun as the grav-lift lamp and lights in the room go offline and he activates the flashlight on his helmet, ready to defend the position from the Banished.
Outside, Sentinels increase their frequency but become more coordinated, creating hordes of Sentinels that crash simultaneously into the carrier.
The Jiralhanae manage to open the door, one Warlord leads other Jiralhanae in to defeat Jerome as soon as the door opens. Jerome is expecting them and ready to defeat them while protecting Isabel.
Sentinels continue to collide with the carrier. One tower is destroyed, but it doesn't stop the Sentinels from continuing ramming themselves into the carrier. They make one straight line formation, wide enough for the width of Enduring Conviction.
Inside the ship, Jerome throws a knife towards a Jiralhanae's head then ducks under a Warlord's attack and grabs its lower jaw with his left hand. He then kicks another Jiralhanae with his right leg and fires his shotgun at another, after which he proceeds to finish off the Warlord.
Isabel continue glassing the Ark as she keeps remembering the scientists she worked with earlier getting slaughtered and hearing them panic.
- Female Scientist #1: "Oh my God!"
- Male Scientist #1 : "Isabel! Help us!"
- Female Scientist #1: "Please!"
Sentinels continue swarming on top of the carrier while continuing their attack. Isabel unleashes her rage on the energy projector, intensifying it.
- Scientists: "ISABEL!"
Sentinels make a clockwise tornado formation while continuing to ram into the ship in a line formation. They continue to ram until they suddenly stop, hearing cracking noises from the carrier. Isabel continue to glass with rage while the Sentinels start to leave the formation and return to the Ark.
Enduring Conviction's sections start to explode, slowly tearing itself in two. The front section falls first while the rest is still in the air and the glassing stops. Jerome witnesses in awe as the carrier starts to tear apart.
- Jerome-092: "Isabel. It's done...time to go home."
Isabel appears on the Holotank, panting and looking at the dead bodies of the Jiralhanae that Jerome took care of.
- Isabel: "Whoa... You've been busy."
- Jerome-092: "Not as busy as you."
Jerome picks up and holsters his weapons as he walks toward the holotank.
Isabel realizes that the grav-lift has been cut off by the Sentinels.
- Isabel: "Crap. The grav-lift! What do we do?"
- Jerome-092: "You. You hold on."
Jerome remove her from Holotank and places her chip in the back of helmet. He sprints forward and leaps out from the carrier, surprising Isabel.
- Isabel: "Wait, what are you... Wait, wait, wait, wait, wait. Oh whoaaaaaaaa...."
Jerome dives back to the Ark's while avoiding the debris of Enduring Conviction.
Fade to black.
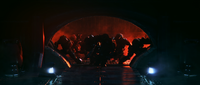
On the Ark, Atriox and Shipmaster Let 'Volir look at the destroyed Enduring Conviction, dumbfounded as their three-month effort of setting up their base of operations was destroyed in mere days by a single Spartan and an AI.
- Atriox: "One Spartan."
- Let 'Volir: "Yes. And the AI. We still don't know how she accessed our..."
Atriox quickly and angrily interrupts.
- Atriox: "How many of your men survived?"
- Let 'Volir: "Enough to honor our contract."
In an addition to their surprise over the ship's destruction, Anders manages to activate the Foundry, allowing the new Halo Ring to be released into space to finalize its preparations.
- Let 'Volir: "But how...?"

Atriox immediately makes his decision to take the ring from the UNSC.
- Atriox: "Get EVERYONE you can on that ring. Take it from the humans."
Let 'Volir nods and leaves.
- Atriox: "Prove you are still worth your price."
Level ends
Leader Power available on this level[edit]
- Restoration Drones I, II, and III (I picked by default)
- Archer Missiles I, II, and III (I picked by default)
- Battle Hardened I
- Lotus Mine I and II (I picked by default)
- ODST Drop (Picked by default)
- Turret Drop I and II (I picked by default)
- R&D I
- Holographic Decoy I
Initial Structures and Units[edit]
- Jerome's Team
- 4 Snipers (Critical Unit until rendezvous with Jerome-092)
- 1000 Supply
- 1000 Power
- Alice's Team
- Stronghold
- Garage
- Supply Pad
- Barracks
- 3 Kodiaks
- Alice-130
- 2 Snipers (Upgraded)
- 2000 Supply
- 2000 Power
- Stronghold
Strategies[edit]
General[edit]
- The player should build a Supply Pad and Barracks on Jerome's side as power can be provided from capturing Power Nodes.
- There are more minibases during Alice's segment of the level. Utilize them carefully as the Banished can retaliate at any time.
- The Sniper is a very effective unit against infantry, but you have to keep them alive early in the mission as they are critical in defeating all infantry before rendezvousing with Jerome. The fewer snipers, the harder it is to complete the level. In addition, if all of the snipers die before you reach Jerome, the mission ends in failure.
- Hit and run is the best strategy to deal with Jiralhanae Warlords. Snipers can take out Warlords without being hit.
- Do note that Snipers cannot fire when they are moving with their backs on the Warlord.
- Similar to the One Three Zero level, destroy the Banished's silos in the map. They will provide extra resources.
- There will be no Kodiak replacement available on Jerome's team, so protect them with Snipers. The fewer Kodiaks, the more time it would take to destroy the Banished's base.
- A good tactic is to garrison a couple of Snipers in the Watchtower near Jerome's base. They will automatically fight off attacking Banished forces without the player's command, drawing fire from the Kodiaks, while the player builds up their forces at the base.
- If you wish to gain more Power during Alice's segment, you can drop ODSTs on Jerome's side of the map to capture the Power Nodes.
- If you missed the Jiralhanae Warlord during Jerome's segment, you still have a chance to kill him during Alice's segment by using the ODST drop near Northern Garrison.
- Do note that higher ground will provide more advantage on line of sight which us useful for Kodiaks and Snipers. Some Banished's turrets are stationed on higher ground and cannot be spotted by Snipers unless they open fire first or a Sniper moves closer to it.
- The player should not rely on Restoration Drones to heal their Kodiaks, but instead use Marines (who are fully upgraded) to heal the damaged vehicles.
Optional and Bonus Objective[edit]
- Locating 50 Plasma Mines may be tricky and difficult, especially during Alice-130's segment. Use your snipers to spot them and take them out first, especially the three plasma mines near the second mini base and another three near the barrier to the Banished's base guarding Third Kodiak spot. If other units take them out, even if it was an accident, it will be impossible to earn 50 plasma mine kill by Snipers.
- The first Warlord is located northeast of your base during Jerome segment. During Alice's segment, the second warlord is east of her Stronghold while the third is guarding the Banished's base.
- During Alice's segment, use all three Kodiaks to eliminate all ground units and clear the path up until the third designated area.
- Although the objective says "Orbital Strike", it is in fact referring to the Archer Missiles. Any enemy unit qualifies for the objective.
- 50 kills with sniper should be easy, especially during the first segment since your sniper is the best unit to wipe out the infantry from long-range.
Trivia[edit]
Miscellaneous[edit]
- This is the only level where the player will receive no Hero Unit as a starting unit.
- During the second part of the mission, all units from the first part will disappear from the map except for any infantry placed in garrisons and its surrounding. Those units will become gray-colored and cannot be controlled. The player can find any unit left by the player during the first segment using the ODST drop during Alice's segment to explore, including Jerome-092.
- The Things That Go Boom skull is awarded for killing all three Brute Warlords.
Mistakes[edit]
- It would seem that there was an oversight while making the script in Hold the Line and this level. In Hold the Line, Jerome says, "Roger that, Douglas. Now get your troops clear. You don't want to be down there when Isabel gets started" while on this level he says, "Roger that, Douglas. Now get your troops clear. You don't want to be down there when Isabel and I are finished."
Gallery[edit]
Screenshots[edit]
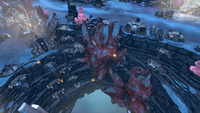
A large crystal protruding over a chasm.
The edge of a chasm.

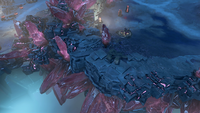
Several plasma mines on the Ark.


Cinematics[edit]
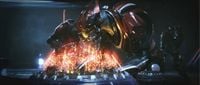
Sangheili aboard the Enduring Conviction.
Sangheili turning to Jerome-092 when boards the ship.

Jerome-092 fires his M6C magnum.
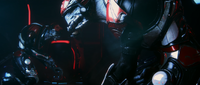
Jerome-092 blocks a Sangheili's attack.
Jerome-092 holding an M1 combat knife.

Jerome-092 insert Isabel's data crystal chip into the ship.

Isabel inside the ship's systems.
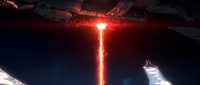
The Enduring Conviction fires its energy projector.
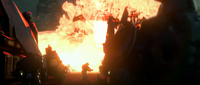
The Banished troops and buildings are set ablaze.

Isabel strained by her efforts to fire the energy projector.
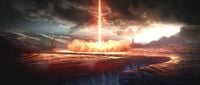
The energy project's fire creates a massive smoke cloud on the surface.
Aggressor Sentinels activate in response to the attack on the Ark.
Jerome-092 turns on his helmet's flashlights.
Jiralhanae on the ship attempt to stop Jerome-092 and Isabel.
A Jiralhanae fighting Jerome-092.
Aggressor Sentinels stop their attack as the ship is bisected.
The Enduring Conviction is bisected.

Jerome-092 looking down from the destroyed ship.

Let 'Volir and Atriox looking at the wreckage of the ship.

Let 'Volir reporting to Atriox.
Installation 09 emerges from the Foundry.


Sources[edit]
| Preceded by Hold the Line |
Halo Wars 2 campaign levels Under the Dark |
Succeeded by The Foundry |
| ||||||||


