HW2:Light the Fuse
From Halopedia, the Halo wiki
|
Prev: |
|
|
Next: |
|
| Light the Fuse | |
|---|---|

| |
|
Game: |
|
|
Player: |
|
|
Date: |
|
|
Location: |
Banished salvage drills, Installation 00 |
|
Objective(s): |
|
|
Par Time: |
35:00 |
 |
Halopedia doesn't currently have a walkthrough for this level; could you write one? |
| “ | Pavium must rescue Voridus and clear a path to the Forerunner structure nearby. | ” |
Light the Fuse is the seventeenth campaign level in Halo Wars 2, and the third of the Awakening the Nightmare expansion.
Players do not have have access to Power Extractors during this level, and Power can only be harvested from the crystals found throughout the map. The Skirmish map Fissures is based on the geometry of this level.
Transcript
BANISHED SALVAGE DRILLS
LIGHT THE FUSE
Mission Briefing
- Pavium: "Voridus, my troops and I are nearly at your position at the salvage drills. Have you reached the Forerunner defense station?"
- Voridus: "Some kind of Flood forms block the entrance to the station, it's as if they understand it's a threat to them. We barely even had a time to establish a base before they besieged us!"
- Pavium: "We MUST reach that station. If we can't reactivate the Forerunner defenses, we will have no chance against the parasite!"
- Voridus: "We haven't the numbers, Pavium. Each time we kill one, another appears. The Flood is everywhere, scattered across every surface, every crack and fissure!"
- Pavium: "The fissures! That whole area is honeycombed with explosive power. If we can start the salvage drills, we can use them to cause a chain reaction and burn the parasite away!"
- Voridus: "I will start the extractors up immediately to start stockpiling power."
Mission Summary
Gather power to start up salvage drills.
Scouting Report
Multiple Flood Bursters have been detected in the area.
{Cutscene}

Voridus' base is under attack by the Flood while he starts up the power extractors.
- Voridus: "Start the extractors! We'll need all the powers we can to start the salvage drills up!"
The Augmented Extractor is destroyed.
- Voridus: "Pavium, the power is too unstable for our extractors."
Cut to the salvage drills area where the Flood are swarming.
- Voridus: "However, there are many small eruptions where the power has crystallized. If we collect them in that state, we can break them down for use in the drills."
The Flood attack Pavium's base, and Pavium leads his troops in to defeat the incoming Flood.
- Pavium: "Very well, Voridus. I've set up my own operation, we'll start gathering the power we need for the salvage drills."
{Gameplay}
- Pavium: "With me! The liquid form of that energy has crystallized where it has broken through the surface. We can use those crystals to start the drills again."
Pavium leads the Banished to destroy the crystals and collect power, while setting up defenses to defend the Salvage Drills.
The screen moves to where a massive Flood bulb is about to explode.
- Pavium: "That thing, something's happening!"
- Voridus: "Pavium, it's about to release more Flood! Get clear!"
It erupts and releases hordes of Pod Infectors.
- Pavium: "They breed faster than Grunts! We must end this quickly, they're heading for our base!"
The Banished retreat to their base to repel the attack.
After repelling it, the Banished continue to gather crystals.
- Voridus: "Brother, I witnessed one of those things decimate a squad of my troops earlier! They are everywhere here. They seem to occur on a cycle."
- Pavium: "Monitor them as best you can. I'll need to know when they're about to burst."
While gathering, the Burster pressure starts to increase from 0%, and is shown on the HUD.
- Voridus: "Pavium, pressure escalating now."
or
- Voridus: "Brother, the pressure has started building."
or
- Voridus: "Pavium, the pressure's begun building up again."
When the pressure reaches 50%.
- Voridus: "Pavium, the pressure is halfway to full release!"
or
- Voridus: "Brother, the pressure is at half!"
or
- Voridus: "Pavium, the pressure is at mid-point. Soon the bursters will loose more Flood!"
While gathering, the Banished spot some Flood blisters.
- Pavium: "So many ways this sickness spreads itself! Keep your distance from those blisters, they seem to know when we are close!"
When the pressure reaches 85% or red level.
- Voridus: "The pressure will soon force the Flood bursters out, brother!"
or
- Voridus: "Pavium, the pressure is reaching critical state! The Flood bursters will erupt soon!"
or
- Voridus: "Brother, the pressure is close to releasing the Flood bursters!"
When it's about to reach 100%.
- Pavium: "Ready your weapons, here they come!"
or
- Pavium: "It's getting ready to spew out more of its filth! Move!"
or
- Pavium: "Ready yourselves, it's about to erupt!"
or
- Pavium: "The bursters is about to erupt, fall back!"
or
- Pavium: "Move! It's about to set loose more Flood!"
The Flood bursts out from another location and start attacking the base. The Banished fall back to the base to repel the assault and continue gathering crystals for power once the Flood has been repelled.
After repelling the third wave, Flood Seeder Infectors appear near the Salvage Drills.
- Pavium: "Stay alert, the Flood infection forms have taken to the air. Keep our aerial units away from them!"
A Flood burster releases Flood Spawners.
- Pavium: "What now? How many forms can these things take?"
- Pavium: "That thing appears to react to our units and spawns opposing forms! It's too dangerous to ignore, take it out!"
The Banished continue to salvage more crystals while leaving some units to defend the base from the Flood attack.
The Banished discovered another Flood Burster guarded by four tentacles, with crystals spread around it.
- Pavium: "Another burster! Grab the power before it erupts!"
or
- Pavium: "Collect the power, but be ready!"
or
- Pavium: "Cleanse this place!"
or
- Pavium: "There's a burster here, collect the power!"
If the area has no crystals left.
- Pavium: "We've secured the power here, move on."
or
- Pavium: "We have exhausted the power from this area, move on!"
Exploring the area for more power resources, the Banished encountered a Flood base and destroy it.
Later, the Flood start coming in with infected Blisterbacks.
- Voridus: "Pavium! The parasite has taken over some of our Blisterbacks! They've bombarding your base!"
- Pavium: "We must neutralize them quickly! If we lose our base, we'll lose the battle!"
The Banished continue salvaging for power and discover a base that has been taken by the Flood.
- Pavium: "The Flood has started overtaking our bases! The rate at which they're spreading is incredible!"
Destroying it, the Banished can call for another base drop.
When Power reserves reach 100%.
- Pavium: "We've gathered enough power for a drill. Keep going."
or
- Pavium: "This is enough power for a drill. We can start one up!"
The Banished activate one of the three salvage drills
- Pavium: "The first drill has been activated.
The Banished start gathering more crystals.
- Pavium: "We need more power, we've used too much on the battle!"
The second drill is activated.
- Pavium: "The second drill is working.
If the crystal reserves are running low.
- Pavium: "We've used too much power elsewhere, we need to restock!"
The final drill is activated.
- Pavium: "The third drill has been activated."
The drills start to calibrate.
- Pavium: "Stand fast! We need to give drills time to calibrate!"
The drills start working.
- Pavium: "Voridus, the salvage drills have begun blasting through. We just need to protect them until they've breached the surface and ignited the liquids beneath."
Voridus starts to feel suspicious when the drilling progress is around 20%.
- Voridus: "Pavium, it's grown quiet. Could we have finally pushed them back?"
- Pavium: "You know better than that, brother. Be ready."
The drills continue working and crystals start to appear on the surface.
- Pavium: "The drills have broken the surface and will soon start the chain reaction!"
When the drilling progress reaches 33%, the rupture pressure immediately turns red and accelerates faster than before.
- Pavium: "The underground pressure is spiking! It's working!"
- Voridus: "Pavium! The Flood reinforcement are accelerating! They must recognize the threat those drills pose to them!"
A Flood Abomination arrives from the southwest.
- Pavium: "Their forms are endless! This thing seems to be leading the others, enhancing their strength! Focus fire on it!"
The Banished defeat the abomination but the rupture pressure stays at 100%.
When the drill progress reaches 50%
- Pavium: "Hold them off a bit longer! We're close to triggering the chain reaction!"
The Flood continue to attack, and the Banished continue to hold them off.
When the drill progress reaches 66%
- Pavium: "The drills are close to starting the chain reaction! Keep the Flood away from them!"
The Banished continue to defend against the Flood until the drilling progress reaches 100%.
{Cutscene}

Two Banshees fly overhead as the Banished ground forces are holding the Flood off. The ground beneath the drill erupts, and the camera pans across cracks in the ground now glowing orange from the explosive energy sent through them towards a Flood burster near the elevator to the structure Voridus found.
- Voridus: "It's working, Pavium!"
- Pavium: "I would have preferred a cleaner solution, but it is clearly effective."
The Flood burster near the structure explodes.
Pavium and Voridus along with their packs are holding off the Flood assault, which, though greatly lessened by the salvage drills, hasn't been completely stopped.
- Voridus: "Pavium, the way is clear! I can reach the Forerunner station!"
- Pavium: "I will stay here with the rest of our troops to guard your exit. Find a way to reactivate the Sentinel defenses down below. Voridus. Redeem yourself."
Voridus takes three Sangheili Rangers and three Brute jump pack with him and the elevator descends into the ground.
- Voridus: "I will not return until I have, brother. Good luck."
- Pavium: "And to you. Now go. I will inform Atriox of what has taken place here."
Level ends.
Mission Complete.
Unit Deployment
- Voridus' base
- 2 Augmented Extractors (Destroyed)
- 2 Augmented Harvesters
- 1 Foundry
- 4 Turrets
- 1 Raid Camp
- 1 War Council
- Pavium's base
- Stronghold
- 2 Harvesters
- Pavium
- 2 Hunters
- 1 Locust
- 3 Grunt Infantry Squad
- 2 Sangheili Rangers
- 900 Supplies
- 400 Power
Leader Powers
- Atriox's Bulwark I, II and III
- Lich Vanguard I
- Rain of Fire I, II and III
- Orbital Designator I and II
- Burnout I, II and III
- Stasis I and II
- Ultra Mines I and II
Strategy
General
- Power Extractors are not available in this level. Any Power used to construct buildings, defenses, or units will be deducted from the Power gathered to activate the Salvage Drills.
- Consider prioritizing using Power to upgrade the base to maximum capabilities before activating the Salvage Drills.
- Mega Turrets and Augmented Harvesters are important investments.
- Keep track of the pressure percentage and time your troops' movements to your advantage. The Flood will always attack in hordes every time the pressure reaches 100%. They will never attack the base when the pressure is not at 100%.
- Your attack force should contain units with Area of Effect attack since they will help with destroying the blisters and the units they spawn upon destruction.
- Quickly take the bases at the southwest and at northeast to build more Harvesters and gain an economic advantage.
- Keep in mind that the minibases do not have turrets, and they will be susceptible to attacks from the Flood when a nearby Burster's pressure reaches 100%.
- The hardest part tends to be gathering enough Power to charge the drills, because you have to leave your base and collect the 8,000 Power three times. Once the drills are charged, its simply a matter of defending the area until the they are calibrated and then ready to create the chain reaction.
- When most of the crystals have been collected, new batches will appear automatically at the Giant Bursters. Be sure to collect crystals from each area thoroughly to avoid retreading old areas.
- After the drills have calibrated and broken the surface, the Power crystals that were destroyed earlier will be replaced, allowing the player to gather more Power to help in their defense of the Drills.
- A useful unit to have in this level is the Barukaza Workshop Scarab due to its high firepower and health. In addition, unlike in The Foundry, the Scarab is fully operational, and, unlike in What Could Go Wrong?, it's completely under the player's control.
- Keep in mind that the Scarab has low mobility, and it requires support from other units like infantries and vehicles to stop the Abomination from reaching the drills.
- Each drill requires 8,000 Powers. Two drills require 16,000 Powers. A total of 24,000 Power is required.
- Upon reaching the threshold numbers, the Flood will intensify its attack because the numbers will be counted as the player can start all the drills.
- Keep Power reserves below the threshold amount if you are not ready to defend the drilling segment.
- Even though the fog of war covers the bursters, you will still be able to hear which ones will erupt. Use this to plan the defense of your base accordingly.
Bonus and Optional Objectives
- Tentacles can be found near the Flood Bursters Set up a Mega Turret at your main base to support attacks on the tentacles.
- The optional objective will end in failure if an Abomination reaches the area near the drills.
- Defeating Abominations may be difficult, especially when both appears from west and east at the same time. It's recommended to set up a barricade with your units to slow it down by having some Wraiths blocking the entrance and Huragok to heal them.
- Save up Power for Leader Powers when the Abominations attack. Stasis can hold one Abomination in place while you direct most of your forces to kill another, then they can focus on the second one. Rain of Fire and Lich Vanguard can also deal massive damage in a short period of time. Setting up a field of Ultra Mines may also be useful.
- It is possible to revert to a saved games if an Abomination reaches the drill.
- There are four Flood bases to destroy on this map:
- Two 2-slot minibases located at northwest and southeast
- Two base sites located at northeast and southwest.
Trivia
Miscellaneous
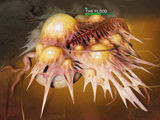
- The Flood Giant Bursters are invulnerable and cannot be damaged by any ordinances, but the surrounding tentacles can be damaged.
- Two Flood Forms are introduced on this level: Seeder Infector, which can infect air units, and Flood Spawners, which create counter units for the units that attack it.
- During the ending cinematic, a Klavrig Workshop Skitterer can be seen fighting the Flood, but they cannot be constructed by the player.
References
- The power gathering method is similar to the RTS Command & Conquer series, where units are deployed to collect resources around the battlefield.
- Halo Wars 2 Skirmish map Fissures is based on this level.
Gallery
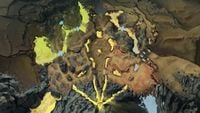
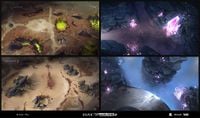
Concept overview of the map.

Concept art of the mission.
Concept art of the mission.
Concept art of the mission.
Concept art of the mission.

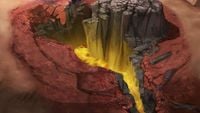
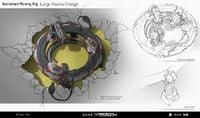
Concept art of the ruptures.
Concept art of the ruptures.
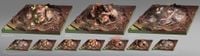
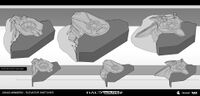
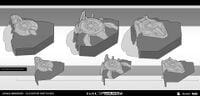
Concept art of the mining rig.
Concept art of the mission.
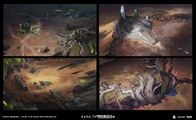
Concept art of the mission.
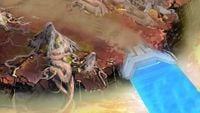
Concept art for the elevator in the mission.
Concept art for the elevator in the mission.
The unique Flood base found on the mission.
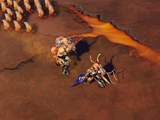
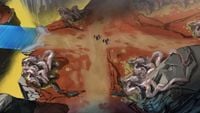
Flood attacker forms followed by a swarm of pod infectors.

A Flood spawner form and two infestor forms near clusters of blisters.

The salvage drill activated.


Sources
- ^ Halo Wars 2, Phoenix Logs: Brothers In Arms I
- ^ Halo Wars 2, Phoenix Logs: Brothers In Arms II
- ^ Halo Wars 2, Phoenix Logs: Warped Reflections
- ^ Halo Wars 2, Phoenix Logs: Tread Carefully
| Preceded by Fighting Retreat |
Halo Wars 2 campaign levels Light the Fuse |
Succeeded by The Archive |
| ||||||||


