CE:Keyes
From Halopedia, the Halo wiki
|
Prev: |
|
|
Next: |
|
| Keyes | |
|---|---|

| |
|
Game: |
|
|
File name (?): |
|
|
Player: |
|
|
Date: |
|
|
Location: |
On the surface of Installation 04 and onboard the Truth and Reconciliation[3][4] |
|
Objective(s): |
|
|
Par Time: |
00:15:00 (Master Chief Collection-only) |
|
Par Score: |
20,000 (Master Chief Collection-only) |
 |
Halopedia has a walkthrough guide for this level; see CE:Keyes/Walkthrough. |
| “ | Stage a one-cyborg assault on a Covenant ship and bring back the Captain. | ” |
Keyes is the ninth campaign level in Halo: Combat Evolved. In this level, the MCPO John-117 returns to the Truth and Reconciliation to rescue the titular Captain Jacob Keyes. The Master Chief fights his way through the ship and on the ground while trying to survive the bloody engagement between the Flood and surviving Covenant forces. At the end of the level, the Master Chief discovers a horrifying truth: Captain Keyes has been completely taken over by the Flood. With no other choice, the Chief physically removes the Captain's implants which contain the access codes to the UNSC Pillar of Autumn. He then hijacks a Banshee and escapes.
In 2026 the level was remade entirely for inclusion in Halo: Campaign Evolved.
Transcript[edit]
Under New Management[edit]
{Original Cutscene} {Anniversary Cutscene}

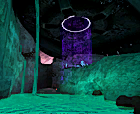
View flies through a canyon filled with pools of reactor coolant under the Truth and Reconciliation. The Ket-pattern battlecruiser is resting on the top of the canyon, heavily damaged. The Flood and Covenant forces are fighting all throughout the region.
- Cortana: "The Covenant network is in absolute chaos! From what I've been able to piece together, their leadership ordered all ships to abandon Halo when they found the Flood, but they were too late. The Flood overwhelmed this cruiser and disabled it. The Covenant are terrified the Flood will repair the ship and use it to escape from Halo. They've sent in a strike team to neutralize the Flood and repair the ship for immediate departure. I've got a good lock on Captain Keyes' CNI transponder signal! He's alive! And the implants are intact! There's some interference from the cruiser's damaged reactor. I'll bring us in as close as I can."
John-117 teleports into the end of a corridor in the cruiser. The view flips over, upside down, and the Master Chief falls on his head; he was teleported in upside down.
- Cortana: "Ohh... I see, the coordinate data needs to be— "
The Master Chief whacks the side of his head with his fist as he stands up.
- Cortana: "Right. Sorry."
{Gameplay}
The Chief begins to walk down the hallway.
- Captain Jacob Keyes (COM): (weakly) "Chief... Don't be a fool. Leave me..."
- Cortana: "Captain? Captain?! I've lost him..."
If the player stalls around on the corridors outside the starship's bridge:
- Cortana: "The damage caused by the crash and the Flood have sealed off all nearby access ways to the control room. We should find another way in."
The Chief encounters a small group of Unggoy fighting the Flood; they are soon overwhelmed. The Chief eliminates the Flood, continues down the hallway, and gets to one of the hangar bays. A large hole in the floor is just past the door, blocking the Chief's progress. Several Sangheili are present in the area beyond, fighting more Flood.
- Cortana: "Analyzing damage... This hole was caused by some kind of explosive. Very powerful if it tore through a ship's hull. All I detect down there are pools of coolant. We should continue our search somewhere else."
After staying in that corridor for a few moments, Flood begin dropping out of a hole in the ceiling behind the Chief, cutting him off.
- Cortana: "Warning! Threat level increasing!"
The Chief fights off the increasing horde of Flood for a few more moments.
- Cortana: "That jump into the coolant is looking better all the time, Chief!"
If the Chief lingers for too long, fighting the Flood:
- Cortana: "Trust me! It's deep enough to cushion our fall!"
If the Chief still continues to hold his ground:
- Cortana: "Chief, we need to jump now!"
Overwhelming Flood forces continue to pour down the hallway, forcing the Chief into the hole.

{Original Cutscene} {Anniversary Cutscene}
The Master Chief falls into a large pool of coolant, which breaks his fall. View begins under-coolant. Covenant and Flood are heavily engaged around the pool.
{Gameplay}
- Cortana: "Let's get out of here, and find another way back aboard the ship."
The Chief navigates the area, interrupting fights between beleaguered Covenant troops and Flood forms.
- Cortana: "We should head this way, towards the ship's gravity lift."
A navigation point appears on the Chief's heads-up display. He continues to head toward the gravity lift. Eventually reaching an overhang, the Chief is able to see a pair of Mgalekgolo engaged with masses of Flood carrier forms.
- Cortana: "The crash did more damage than I suspected. Analyzing. Coolant leakage rate is significant. The ship's reactor should already have gone critical."
The Chief fights his way through more Covenant and Flood forces until he finally reaches the gravity lift. Several Sangheili and Unggoy furiously defend the gravity lift from increasing numbers of Flood, desperately trying to prevent the parasitic creatures from entering the Truth and Reconciliation.
- Cortana: "Power source detected. There's the gravity lift. It's still operational! That's our way back in!"
Once the area is cleared, the Chief takes the gravity lift back inside the ship:

{Original Cutscene} {Anniversary Cutscene}
The Chief, standing in the gravity lift, looks up and flies up into the Truth and Reconciliation.
Upstairs, Downstairs[edit]
{Gameplay}
The Chief arrives at the gravity lift bay, which is strewn with dead Covenant troops. Blood is splattered all around. A few Infection Forms wander around.
- Cortana: "We should be able to get into the ship's control room from here."
The Chief finds an unlocked door and walks through it.
- Cortana: "The Covenant Battlenet is a mess. I can't access the ship's schematics. My records indicate that a shuttle bay should be... here."
Cortana marks the spot with a navigation point.
Fighting his way through multiple Flood carrier forms, the Spartan eventually reaches the nav point, it turns out to be a cargo bay. Flood forms walk around the area, guarding the corpses of dead Covenant troops in the corners.
- Cortana: "Look, in the corners. The Flood are gathering bodies here."
After fighting through hordes of Flood, the Chief finds more living Covenant. He continues on, reaching the shuttle bay.
- Cortana: "Looks like another shuttle bay. We should be able to reach the control room from the third level."
- Keyes (COM): (pained) "I... gave you an order, soldier! Now pull out!"
- Cortana: "He's delirious! In pain! We have to find him!"
A group of Sangheili hold the center of the shuttle bay, using a Shade turret to provide supporting fire while a single Mgalekgolo and other Covenant troops fight the Flood in the corridors. The Chief ascends through the corridors and reaches the third floor.
- Cortana: "The control room should be... this way."
She assigns another navigation point. A Spirit dropship enters the open shuttle bay doors and disperses a group of black-armored Covenant soldiers in the lowest area of the bay. The Chief battles through more Flood guarding the open door that the navigation point directs him to. Killing all hostiles, the Chief follows the navigation point, venturing deeper into the chaotic hallways.
The Captain[edit]
Keyes screams over the COM channel in agony.
- Cortana: "The Captain! His vitals are fading! Please, Chief, hurry!"
The Chief eliminates both Covenant troops and Flood forms outside the bridge. He then enters the bridge and walks up the ramp leading to the command center.
{Original Cutscene} {Anniversary Cutscene}

The Chief aims his weapon at the Proto-Gravemind sitting on the command center in the bridge as he walks up to the raised platform. The Captain's face sticks out of it, with his body dangling below, deformed.
- Cortana: "No human life-signs detected. The Captain! He's...one of them!"
The Chief stares at what's left of Keyes.
- Cortana: "We can't let the Flood get off this ring! You know what he'd expect- What he'd want us to do."
Master Chief punches into Keyes' skull, sticking his hand inside. He pulls out the neural implants, shakes the Flood biomass off of them, and inserts them into his helmet.
- Cortana: (quietly) "It's done, I have the code. We should go."
{Gameplay}
- Cortana: "We need to get back to the Pillar of Autumn. Let's go back to the shuttle bay and find a ride."
Side doors open and hordes of Flood forms charge into the bridge. At the same time, the doors the Chief entered through open up to reveal a Covenant Special Operations team. A huge firefight ensues.
Once the Chief returns to the shuttle bay, another Covenant Spirit dropship enters the hangar, dropping off more troops, escorted by two Banshees. The Banshees land, and their Sangheili pilots jump out.
- Cortana: "Perfect. Grab one of the escort Banshees, and we'll use it to return to the Pillar of Autumn."

The Chief, after fighting through Covenant Special Operations troops and Flood forms, eventually reaches the lowest level of the shuttle bay and steals one of the Banshees. (Alternatively, the Chief can just jump off of the upper level and skip most of the fighting.)
{Original Cutscene} {Anniversary Cutscene}
The Chief, onboard the Banshee, flies out of the hangar. Multiple Covenant infantry and a Shade turret fire at him, but the Banshee quickly flies out of range.
Fades to black.
Level ends.
Achievements[edit]
The following achievements can be unlocked on Keyes across the Xbox 360 and Halo: The Master Chief Collection editions of Halo: Combat Evolved Anniversary. The original Xbox and PC and Macintosh releases of Halo: Combat Evolved did not contain achievement unlocks.
| Halo: Combat Evolved Anniversary (Xbox 360) | Halo: MCC (Xbox One, Xbox Series X|S) | Halo: MCC (Steam) | Title | Unlock requirement | Games |
|---|---|---|---|---|---|
 |
 |
 |
Complete Keyes on any difficulty. | Halo: The Master Chief Collection | |
 |
 |
 |
Kill every Elite on the level Keyes on Heroic or Legendary difficulty. | Halo: The Master Chief Collection | |
 |
Kill 100 Flood Infection Forms on the level Keyes on Heroic difficulty or above. | ||||
 |
 |
Beat the par time on Keyes. | |||
 |
 |
Beat the par score on Keyes. | |||
 |
 |
Find the Terminal on Keyes. | |||
 |
 |
Disapprovingly look at Captain Keyes' abandoned pipe. |
Trivia[edit]
Glitches[edit]

- If Flood infection forms get to the player in the gravity lift cutscene, the Chief's blood will spray and the forms will still float in the place.
- If the player manages to skip all the battles with the Flood and the Covenant after they get into the Cargo Bay, they will get to the Proto-Gravemind before the chapter "The Captain" can be triggered. The chapter title and the dialogue between Cortana and Keyes will be triggered after the player gets back to the Cargo Bay.
- It's possible to trigger the cutscene on the bridge without first defeating all the Flood. If this happens, then all surviving Flood will transfer over to the cutscene and will continue to attack and eventually "kill" the Master Chief. The scene continues to play as scripted with Cortana speaking and the Captain's face exploding. When gameplay resumes, the player will still be alive as though nothing happened.
- It's also possible to trigger the cutscene on the bridge without defeating both the Covenant and Flood; this can be easily done on the Easy difficulty. If this happens, then all the surviving Covenant and Flood will continue fighting when the cutscene begins as the Master Chief can hear the fight between the Covenant and Flood during the cutscene.
- When piloted, the escort Banshees can fly through walls.
- It is possible skip the overwhelming majority of the level and get directly to the bridge where the Proto-Gravemind is via a trick commonly known as the "Shield Bump," or less commonly referred to as "the Plasma Wall Spawn glitch." It is performed by overloading the portable shield in the beginning of the level and then standing on top of it; with perfect alignment the shield will bump the player up and out of bounds such that with careful movement they can make a few jumps and ultimately hop into the room. The level cannot be continued unless one backtracks towards the hallway that would normally come up from the hanger bay (right by the same hallway where the level starts and gets a checkpoint.)[5]
- Alternatively one can use a different glitch known as the "Flood Bump" to use a reviving combat form (ideally the one chasing the Grunt at the start) to push the player through the wall behind them at the very start of the level. Both of these glitches are utilized by speedrunners and can be used to net the Scurty Bump achievement.
Easter eggs[edit]
- In Halo: Combat Evolved Anniversary, the ninth terminal, represented as a red holographic panel, can be found in the bridge's right sunken crevice, specifically to the side of the raised platform.
References[edit]
- The scenario of Keyes is almost identical to that of the level, Sorry Don't Make It So, from Marathon 2: Durandal. Both of the levels require the protagonist to fight his way through a captured and heavily damaged alien ship during a heated battle between two opposing forces being the Flood against the Covenant in Keyes and the Pfhor against the UESC in the level from Marathon.
- When inside the bridge, look a bit to the right off the ramp and one could see a tentacle with Keyes' pipe, which has the Marathon logo on it.
Mistakes[edit]
- If analyzed, the route the Chief took in the beginning of the level is wrong. Since players can see the bridge through the grille in the beginning of the level, it indicates that the player is on the third floor. However, once the player reaches the hole created by coolant, they are located on first floor of the shuttle bay. The corridors that lead the player from the beginning of the level to the hole are obviously too short to travel such a high and long distance. This is obviously an oversight by Bungie's mission designer.
- The route the Chief takes the second time he enters the ship also seems to be wrong. The first Cargo Bay's general layout has changed (the big doors though which the Marines came out in the previous level now leads the other way, the corridor on the right side leads down instead of up to the second floor of the Cargo bay, and that place is now taken by the corridor on the left side), the Hangar Bay's highest platforms have doors that switched places (the first time the Chief enters the ship, the route to the Control Center was at the last door on the platform while this time it's at the first door) and the Control Center's entrances are also changed.
- Sometimes, when the player reaches the Shuttle Bay in the last part of the level, if the player walks up to the edge of the disabled energy barriers, Cortana may start to repeat the quote about the ship's crash and it leaking coolant.
Miscellaneous[edit]
- The player can see the Proto-Gravemind inside the bridge by looking through the grille in the beginning of the level.
- The sentence "Chief... leave me," was added by Martin O'Donnell to provide an explanation for why the player is looking for Captain Keyes aboard the ship.[6]
- The waves of Flood which force the player to jump are not endless, but can in fact all be killed if the player expends sufficient ammunition. This is far easier if the player utilizes the Bandanna Skull in Halo: Combat Evolved Anniversary.
- The crashed Banshee next to the gravity lift is the only pre-placed Banshee wreckage to appear in-game until Halo 3: ODST. The crashed Banshee has its own model in the games files.
- The Wraiths and Ghosts aboard the Truth and Reconciliation can not be driven, though they can be destroyed with grenades or gunfire. This differs from the drivable Ghosts in the game, which cannot be destroyed or damaged unless they are being driven. The Ghosts aboard the ship remain completely stationary regardless of any explosions nearby; drivable Ghosts will be flung by nearby detonations.
- Strangely, the Grunt with the fuel rod gun in the Spirit dropship will always die upon impact with the ground. Furthermore, the fuel rod gun's subsequent explosion does not kill any of the nearby Grunts. On rare occasions, the fuel rod gun-wielding Grunt will survive the explosion and will be left with no weapon. He will act as if he is holding a weapon and if the player gets close he will scream out as if throwing grenades, although he does not actually throw them.
- In the cutscene "The Captain", the player controlled Master Chief biped is teleported under the bridge platform while a separate actor Master Chief carries out the cutscene. One can see this with the use of a flycam. This was done in order to have the player character's biped out of sight while the cutscene is acted out.
- Both the actor Master Chief and the player can be killed by enemies during the cutscene. If the actor is killed he will die normally and drop all of of his weapons just like the player and most other AIs but the cutscene itself will still continue playing. A static "ghost" Chief with an assault rifle will appear as Cortana talks about how there are no human life signs detected which will change to an upright weaponless ghost during the portion where the Chief punches through Keyes' skull. The body dead body will remain even after the cutscene is over and the player can even pick up any of the weapons dropped. However if the actual player is killed during the cutscene, the game will revert to the last checkpoint mid cutscene. Unlike normal reverts the options to restart the level and revert to the last checkpoint will be missing from the pause menu and only be restored when the player triggers the cutscene again and it plays without the player dying. The other options such as "Save and quit" will still function as normal however.
- Aside from the assault rifle seen during the cutscene, the actor also has a pistol and three grenades which drop if he is killed.
- In the cutscene, "The Captain", when the Master Chief retrieves Captain Keyes' neural implants, he was meant to burn Keyes' skull out of the Proto-Gravemind with a flamethrower and then retrieve the implants. Due to time constraints, the flamethrower was removed from the final game. Bungie had Robert McLees do research on what burned skulls looked like. When he had finished, he said "[He'd] done [his] work too well", as the burned skull was too gruesome.[7]
- The escort Banshee with the navigation point is tagged as an ally on the motion tracker. This probably is due to Cortana wanting the player to use an “ally’s” vehicle. For example, if players board a vehicle, drive fast, and bail out with it still moving, it will indicate a large yellow dot on their motion tracker, even if there is no one inside. However, when an enemy is in a vehicle, they are shown as red blips.
- When the escort Banshees enter the Truth and Reconciliation, their canopies are in the open position, despite being manned and airborne.
- The Banshee that the Master Chief commandeers at the end of the level makes the same flying sounds a Pelican does and flies at the same speed.
- For some odd reason, when the player enters the Banshee, if they fly to the left, the player will find that the level's geometry has become phased, allowing the player to fly through it.
- In Halo: Combat Evolved Anniversary, a very faint whispering can be heard coming from the Proto-Gravemind even after Keyes' skull has been crushed.
- This is likely explainable by the simple fact that the Proto-Gravemind wouldn't have been killed by the Master Chief punching into Keyes' head. Keyes was only a part of the being so destroying his brain wouldn't have been enough to kill it.
- Unlike all the other levels in the Anniversary remake, this level does not feature a skull.
- This is the first level to feature Special Operations Sangheili, the only rank of Sangheili who throw plasma grenades in the original trilogy.
- If the player chooses to remain in certain areas on the level, enemies will keep respawning endlessly until the player proceeds forward.
- The Truth and Reconciliation's gravity lift appears to be in a different location than in the level The Truth and Reconciliation. No explanation is ever given for this in either the game or Halo: The Flood.
- In Halo: The Flood, Cortana's monologue goes differently. The part starting from Cortana talking about how she's got a lock on the Captain's CNI transponder doesn't happen in mid-teleport. Instead, Cortana tells the Master Chief this at the third phase pulse generator when he tells her to find the Captain before using the teleportation grid. The first part where Cortana tells the Master Chief about the damage to the cruiser happens after they board the Truth and Reconciliation and is a situation report that the Master Chief requests from her.
- At the end of the level, upon returning to the shuttle bay, the player can easily skip most of the rest of the level: after clearing out the third level, the player can jump to the second level platform where the Shade turret is and then from there to the ground next to the Banshees. However, the player should allow their shields to recharge between jumps and take out the Shade gunner due to the fire they will take from enemies which can kill the player before they can escape in the Banshee. Taking out the Shade gunner lessens this problem. If the player chooses to do this shortcut, its best to jump onto the ground as close to the Banshee as possible due to the number of enemies around who can quickly overwhelm and kill the player.
Gallery[edit]
Halo: Combat Evolved[edit]
Preview of the level in Halo: Combat Evolved menu.
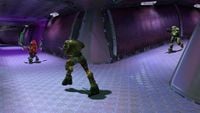
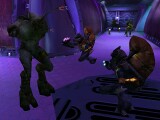
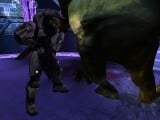
A Flood combat form chases an Unggoy Major down a corridor.
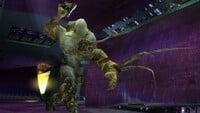
John comes across a Flood attacker form.
Two Flood carrier forms onboard the Truth and Reconciliation.
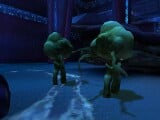
Two Unggoy Minors fighting the Flood.
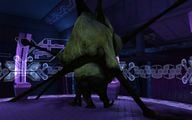
A Flood combat form on the ship.
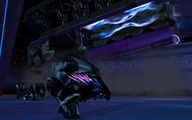
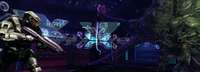
Covenant SpecOps being deployed into the hangar bay.
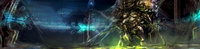
The Proto-Gravemind on the bridge of the Truth and Reconciliation.
John-117 finds the Proto-Gravemind.


Halo: Combat Evolved Anniversary[edit]
Preview of the level in Halo: Combat Evolved Anniversary menu.
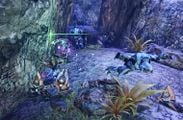
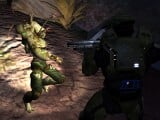
Covenant forces fighting Flood forms on the surface of Installation 04.
John-117 finds the Proto-Gravemind.


Halo: Campaign Evolved[edit]
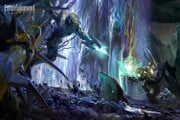
Concept art for the battle around the gravity lift.

Sources[edit]
- ^ Halo: Combat Evolved Editing Kit, game file
HCEEK\tags\levels\d20\d20.scenario - ^ Halo Waypoint, The Halo Bulletin: 10.8.14 (Retrieved on Oct 12, 2014) [archive]
- ^ Halo: The Flood, page 288
- ^ Bungie.net: Jason Jones Interviewed by You ("[...] the Flood's galactic joyride in the Truth and Reconciliation...")
- ^ https://www.youtube.com/watch?v=rrLeov8tq5M
- ^ Halo 3, Legendary Edition: Halo: Combat Evolved developer commentary
- ^ The Art of Halo, page 140
| Preceded by Two Betrayals |
Halo CE Campaign Missions Keyes |
Succeeded by The Maw |
| |||||||||||||||||||||||


