Reach:Lone Wolf
From Halopedia, the Halo wiki
|
Prev: |
|
|
Next: |
|
| Lone Wolf | |
|---|---|

| |
|
Game: |
|
|
File name (?): |
|
|
Player: |
|
|
Date: |
|
|
Location: |
Near Asźod ship breaking yard, planet Reach |
|
Objective(s): |
Survive as long as possible |
|
Par Score: |
50,000 (Halo: Reach-only) |
 |
Halopedia has a walkthrough guide for this level; see Reach:Lone Wolf/Walkthrough. |
| “ | Spartans never die. They're just missing in action... | ” |
Lone Wolf is the eleventh and final campaign level of Halo: Reach. The level takes place after the credits and is accessible after finishing the entire campaign.
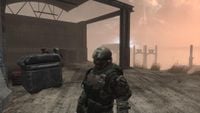
The level begins at 20:00 hours of August 30, 2552, near the ship-breaking yards at Asźod. SPARTAN-B312, left at the ship-breaking yards after the UNSC Pillar of Autumn’s escape, is left to fend off the remaining Covenant forces alone, attempting to stay alive as long as possible. After fighting off waves of Covenant, Noble Six eventually succumbs and is killed by a swarm of Sangheili warriors.
Transcript[edit]

Planet Reach
August 30, 2552 20:00 Hours
As two Banshees fly past, the camera pans down to Noble Six, standing alone on a raised platform. The sky is choked with smoke and ash from the ongoing glassing. With no means of escape, Noble Six is stranded on Reach as it burns. The Spartan watches as Banshees dominate the sky and Phantoms approach their position.
{Gameplay}
There'll be Another Time...[edit]
Spartans never die...
Waves of Covenant troops, including Sangheili, Unggoy, and eventually Wraiths attack the lone Noble Six. Covenant aircraft from above, while initially ignoring the Spartan, also begin to fire on their position.
Noble Six holds out for as long as possible. As more damage is taken, cracks begin to appear in the Spartan's visor. Eventually, Six takes enough damage and the screen turns to black.

Fade in on Noble Six's point of view: SPARTAN-B312 is under heavy fire and hurt, with two cracks on Six's visor. A single assault rifle is lying on the ground. The Spartan pulls off the damaged helmet, tosses it aside, and picks up the weapon.
Scene switches to the discarded helmet's point of view, which sees Noble Six making a final stand against the Covenant. A Sangheili Ultra charges at the Spartan, firing a Okarda'phaa-pattern plasma rifle, but Six calmly steps forward and guns it down with the assault rifle. A Sangheili General approaches from behind with an energy sword. Before it can strike, Six turns around and rams their elbow into the General's face, disabling its shields and knocking it to the ground. Six draws a pistol and kills the fallen General, then holsters the pistol and resumes firing the assault rifle. Nakata'vho-pattern plasma repeater fire from another Elite off-screen hits Six across the stomach. With their shields already down, the Spartan is severely wounded. Six reels from the attack, but remains standing.
Holding the assault rifle at the hip in the right hand and the pistol in the left, SPARTAN-B312 continues firing, killing two more Sangheili before another Ultra shoves Six to the ground and pounces on them with an energy dagger. The Spartan kicks the Ultra backwards, causing it to stumble into the helmet. At the same time, a sword-wielding Sangheili Zealot appears and tries to kill the downed Spartan, but Six knocks the sword out of its hand. The Zealot staggers backwards, its shields recharging. The Ultra again tries to stab Noble Six with its energy dagger, but Six rolls away from the stab and elbows the Ultra in the jaw. The Zealot ignites its own energy dagger and stabs downward towards the fallen Noble Six. The foot of a Field Marshal steps into the frame as the Sangheili ignites its energy sword, blocking the view.
Cut to Noble Six's shattered helmet, lying on the ground in the dust - as seen at the Reach:Noble Actualbeginning of the game.
Fade to black.
Fade in to the same location. The ground is now a grassy plain and the skies are blue. The only signs that a battle was fought here are debris from a destroyed frigate in the background and Noble Six's helmet, still lying where it fell.

Planet Reach
July 7, 2589
- Catherine Halsey: (voiceover) "It didn't take long for Reach to fall. Our enemy was ruthless. Efficient. But they weren't nearly fast enough."
The camera begins slowly pulling back.
- Halsey: (voiceover) "For you had already passed the torch. And because of you, we found Halo, unlocked its secrets, shattered our enemy's resolve. Our victory - your victory - was so close... I wish you could have lived to see it."
The camera pulls back, revealing a UNSC colony ship landing in the background.
- Halsey: (voiceover) "But you belong to Reach. Your body, your armor - all burned and turned to glass. Everything...except your courage. That, you gave to us. And with it, we can rebuild."
Fade to white.
Game ends.
Achievements[edit]
The following achievements can be unlocked on Lone Wolf in the Halo: The Master Chief Collection edition of Halo: Reach. There are no achievements for this level in the Xbox 360 version.
| Halo: MCC (Xbox One) | Halo: MCC (Steam) | Title | Unlock requirement | Games |
|---|---|---|---|---|
 |
 |
Achieve a score of 30,000 points on Lone Wolf. | ||
 |
 |
Achieve a score of 150,000 points on Lone Wolf. | ||
 |
 |
Find Data Pad 19 on Lone Wolf on Legendary difficulty |
Trivia[edit]
Glitches[edit]
- An untextured Spartan model can be found in this level using theater mode.
- Using the glitch that takes the player out of the map, the player can also come back to where they start off the level, and a trooper will still be alive.
References[edit]
- This level has a single rally point, Rally Point Omega. In Greek, Omega (Ω - the last letter of the alphabet) means "last" or "the end." This could also be a reference to the fact that Reach is the last Halo game to be made by Bungie, or because it is "the end" of Noble Six, or simply that it is the last rally point.
- "There'll Be Another Time" may be a reference to a line spoken by Han Solo as he is about to be frozen in carbonite in Star Wars: The Empire Strikes Back.
- The last enemies the player fights in Reach's Campaign are Elites, just like the first enemy the player ever encounters in the series is an Elite in the opening sequence of The Pillar of Autumn
- Seven Sangheili warriors attack SPARTAN-B312 in the ending cutscene.
- After the level's end, Noble Six becomes the fourteenth dead Spartan in the area, a reference to Bungie's favorite number (7x2=14).
- The date of the cutscene following the level is July 7, 2589. This is a reference to Bungie Day. This is also another seven reference as the year is made up of 25, 2+5=7, and 89, 8+9=17.
Miscellaneous[edit]
- It is impossible to beat this level, no matter how skilled the player is.
- All attempts to escape the level will result in death, as the map has boundaries just like any other.
- If the player dies outside the boundaries of the level due to the out-of-bounds countdown, the final cutscene will start to play with the player having all-white armor, but will then reset the player to the beginning of the level.
- All enemies are infinitely respawning.
- Enemies become significantly tougher the longer the mission runs.
- Future spawns include Wraiths, Elite Generals armed with Concussion Rifles and Energy Swords, and a BOB with an energy sword with significantly more aggressive AI than the other Elites that will mostly ignore cover in favor of charging at the player.
- It is possible to hide for several minutes without any enemies firing at Six if the player goes to the cluster of barrels to the left (from the beginning spawn of the level) of the main structure. It is possible for the player to survive even longer if he hides between the crates in the garage building.
- Overall, this level is more similar to Firefight than a campaign gameplay wise. Unlike standard Firefight, players only have one life and no breaks between waves.
- All attempts to escape the level will result in death, as the map has boundaries just like any other.
- Lone Wolf marks the only time a post-credits sequence has been playable in a Halo game.
- Halo: Reach's campaign begins with SPARTAN-B312 putting on their helmet and ends with them taking it off.
- The name of the level is ironic, especially since Carter told Noble Six to get rid of their "lone wolf" behavior upon joining Noble Team. However, at this point, due to the deaths of the rest of Noble Team except for Jun (who was sent away on assignment to watch over Dr. Catherine Halsey), Noble Six is truly alone.
- The final fate of Noble Six echoes the first campaign level of Reach; instead of being saved by Carter-A259 from being killed in the hands of a Sangheili Zealot's Energy dagger, Six meets their demise as another Sangheili Zealot ignites its Energy dagger and stabs them in the final cinematic.
- During co-op, the SPARTAN-B312 depicted in the cutscene depends on which player survives the longest. Since enemies will continue spawning, players who died won't be able to respawn, and the last player who dies will appear in the cutscene.
- It is possible, at least on co-op, to hijack at least one of the Wraiths.
- Earlier in the development of Halo: Reach, the game was going to end in a cutscene directly after the UNSC Pillar of Autumn took off, with the camera resolving down onto Noble Six as they inserted their last magazine into their weapon and walked off into the oncoming Covenant threat that still exists on the planet. The idea of a gameplay sequence in the end came fairly late in the game's development.[2]
- Thirteen dead Spartans can be found in this level. Two are inside the structure, while the rest are scattered throughout the area. Their armor permutations and color are randomly generated; their helmets have no attachments, their combat knives are missing, and some have non-accessible or glitched chest pieces, e.g: Assault/Sapper chest, but with only one grenade belt, or any chest with unknown attachments on the waist.
- According to the developer commentary, the Legendary ending of this level was supposed to depict an eagle landing on Noble Six's helmet, but this was cut from the game.[3]
- In the cutscene where Noble Six dies and the camera is pointing towards their helmet, the helmet doesn't show any sign of the two cracks on the visor that Six receives before they take off their helmet. Instead, it is replaced with a big hole in the middle of the visor. However, the only two exceptions are the ODST, which if one looks closely, one can see two holes, and GUNGNIR, which uses a camera instead of a visor respectively, and shows a small hole in the helmet itself.
- A slight mistake occurs involving Noble Six's helmet in the final cutscene. In both the first and last times it's seen, the helmet is tilted to the right, but when the battle is shown from its point-of-view during the final cutscene, the helmet is tilted off to the left. It may have been kicked to a different area since there are no dead bodies or buildings around.
- If the Haunted Helmet is worn during the final cutscene, it will swap models with random helmets while it lays on the ground.[4]
- Some helmets' visors are completely blackened during the final cutscene instead of the usual visor color, most notably HAZOP, Mark V, Security, and Military Police helmets. Others are slightly shaded while some are bright.
- This is the only playable level in Halo: Reach that contains just one data pad, which is found when playing on the Legendary difficulty. All other playable levels have two data pads, one on Legendary, and another while playing any other difficulty.
- Using the glitch that takes a player outside the map in theatre, the player can view the mountain seen frequently throughout the campaign, the skybox begins to disappear after certain distances and is replaced with a blue box. 2-dimensional Covenant ships can be seen outside the level.
- The mountain seen in the background of the final scene is believed by some fans to be Menachite Mountain, home of ONI's CASTLE Base. The irregular shape of its tip has been theorized to be the result of the Covenant blasting through the mountain to get to the Forerunner structure under it.
- This theory was proved to be false, after being revealed that the mountain is named Mount Törött.
- The partially destroyed house in the center of the level is reused from the level The Pillar of Autumn, from the Wraith encounter after the Mongoose jump.
- Noble Six seems to shoot their assault rifle for longer than the normal 32 round magazine would allow without reloading.
- Sounds of Covenant ships glassing the nearby area can be heard in the background.
- Unlike other Halo: Reach campaign levels, the soundtrack used for this level is not named after the level's name. Another track entitled Lone Wolf is instead part of the soundtrack for Winter Contingency.
Gallery[edit]
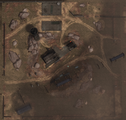
Map of the campaign level.
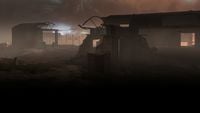
The level's loading screen.
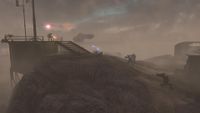
SPARTAN-B312's final stand.
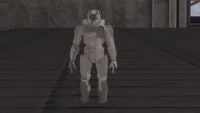
The hidden Spartan statue in MJOLNIR Mark VI armor.
Some of the troopers who are found dead later on in the level.
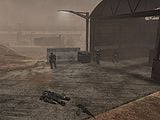
UNSC troopers both alive and dead in the level.


Sources[edit]
- ^ Halo: Reach Editing Kit, game file
HREK\tags\levels\solo\m70_bonus\m70_bonus.scenario - ^ GameSpot: Halo: Reach - Final Thoughts
- ^ YouTube: Halo Reach Developer Commentary (2010)
- ^ YouTube: Halo: Reach, Lone Wolf w/Haunted
| ||||||||||||||||||||||||||||||||||||||||||


