Mombasa Streets
From Halopedia, the Halo wiki
|
Prev: |
|
|
Next: |
|
| Mombasa Streets | |
|---|---|

| |
|
Game: |
|
|
Player: |
|
|
Date: |
|
|
Location: |
|
 |
Halopedia has a walkthrough guide for this level; see Mombasa Streets/Walkthrough. |
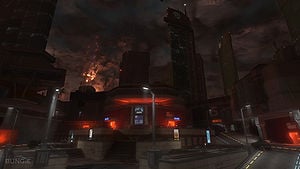
Mombasa Streets is the second campaign level of Halo 3: ODST, and serves as "the hub", an open-world environment used to access flashback missions. It is set in the city of New Mombasa.[1]
Summary
Unique as a Halo game level, this level is an open world environment, which contains "beacons", objects left by or noted by the Rookie's squad members, which trigger "flashback" levels, explaining previous events. In addition to the beacons, the level also has additional content, such as Audio Logs and Supply Caches.
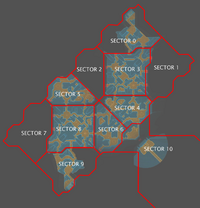
The city map provided by the Superintendent highlights points of interest, such as the "beacon" objects. The Superintendent also guides the player into the right direction using the city's plentiful digital signs and billboards.
During the first playthrough, some areas in the city are inaccessible, and the player is forced to play the flashbacks in chronological order. Completing flashbacks unlocks more areas in the city, allowing the player to progress to the next beacon. Once game is completed, the city is fully unlocked for exploration.[1]
Plot
The level starts six hours after the Squad's failed orbital insertion, in the occupied city Centre of New Mombasa. Some time after the Rookie wakes up, exits his pod and starts to explore the city, the Superintendent will contact him via a public phone and upload a map of the city to his VISR navigation database. After finding the final beacon and completing the last flashback level, the Rookie will receive a distress signal from Captain Dare, who is pinned down in the data center under the city. At this point, the city will be mostly locked, with only a way to the nearest underground entrance, where the Rookie will descend into the depths of the city.[1]
Transcript
Text appears on black screen:
The Rookie
Occupied city center
6 hours after drop
{The Rookie slowly opens his eyes in his pod. There is static interference in his visor, and multiple cracks in his pod's windows. The screens that are still working are filled with static. A Covenant Phantom flies in the background.}
{Shortly after the dropship passes, the Rookie activates four bolts to release his pod door open. The pod is on the edge of a short building, but, having no other choice, the Rookie hops out, only to fall about 10-20 feet to ground, injuring him slightly. If the game is being played in cooperative mode, the bolts section is skipped, and the hatch is popped automatically, as is the Rookie jumping out.} Template:Sectstub
Beacons
There are six beacons around the level, each an object related to a squadmate. The following is a list of the locations of these beacons, and the flashback levels they trigger, in chronological order.
| Location | Object | Character | Level | Time |
| Sector 5, room overlooking Tayari Plaza | Dare's Recon helmet | Buck | Tayari Plaza | Immediately after drop (16:06) |
| Sector 9, in front of New Mombasa Uplift building | Damaged F-99 Drone optics package | Dutch | Uplift Reserve | 30 minutes after drop (16:36) |
| Sector 4, building overlooking Kizingo Boulevard | Destroyed Gauss turret | Mickey | Kizingo Boulevard | 90 minutes after drop (17:36) |
| Sector 10, near destroyed bridge to ONI Alpha Site | Remote detonator | Dutch | ONI Alpha Site | 2 hours after drop (18:10) |
| Sector 3 | Sniper Rifle (bent, hanging from a power line.) | Romeo | NMPD HQ | 3 hours after drop (19:14) |
| Sector 0, entrance to Kikowani Station | Biofoam canister | Buck | Kikowani Station | 5 hours after drop (21:01) |
Trivia
- This level is the only level in Halo 3: ODST which does not unlock an achievement upon beating it on Normal or above. This is probably because of the fact that this is a free roaming level.
- This is the first non-linear open-world level ever in a Halo game, and the largest open environment Bungie has ever created.
- The Rookie was already missing health before he even jumped out of his pod. This is most likely due to the very rough landing the Rookie endured.
- This level is the easiest to avoid enemies, as there are several detours and wide areas allow you to sneak past enemies. Just stay near walls to avoid being spotted by a sniper.
- The level's moody atmosphere, from color palette to lighting and music, is said to be influenced by the Film Noir genre.
- Past an abandoned Olifant, there is a deceased Elite without shoulder pads. Due to the frequent appearances of Elites without shoulder pads and the fact that they only sport white/silver armor, it is possible that they could be ranked as either Stealth Elites, Ossoonas, or Sangheili Ultras.
- On this level, there are several graffiti markings where you can read BELIEVE, maybe being a reference to the marketing campaign for Halo 3 of the same name. There is other graffiti in the city, some of which read "YOU LOOT, I SHOOT", "KINSLER IZ A THUG","UNSC=LIARS", "FASCISTS", "REMEMBER REACH", and "GLASS THIS!".
- Within one of the many building enclosed courtyards, the player can find two lone Huragok floating around. From what can be observed, they could have possibly strayed from their patrol and have not yet been discovered since all of the units in the courtyard are deceased except for them.
- If a group of hostiles is giving you trouble, fall back through the bulkhead to the last area. They often disappear, or forget you were there. This is very useful for patrols protected by Engineers, when you can't get a shot at it from the volleys the brutes are laying on you.
- After entering the building next to the first locked weapons cache, search the floor surrounding the door leading to the first courtyard. When searching the floor, you will find a box of cereal labeled, Web-O's. The mascot on the front of the box is a picture of a gorilla with a cowboy hat. This character is recognized by Bungie employees and Bungie.net members as, "The Webmaster" (one of Bungie's many inside jokes). In the right corner below him the phrase, "Your Host LOVES 'em!" can be seen, a reference to how Bungie.net is hosted by a webmaster.
- There is a pair of mp3 headphones on a bench in the ONI Building's lobby.
- On the left side of the second floor of ONI Building's lobby, there are two photo IDs on the floor in the mess of papers. The photos on the two IDs are of Martin O'Donnell and Shi Kai Wang. In addition, the ID inside the front door entrance has a photo of Shishka. In fact, all of the IDs found laying around in the lobby on both the first and second floor are of Bungie employees that served a major role in ODST's development.
- The small green blips that appear on the city map are used to mark locations that your person stood for a brief period of time without moving. These blips later disappear once you've come out of the proximity of that area.
- Markings created by the Huragok can be seen around the level in various points of interest, such as in Supply Caches or in areas with dead Elites. These symbols are more easily seen with the VISR mode turned on.
- Almost every abandoned Ghost encountered in the city is allegedly "destroyed". However, they are almost completely intact to the point that they are still drivable. The effect used on the Ghosts in the city is actually the exact same technique used for the inaccessible Ghosts found on the levels, The Truth and Reconciliation (Level) and Keyes (Level) in which all of the vehicles found on the level are intact but inaccessible.
- Their is a Police Man who has White Arms, but a black face (looking underneath the helmet), which may be a game error, or an Easter egg Bungie put in (the Multi Colored Man).Template:Fact
- In the building holding the beacon object for Kizingo Boulevard, there is a bench halfway up the staircase in front of a dead Brute. There is a possibility that the NMPD managed to fling the bench down the stairs in an attempt to crush Covenant forces attempting to advance to the top floor.
- The E3 demo of this game took place on this level and ONI Alpha Site. In the demo, the Rookie's pod drops in front of the site's entrance tunnel.
Sources
- ^ a b c Halo 3: ODST
