Holdout: Difference between revisions
From Halopedia, the Halo wiki
mNo edit summary |
m (better image) |
||
| Line 3: | Line 3: | ||
{{Multiplayer Map Infobox | {{Multiplayer Map Infobox | ||
|name=Holdout | |name=Holdout | ||
|image=[[File: | |image=[[File:HaloHoldout.jpg|300px]] | ||
|game=''[[Halo: Reach]]'' | |game=''[[Halo: Reach]]'' | ||
|location=Aszod ship-breaking yards, Reach | |location=Aszod ship-breaking yards, Reach | ||
| Line 35: | Line 35: | ||
==Gallery== | ==Gallery== | ||
<gallery> | <gallery> | ||
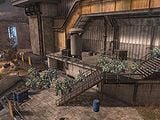
File:Holdout.jpg|A view of the [[Pillar of Autumn]]. | |||
File:Holdout Heatmap.jpg|An overhead view of Holdout. | File:Holdout Heatmap.jpg|An overhead view of Holdout. | ||
File:Reach 7738307 Full.jpg|A group of Grunts on Firefight. | File:Reach 7738307 Full.jpg|A group of Grunts on Firefight. | ||
File:Reach 8469760 Full.jpg|The | File:Reach 8469760 Full.jpg|The factory side of the map during a bonus round of Hunters. | ||
</gallery> | </gallery> | ||
Revision as of 08:27, November 23, 2011
 This article is a stub. You can help Halopedia by expanding it.
Template:Multiplayer Map Infobox Holdout is a Halo: Reach Firefight level. It is centered around a landing platform near the ship-breaking facilities in Aszod on Reach and is based on the final section of the campaign level The Pillar of Autumn.[1]
Overview
Holdout is a small sized Firefight map. The map is composed of four main sections: a middle complex of buildings and pads and two drop zones to the right and left. The map also has a terrace at the back which connects to the right drop zone and the middle complex. The terrace also serves as a great sniping position when enemies push in too far. The main complex is composed of a smaller building where players spawn, a middle platform, and two helipads. The spawn building has three levels: an interior where ammo caches can be found, the rooftop, which has a small structure to the left where players can snipe from, and the basement, with an ammunition cache and an entrance to either the main platform or the underside of it. The rooftop has two ramps leading down to an intermediate platform, which also has ramps that lead to the right area and the middle platform. The middle platform has a small structure in the center which contains a Turret and three ramps leading to the left drop zone and the two helipads, one raised which also connects to the left drop zone and a lower one which is connected to the right drop zone. The center platform also has a space beneath it, which links to the left drop zone and to the lower helipad.
Locations
- Storeroom
- Central Platform
- Helipad
- Mesa
- Field Office
- Crow's Nest
- Factory
- Backyard
Trivia
- In the game manual, it shows a screenshot of the Firefight lobby with Holdout selected, but the Template:UNSCship is absent in the background.
- The hazard on this map is the Banshee.
Gallery
- Holdout.jpg
A view of the Pillar of Autumn.
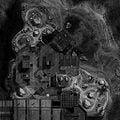
An overhead view of Holdout.

A group of Grunts on Firefight.
The factory side of the map during a bonus round of Hunters.


Sources


