The Tower: Difference between revisions
From Halopedia, the Halo wiki
m (→Transcript) |
m (→Transcript: Banished dropship links, replaced: Banished Phantom → Banished Phantom) |
||
| (30 intermediate revisions by 6 users not shown) | |||
| Line 1: | Line 1: | ||
{{ | {{Status|Gameplay}} | ||
{{disambig header|the [[Halo Infinite]] campaign level|the location|Tower}} | |||
{{Level infobox | {{Level infobox | ||
|pagegamelabel=HI | |pagegamelabel=HI | ||
| Line 7: | Line 8: | ||
|devname= | |devname= | ||
|name = The Tower | |name = The Tower | ||
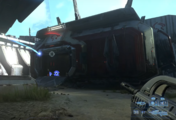
|image =[[File:HINF Tower | |image =[[File:HINF Tower Torture Chamber.png|300px]] | ||
|player = [[John-117]] | |player = [[John-117]] | ||
|date = c. [[2560#May|May 28, 2560]]{{Ref/Generic|Id=Premiere|[[Halo Infinite Campaign Gameplay Premiere]]}} | |date = c. [[2560#May|May 28, 2560]]{{Ref/Generic|Id=Premiere|[[Halo Infinite Campaign Gameplay Premiere]]}} | ||
| Line 23: | Line 24: | ||
==Overview== | ==Overview== | ||
{{Article quote|This well-fortified stronghold was once a central processing and interrogation site for UNSC prisoners captured by the Banished throughout the Ring. But since the fall of its warden Chak 'Lok, this hulking structure now lay silent.}} | {{Article quote|This well-fortified stronghold was once a central processing and interrogation site for UNSC prisoners captured by the Banished throughout the Ring. But since the fall of its warden Chak 'Lok, this hulking structure now lay silent.{{Ref/Note|This is a description of the Tower itself that appears after the mission is complete. The events of the actual mission are summarized in [[Recovery]].}}}} | ||
[[John-117]] tracked the UNSC signal to a [[Banished]] facility known as the Tower. Its warden, [[Chak 'Lok]], denied the Spartan access into the Tower by putting the outpost on lockdown. With guidance from [[the Weapon]], John-117 lifted the lockdown, and entered the Tower via the gravity lift at its base. Inside, John-117 discovered Spartan [[Hudson Griffin]] being restrained and tortured. Although Chak 'Lok intervened, he was killed in battle against John-117. Upon being freed, Griffin told John-117 of the Banished's search for the [[Conservatory (location)|Conservatory]] at the excavation site north of the Tower, but passed away shortly. | |||
[[John-117]] tracked the UNSC signal to a [[Banished]] facility known as the [[Tower]]. Its warden, [[Chak 'Lok]], denied the Spartan access into the Tower by putting the outpost on lockdown. With guidance from [[the Weapon]], John-117 lifted the lockdown, and entered the Tower via the gravity lift at its base. Inside, John-117 discovered Spartan [[Hudson Griffin]] being restrained and tortured. Although Chak 'Lok intervened, he was killed in battle against John-117. Upon being freed, Griffin told John-117 of the Banished's search for the [[Conservatory (location)|Conservatory]] at the excavation site north of the Tower, but passed away shortly. | |||
==Transcript== | ==Transcript== | ||
'''{''Gameplay''}''' | '''{''Gameplay''}''' | ||
''John-117 approaches the Tower.'' | ''[[John-117]] approaches the [[Tower]].'' | ||
*'''[[The Weapon|Weapon]]''': "I guess Tower was a more than appropriate name. Look at that place. The signal's coming from within that main structure. Somewhere up top. We're going to need to find a way in." | *'''[[The Weapon|Weapon]]''': "I guess Tower was a more than appropriate name. Look at that place. The signal's coming from within that main structure. Somewhere up top. We're going to need to find a way in." | ||
| Line 35: | Line 37: | ||
''The Chief breaches the Tower's outer perimeter, either by going through the main gate, or entering a service corridor in the side of the facility.'' | ''The Chief breaches the Tower's outer perimeter, either by going through the main gate, or entering a service corridor in the side of the facility.'' | ||
*'''Jiralhanae | *'''[[Jiralhanae]] 1''': "Look, brothers! More meat for [[Chak 'Lok]]'s [[Banished torture machine|machines]]!" | ||
*'''Jiralhanae | *'''Jiralhanae 2''': "He's here for [[Hudson Griffin|the asset]]! Send word to Chak 'Lok! He must not pass!" | ||
'' | *'''Jiralhanae 3''': "You won't leave this Tower alive, human!" | ||
''The | ''The Chief engages the [[Banished]] in the Tower's courtyard. During the battle, he comes across a number of captive [[marine]]s, whom he frees.'' | ||
*'''Chak 'Lok (hologram)''': "So, the | ''The Tower's [[gravity lift]] suddenly shuts down. A massive [[hologram]] of a [[Sangheili Warlord]] appears in its place.'' | ||
*'''[[Chak 'Lok]] (hologram)''': "So, the Demon is here. Did you think I would let you walk right into my Tower? ''My'' Tower?! I think not. My facility is locked down. There is nothing you can do here... except die." | |||
''Hologram vanishes.'' | ''Hologram vanishes.'' | ||
| Line 55: | Line 59: | ||
*'''Weapon''': "We need to deactivate the lockdown." | *'''Weapon''': "We need to deactivate the lockdown." | ||
'' | ''Or'' | ||
*'''Weapon''': "We're not getting into the Tower while the lockdown is still active." | *'''Weapon''': "We're not getting into the Tower while the lockdown is still active." | ||
| Line 62: | Line 66: | ||
*'''Weapon''': "This is it. Let's find a way in." | *'''Weapon''': "This is it. Let's find a way in." | ||
''Or'' | |||
*'''Weapon''': "This is where the lockdown was triggered." | |||
''The Chief enters the security building and goes upstairs where he locates a terminal. He deploys the Weapon onto the terminal.'' | ''The Chief enters the security building and goes upstairs where he locates a terminal. He deploys the Weapon onto the terminal.'' | ||
| Line 87: | Line 95: | ||
*'''Weapon''': "You're going to need to manually activate the gravity lift. I've marked it on your map." | *'''Weapon''': "You're going to need to manually activate the gravity lift. I've marked it on your map." | ||
''The Chief heads back outside to reactivate the gravity lift. [[ | ''The Chief heads back outside to reactivate the gravity lift. [[Gydrozka Workshop Breaching Pod]]s land in the courtyard, bringing enemy reinforcements.'' | ||
*'''Weapon''': "This location acts as a holding facility. Prisoners are captured, funneled through to Chak 'Lok and then on to somewhere they call the [[House of Reckoning (location)|House of Reckoning]]. Which is... suitably ominous and Banished sounding." | *'''Weapon''': "This location acts as a holding facility. [[Prisoner of war|Prisoners]] are captured, funneled through to Chak 'Lok and then on to somewhere they call the [[House of Reckoning (location)|House of Reckoning]]. Which is... suitably ominous and Banished sounding." | ||
''If the Chief stalls:'' | ''If the Chief stalls:'' | ||
| Line 95: | Line 103: | ||
*'''Weapon''': "Remember. We can't get up there without activating the gravity lift." | *'''Weapon''': "Remember. We can't get up there without activating the gravity lift." | ||
'' | ''Or'' | ||
*'''Weapon''': "Find a way to activate the gravity lift." | *'''Weapon''': "Find a way to activate the gravity lift." | ||
''The Chief locates the controls for the gravity lift and reactivates it. Additional Banished reinforcements show up. The Chief and any marines he's freed (or brought with him) engage | ''The Chief locates the controls for the gravity lift and reactivates it. Additional Banished reinforcements show up via drop pods and [[Eklon'Dal Workshop Phantom|Banished Phantom]]s. The Chief and any marines he's freed (or brought with him) engage the attackers while the lift powers back up.'' | ||
''Once most of the reinforcements have been dealt with:'' | ''Once most of the reinforcements have been dealt with:'' | ||
| Line 105: | Line 113: | ||
*'''Weapon''': "Let's go. The gravity lift's powered up." | *'''Weapon''': "Let's go. The gravity lift's powered up." | ||
''The Chief enters the gravity lift and arrives inside the Tower's main structure. He sees a pile of Spartan armor and other UNSC gear.'' | ''The Chief enters the gravity lift and arrives inside the Tower's main structure. He sees a pile of Spartan armor and other [[UNSC]] gear.'' | ||
*'''Weapon''': "Chief... more [[ | *'''Weapon''': "Chief... more [[MJOLNIR Powered Assault Armor (GEN3)|Spartan armor]]. And the source of the UNSC distress call. We're too late." | ||
''The Chief inspects the empty set of Spartan armor. He picks up a [[Threat Sensor|piece of equipment]] and examines it.'' | ''The Chief inspects the empty set of Spartan armor. He picks up a [[Threat Sensor|piece of equipment]] and examines it.'' | ||
*'''Weapon''': "A deployable Threat Sensor. It appears to lock onto and highlight any targets in range. Could be useful." | *'''Weapon''': "A deployable [[Threat Sensor]]. It appears to lock onto and highlight any targets in range. Could be useful." | ||
''The Threat Sensor is integrated into the Chief's armor.'' | ''The Threat Sensor is integrated into the Chief's armor.'' | ||
*'''Weapon''': "This armor belonged to a Spartan named [[Hudson Griffin]]. Sensor logs suggest he was alive when the armor was removed. Forcibly. It's a longshot... but he might still be alive." | *'''Weapon''': "This armor belonged to a [[Spartan-IV|Spartan]] named [[Hudson Griffin]]. Sensor logs suggest he was alive when the armor was removed. Forcibly. It's a longshot... but he might still be alive." | ||
'' | ''An alarm starts blaring. A previously locked door opens up, revealing a [[Jiralhanae Berserker]] and a pair of [[Unggoy]]. The Chief kills these enemies and heads through the door.'' | ||
''Chak 'Lok addresses the Chief over the loudspeaker.'' | |||
*''' | *'''Chak 'Lok (loudspeaker)''': "You have overreached, Demon. This is not a place to come by choice. I await you. Eagerly." | ||
'' | *'''Weapon''': "He's... about what you would expect. For an Elite. Who specializes in torture." | ||
''The Chief heads deeper into the Tower, killing any Banished troops in his path.'' | |||
*''' | *'''[[Unggoy]]''': "If we don't kill him, Chak 'Lok is DEFINITELY killing us!" | ||
'' | *'''[[Sangheili]]''': "Do you seek our prize, Spartan? You will not reach it." | ||
''As the Chief continues his search for Spartan Griffin, Chak 'Lok addresses him over the loudspeaker again.'' | |||
*'''Chak 'Lok (loudspeaker)''': "[[Escharum]] was correct. So easy. A signal. A lure. And the Master Chief comes running. I wish only that I would have time to enjoy you. Time to learn your secrets. Peel back your visage and expose your weakness." | *'''Chak 'Lok (loudspeaker)''': "[[Escharum]] was correct. So easy. A signal. A lure. And the Master Chief comes running. I wish only that I would have time to enjoy you. Time to learn your secrets. Peel back your visage and expose your weakness." | ||
''After fighting through | ''After fighting through more Banished troops, the Chief comes across an interrogation chamber containing a [[Banished torture machine|large machine]] at its center. Looking through the [[energy barrier]], the Chief sees a [[human]] trapped inside the machine.'' | ||
*'''Spartan Griffin''': ''(groans in pain)'' | *'''Spartan Griffin''': ''(groans in pain)'' | ||
| Line 157: | Line 167: | ||
*'''Chak 'Lok''': "It is where you will give up your secrets." | *'''Chak 'Lok''': "It is where you will give up your secrets." | ||
''Chak 'Lok | ''Chak 'Lok reengages his [[active camouflage]].'' | ||
'''{''Gameplay''}''' | '''{''Gameplay''}''' | ||
| Line 167: | Line 177: | ||
*'''Chak 'Lok''': "Ah, much better." | *'''Chak 'Lok''': "Ah, much better." | ||
''The walls surrounding the chamber raise themselves | ''The walls surrounding the chamber raise themselves, allowing Chak 'Lok to move freely about.'' | ||
*'''Weapon''': "The walls retracted. Watch your back! He could come from anywhere!" | *'''Weapon''': "The walls retracted. Watch your back! He could come from anywhere!" | ||
*'''Weapon''': "Griffin's Threat Sensor can help you locate Chak 'Lok." | *'''Weapon''': "Griffin's Threat Sensor can help you locate Chak 'Lok." | ||
*'''Weapon''': "Chak 'Lok's cloaked. Hard to see. Use the Threat Sensor." | |||
*'''Weapon''': "Use the Threat Sensor, Chief." | |||
''Chak 'Lok is a fast and cunning foe, who uses his active camouflage to get the drop on the Chief at every opportunity. However, the Chief uses Griffin's Threat Sensor to even the playing field. Eventually, the Master Chief prevails and kills Chak 'Lok.'' | ''Chak 'Lok is a fast and cunning foe, who uses his active camouflage to get the drop on the Chief at every opportunity. However, the Chief uses Griffin's Threat Sensor to even the playing field. Eventually, the Master Chief prevails and kills Chak 'Lok.'' | ||
*'''Weapon''': "We need to get him out of that machine." | *'''Weapon''': "We need to get him out of [[Banished torture machine|that machine]]." | ||
''The Chief finds the terminal controlling the torture machine and deploys the Weapon.'' | ''The Chief finds the terminal controlling the torture machine and deploys the Weapon.'' | ||
| Line 181: | Line 195: | ||
'''{''Cutscene''}''' | '''{''Cutscene''}''' | ||
''Spartan Griffin is trapped behind an energy | ''Spartan Griffin is trapped behind an [[energy barrier]] and suspended in midair by [[energy shackle]]s around his arms and legs. He continues to groan in pain.'' | ||
*'''John-117''': "Shut this thing down." | *'''John-117''': "Shut this thing down." | ||
*'''Weapon''': "Working on it. Okay. Be ready | *'''Weapon''': "Working on it... Okay. Be ready - I'm going to cut him loose." | ||
''There's a pulse of energy, and the machine shuts down. Spartan Griffin's limp body falls into the Master Chief's arms.'' | ''There's a pulse of energy, and the machine shuts down. Spartan Griffin's limp body falls into the Master Chief's arms.'' | ||
*'''Spartan Griffin''': ''(weakly)'' "It's you. You're alive | *'''Spartan Griffin''': ''(weakly)'' "It's you. You're alive-" | ||
''The Chief sets him down. Griffin is barely clinging to life.'' | ''The Chief sets him down. Griffin is barely clinging to life.'' | ||
| Line 197: | Line 211: | ||
*'''John-117''': "Easy. You're safe now." | *'''John-117''': "Easy. You're safe now." | ||
*'''Spartan Griffin''': "The Banished, they... they have something they call the [[Conservatory (location)|Conservatory]]. That's all I know. I was picked up north of here. Dig site. I couldn't stop them... but you can. You have to." | *'''Spartan Griffin''': "The Banished, they... they have something they call the [[Conservatory (location)|Conservatory]]. That's all I know. I was picked up north of here. [[Site Novem|Dig site]]. I couldn't stop them... but you can. You have to." | ||
*'''John-117''': "Consider it done." | *'''John-117''': "Consider it done." | ||
| Line 209: | Line 223: | ||
*'''John-117''': "I'll find them." | *'''John-117''': "I'll find them." | ||
*'''[[Fernando Esparza|Pilot]] (COM)''': "Echo 216. All channels. Can you hear me? I repeat. Can you hear me?" | *'''[[Fernando Esparza|Pilot]] (COM)''': "''[[Echo 216]]''. All channels. Can you hear me? I repeat. Can you hear me?" | ||
''Disheartened by Griffin's death, John doesn't answer.'' | ''Disheartened by Griffin's death, John doesn't answer.'' | ||
| Line 215: | Line 229: | ||
*'''Weapon''': ''(quietly)'' "Chief?" | *'''Weapon''': ''(quietly)'' "Chief?" | ||
*'''Pilot (COM)''': "Big guy. Your motion tracker isn't moving. ''(frustrated groan)'' Come on. Come on! Give me anything." | *'''Pilot (COM)''': "Big guy. Your [[motion tracker]] isn't moving. ''(frustrated groan)'' Come on. Come on! Give me anything." | ||
''Scene shifts to focus on the Weapon.'' | ''Scene shifts to focus on the Weapon.'' | ||
| Line 221: | Line 235: | ||
*'''Weapon''': "Chief, I..." | *'''Weapon''': "Chief, I..." | ||
''She trails off, not certain | ''She trails off, not certain what to say.'' | ||
*'''Pilot (COM)''': "Respond! ''Please.'' Did you find the source of the signal? Whatever's down there either has to come with us or be left behind. Can you hear me?" | *'''Pilot (COM)''': "Respond! ''Please.'' Did you find the source of the signal? Whatever's down there either has to come with us or be left behind. Can you hear me?" | ||
| Line 235: | Line 249: | ||
''He retrieves the Weapon.'' | ''He retrieves the Weapon.'' | ||
''Level ends'' | ''Level ends.'' | ||
==Achievements== | ==Achievements== | ||
| Line 256: | Line 270: | ||
|Followed the UNSC signal to a Banished stronghold called the Tower. Found the source. Got out alive. | |Followed the UNSC signal to a Banished stronghold called the Tower. Found the source. Got out alive. | ||
|} | |} | ||
== | |||
{{ | ==Collectibles== | ||
*'''Audio Logs''' (2): [[Audio log (Halo Infinite)/Banished/Escharum/03|Escharum's Testimony 03 - Harbinger]], [[Audio log (Halo Infinite)/UNSC/Prisoner/02|Prisoner 02 - What Was Inside]] | |||
*'''Mjolnir armory lockers''' (1): [[Armor coatings (Halo Infinite)#Mark VII core|Midnight Griffin MKVII Armor Coating]] | |||
*'''Skulls''' (1): [[Halo Infinite skulls#IWHBYD (I Would Have Been Your Daddy)|IWHBYD]] | |||
*'''[[Spartan core]]s''' (2) | |||
==Notes== | |||
{{Ref/Notes}} | |||
==Gallery== | ==Gallery== | ||
===Concept art=== | ===Concept art=== | ||
| Line 266: | Line 288: | ||
===Screenshots=== | ===Screenshots=== | ||
<gallery> | <gallery> | ||
File:HINF-Chak.jpg|Chak 'Lok inside the Tower. | File:HINF Tower main entrance.png|Approaching the Tower's main entrance. | ||
File:HINF Tower side entrance.png|A side entrance. | |||
File:HINF Tower Security Building.png|The security building where the lockdown is controlled. | |||
File:HINF Tower Weapon lifts lockdown.png|The Weapon lifts the Tower's lockdown. | |||
File:HINF Tower Grav Lift.png|Entering the Tower's gravity lift. | |||
File:HINF Tower Spartan Armor.png|Investigating Spartan Griffin's empty armor. | |||
File:HINF Tower finding threat sensor.png|Picking up the Threat Sensor. | |||
File:HINF Tower interior.png|The Chief fights his way through the Tower. | |||
File:HINF Tower interior threat sensor.png|Using the Threat Sensor inside the Tower. | |||
File:HINF Banished Elite.png|Chak 'Lok welcomes John-117 to his tower. | |||
File:HINF Banished Elite 2.png|Chak 'Lok after welcoming John-117 to his tower. | |||
File:HINF-Chak.jpg|Chak 'Lok threatening John-117 after welcoming him to his tower. | |||
File:HINF Tower Chak Lok Threat Sensor.png|Using the Threat Sensor to find Chak 'Lok. | |||
File:HINF Chak Lok Fight.png|The Chief battles Chak 'Lok inside the Tower. | |||
File:HINF Chak Lok - making sure he's dead.png|The Chief makes sure Chak 'Lok is really dead. | |||
File:HINF HudsonGriffin Rescue.jpg|John-117 finds Spartan Hudson Griffin inside the Tower. | File:HINF HudsonGriffin Rescue.jpg|John-117 finds Spartan Hudson Griffin inside the Tower. | ||
File:HINF Tower Griffin Conservatory.png|A dying Spartan Griffin tells the Chief about the Conservatory. | |||
</gallery> | </gallery> | ||
==Sources== | ==Sources== | ||
{{Ref/List}} | {{Ref/List}} | ||
Latest revision as of 14:34, March 7, 2023
|
Prev: |
|
|
Next: |
|
| The Tower | |
|---|---|

| |
|
Game: |
|
|
Player: |
|
|
Date: |
|
|
Location: |
|
|
Objective(s): |
|
 |
Halopedia has a walkthrough guide for this level; see The Tower/Walkthrough. |
| “ | Investigate the UNSC distress signal. | ” |
The Tower is the fifth campaign main mission in Halo Infinite, under the second campaign section "Lockdown", and the second half of a multi-stage mission started in Recovery.
Overview[edit]
| “ | This well-fortified stronghold was once a central processing and interrogation site for UNSC prisoners captured by the Banished throughout the Ring. But since the fall of its warden Chak 'Lok, this hulking structure now lay silent.[Note 1] | ” |
John-117 tracked the UNSC signal to a Banished facility known as the Tower. Its warden, Chak 'Lok, denied the Spartan access into the Tower by putting the outpost on lockdown. With guidance from the Weapon, John-117 lifted the lockdown, and entered the Tower via the gravity lift at its base. Inside, John-117 discovered Spartan Hudson Griffin being restrained and tortured. Although Chak 'Lok intervened, he was killed in battle against John-117. Upon being freed, Griffin told John-117 of the Banished's search for the Conservatory at the excavation site north of the Tower, but passed away shortly.
Transcript[edit]
{Gameplay}
John-117 approaches the Tower.
- Weapon: "I guess Tower was a more than appropriate name. Look at that place. The signal's coming from within that main structure. Somewhere up top. We're going to need to find a way in."
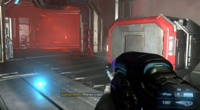
The Chief breaches the Tower's outer perimeter, either by going through the main gate, or entering a service corridor in the side of the facility.
- Jiralhanae 1: "Look, brothers! More meat for Chak 'Lok's machines!"
- Jiralhanae 2: "He's here for the asset! Send word to Chak 'Lok! He must not pass!"
- Jiralhanae 3: "You won't leave this Tower alive, human!"
The Chief engages the Banished in the Tower's courtyard. During the battle, he comes across a number of captive marines, whom he frees.
The Tower's gravity lift suddenly shuts down. A massive hologram of a Sangheili Warlord appears in its place.
- Chak 'Lok (hologram): "So, the Demon is here. Did you think I would let you walk right into my Tower? My Tower?! I think not. My facility is locked down. There is nothing you can do here... except die."
Hologram vanishes.
- John-117: "He seems confident."
- Weapon: "Yes he does, but fortunately it's misplaced. When the lockdown triggered there was a power spike in what I presume was a security building. I've marked it on the map."
If the Chief stalls:
- Weapon: "We need to deactivate the lockdown."
Or
- Weapon: "We're not getting into the Tower while the lockdown is still active."
The Chief approaches the security building.
- Weapon: "This is it. Let's find a way in."
Or
- Weapon: "This is where the lockdown was triggered."
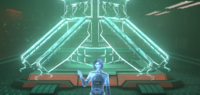
The Chief enters the security building and goes upstairs where he locates a terminal. He deploys the Weapon onto the terminal.
{Cutscene}
The Weapon studies a hologram of the Tower.
- Weapon: "The lockdown protocol should be simple to reverse. Let me see. Three, two, one..."
She snaps her fingers. The hologram of the Tower turns from red to green.
- Weapon: "Done." (suddenly concerned) "Oh."
- John-117: "What is it?"
- Weapon: "This... this place is an interrogation facility run by our Elite friend back there. Chak 'Lok. His reputation is... not good."
- John-117: "Neither is mine."
He retrieves the Weapon.
{Gameplay}
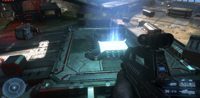
- Weapon: "You're going to need to manually activate the gravity lift. I've marked it on your map."
The Chief heads back outside to reactivate the gravity lift. Gydrozka Workshop Breaching Pods land in the courtyard, bringing enemy reinforcements.
- Weapon: "This location acts as a holding facility. Prisoners are captured, funneled through to Chak 'Lok and then on to somewhere they call the House of Reckoning. Which is... suitably ominous and Banished sounding."
If the Chief stalls:
- Weapon: "Remember. We can't get up there without activating the gravity lift."
Or
- Weapon: "Find a way to activate the gravity lift."
The Chief locates the controls for the gravity lift and reactivates it. Additional Banished reinforcements show up via drop pods and Banished Phantoms. The Chief and any marines he's freed (or brought with him) engage the attackers while the lift powers back up.
Once most of the reinforcements have been dealt with:
- Weapon: "Let's go. The gravity lift's powered up."
The Chief enters the gravity lift and arrives inside the Tower's main structure. He sees a pile of Spartan armor and other UNSC gear.
- Weapon: "Chief... more Spartan armor. And the source of the UNSC distress call. We're too late."
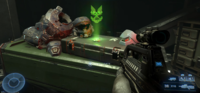
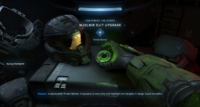
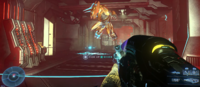
The Chief inspects the empty set of Spartan armor. He picks up a piece of equipment and examines it.
- Weapon: "A deployable Threat Sensor. It appears to lock onto and highlight any targets in range. Could be useful."
The Threat Sensor is integrated into the Chief's armor.
- Weapon: "This armor belonged to a Spartan named Hudson Griffin. Sensor logs suggest he was alive when the armor was removed. Forcibly. It's a longshot... but he might still be alive."
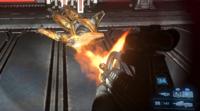
An alarm starts blaring. A previously locked door opens up, revealing a Jiralhanae Berserker and a pair of Unggoy. The Chief kills these enemies and heads through the door.
Chak 'Lok addresses the Chief over the loudspeaker.
- Chak 'Lok (loudspeaker): "You have overreached, Demon. This is not a place to come by choice. I await you. Eagerly."
- Weapon: "He's... about what you would expect. For an Elite. Who specializes in torture."
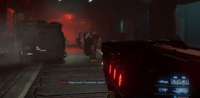
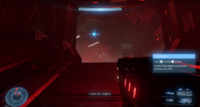
The Chief heads deeper into the Tower, killing any Banished troops in his path.
- Unggoy: "If we don't kill him, Chak 'Lok is DEFINITELY killing us!"
- Sangheili: "Do you seek our prize, Spartan? You will not reach it."
As the Chief continues his search for Spartan Griffin, Chak 'Lok addresses him over the loudspeaker again.
- Chak 'Lok (loudspeaker): "Escharum was correct. So easy. A signal. A lure. And the Master Chief comes running. I wish only that I would have time to enjoy you. Time to learn your secrets. Peel back your visage and expose your weakness."
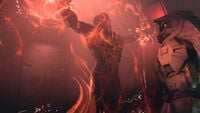
After fighting through more Banished troops, the Chief comes across an interrogation chamber containing a large machine at its center. Looking through the energy barrier, the Chief sees a human trapped inside the machine.
- Spartan Griffin: (groans in pain)
- Weapon: "Oh no. Spartan Griffin! He's still alive."
- John-117: "We need to get him out of there. Where's Chak 'Lok?"
- Weapon: "Unknown."
{Cutscene}
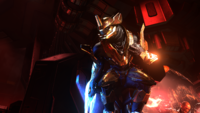
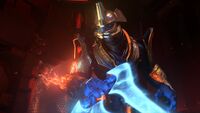
Master Chief's POV: He forces the doors to the interrogation chamber open and steps inside. Chak 'Lok, who has been standing atop one of the machine's jaw-like contraptions, decloaks, energy sword in hand.
- Chak 'Lok: "Welcome to my Tower, Master Chief."
He jumps down, spinning himself with a flourish.
- Chak 'Lok: "It is where you will be broken."
He jumps down again and brandishes his energy sword.
- Chak 'Lok: "It is where you will give up your secrets."
Chak 'Lok reengages his active camouflage.
{Gameplay}
- Spartan Griffin: (groans in pain)
- Chak 'Lok: "Ah, much better."
The walls surrounding the chamber raise themselves, allowing Chak 'Lok to move freely about.
- Weapon: "The walls retracted. Watch your back! He could come from anywhere!"
- Weapon: "Griffin's Threat Sensor can help you locate Chak 'Lok."
- Weapon: "Chak 'Lok's cloaked. Hard to see. Use the Threat Sensor."
- Weapon: "Use the Threat Sensor, Chief."
Chak 'Lok is a fast and cunning foe, who uses his active camouflage to get the drop on the Chief at every opportunity. However, the Chief uses Griffin's Threat Sensor to even the playing field. Eventually, the Master Chief prevails and kills Chak 'Lok.
- Weapon: "We need to get him out of that machine."
The Chief finds the terminal controlling the torture machine and deploys the Weapon.
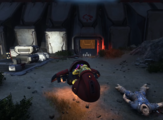
{Cutscene}
Spartan Griffin is trapped behind an energy barrier and suspended in midair by energy shackles around his arms and legs. He continues to groan in pain.
- John-117: "Shut this thing down."
- Weapon: "Working on it... Okay. Be ready - I'm going to cut him loose."
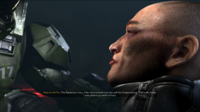
There's a pulse of energy, and the machine shuts down. Spartan Griffin's limp body falls into the Master Chief's arms.
- Spartan Griffin: (weakly) "It's you. You're alive-"
The Chief sets him down. Griffin is barely clinging to life.
- Spartan Griffin: "Chief. The Banished. I tried to stop them. I tried to..."
- John-117: "Easy. You're safe now."
- Spartan Griffin: "The Banished, they... they have something they call the Conservatory. That's all I know. I was picked up north of here. Dig site. I couldn't stop them... but you can. You have to."
- John-117: "Consider it done."
- Spartan Griffin: "That's good. Good. The others- The Spartans. Did you..."
Griffin succumbs to his injuries.
Focus in on the Master Chief.
- John-117: "I'll find them."
Disheartened by Griffin's death, John doesn't answer.
- Weapon: (quietly) "Chief?"
- Pilot (COM): "Big guy. Your motion tracker isn't moving. (frustrated groan) Come on. Come on! Give me anything."
Scene shifts to focus on the Weapon.
- Weapon: "Chief, I..."
She trails off, not certain what to say.
- Pilot (COM): "Respond! Please. Did you find the source of the signal? Whatever's down there either has to come with us or be left behind. Can you hear me?"
Scene rotates around so that both the Weapon and the Chief are in the shot.
- Weapon: "A dig site on the Ring? This Conservatory must be some sort of Forerunner installation. What do you suppose they're after?"
John finally looks up.
- John-117: "It's time to go."
He retrieves the Weapon.
Level ends.
Achievements[edit]
The following achievements can be unlocked on The Tower across the all editions of Halo Infinite.
| Xbox | Steam | Title | Unlock requirement |
|---|---|---|---|

|

|
Visionary | Unlocked the Threat Sensor ability. |

|

|
Fallen | Followed the UNSC signal to a Banished stronghold called the Tower. Found the source. Got out alive. |
Collectibles[edit]
- Audio Logs (2): Escharum's Testimony 03 - Harbinger, Prisoner 02 - What Was Inside
- Mjolnir armory lockers (1): Midnight Griffin MKVII Armor Coating
- Skulls (1): IWHBYD
- Spartan cores (2)
Notes[edit]
Gallery[edit]
Concept art[edit]
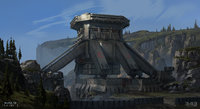
Concept art of the Tower.
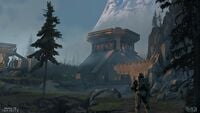
Concept art of John-117 approaching the Tower.


Screenshots[edit]
Approaching the Tower's main entrance.
A side entrance.
The security building where the lockdown is controlled.
The Weapon lifts the Tower's lockdown.
Entering the Tower's gravity lift.
Investigating Spartan Griffin's empty armor.
Picking up the Threat Sensor.
The Chief fights his way through the Tower.
Using the Threat Sensor inside the Tower.

Chak 'Lok welcomes John-117 to his tower.
Chak 'Lok after welcoming John-117 to his tower.
Chak 'Lok threatening John-117 after welcoming him to his tower.
Using the Threat Sensor to find Chak 'Lok.
The Chief battles Chak 'Lok inside the Tower.
The Chief makes sure Chak 'Lok is really dead.
John-117 finds Spartan Hudson Griffin inside the Tower.
A dying Spartan Griffin tells the Chief about the Conservatory.


Sources[edit]


