Diorama
From Halopedia, the Halo wiki
| This article does not meet the wiki's general standards and/or standards on layouts. You can help by cleaning this article. |


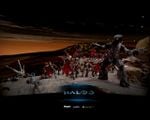
Diorama is an interactive flash movie, a part of the Believe ad campaign for Halo 3. It is a fly-through of the John-117 Monument representing the Human-Covenant War and John-117's sacrifice for humanity.
Summary
| “ | Years after the great war, an immense monument was built, remembering those who fought for our survival, and paying tribute to the hero who led us from the brink. | ” |
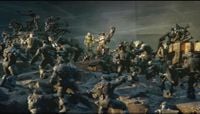
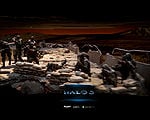
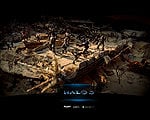
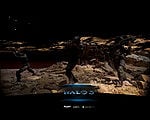
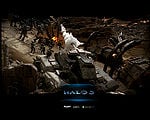
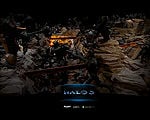
The flash player loads a video of a camera that flies through the diorama (supposedly based on the Battle of Mombasa). The scene is very dark, and very dirty. Marines are seen, dead and alive, trying to fight the many Brutes that fill the streets. As the camera continues along its path, it goes down a hill, showing more ruined buildings, Jackals, a Warthog, and a Scorpion. This location seems to be the only strong point for the Marines. The camera goes up a hill, where a lone group of Marines are in a Warthog, fighting off the many surrounding Brutes. It then pans over a broken bridge, where a Spec Op Grunt is grouped with many Brutes, over to the top of a high structure. A few Marines use it as a vantage point, to snipe off Covenant forces.
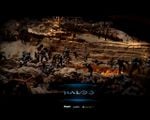
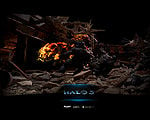
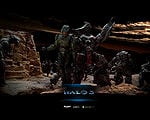
The next view is of the "Hill", a Covenant-controlled landmark. There is a large trench next to it, where Marines take a stand against them. A Brute Chieftain, a Hunter, and others battle the few surviving Marines. The camera circles around the hill, where it shows the captured Master Chief, holding a Plasma Grenade. Once the camera reaches a certain point, an animation of the Chief looking up slowly is shown. The bridge, a large choke point, is shown again from a higher view; it was destroyed by the UNSC in order to stop the flow of Covenant. The camera flies by a ruined building where a group of Marines are gathered, and then it returns to the beginning. A viewer may fly through the diorama again from this point.
Features
- An interactive viewing of a fly-through of the New Mombasa diorama, which can be controlled by a keyboard or mouse, forwards or backwards, and can be auto-played.
- 360-degree views of key locations, showing everything happening around those points.
- First-person accounts and profiles of many people on the battlefield; accounts of veteran Marines, notes on KIA Marines, Covenant profiles, and vehicle descriptions. Profiles give a 360-degree view of the selected character.
- The ability to take 1280x1024 screenshots of any moment in the diorama, including the 360-degree views, as well as downloading wallpapers of the character profile views.
- All videos of the Believe campaign can be watched while in the viewer.
Clickable entities
Enemy Combatant
H-133-185 (Mgalekgolo)

EC#: H-133-185
SPECIES: HUNTERS (Lekgolo)
Due to the nature and complex biology of Hunters, very little is known about this particular specimen. On the whole, Hunters are considered extremely dangerous, and their ferociousness on the New Mombasa battlefield was no exception.
J-011-422 (Kig-Yar)

EC#: J-011-422
SPECIES: JACKALS (Kig-Yar)
J-011-422 is unique among Sniper Jackals in that he was found carrying an energy shield and needler. Normally, a Jackal of this rank would abandon their shield to better handle their beam rifle, the Covenant long range sniper weapon.
B-021-331 (Jiralhanae)

EC#: B-021-331
SPECIES: BRUTES (Jiralhanae)
B-021-331 was found dead along the southern bridge span. Although his armor was relatively new, other evidence proved that the Brute was a veteran of many battles. His massive torso contained bullet scars, the blades on his spiker were dull, and one of the four digits on his left hand was missing.
While Brute Minors only recently began wearing heavy armor, its protection did little to save this alien from the sniper fire that killed him.
G-020-055 (Unggoy)

EC#: G-020-055
SPECIES: GRUNTS (Unggoy)
Grunts, often considered ineffective on their own, are the basic unit of the Covenant infantry. G-020-055 is a rarity among his species in that he held a special operations designation. Grunts holding this title and wearing the tell-tale black armor are only called in for special combat situations. His presence on this battle field shows the severity and importance that the Covenant leadership was placing on this particular engagement.
B-010-233 (Jiralhanae)

EC#: B-010-233
SPECIES: BRUTES (Jiralhanae)
Very little is known about B-010-233. His red headdress and gravity hammer signify a high rank in Brute wartime society, although his prowess as a soldier is debated. B-010-233 was killed by SMG fire soon after reaching the peak of this ravine. There are no UNSC killed or wounded attributed to his actions.
B-113-421 (Jiralhanae)

EC#: B-113-421
SPECIES: BRUTES (Jiralhanae)
B-113-421, notable for his loud animalistic battle cries, is credited with over a dozen UNSC kills. Reports claim that marines would shake with fear when his guttural voice echoed through the valley. The Brute minor was last seen along the top of the New Mombasa ridge just moments after Master Chief's capture.
B-054-846 (Jiralhanae)

EC#: B-054-846
SPECIES: BRUTES (Jiralhanae)
B-054-846 reportedly killed 23 marines before being neutralized by Lance Corporal T. B. Williams scoring a long-range sniper kill. ONI is currently cross-referencing this Brute Chieftain's identifiers against those recorded in previous Brute encounters.
First Person Accounts
Ian Callahan

SERVICE NUMBER: 10056-00254-IC
"The fighting was real heavy in the corridor. I'd taken a plasma shot straight to the hip to put me down. After laying in the street for God knows how long, someone finally grabbed me and started pulling me to safety. I remember yelling "thank you" over and over to whoever was tugging me out of harm's way. But then... something just didn't feel right.
When I looked to my left I didn't see the standard issue boots of a marine. It was some grotesquely shaped foot. That's when I started screaming.
Turns out two Jackals had me. I tried to resist but after a swift kick to my wounded leg, I was in too much pain to fight back. They searched through all my equipment, checking my radio for power. No dice. Without a working radio or weapon I was of little use to them. One of them pulled out his plasma pistol and aimed it right in my face. I closed my eyes and thought of home. That's when I heard two blasts from an M90. I opened my eyes and saw what was left of my captors in crumpled heaps. I never saw the marine that fired those shots. I hope he knows how grateful I am."
Thomas P. Porter

SERVICE NUMBER: 19190-54121-TP
"Riding in a Scorpion Tank is literally like being in the middle of an explosion. All around you are the sounds of small-arms fire being deflected off your armor, and the head-bashing boom of the 90mm gun. All that combined with the constant grind of the tread leaves little room for anything else to penetrate your ears. It's the sound of war. I know, I listened to it for much too long."
Jackson Law

SERVICE NUMBER: 10082—00055-JL
“We were patrolling the southern ridge in a standard Delta formation; three men to a Warthog, three hogs to a patrol. Just before the plasma round obliterated the ground in front of us, I heard our gunner yell out a warning. The next thing I knew, the hog was flipping end over end.
I awoke hours later, covered in dirt, about 40 feet from my smoldering vehicle. No one else in my patrol survived the attack. I walked away with 4 cracked ribs and a broken arm.”
Sian Wong

SERVICE NUMBER: 64040-11144-SW
“The bridge turned out to be one hell of a crow's nest. Almost everything that stood above us had been blown to high heaven, and from my position I could pick off Covenant troops up to 1000 yards away. I must have logged around 20 kills the first few hours alone.
Eventually the Covenant sent a couple of Banshees to take us out and regain the high ground. As we ran for cover, they peppered us with automatic plasma fire. I still have the burn marks up and down my right side to prove it.”
Russel Tinnier

SERVICE NUMBER: 10032-00154-RT
"The trenches were supposed to be a last line of defense worst-case scenario sort of thing. We're Marines, we prepare for everything. No one thought they'd work against us. And we certainly didn't think they'd become the grave for so many of our own people.
"After the bridge was blown they came up the cliff in droves. My platoon was ordered to intercept, but we were out-manned and out-gunned. The bravo kilos quickly saw they could force us back into a trench and trap us like rats. That's when I saw the glow of the plasma grenades. It was all I could do to scramble up that wall. No one else even had the chance. I watched a lot of brave men die that day."
Thomas C. Meyer

SERVICE NUMBER: 10072-00026-TM
"It took everything to stand on that bridge and keep shooting across its expanse. I was working with a rocket launcher and the 15 rockets I fired barely made a dent in the enemy onslaught. It quickly became apparent that the only way to slow down the Covenant offense was to blow the bridge in two. We hoped it would force their troops into the valley where we could pick them off from our elevated position.
At around 1400 hours the orders came through and BOOM, down it went. We all cheered like hell at the destruction, that is until the dust settled and we were able to see that the Covenant was already pushing a wave through the valley. They didn't even give a second look to their forces who died on that bridge, they just kept rushing forward."
Emmanuel Lomax

SERVICE NUMBER: 66200-16524-EL
"I spent the night in a destroyed building, sleeping under the collapsed concrete of the eastern wall. My team was allotted a 4-hour sleep shift but when our COM units started squawking, it felt more like we had just lain down. I was still in the haze of waking up when Master Chief stepped into the rubble.
Within two minutes every soldier in my squad was locked and loaded, ready to charge into battle behind him. We all felt stronger when he was around, like we were on the brink of winning back our world."
Field CSV
Corporal James Dessen

SERVICE NUMBER: 00578-48433-JD
Corporal James Dessen was killed in action along the northern ridge of the Battle for New Mombasa. Due to the field reports of the 77th Marine Regiment concerning the bravery of the corporal's actions under fire, he was posthumously awarded the UNSC Legion of Honor.
Sergeant Thomas Chang

SERVICE NUMBER: 01866-10032-TC
A veteran of multiple engagements including the Battle of Installation 04, Sgt. Chang joined the New Mombasa clash fifteen hours after the mission began. As a part of second UNSC infantry wave, the Sergeant was tasked with securing a forward HQ, as well as capturing Covenant prisoners for ONI interrogation.
Immediately following the initial battle, Sergeant Chang was given a field promotion and ordered to the western shore of the Mombasa Quays. It was here, while on routine patrol, that Sgt. Chang was killed by Covenant air assault.
John-117

NAME: Classified
SERVICE NUMBER: S-117
A tenacious, driven soldier known primarily by his rank, the Master Chief is the last of the Spartan II warriors - an elite group of genetically superior, highly trained super-soldiers.
Though much of his wartime record is still classified, it is known that Spartan-117 participated in over 200 battles, neutralized thousands of Covenant targets, and was awarded every UNSC decoration except the Prisoner of War Medallion.
Private Caio Zanato

SERVICE NUMBER: 18221-50020-CZ
The Battle for New Mombasa was Private Zanato's first engagement with the Covenant. An extremely capable soldier and recipient of the Basic Training Honor Graduate Ribbon, the Private was promoted to the rank of Private First Class within his first week of active duty. When asked about his hasty advancement the Private replied, "I got the job because I was the only one in my squad still alive."
Descriptor
PanoramaA
It was here that the first shots of the Battle for New Mombasa were fired. In this tangle of destroyed buildings and wide streets, Covenant and UNSC forces would trade control of the outer landing area in a never ending back and forth of aggression.
PanoramaB
It was at this point that the 506th tank regiment, tasked with securing a road to the southern bridge span, engaged enemy forces. Greatly outnumbered, the 506th plowed forward and succeeded in clearing a path for the second wave of UNSC infantry to follow.
PanoramaC
Home to the most ferocious and bloody bottleneck in the New Mombasa battlefield, “The Hill” became notorious for its difficulty to defend. Two thirds of all the squads sent to secure the rise would eventually fall under the constant push of the Covenant war machine.
PanoramaD
It was here that Master Chief Petty Officer Spartan-117 turned the tide in the Battle for New Mombasa. By allowing his own capture, the Master Chief set in motion events that sealed his title as Earth's greatest hero.[1]
Vehicle
VEHICLE: BANSHEE
BANSHEE - COVENANT
GROUND SUPPORT AIRCRAFT
PROPULSION: Boosted gravity propulsion drive
ARMAMENT: Twin plasma cannons and a plasma mortar weapon
CREW: 1
LENGTH: 5.5 meters
MASS: 2.25 tons
VEHICLE: SCORPION
M808B SCORPION MBT - UNSC
MAIN BATTLE TANK
PROPULSION: Hybrid internal combustion engine
ARMAMENT: 90mm High Velocity Gun / 12.7mm machine gun
CREW: 1 driver, 1 gunner
LENGTH: 10 meters
MASS: 66 tons
Videos
- Museum
- Enemy Weapon
- Hunted
- Diorama
- Gravesite
Production notes
Credits
- Executive Creative Director: Rei Inamoto
- Creative Director: John Jakubowski
- Associate Creative Director: Thiago Zanato Tripodi
- Creative Lead: Hoj Jomehri
- Art Director: Kevin Hsieh
- Copywriters: Joel Kaplan/ Keith Hostert
- Creative Developer: Jason Gatt
- Title Sequence: Caio Lazzuri
- Senior Designer: Alex Lyman
- Motion Designer: Matt Law
- Associate Motion Designer: Rian Devos
- Producer: Nancy Cardillo/ Larry Ewing
- Senior Technical Project Manager: Kirk Kepley
- Group Account Director: Simon Jefferson
- Account Director: Erica Power
- Senior Account Executive: Nicole Biondi
- Diorama: New Deal Studios (Director – Matt Gratzner)
- Figurines: Stan Winston Studio
- Sound Design: Richard Devine
Production information
During the sites production there was a few versions made.
Trivia
- When you reach the Master Chief, and go into 180 mode, if you go turn the camera right and look carefully, you'll find a Grunt with no mask strangling a Marine.
- The music played in the background is measures 25-43, 60-64 of Frederic Chopin's Prelude, Op. 28 No. 15, nicknamed the "Raindrop Prelude"
- When you reach a bridge (right after the tank if you chose to go to the right), slowly move the camera and look at the Brute holding a human. At one frame, an exclamation mark will appear in the gap between the brute's arm and its head.
- Sergeant Thomas Chang may be a reference to the character seen in the original Halo E3 video, when the Master Chief first made his debut. Though the video clearly showed the character being killed, because it is not considered "canon", it is possible that Chang was retconned into surviving.
- Oddly, there is an Armor-class Chieftain (usually holding plasma cannons as such) wielding a Gravity Hammer.
- A majority of Brute Chieftains with Gravity Hammers have older models similar to the Fist of Rukt, with only a few wielding the updated version.
- Due to unknown reasons, all of the lower-ranked brutes seen throughout the diorama are wearing Brute Stalker attire. This is probably to increase drama due to the amount of intimidation inflicted by the appearance of the Stalker uniform/armor.
- If you look closely between the ending section of The Storm and the beginning to the end of the diorama, you can note that the scenery is almost the same in both buildings and terrain. Damaged buildings and rubble make the similarity harder to spot.
- In the diorama, a segment of the Mombasa Tether appears to have fallen in the landscape. Strangely, perhaps due to size constrictions, the segments are incredibly small compared to their in-game counterparts seen both in Halo 3 and Halo 3: ODST.
- As of 2011, the interactive diorama website is no longer active. [citation needed]
- After filming was completed, the monument was broken up and its parts distributed to various owners. Pieces of the monument are at Microsoft's campus buildings in Redmond. The central portion with Master Chief, the Brute Chieftain, and many surrounding Brutes is kept at Bungie's studio in Bellevue.[2] 343 Industries received their own segment of the diorama as well. At Halo Fest 2011, three chunks of the diorama were put on display (a portion with a Scorpion tank and fighting armies, a section with Hunters and Marines fighting around building fragments, and Bungie's central piece). A few other sections and pieces of the monument were auctioned off and sold in 2015 and 2016 at El Segundo, California. When 343 Industries moved out from Kirkland in 2016, they were unable to take their diorama piece into their new building, as it was not glued together and could not be safely transported. When Joseph Staten learned of this during a tour for the Halo 15th Anniversary Twitch livestream, he jokingly proposed that they carry out an elaborate raid to go retrieve the piece back.[3]
Gallery
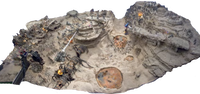
The full diorama.
A Brute Chieftain holding Spartan-117.
Diorama 0229
Diorama 0672
Diorama 0749
Diorama 1220
Diorama 1352
Panorama A 001
Panorama A 096
Panorama B 006
Panorama C 001
Panorama D 001
Panorama D 044


Sources
See also
| ||||||||||||||||||||


