Jared Miller
From Halopedia, the Halo wiki
| Jared Miller | |
|---|---|

| |
| Personal details | |
|
Species: |
|
|
Gender: |
Male |
|
Hair color: |
Brown |
|
Eye color: |
Brown |
| Political and military information | |
|
Affiliation: |
|
|
Rank: |
|
- "Miller, your attention to detail is one of the few things I truly like about you. Never stop."
- — Commander Palmer sarcastically commenting on Miller's tendency to state the obvious.[1]
Jared Miller is a SPARTAN-IV supersoldier. During the Requiem Campaign in February 2558, he served as part of the Spartan contingent aboard the UNSC Infinity. He is assigned as Fireteam Crimson's mission handler, acting as an intermediary with Commander Sarah Palmer and liaising with fellow information specialist Robert Dalton.[2]
Biography
Requiem Campaign
- Main article: Requiem Campaign
First missions

In February 2558, Jared Miller was aboard the UNSC Infinity when it returned to Requiem to establish research facilities on the Forerunner construct, and eliminate any opposition from the occupying Promethean and Covenant forces. Miller served as the mission handler for Fireteams Castle, Majestic, Domino, and Ivy.[3] In an attempt to stop the Covenant from establishing permanent bases throughout Requiem, Miller assigned Crimson to assist UNSC Marines in neutralizing Covenant forces in the area and to capture a Covenant-held power station.[4] Later, while Crimson was exploring a Forerunner complex, Miller discovered Covenant anti-air batteries operating within the vicinity and redirected Fireteam Castle to take them out. Castle succeeded and Crimson retrieved a mysterious Forerunner artifact from the complex.[5]
After receiving a science team's distress call, Miller sent Crimson to aid the scientists. Crimson fought their way through Covenant forces and rescued the scientists.[6] After the scientists returned to the Infinity, Miller sent Crimson to aid Marine squad Hacksaw.[7] En route to the Refuge, Crimson was shot down in Sniper Alley by nearby anti-air turrets and were thought to have died. Miller learned that Fireteam Crimson was still alive and they were sent to take out the turrets.[1] When Science Team Gagarin disappeared, Miller sent Crimson to search for them. When the Fireteam was unable to locate the scientists, Miller believed that what had happened to Dr. Henry Glassman earlier also happened to Gagarin.[8]
Later, Spartan Sarah Palmer ordered Crimson to assassinate Jul 'Mdama's associate, Parg Vol. Miller spotted Vol, but after facing heavy Covenant resistance, they were unable to kill Vol and he escaped.[9] After Vol escaped, Miller sent Crimson to protect Galileo Base and to rescue Mountain Squad. Unfortunately, the squad was overwhelmed by Covenant forces and killed.[10][11] In an attempt to kill Crimson, the Covenant sent a large amount of forces to the Spartan's location. With the help of Palmer's and Miller's assessments, Crimson survived the attack.[12] Vol was once again located, this time retaking "the Gate" with his Covenant forces. Crimson neutralized him and several Covenant and Promethean warriors.[13]
After Vol's death, Miller sent Crimson to activate a set of switches to allow the Infinity scientists to access the Covenant's communications network.[14] After Miller sent Crimson to Two Giants to attack Covenant forces, he learned that Jul 'Mdama was nearby. However, when the Spartans arrived at the location, they only found Promethean forces. Infinity's Spartans began to hypothesize that the Covenant forces were teleporting throughout Requiem. After Crimson followed a group of Covenant forces to a slipspace portal, Palmer ordered Crimson to enter to follow 'Mdama.[15] After regaining contact with Miller, Crimson was sent through the exact portal that 'Mdama entered.[16] However, 'Mdama managed to escape through a portal, leaving behind an artifact known as the "Didact's Gift".[17] Eventually, Crimson and Fireteam Majestic retrieved the artifact and brought it to the Infinity.[18]
Further operations
Fireteam Crimson was sent back to the Gate to investigate power fluctuations, but Palmer was unreachable, forcing Spartan Miller to take charge of the op. After being attacked by Prometheans, Miller sent Crimson through a portal to Dr. Leslie Boyd's location at the Refuge.[19] After exiting the portal, Crimson defended Boyd's scientist team from Promethean forces. Once they had eliminated all hostiles, Crimson destroyed the device that was creating the slipspace portals. Miller ordered the Spartans to stay in the location as it was being locked down.[20] However, the facility was attacked by Covenant forces. Miller ordered Fireteam Shadow to infiltrate and destroy a nearby cruiser. After the cruiser was destroyed and Crimson cleared out the Refuge again, Spartan Robert Dalton contacted Miller asking for reinforcements at Magma Base. Miller sent the closest fireteam, Crimson.[21] After clearing out the base of Covenant forces, Roland contacted Miller and informed him that Spartan Gabriel Thorne's, who recently disappeared, IFF transmitter was found.[22] Upon arriving at the transmitter's location, Crimson was overwhelmed by Covenant forces and Miller realized too late that it was a trap.[23]
Crimson was taken captive by the Covenant, but Miller and Dalton located the fireteam and distracted the Covenant guards long enough for the Spartans to escape. While escaping, Crimson encountered Icebreaker squad, and rescued them at Miller's request.[24] Escaping with Icebreaker in a Ru'swum-pattern Phantom, Crimson landed with the rest of the Covenant forces in a secure location and Miller ordered Crimson to hack into the Covenant's communications.[25] This led them to a central intel facility based in the Warrens. Crimson attacked the facility and Miller gained access to a Covenant computer, which revealed the locations of a Covenant archaeological dig and a plasma supply depot.[26] Crimson was sent to destroy the supply depot, while Fireteam Switchback was sent to stop the dig. Crimson successfully infiltrated the supply depot and destroyed the plasma stockpiles. However, they also discovered that the Covenant had stolen a large amount of UNSC weaponry - including nuclear weapons. The warheads themselves could not be found. They then received a distress call from Switchback, who were at the dig site.[27] Crimson headed over to the dig site to help Switchback, but discovered no trace of the team except for their IFF tags. On Commander Palmer's orders, Crimson attacked and disabled the Harvester the Covenant were using in their dig.[28]
While Crimson was in the middle of an op, Miller ordered them to abort it immediately and to return to the Infinity which has been boarded.[29] Once aboard the Infinity, Miller had Crimson and Fireteam Lancer eliminate Promethean and Covenant forces and disable the stolen UNSC warheads the Covenant had placed on the ship.[30] After securing the Infinity's engine rooms, Miller ordered Crimson to destroy Covenant jamming systems to reactive the ship's defense systems.[31] After Crimson eliminated the remaining hostiles aboard the Infinity, Miller congratulated the Spartans.[32]
Some time afterward, Crimson returned to the Apex to destroy recently set up Forerunner portals being used by the Covenant. After Crimson destroyed the portals, Miller picked up an SOS in Morse code on the Covenant comm network. While Lancer guarded the Apex, Crimson left to aid Majestic.[33] While Fireteams Crimson and Kodiak reinforced Majestic at "Cyclone", Miller noticed that the Covenant seemed to be able to predict the Spartans' every move. After eliminating hostiles, Crimson left to regroup with Lancer to attack a recently-discovered Covenant base.[34] While the two fireteams were attacking the base, Miller picked up the mysterious SOS signal again, originating from a nearby cave. Lancer and Crimson made their way into the cave and discovered Fireteam Switchback. Shortly after, the Spartans were evacuated.[35] Later, the recently rescued Dr. Glassman had Miller order Crimson to head to certain locations to ensure that the map taken off of Gek 'Lhar was accurate. After finding a stockpile of Promethean heavy weapons, Miller had Crimson evacuated.[36]
Halsey and escaping Requiem
After she was captured by Covenant and Promethean forces, Miller had Crimson attempt to look for Dr. Catherine Halsey. Miller and Roland tracked Halsey's transmissions and sent Crimson to the locations where the transmissions were being relayed to.[37][38] While searching for Halsey, Miller sent Crimson back to "Lockup". Crimson was ambushed by Covenant forces and Miller told the fireteam to prepare for additional Covenant reinforcements.[39] While holding off Covenant forces, Roland detected Hawk Squad's IFF tags. Crimson arrived at its location and defeated more Covenant forces. Miller learned that the Sangheili had attempted to get the Marines to activate a Forerunner map.[40]
When Jul 'Mdama sent Requiem on a crash course towards its sun, Crimson and Majestic were to deactivate the Forerunner devices that were keeping the Infinity in place over the planet. As Crimson arrived at their artifact, it is discovered that it is in fact the same artifact that the Covenant were searching for earlier. Miller ordered Crimson to use the Harvester to dig out the artifact. Unfortunately, the Harvester lacked power, due to Crimson disabling it earlier. Roland informed Crimson of a power source back at the Apex.[41][42] Much to Miller's anger, Roland did not reveal the specifics of his plan to lure a Covenant Lich to the area and steal its power source until when the Lich arrived and engaged the Spartans. Crimson boarded the Lich and stole the power core inside.[43] Eventually, Crimson returned to the Harvester with the Lich power core. After creating an opening to a cavern with the Harvester, Miller directed the Spartans to a chamber where the artifact was located. Crimson deactivated the artifact, and Majestic deactivated theirs shortly after. Crimson and Majestic made it back to the Infinity just in time to escape Requiem's destruction.[44]
Post-Requiem
In March 2558, when an operation to rescue the freighter Pilgrims' Pride was revealed to be an ambush, Miller helped coordinate the deployment of Fireteams Majestic, Colossus, and Fenrir. After the threats were neutralized and Pilgrims Pride was destroyed, Miller contacted Gabriel Thorne who requested the evacuation of all the Spartans.[45] Later, while Commander Sarah Palmer led Fireteam Majestic to help recover the UNSC Spirit of Fire near Oth Lodon, Miller gave support from the UNSC Infinity. However, when the group entered an asteroid field in the planet's system, Palmer shut off connections to Miller, believing him to be annoying. Upon encountering a hidden Covenant space station, Palmer restored communications to Miller, only to order him to patch her through to Lord Hood immediately.[46]
Personality and traits
Miller approaches his task in a professional, no-nonsense manner and has an aversion for deviations from well-established and dependable practices. By virtue of his post, he is rather talkative when directing operations, and has a penchant for stating details to an exhaustive degree. He enjoys some friendly rivalry with Infinity shipboard AI, Roland, who occasionally joins him to provide intel and technical assistance during missions. Miller is frequently mocked by Commander Palmer due to his chatter and by-the-book approach to his job; while usually dismissive of Palmer's remarks, Miller showed concern about the Spartan commander's negligence of her duties when she vanished without warning amidst the operations on Requiem. Similarly, he quickly grew worried when Palmer disabled her and Fireteam Majestic's communications out of her dislike of Miller during the infiltration on Oth Lodon.
Equipment
Miller wears the Recruit variant of MJOLNIR GEN2 armor.
Production notes
- Miller is voiced by Ben Diskin. Originally, Miller would be a grisly, battle-scarred soldier but in the end it did not match the casting 343 Industries had made.[47]
- Miller was at one point considered (most likely unseriously) for inclusion on Fireteam Osiris in Halo 5: Guardians.[48]
Gallery
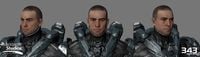
A render of Miller's face.
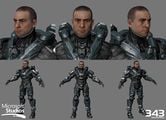
An older 3D model of Miller. Note the scars.
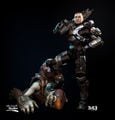
A render of Miller posing on an Unggoy corpse.

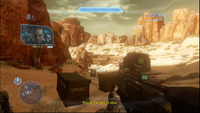
Miller notifying Fireteam Crimson of a nearby SPARTAN-IV in need of assistance.
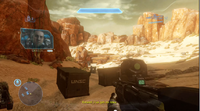
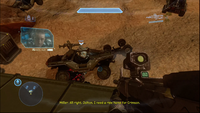
Miller communicating with Fireteam Crimson during an attempt to locate and rescue Gabriel Thorne.


List of appearances
- Halo 4
- Spartan Ops (First appearance)
- Halo: Escalation
- Halo: Official Spartan Field Manual (Mentioned only)
- Halo: Vertical Umbrage
Sources
- ^ a b Halo 4 - Spartan Ops, episode Artifact, level Pelican Down
- ^ YouTube - Halo 4: Spartan Ops Gameplay
- ^ Halo 4 - Spartan Ops, episode Departure
- ^ Halo 4 - Spartan Ops, episode Departure, level Sniper Alley
- ^ Halo 4 - Spartan Ops, episode Departure, level Core
- ^ Halo 4 - Spartan Ops, episode Artifact, level For Science
- ^ Halo 4 - Spartan Ops, episode Artifact, level Hacksaw
- ^ Halo 4 - Spartan Ops, episode Artifact, level Gagarin
- ^ Halo 4 - Spartan Ops, episode Catherine, level The VIP
- ^ Halo 4 - Spartan Ops, episode Catherine, level Galileo
- ^ Halo 4 - Spartan Ops, episode Catherine, level Spartan Mountain
- ^ Halo 4 - Spartan Ops, episode Catherine, level Shootout in Valhalla
- ^ Halo 4 - Spartan Ops, episode Catherine, level Hunting Trip
- ^ Halo 4 - Spartan Ops, episode Didact's Hand, level Hairy Call
- ^ Halo 4 - Spartan Ops, episode Didact's Hand, level Rally Point
- ^ Halo 4 - Spartan Ops, episode Didact's Hand, level Random Transport
- ^ Halo 4 - Spartan Ops, episode Didact's Hand, level The Chase
- ^ Halo 4 - Spartan Ops, episode Didact's Hand, level The Didact's Gift
- ^ Halo 4 - Spartan Ops, episode Memento Mori, level Spartan Miller
- ^ Halo 4 - Spartan Ops, episode Memento Mori, level Nothing Can Go Wrong
- ^ Halo 4 - Spartan Ops, episode Memento Mori, level Everything Has Gone Wrong
- ^ Halo 4 - Spartan Ops, episode Memento Mori, level The Cauldron Base
- ^ Halo 4 - Spartan Ops, episode Memento Mori, level Spartan Thorne
- ^ Halo 4 - Spartan Ops, episode Scattered, level Escape Plan
- ^ Halo 4 - Spartan Ops, episode Scattered, level All The Secrets
- ^ Halo 4 - Spartan Ops, episode Scattered, level Need To Know
- ^ Halo 4 - Spartan Ops, episode Scattered, level Search and Destroy
- ^ Halo 4 - Spartan Ops, episode Scattered, level Switchback
- ^ Halo 4 - Spartan Ops, episode Invasion, level Backup
- ^ Halo 4 - Spartan Ops, episode Invasion, level Engine of Destruction
- ^ Halo 4 - Spartan Ops, episode Invasion, level The Guns of Infinity
- ^ Halo 4 - Spartan Ops, episode Invasion, level Victory Lap
- ^ Halo 4 - Spartan Ops, episode Expendable, level Unfinished Business
- ^ Halo 4 - Spartan Ops, episode Expendable, level Majestic Rescue
- ^ Halo 4 - Spartan Ops, episode Expendable, level Lancer
- ^ Halo 4 - Spartan Ops, episode Expendable, level Glassman
- ^ Halo 4 - Spartan Ops, episode Key, level The Search for Halsey
- ^ Halo 4 - Spartan Ops, episode Key, level Clean Up
- ^ Halo 4 - Spartan Ops, episode Key, level Revenge
- ^ Halo 4 - Spartan Ops, episode Key, level The Hammer
- ^ Halo 4 - Spartan Ops, episode Exodus, level Artifact
- ^ Halo 4 - Spartan Ops, episode Exodus, level In One Way
- ^ Halo 4 - Spartan Ops, episode Exodus, level Seize the Power
- ^ Halo 4 - Spartan Ops, episode Exodus, level One Last Time
- ^ Halo: Escalation, issue 4
- ^ Halo: Escalation, issue 5
- ^ Tumblr, Kyle Hefley - Spartan Miller: "Spartan Miller was seen exclusively in Spartan Ops, doling out mission information in communications. Originally we pushed for him to be a grisly, battle scarred soldier but in the end it didn’t match the casting they had made. Miller wasn’t based on a scan of an actor and instead was one of the few heads that I got to art exclusively on Halo 4." (Retrieved on Apr 13, 2026) [archive]
- ^ ', page 161: "For the better part of an afternoon about three years ago, we discussed putting him on Fireteam Osiris. I don't think we were ever serious about it, but there was a stretch of a few days in story development where everybody was considered for Osiris at one point or another." - Brian Reed


