Halo 2 skulls
From Halopedia, the Halo wiki

Skulls are gameplay modifiers included in the Halo 2 campaign to modify gameplay experience or difficulty. Bungie first introduced skulls to the Halo series in Halo 2, and they have been included in every game since.
Skulls are collected by picking them up, as the player would a weapon, though there is no information text to wield a skull. Skulls' effects are only found in the game's campaign.
In the original Xbox game, once a skull is collected it is immediately activated (with the exception of IWHBYD); this activation is denoted by a white flash and a loud "whoosh" sound. The skull's effects then last until the console is restarted. The same is true of Halo 2 for Windows Vista, though the effects last until the game is restarted. In order to reactivate the skull, the player must find and collect the skull again.
In Halo: The Master Chief Collection the skulls are present, however they are not activated when they are collected (though the flash and "whoosh" are still present). Instead, skulls must be selected from the pre-game menu before beginning the level. The skulls are unlocked by default (along with a number of new skulls) and do not need to be found before they can be used, however each skull unlocks an achievement when collected, providing players motivation to seek them out.
Background[edit]
Every skull except for Blind and Assassins can only be found on Legendary difficulty (though on other difficulties the Assassins skull will have no effect). The Blind skull may be a very handy tool when recording video on the original Xbox, and, fortunately, is very easy to activate.
The skulls are mostly used by players to customize their gaming experience by manipulating the game-play engines with the various skull combinations. Each skull has various effects: Mythic increases enemy armor and shield strength greatly (Ultra Elites even require two overcharged Plasma Pistol bursts to compromise their shields); Thunderstorm changes all enemies to their highest rank; Envy allows the Master Chief to use Active Camouflage technology at the expense of his flashlight; and IWHBYD unlocks hidden dialog and causes the AI to interact verbally more often.
Campaign order[edit]
- The Heretic: N/A
- The Armory: That's Just... Wrong
- Cairo Station: Thunderstorm
- Outskirts: Blind & I Would Have Been Your Daddy
- Metropolis: Catch
- The Arbiter: Grunt Birthday Party
- The Oracle: Famine
- Delta Halo: Envy
- Regret: Assassins
- Sacred Icon: Mythic
- Quarantine Zone: Sputnik
- Gravemind: Anger
- Uprising: Ghost
- High Charity: Iron
- The Great Journey: Black Eye
List of known skulls[edit]
Anger[edit]

Level: Gravemind
Difficulty: Legendary
Effects: Enemies and allies fire their weapons faster and more frequently.
Directions:
- After saving both groups of Marines, the player reaches the first outdoor area with dirt and vegetation.
- Take a right as entering the area and run up to the wall past the Gravity lift that leads up to the Covenant watchtower.
- Get on top of the wall by going up the dirt mound on your left.
- Follow the wall and an invisible Unggoy Heavy will spawn wielding a Pez'tk-pattern fuel rod gun. Kill him and reach the floating skull called "Anger".
Trivia: The skull floats above a Gravity Lift ring. This skull is treated as a "third" weapon rather than a pickup weapon. You can throw grenades (though there is no animation) and switch to primary and secondary weapons (though there is no side symbol, but a put-away animation).
Assassins[edit]

Level: Regret
Difficulty: Legendary
Effect: All enemies in game are permanently cloaked. Allies can sometimes see them but mostly they can't, so they can't help much.
Directions:
- Immediately after the first gondola ride (following the battle with the Mgalekgolo), you will arrive at a building with two turrets on it.
- Enter the building and turn to your right.
- Jump on the cube structure, then jump to the adjacent light fixture, then to the ledge. The ledge leads to the balcony with the two turrets.
- Once there, use Grenade Jump to get onto the roof area. Then, using Crouch Jumps and/or Grenade Jumps, follow the right side perimeter of the building.
- Once you have gone as far as you can go you will find a small grassy area with two Stealth Elites holding Energy Swords (one can be assassinated, the other cannot) in their "angry stance" and the Assassins skull between them.
Note: This skull also appears on any difficulty, and even on co-op play, but no Elites will be standing there, the flash and name will not appear, and the effect will not take place. If you betray two Marines in a row, they will turn against you and become cloaked.
Black Eye[edit]

Level: The Great Journey
Difficulty: Legendary
Effect: Your shield does not charge normally. To charge your shields you must kill something (enemy, ally, or turret) with a melee attack (anything but the Energy Sword). You can charge your shields into the Overshield range by doing this (one kill will charge 100% of your normal shields). Also activates subtitles during cut scenes. Additionally, this skull causes the falling snow in the multiplayer level Lockout to disappear.
Directions:
- Progress through the level until you need to escort Sergeant Johnson's Scarab, to Installation 05's Control room.
- Directly above the door that Johnson blows open with the Scarab is an angled beam. Land your Banshee on this beam and walk to the top of the beam.
- Look down and to your left and you will see a circular angled wall. Jump onto this wall and walk to the top.
- Walk straight along the right-hand side of this area.
- You will have to jump over a small beam in front of you.
- Continue walking straight until you come to a grassy area.
- Keep walking up the grassy hill and go until you come to the point where can jump onto the angled support for the tower meets the grass.
- Jump onto the support and walk up the support. It's a very steep climb, so jumping while you're going up the support speeds up the walk some.
- At the first landing you will see the Black Eye skull sitting on a glowing white panel on the floor.
Blind[edit]

Level: Outskirts
Difficulty: Any
Effect: Your heads-up display becomes invisible. In other words, you cannot see your weapon (unless it's the Energy Sword, which has a glitched appearance with this skull), body, shields, ammunition, motion tracker, or use your flashlight. Muzzle flare from weapons though, are still visible.
Directions:
- Immediately at the beginning of the level, go through the door and kill the Unggoy there.
- Backtrack and right above the first door you came through there is a light.
- Crouch Jump onto that and either Crouch Jump or Grenade Jump again (Crouch jumping is easier), and you should be on the roof (or you can get the Sputnik skull and only use one grenade).
- Look for a space between the two buildings, and go into it, at the end there should be four M9 fragmentation grenades, a spotting scope, and the skull in front of them.
Note: An interesting possible message left by Bungie is seen in the form of the frags and scope. Since the Blind skull is available on all difficulties, it is a sort of "trick skull", to trick players into thinking they have obtained the skull of the level, since a skull is obtainable in every other level (excluding The Heretic, which is an opening cut-scene). So, it could be here to divert players from finding the IWHBYD skull. Alternatively, the scope is meant to stand for the word "Look" and the four grenades stand for the word "For" which could make the message "Look for Skulls" ("Skull" is in reference to the Blind skull).
Catch[edit]

Level: Metropolis
Difficulty: Legendary
Effect: A.I. will throw more grenades. Also, everybody (allies and enemies) will drop two grenades of their kind (humans drop frag grenades and aliens drop plasma grenades) Flood will drop grenades depending on whether they're human or Covenant.
Directions:
- Right after exiting from the underground highway, you'll come to a large open-air circular area with a handful of Jackal Snipers and some Elites. The quickest way to get safely to the skull is to get the next checkpoint by jumping into the Warthog and drive to the next area.
- Backtrack to the large area, and clear the enemies. Alternatively, you can skip through the area until you reach where you find the Wraiths attacking the building where the Marines are (but you don't have to fight them) and then go back and the enemies will be gone when you go back.
- There is a large semi-circular beam going from one of the main platforms that goes from the ground up to the top of the two towers. Do a Grenade Jump at the bottom of this beam and walk all the way to the top. Jump over to the ledge of the left tower. Walk to the end of the ledge and you will find the Catch skull. The Sputnik skull may be helpful if you have trouble Grenade Jumping.
Note: This skull is slightly tinged orange whereas the other skulls are not. Since Flood combat forms do not throw grenades but do drop grenades upon death, this skull is particularly useful in levels featuring Flood as the player would have a constant supply of grenades.
Envy[edit]

Level: Delta Halo
Difficulty: Legendary
Effect: The Master Chief now has an Active camouflage just like the Arbiter's. However, there is no visible timer, so remember: five second cloak with ten second recharge on Legendary (the cloak and recharge times are longer and shorter, respectively, on easier difficulties). To fully exploit the effects of this skull, execute the permanent invisibility glitch.
Directions:
Method 1
- Progress through Delta Halo until you come to an area with a large central structure that has a multitude of columns (the place with the many stationary shield generators). This is the area where Cortana tells you that they are all pouring out of the middle.
- When you first get into this area, you have to go left, and there is a ramp on the left that goes up and then back down. Get on this ramp and continue up the wall until you are on the landing where there will be (or used to be) some Plasma Turrets.
- Follow this landing all the way to its end, and you'll see a door that is blocked off by a large stone.
- Jump on top of the stone, and jump again to get on a thin ledge. Make sure you're up against the left wall, and Grenade Jump up to the top of the wall to your left.
- Once you're on this wall, you'll see that the right wall ends and there is some earth behind it.
- Jump onto the dirt, and follow the stone wall all the way to the top.
- When you're on the top of this wall, you can look down towards the center and you should see two Stealth Elites repeating their "angry stance" towards each other with the Envy skull between them. (Note: They will not attack you, even if you shoot at them. But if they are killed they will fire their weapons randomly before they hit the ground, which can hurt you).
Method 2
Use grenades to blast the stone away from the door. For that, you'll need all the Fragmentation and Plasma Grenades you can carry, sometimes even more (using rocket launcher and having the Sputnik skull would be helpful). Throw each of them into the corner behind the stone. Every time a grenade explodes, the stone will move a little. You'll never get it fully out of the way, but after about eight or nine grenades, there will be enough space to go through the door. Alternatively jump on the rock and throw one Plasma Grenade in the corner behind the rock. This should move it enough so that you can drop into the crack and melee the rock until the doorway is clear. If not, throw a couple more grenades. If you do not have any grenades or rocket launcher ammo, use a Scorpion or Wraith to blast the stone away. This method leads you up a ramp and into a room open to one side where you'll find two dead Grunts along with two Energy Swords (an Easter egg which implies that these two Grunts accidentally killed themselves with the Swords). Exit the room and you'll be on a platform above the normal area. Grenade jump towards the room you just exited, and you'll be with the Stealth Elites and the Envy skull.
Famine[edit]

Level: The Oracle
Difficulty: Legendary
Effect: All dropped weapons have half ammo. Weapons that spawned on the floor or spawned with are unaffected.
Directions:
- After you get off of the slowly descending elevator, you will come to a hallway where you see a handful of dead bodies.
- Continue into the next room, and you will be on the second floor of a room that has a lot of glass windows. When you enter this room, look to the right, and find the third pane of glass. It should be to the right of a wall that has some Flood guts splattered on it.
- Shoot out this window, and the windows directly across the room.
- If you look below you, you will see a platform that has four tall posts. On the far side of the room there is a column that is right in between the two windows on the far side of the room.
- Turn on your Active Camouflage, and jump to the center platform.
- Jump on either of the posts on the far side of the platform and jump to the column between the windows.
- Make another jump through the window you shot out, and make a left.
- Walk all the way to the end and you'll find four Elite Combat Forms convulsing on the floor, with the Famine skull in the middle of them. Sometimes, the Combat Form nearest to the battlefield stands up, but it does not attack.
Ghost[edit]

Level: Uprising
Difficulty: Legendary
Effect: A.I. characters will not flinch from attacks, melee or otherwise.
Directions: Immediately after the armory room that is full of Covenant and human weapons, there is an L shaped hallway. Grenade Jump, using a Ghost, up to the rafters of this room, and you will find the skull over a doorway. Or, if you are playing co-op, get a box from the weapon room, and have one player stand on the box, then have the other player stand on the first player's head, have player two Crouch Jump on to the ledge and grab the skull.
Grunt Birthday Party[edit]

Level: The Arbiter
Difficulty: Legendary
Effect: Headshots turn into Plasma Grenade explosions. You must first take down an Elite's shield for this to work on one. You also need to shoot Brutes and fellow Marines twice (if they don't have a helmet or you shoot marines in their face, you only need to shoot them once) in the head for this to work. You can also give a headshot to a dead body and it will still explode. This skull doesn't affect Hunters, Drones or Sentinels. Keep in mind that the Flood's "head" is actually their sensory antennae, so you need to shoot them in the chest area.
In The Master Chief Collection the skull's effect is changed to a confetti explosion and cheering children sound effect, as found in all Halo FPS games from Halo 3 on. The sound and graphical effects only appear in remastered mode, and as such the skull is rendered inoperative in classic mode.
Directions:
- The very first time you get a Banshee, fly down. Below you is a large beam-like structure (not to be confused with the one directly below you that turns and goes vertical) running from the arm of the station you just came out of to one exactly like it on the side opposite.
- Below this structure are three cylinders hanging down, with cylinders of light shooting out of the bottom(and the sides). They look like they are what keep the station afloat. If this explanation is too vague, they are the absolute lowest parts of the station.
- Now go to the middle engine and land on the top part of it.
- This and the other engines connect to the large structure mentioned earlier. The tops of the engines come up to meet the structure at an angle, where this angle is under the connecting structure and coming up to meet it, there is a place to walk (like being under a bridge).
- Under one side you will see the six Heretic Grunts dancing in a circle around the skull.
I Would Have Been Your Daddy (IWHBYD)[edit]

Level: Outskirts
Difficulty: Legendary
Effect: The rarity of combat dialog is changed, rare lines become far more common but common lines are still present at their normal rate.[1]
Directions: The skull can be found on the level Outskirts when playing on Legendary. This skull has a one in seven chance of spawning (referenced by the "1" and "7" posters in the room containing the skull) when the game loads the Jackal snipers in the alley after the clearing where Johnson is picked up in the pelican. You may skip the entirety of the encounters up to the sniper alley by using the rooftops. The following guide is a fast route to the skull with safety checkpoints. It is strongly advised that you activate the permanent invisibility glitch for this.
From the beginning of Outskirts, run into the first hallway and then look overhead. You will see two lights on either side of the hallway. Jump on to one of them, and then crouch jump up to the higher platform. From there turn around and run along the ledge to the right of the alleyway below.
Across from it, you will see another platform. Jump to it, then Grenade Jump or double jump onto yet another higher level. From there, look left and you will see a nearby rooftop, jump to it; go to the right and head down that alley, where you'll be able to jump onto the higher rooftop. Continue to the other side of the rooftop and drop down to the street. Turn right and head toward the open area, where you can hide from the Jackals' fire behind the large truck. Once you hear that the Jackals have been killed by your allies, you can head towards the ramp ahead, but DO NOT go past the top of the ramp. Wait for the checkpoint if it hasn't happened already, then save and quit the game. This checkpoint is before the Jackal snipers in the alley are spawned, which is when the game calculates the random chance of whether the skull spawns or not. This is the checkpoint you will reload if the skull does not spawn.
Unfortunately, the game automatically checkpoints a little bit after you enter the alley as well, locking in the "dice roll" of the skull spawn. It is important that this checkpoint is skipped, which you can do by constantly meleeing as you run through this next part. As long as you are meleeing, the game will not save a checkpoint. If it does checkpoint, you can exit the game entirely without saving (turning off the console) and reload your saved checkpoint, or kill yourself five times quickly to revert to the pre-alley checkpoint.
Head through the alley, and you should see a dumpster to your right. Jump onto the dumpster and onto the nearby roof. Jump onto the pipes attactched to the wall, onto the platform, and then leap to the roof across the alley. Head diagonally forward and right onto the roof just past bridge-like structure and turn left. You should see a balcony across the alley with a doorway. Stop meleeing now. Enter this doorway and look at the ground to the right. Wait about ten seconds. A checkpoint will occur, and the skull may or not appear at the same time as the checkpoint. If there is no skull, reload the pre-alley checkpoint, either by killing yourself five times or by quitting the game without saving, and try again.
If you want to save the skull, (in case you fail in the fight with the Elites) you should exit the room and proceed to get another checkpoint. Save and quit. Restart and go back to room with the skull. It will always be there. When you grab the skull, you'll be transported into the alley. You will have only a Plasma Pistol, and must fight off seven waves of Ultra Elites (wave one starting with one Elite, wave two with two Elites, and so on).
Note: The skull is named after a quote originally spoken by Stacker:[2] "I would have been your daddy, but the dog beat me over the fence!" The quote has since been spoken by both Sergeant Johnson and Sergeant Stacker. The first chapter of Assault on the Control Room is also named "I Would Have Been Your Daddy...". This skull might also just be the skull to make up for the first level since it is just a cut scene all the way and that there was supposed to be at least one skull on every level.
Fighting off seven waves of Ultra Elites and the 1 in 7 chance to spawn are references to Bungie's favorite number, "7".
After you have fought several waves of enemies, you should see in the top left "I would have been your daddy". This means you attained and the skull is active!
Tips and tricks[edit]
This is much easier with the permanent invisibility glitch. If you die in the alley with no checkpoint after the checkpoint in the skull room, there will be several white flashes, you will be reverted to the checkpoint in the skull room, the skull will disappear sometimes and will not take effect. Also, if you attempt to escape the alley, you will get teleported to the Elites' position and lose all your collected weapons. Once you kill all seven waves, the skull will become active.
If you get a checkpoint while fighting the Elites, save and quit. You will restart where you saved and then you can continue killing them. Saving here will enable you to load the IWHBYD effect (by killing the remainder of the Elites) after the Xbox is turned off, although the actual skull will not be reloaded.
If you manage to get the skull to spawn (appear) then do not grab it straight away; walk around for a while until you get an another checkpoint then get the skull, That way if you die while battling the 7 waves of elites, you can just try again instead of having to restart the level
You can battle the Elites with the skull if you so desire. To do this, the second you grab the skull, leave the room and drop it over the balcony. It will fall into the alley you fight the Elites in and sometimes will go straight into your hands.
New and Updated tip for acquiring this skull: This process was used to acquire the IWHBYD skull on 3/17/2018. To get this skull in Halo MCC Halo 2: Set Legendary/Solo with only the Scarab skull enabled. No other skulls. Kill (4) sniper jackals immediately when they spawn in the following locations. No Checkpoints needed any more. (In Co-Op the skull didn't appear. Not sure if maybe missing a different process or method or doesn't work at all for Co-Op.)
Take off and get up to the roof top through the first door/hallway. Skip the grunt at the beginning. Crouch jump on to the light and then again from the light to the roof top. Make your way to the roof top where the Pelican will appear. Skip the waiting for the Pelican and Sgt. Johnson. Proceed directly down off this roof top to the broken highway. Grenade jump over across the broken highway to the roof top and move forward to the far side of the root top.
The first sniper is at the normal spawn place down below in the alley between the buildings. Just walk uo the edge of the roof top, make sure you don't fall off. As soon as the Jackal appears next to the purple supply box. Kill it. (This is usually Checkpoint #4.) This is Jackal #1.
Turn left and jump across the next root top to the right. Walk forward towards the end of this root top, then turn right. (Checkpoint #5 is usually here.) Walk towards the right side of this roof top and look at the alley way down below and to the right. There will be TWO jackals that spawn here next to a box down below. Kill them both immediately when they appear. (These usually appear soon after Checkpoint #5 and as you approach the right side of this roof top.) This is Jackal #2 and #3.
Continue forward and hop across to the next root top in front of you and turn right and head towards where the skull building location is. (This is usually Checkpoint #6.) The building will be in front and to the right.
Hop across to skull building roof top and soon as you make the landing turn immediately right and kill the jackal that appears to the right and behind you between two building walls. This is Jackal #4.
From here make your way over and down to the skull closet on the far side of this building where the skull should appear. (Checkpoint 7 would normally appear here.)
Entire trip should take under two minutes if done right and the skull should appear.
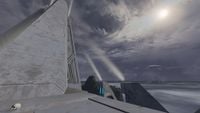
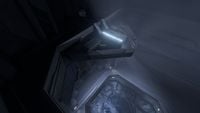
Iron[edit]

Level: High Charity
Difficulty: Legendary
Effect: When playing co-op, if either player dies the game restarts you at your last checkpoint. The effect resembles the effect already in place on Legendary difficulty, making it a somewhat redundant skull.
Directions: When you enter the final (the second) large Gravity Lift (do not confuse with smaller ones throughout the level) after passing the Inner Sanctum, look up. A skull will pass through you extremely quickly so you must start holding X a bit before you actually pass it to grab hold of it.
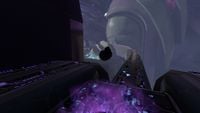
Mythic[edit]

Level: Sacred Icon
Difficulty: Legendary
Effect: Enemies have more health and shielding, and are therefore harder to kill. Note: health and shielding increase more as the enemies rise in rank. A red Grunt will not gain as much health as a white Grunt. Similarly, a blue Elite Minor will gain a small bit of health, but an Ultra Elite will gain a ridiculous amount of both shielding and health, to the point that a Plasma Pistol overcharge won't drop their shields even halfway. Besides that, it also makes your allies gain a small bit of health, and the skull will make allies immune to being meleed.
Directions:
- There is a semi outdoor area which has the same type of area right next to it. There is an Enforcer in front of each one. Go past this area and down the piston and you'll be in a somewhat dark Flood infested area with thick green gas.
- There's a stack of six or seven boxes as you enter the room. Use them to jump up to the landing above. There are a handful of alcoves on your right hand side. The skull is in the third alcove, floating above a dead human Flood combat form.
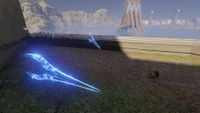
Sputnik[edit]

Level: Quarantine Zone
Difficulty: Legendary
Effect: The mass of certain objects is severely reduced, making them fly further when smacked with a melee hit, or when they are near an explosion. Weapon damage seems to have strengthened slightly. It also has the added effect of making enemies turn around when you hit them, allowing you to kill them in two hits. With the Sputnik skull's effect in place, players can reach nearly impossible places and much higher altitudes using Grenade Jumps. Also, your melee has strengthened force. This skull can be used to obtain the Scarab Gun by allowing the player to reach massive heights, and is a key component if you want to get the Soccer Ball Easter egg.
Directions:
- At the start of the level, look directly behind you for an Elite. Right behind the Elite is a tunnel (hard to miss). Go through the tunnel and continue walking straight until you pass a bridge, which is to your right.
- Beyond the bridge there is a narrow ledge jutting out of the cliff face ahead. Jump onto this.
- Hug the wall (Just enough room for you to walk) until you get to the end of the cliff, and you will see the Sputnik skull floating in the air.
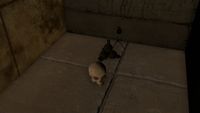
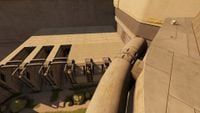
That's Just... Wrong[edit]

Level: The Armory
Difficulty: Legendary
Effect: That's Just... Wrong strengthens the hearing of both allies and enemies. They will now notice the slightest sound of reloading or drawing a weapon, footsteps, etc., rendering active camouflage useless. All computer-controlled characters have better accuracy.[3]
Directions:
- At the beginning of the level, after you power your shields for the first time, Sergeant Johnson shows up on an elevator. Wait in the room until Johnson starts berating you, telling you to get into the elevator. You MUST wait for him to say "Would it help if I said please?" (this takes approximately four minutes and forty seconds). Once he says this, get in the elevator, and go up to the tram.
- Get on the tram, and face towards the INSIDE of the building.
- Press up against the glass doors towards the inside of the building.
- You should hold X down, and you should pick up the skull. It's on a stack of crates, near the end of the tram ride.
Thunderstorm[edit]

Level: Cairo Station
Difficulty: Legendary
Effect: Causes most enemy and ally units to be their highest rank. Elites and Grunts will become Ultras, Jackals will become Majors (orange shields), Sentinels will be Majors (gold) except for the ones in the levels The Arbiter and The Oracle, Brutes will become Captains and all Flood Elites will have shields. Spec Ops, Rangers, Honor Guard Elites, Drones, Hunters, Jackal snipers, Flood humans, Marines, Gunner Grunts and basically everyone else are unaffected.
Directions: Method 1
- In the large room after the armory, you need to use a Crouch Jump to get onto a light fixture on the right wall (right of the room when you enter) and then jump from there onto the higher area.
- There is a series of diagonal beams. Walk up one near to the end of it and use it to Crouch Jump onto one of the rails. You can fall between the rails, so be careful.
- Once on the rail, walk down it until you can jump onto the highest platform. Then melee the trashcan away from the wall a few times, the skull is right behind it.
Method 2
- It is possible to Grenade Jump up to the platform if you can't stay on the rails. The Sputnik skull helps a lot here, but it's possible without it.
- Just get on the ground near the platform the skull is on and Grenade Jump.
Note: Any enemy units that have spawned, previous to you acquiring the skull, will remain at the same rank they spawned as. You also don't need to melee the trashcan out of the way, but it will reveal an interesting hidden object. Near the skull is a burning cigar that looks like a Sweet William Cigar, the type that Sergeant Johnson is seen using.
Achievements[edit]
The following achievements can be unlocked on Halo: The Master Chief Collection.


Trivia[edit]
- Halo 2's skulls are the only ones that have fun surroundings. An example being the Heretic Unggoy dancing around the Grunt Birthday Party skull. This is a distinction that is absent in Halo 3 and Halo: Combat Evolved Anniversary.
- Original Xbox players who want to have access to any skull any time they want can follow these steps.
- Set up a new profile with the name of the desired skull (to know which profile is which)
- Play through on Easy or Normal until reaching to the level with the desired skull.
- Play the level on Legendary until they get to a checkpoint just before the skull.
- Save and quit. Now when they want the skull they can go back to that profile, pick up the skull, and exit out. Then just go to another profile and enjoy. This is much more easily done if the player obtains the Envy skull first. NOTE: If you get a checkpoint after picking up the skull DO NOT save and quit just turn your Xbox off and try again.
- Rumors initially persisted that activating all skulls in the original Xbox game simultaneously (also known as Mythic difficulty) would unlock a secret movie at the end of the game, similar to the Legendary cutscene in Halo: Combat Evolved. Players who believed the rumor found a fifteen-letter code on the Halo 2 Soundtrack and thought this code was a specific order these skulls needed to be activated to unlock the secrets. All such rumors were ultimately proven false.
- The name of the That's Just... Wrong skull was originally unknown, as no name for the skull appears in-game. Data for an early version of the skull list in the Halo 2 menu file nicknames the Unnamed skull 'Whuppopotamus', which was used by the community for a while. The version of the list with correct names for other skulls and also got translations lists the skull as "Cow Bell" (referencing how any noise will alert enemies), with "That's Just... Wrong" going unreferenced in the same lists. It was given its now-official name in The Master Chief Collection, likely to avoid confusion with the Halo 3-style Cowbell skull.
- The That's Just... Wrong skull has an Exclamation Mark (!) on it. This could very likely be a reference to the Metal Gear Solid games, as when an enemy notices the player, an Exclamation mark appears above the enemy.
- A skull's melee power is a little less than equal to firing a round of an M90 Shotgun.
- In Halo 2's level script files, skulls are referred to as 'Ice Cream Flavors' and some have comments regarding their effects.
- The Sputnik Skull's spawning script is named "ice_cream_superman" and contains the following comment: "you're going to get fat!!!!! or dead... because now everyone is superman!!!!" This format is shared with the Angry and Mythic skulls in their levels' scripts. This may suggest the Sputnik Skull was once called the Superman Skull.
- The Blind Skull's object name is "e1_ghost_key." This may suggest the Ghost Skull was originally supposed to be found on outskirts or the Blind Skull was originally called Ghost.
- Halo 2's hud_messages file contains a line designating the 15th skull (by ID) as "Cow Bell." Interestingly, "That's just... wrong" is listed as the 15th Ice Cream Flavor - "ice_cream_flavor_stock 14" (The IDs start at 0) while in hud_messages it is called the 16th. This may indicate the Cow Bell skull became the "That's just... wrong" skull at some point in development.
- The line that spawns the Catch Skull is commented with "Mmmm, pineapple". This may suggest it was previously called the Pineapple Skull, a likely reference to the common nickname for fragmentation grenades.
Gallery[edit]
The Anger skull floating on the wall surrounding the first Valley of Tears in Halo 2: Anniversary.
The Assassins skull flanked by two invisible Sangheili in Halo 2: Anniversary.

The Envy skull and two invisible Sangheili in Halo 2: Anniversary.
The Black Eye skull on the top of the control room in Halo 2: Anniversary.
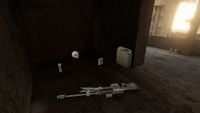
The Blind skull, four grenades, and a spotting scope in Halo 2: Anniversary.
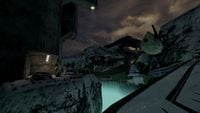
The Catch skull on a ledge, high above the entrance into the area, in Halo 2: Anniversary.
The Envy skull and two invisible Sangheili in Halo 2: Anniversary.
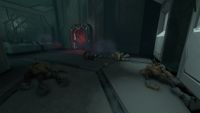
The Famine skull surrounded by dead Flood combat forms in Halo 2: Anniversary.
The Ghost skull sitting above the doorway in Halo 2: Anniversary.
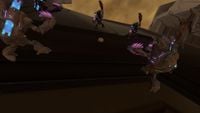
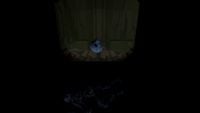
Heretic Unggoy dancing around Grunt Birthday Party skull in Halo 2: Anniversary.
The IWHBYD skull and the hidden sniper rifle in Halo 2: Anniversary.
The Iron skull in the middle of the gravity lift in Halo 2: Anniversary.
The Mythic skull floating above a dead Flood combat form in a vent in Halo 2: Anniversary.
The Sputnik skull floating in midair in Halo 2: Anniversary.
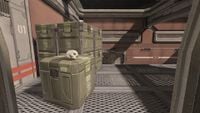
The That's Just... Wrong skull on top of a crate in Halo 2: Anniversary.
The Thunderstorm skull and the displaced trashcan in Halo 2: Anniversary.


Sources[edit]
- ^ Bungie podcast Episode 1
- ^ YouTube: Halo Fest: Halo Universe
- ^ Halo 2 Skull: That's Just... Wrong
| |||||||||||||||||||||||||
| ||||||||


