Installation 00 Citadel
From Halopedia, the Halo wiki

The Citadel was one of several Clarion facilities located on Installation 00 where the entire Halo Array could be controlled and activated remotely by means of a superluminal communications system. It was located on the rim of the core of the Ark, and was defended by multiple shield-projecting barrier towers that had to be disengaged before the Citadel could be accessed.[1] Although of Builder design and construction like the rest of the Ark, the Citadel was considered a highly impressive command facility by Warrior-Servant standards.[2]
Millennia after its usage by the Forerunners, the abandoned structure was occupied by the High Prophet of Truth's Covenant. They used it as their new stronghold while making their last stand against humanity and the Sangheili before falling.
The Citadel is a part of the Clarion network, a series of facilities from which the Halo Array can be controlled by a Reclaimer.[3] After having been badly damaged in the firing of Installation 08 and then briefly used by 000 Tragic Solitude,[4] it was destroyed as the Ark repaired itself.[5]
Description
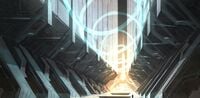
The Citadel was a large structure, one end of which was suspended over the void of the Ark's core. The interior of the structure consisted of a long chamber with the entrance on one end and the control center on the other. The entrance to the Citadel consisted of a ramp and an energy bridge leading to a smaller antechamber, at the far end of which was an elevator which led to the Citadel's cavernous main hall. The hall, framed by vertical, patterned windows with a single enormous window at its far end, housed a single central bridge lined by jutting structures and holographic representations of each Halo ring. These representations are not up-to-date, but instead represent the status of the rings' surfaces at the time of their last-update with the Ark, and are outdated projections of the rings' current forms by up to tens of thousands of years.[6] At the far end of this bridge was an energy bridge connecting it to the circular control platform housing the Halo Array's control panel. When inactive, the center of the activation facility was level with the rest of the floor, but once the Array's activation sequence had been initiated, each tiered segment rose up to form a slightly raised platform.[1]
At the back of the main hall near the elevator is a chute leading into the undercarriage of the citadel which is connected to the wall of the Foundry.[1][7] In these lower levels is the primary control station for the citadel. While the main hall is dedicated to controlling the Halo Array, this control station is for the systems in the building itself. One of these systems is a detailed map of the underground assembly of the citadel and the local sections of the Foundry wall. The map clearly and cogently labeled every detail of the entire complex, including the basin-like interior and the three energy pylons controlling the shielding for the citadel. The citadel's lower levels contained a passageway connecting the citadel to the Foundry's control station.[8]
History
The Halos' firing

- Main article: Battle of the Maginot Sphere
Narrowly escaping the destruction of the greater Ark in the final hours of the Forerunner-Flood war, the IsoDidact arrived at Installation 00 with the intent of firing the Halo Array and stopping the Flood, which now controlled most of the galaxy. Sharing all resources with the Metarch Offensive Bias, the Citadel functioned as a command hub for the complex action of coordinating the deployment and firing processes of the rings. This was performed almost exclusively by Offensive Bias, who was simultaneously present at the Maginot Line with the Forerunners' last combined fleet, tasked with stalling the subverted Mendicant Bias and the Flood's enormous fleet long enough for the Halos to fire.[9]
Battle of Installation 00
- Main article: Battle of the Citadel
During the Battle of Installation 00 in December 11, 2552, the Prophet of Truth landed upon Installation 00 on the Forerunner Dreadnought, and seized the Citadel while the majority of his fleet and armies distracted the pursuing United Nations Space Command/Sangheili allied forces. However, Shipmaster Rtas 'Vadum "laid waste" to the Prophet of Truth's fleet while the Master Chief and the Arbiter led a Marine and Sangheili ground attack on the Ark's surface, pushing forth to the Brute-held Citadel. However, the Prophet of Truth activated the barrier towers, forcing the UNSC and the Elites to send strike teams to lower the barrier before gaining access to the Citadel. During the assault, however, Sergeant Major Avery J. Johnson was captured by the Brutes, and was taken to the Citadel, because the Prophet of Truth needed a human Reclaimer in order to activate the Halo Array.[1]
UNSC assault

After the barrier towers were deactivated, the assault carrier Shadow of Intent moved over the Citadel and attempted to destroy it. This was interrupted by the Flood-controlled High Charity suddenly appearing out of slipspace and raining debris on the area, severely damaging the Shadow of Intent. The UNSC then launched an assault on the Citadel, led by the Master Chief, with one M808B Scorpion Tank, multiple M12 Warthog LAAVs, one Mongoose, and multiple Hornet VTOLs, and a Pelican dropship. However, the Covenant defended the Citadel, landing a pair of Scarabs by an atmospheric landing, supplemented with one Wraith tank and a handful of Ghost and Prowler attack vehicles. Despite heavy resistance, SPARTAN-117 and Thel 'Vadam were able to defeat the Covenant defense, and with 343 Guilty Spark's assistance, entered the Citadel.[1]
However, in the Citadel, Truth was readying to activate the Halos, and a Brute Chieftain was torturing the captive Johnson. When SPARTAN-117 radioed that he was too far from Truth to prevent him from activating the Halos, Commander Miranda Keyes boldly took a Pelican dropship and crashed it into the Citadel, landing in the midst of Truth, his attendant Brutes, and Johnson. Keyes opened fire on the Brutes, killing one and injuring another before she realized that the situation was hopeless: she could not engage dozens of Brutes, then kill Truth, and then rescue Johnson. She aimed her magnum at Johnson, offering to kill him and then herself, thus preventing the Covenant from firing the Halos, until Truth rose and shot her several times in the back with a Spiker, killing Miranda Keyes. Truth then forced Johnson's hand onto the control panel, initiating the Halo Array's activation sequence.[1]
The Flood
- "How could I have known the Parasite would follow? Undoubtedly, this is the heretics' doing!"
- — Prophet of Truth
Meanwhile, the Flood were readying their forces against Truth: If the UNSC and Sangheili could not prevent Truth from firing the Halos, then the Flood would, and they began to scale the outer reaches of the Citadel, joining forces with John-117 and the Arbiter in a desperate attempt to deactivate the Halos. While Truth continued to sermonize, the Master Chief, the Arbiter, and a Flood swarm attacked the Chieftain and the Covenant forces defending Truth, clearing the way for them to reach Truth. Upon reaching Truth, the Master Chief and the Arbiter found Johnson closing the eyelids of a now deceased Miranda Keyes. The Master Chief then quickly deactivated the Halos before they could complete their firing sequences, to Truth's dismay. The Arbiter then killed the defenseless Prophet of Truth with his Energy Sword.[1]

As the Arbiter observed Truth's crumpled corpse, Johnson took Keyes' body inside her crashed Pelican. The Flood, however, betrayed both Master Chief and the Arbiter: now that they had prevented the Halos from being activated, the Gravemind declared that it would lay waste to Master Chief and the Arbiter. As Master Chief and the Arbiter tried to board the Pelican, the Flood were able to knock the Chief and the Arbiter to the ground and nearly causing Johnson to crash. As a result, the two had to battle Flood on their way out.[1]
Having escaped the Flood, the Master Chief saw the cryptic figure of Cortana, and he tentatively followed the flickering figure to an open balcony where he activated a panel, shortly after which a massive ring rose from the center of Installation 00. 343 Guilty Spark announced that this was another Halo installation, constructed by the Ark's foundries to replace the destroyed Installation 04 and asked Master Chief what he would do. Master Chief replied that he would activate it, and 343 Guilty Spark hurried off excitedly to make the final preparations. The Arbiter asked the Master Chief exactly how he planned to do such a thing, due to the fact that he will need an Activation Index in order to activate Halo. The Master Chief then proceeded to retrieve Cortana from the crashed hulk of Flood-infested High Charity nearby, knowing full well that Cortana has possession of the Index from the first Halo ring.[1]
000 Tragic Solitude
- Main article: Operation: FAR STORM
In March 2555, the Ark's Monitor 000 Tragic Solitude, with the help of Bobby Kodiak acting as a Reclaimer, used the citadel to initiate an activation of the Halo Array in five weeks time both to wipe out all sentient life in the galaxy and force the UNSC to reactivate the Excession so that he could send Retriever Sentinels to strip-mine the Sol system for the materials needed to repair the Ark. In response, a joint UNSC-Swords of Sanghelios operation was launched to the Ark to stop the firing sequence.[4]
After reaching the citadel, Dr. Luther Mann was able to use the controls to deactivate the Array, but they then came under attack from armigers under the control of Tragic Solitude and were forced to flee down a chute when the elevator proved to be non-functional.[7] The chute deposited the group to the citadel's undercarriage where it connected to the wall of the Foundry. In the undercarriage, the group located the citadel's primary control station that controlled the building itself which had been damaged when Installation 08 fired and was knocked off-line. While Huragok Drifts Randomly worked to restore power to the station, Dr. Henry Lamb was attacked and killed by a damaged Sentinel under Tragic Solitude's control. After Drifts brought the control station online, Mann was able to find an exit through network of interior passages to the Foundry's control station.[8]
Destruction
Due to the damage the Citadel sustained, it was eventually completely destroyed as the Ark repaired itself and changed its surface in countless different ways.[5] By October 2559, all but one of the other facilities in the Clarion network were off-line for repairs when the Keepers of the One Freedom and the Dhas Bhasvod's Covenant sought to activate the array. According to the Epsilon Spire's submonitor, the other facilities in the network like the Citadel are either inoperable or inaccessible and may remain that way for some time.[3]
Trivia
- If you make it to the left side of the Citadel on a high, perched corner you will hear the song Siege of Madrigal. If you make it to the right side, you will find the Microsoft Sam Easter egg.
Gallery
Concept art

Concept art of the Citadel.

Concept art of the Citadel.
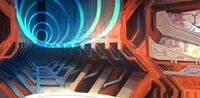
Concept art of the Citadel's interior.
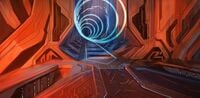
More concept art of the Citadel's interior.
More concept art of the Citadel's interior.


Screenshots
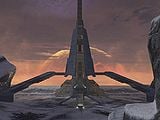
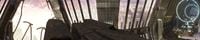
Front view of the Citadel.
A panorama of the Citadel's interior.
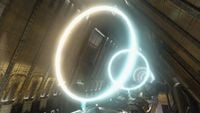
The holograms of the Halo Array inside the structure.
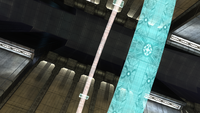
The hologram of the Gamma Halo.


List of appearances
- Halo 3 (First appearance)
- Halo Evolutions - Essential Tales of the Halo Universe
- The Return (Motion comic only)
- Halo: Silentium
- Halo: Hunters in the Dark
- Halo Mythos
Sources
- ^ a b c d e f g h i Halo 3, campaign level The Covenant
- ^ Halo: Silentium, page 310-311
- ^ a b Halo: Divine Wind, chapter 8
- ^ a b Halo: Hunters in the Dark
- ^ a b Halo: Divine Wind, chapter 7
- ^ YouTube - Halo, Halo Lore Stream: The Halo Array: 46:50
- ^ a b Halo: Hunters in the Dark, page 258-262
- ^ a b Halo: Hunters in the Dark, page 277-289
- ^ Halo: Silentium, page 326-328


