Control Room (Installation 09)
From Halopedia, the Halo wiki

The Control Room is the site that controls all of the operations of the Halo Array's Installation 09.[1]
Overview[edit]

Design details[edit]
The Control Room of Installation 09 displays a remarkably different exterior design to those of the other Halo installations. Rather than a pyramidal structure built into a cliff (as seen on Installation 04 and Installation 08, or a large spherical structure built atop an island like that of Installation 05, the structure bears more resemblance to the free-floating architecture of Requiem or Genesis. The initial structure consists of an abstract geometric spike with an entrance portal leading to a circular control platform; once accessed, various aspects of the building begin to float and the control platform is raised into the air while a large energy shield is projected around the building.[1]
The Control Room's placement on Installation 09 is similarly-aberrant. Unlike the arctic landscapes or oceanic climate of the previously-discussed Control Rooms, Installation 09's Control Room is placed on open ground, amid a vast landscape of rolling hills and trees. The overall Forerunner complex is surrounded by a near-impenetrable energy shield, which requires a Retriever Sentinel to deactivate.[2]
History[edit]
The Control Room, as with Installation 09 as a whole, was constructed by the Ark following the devastating final battle of the Human-Covenant War in December 2552. The ring was constructed as a replacement for the original Alpha Halo Installation 04, which was itself replaced by Installation 08. In the Battle of the Ark, Installation 08 was fired in an attempt to destroy the Ark, leading to the surviving installation constructing a second replacement for the original Installation 04.
- Main article: Battle of Installation 09

By 2559, the ring had been completed and was sitting ready within the Ark's foundry - having yet to be released into the Soell system due to lacking clear directives from the Ark. When the Second Ark Conflict erupted between the Banished and the forces of UNSC Spirit of Fire in that year, Installation 09 became a key target for both sides of the conflict. With both sides lacking a slipspace-capable starship to take them back to the Milky Way for help, the emergence of the ring was seen as an ideal tool to use to seek aid. In April of 2559, forces from both sides landed on the ring, with the UNSC forces establishing Alpha and Bravo Bases near the Control Room as they sought to ward off the Banished from taking control of the ring. Due to the Halo's release from the Ark's foundry, heightened security protocols were in place leading to a Retriever Sentinel patrolling the region around the Control Room to defend it from intrusion. Both forces fought to control three Control Towers, which ultimately allowed Ellen Anders to gain control of the Retriever and open up the Control Room for UNSC access.[2]
Lacking time to establish a full firebase at the Control Room, Spirit of Fire deployed a mass of forces to the Control Room directly to defend it while Anders gained control of the ring. The UNSC deployment was able to successfully fend off a massive sustained attack by the Banished, resulting in Anders ejecting Banished-occupied portions of the ring into space - before the ring was deployed back into the Milky Way galaxy.[1]
In-game information[edit]
Halo Wars 2[edit]
The Control Room appears in Last Stand, the final level of Halo Wars 2. During the level, the player must defend the Control Room from an onslaught of Banished forces for 20 minutes.
Phoenix Logs[edit]
 The Ark has several supraluminal communication towers with the purpose of transmitting data to and from the weapon installations that make up the Halo Array. Each Halo has a designated Control Room which activates the Halo's weapon systems upon receiving the data, as well as emergency shutdown protocols to disable the systems and halt the Halo's activation. Like the Cartographer, these Control Rooms are often protected by a large energy barrier and patrolled by high security Sentinels to protect from misuse. The Control Room is integral to the maintenance of the Halo's weapon systems, and the interior leads deep down to the Halo's superstructure in a maze of winding tunnels and shifting walls. |
Production notes[edit]

The control room of Installation 09 is inconsistently depicted in Halo Wars 2's gameplay and cutscenes. This is due to the development of the game; the structure as depicted in the level Last Stand was designed from the ground-up for Halo Wars 2's gameplay by Creative Assembly, while that featured in the final cutscene is the model created by Blur Studio for the CGI cutscenes. The Blur Studio model was previously developed to represent the Delta Halo control room in Halo 2: Anniversary's cutscenes, and was one of a number of assets reused for Halo Wars 2; albeit with the lighting toned down.
In the 2022 edition of the Halo Encyclopedia, Installation 09 is noted as extremely similar to Alpha Halo as with Installation 08 before it, indicating that these visual differences may be the result of gameplay/development needs, with the actual canon of the installation resembling one of the more classic designs.[3]
Gallery[edit]

|
Browse more images in this article's gallery page. |
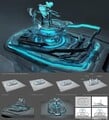
Concept art for the control room.

Concept art for the control room.

An unused piece of Phoenix Log artwork for the control room, left unused in the Halo Wars 2 game files.

The control room on the level Last Stand.

The control room on the level Last Stand.

Close-up of Anders at the control room's console on the level Last Stand.


List of appearances[edit]
- Halo Wars 2 (First appearance)
Sources[edit]
- ^ a b c Halo Wars 2, campaign level Last Stand
- ^ a b Halo Wars 2, campaign level The Halo
- ^ Halo Encyclopedia (2022 edition), page 357


