Guardian
From Halopedia, the Halo wiki
| Guardian | |
|---|---|

| |
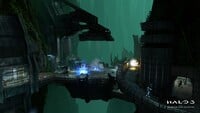
| Map overview | |
|
Game: |
|
|
Map file name (?): |
|
| Lore information | |
|
Location: |
|
| Gameplay overview | |
|
Terrain: |
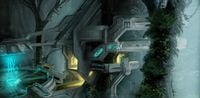
Jungle, giant trees around suspended Forerunner structures. |
|
Map layout: |
Asymmetrical |
|
Recommended number of players: |
2-6 |
|
Recommended gametype(s): |
|
| “ | Millennia of tending has produced trees as ancient as the Forerunner structures they have grown around. | ” |
Guardian is a Halo 3 multiplayer map that was also included in Halo Online. Reminiscent of Halo 2 multiplayer maps Lockout and Ascension, Guardian is a medium-sized level comprised of catwalks and small rooms, which make the level feel smaller than it actually is. Its asymmetric layout makes it great for Slayer and Team Slayer gametypes, while its central platform makes for interesting games of King of the Hill.
Universe and lore[edit]
Guardian is set in an ancient Forerunner complex on Installation 00[2] surrounded by a lush, dense jungle. The multi-level map is split into four key areas; some of these areas connect to each other with catwalks and man cannons, and all of these areas connect to each other at the center of the map. Quadwings fly around the outskirts of the map.
Overview[edit]
Layout[edit]
Guardian's central area and size are reminiscent of Ascension, while its layout and weapon spawns resemble those of Lockout. Unlike Lockout, the scenery between areas of the map changes noticeably, so players do not get lost as easily. The changes in scenery and the simplicity of the map's layout lead to a short learning curve. It is a very good map for free-for-all multiplayer games.
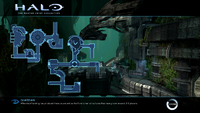
Guardian Map.
An overhead view of the map.


Sniper Tower[edit]
The map's Sniper Tower is a three-floored structure that features a winding circular ramp. The eponymous sniper rifle spawns on the bottom level of the tower. A Covenant carbine and an overshield are tucked into opposite corners of the tower's second-floor room, and a needler spawns nearby at the base of the tower's circular ramp. The top of the winding ramp features two plasma grenade spawns, and gives players a view of the entire upper portion of the map. A plasma battery also spawns here, to balance the location and prevent camping.
Each level of the sniper tower offers direct access to the center platform and a clear view of the opposite side of the map. An L-shaped walkway (referred to by some as "the Elbow") connects the sniper tower's second-floor room to the map's more forested area.
Rooms in the sniper tower are commonly called out as "S1", "S2", and "S3", going from bottom to top.
Sniper Tower Overlook with Elbow in background.

Blue Room[edit]
The Blue Room, named for its soft lighting, is adjacent to the yellow lift and the center platform. It contains two plasma batteries, a flare, and a Mauler.
An archway allows players to jump from the blue room into both the top and bottom floors of the yellow lift. Adjacent to that archway, an L-shaped hallway (with explosive power cores built into a wall) offers direct access to yellow lift's top level and bottom blue's shotgun spawn. Across from these paths, a walkway (featuring an SMG) connects the blue room to the central platform, and features impenetrable glass to shield players from enemy fire.
Bottom Blue[edit]
The area beneath the blue room is known as "bottom blue," and features a man cannon that leads to the sniper tower, a dead-end hallway (that can be dropped into from the blue room), and walkways that lead to the yellow lift's bottom level. A shotgun spawns in the dead-end hallway.
Using the bottom blue man cannon at the start of a Team Slayer game is unwise, as the other team will have control of the overshield that spawns at Sniper Tower.
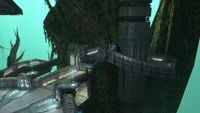
Yellow Lift[edit]
The yellow lift, also known as the gold room, is a two-floored structure that lies directly across from the Sniper Tower. The area closely resembles Lockout's blue lift: the eponymous gravity lift allows players to travel from the bottom floor to the top, and holes on either side of the lift allow players to drop back down to the bottom floor.
Yellow lift's top floor features a battle rifle and four doorways. The first doorway leads to an L-shaped hallway that connects yellow lift to blue room, while an adjacent doorway opens up to a gap that players can jump across to enter blue room through its archway. A doorway at the front of yellow lift opens up to a gap that players can jump across to reach the center platform. The last doorway is directly opposite the first two, and leads to a curved walkway that features an active camo spawn, two Plasma Grenade spawns, and a man cannon that leads to the center platform.
Two walkways directly connect yellow lift's bottom floor to the central platform and to bottom blue; the walkway to the center platform lies directly under the gap between central platform and yellow lift's top floor. Both of these walkways contain plasma rifle spawns.

An overlook of the Yellow Lift.

Green Area[edit]
The forested green area does not see as much action as the rest of the map, due in part to its weapon spawns. A short bridge connects the green area to the central platform's lower level, and an L-shaped catwalk (sometimes called "the Elbow") connects the green area to the sniper tower's second floor. A man cannon provides direct access to yellow lift's active camo spawn. A bubble shield spawns atop a small, ramp-like tree stump at the center of the green area; this tree stump can be used to jump up to the top of the central platform.
A Brute Shot spawns at the base of the stump, and a plasma battery is placed past it, against the green area's outer wall. A plasma pistol spawns nearby on the bridge to the central platform, and pairs of Spikers and frag grenades spawn on the elbow.
Center Platform[edit]
The circular center platform acts as the main pathway between all of Guardian's four outer regions, and therefore sees quite a bit of traffic. The large top floor is completely devoid of cover and weapons, while the smaller, closed-in bottom floor contains a gravity hammer spawn.
A decorative Forerunner structure hangs above the center platform, and can be reached through various means:
- a grenade-jump from the elbow with help from a plasma battery.
- a Brute Shot jump from the top of sniper tower's curved ramp.
- a gravity hammer bounce.
- a precisely-placed grav lift in Forge.
Strategies[edit]
- You can access an effective sniping perch by standing atop the plasma battery at the Sniper Tower, jumping, and then shooting the Plasma Battery at the height of the jump. This will propel you up the tree, granting a view of almost the entire level.
- As you run up the ramp to the overshield spawn, you can jump off of the right side to land downstairs where the sniper rifle spawns. This can sometimes allow you to avoid the overshield player and get to the sniper rifle first during free-for-all matches.
- If you plan on using the sniper rifle at the sniper tower's circular ramp, you should destroy the plasma battery first, so that it cannot be used against you.
- The sniper rifle and the needler can be used to get easy kills in the hallway that runs through the bottom of the center platform.
- Players that dual-wield Spikers can be quite dangerous in the blue room, particularly if they are helping to protect a sniper in that area.
- Spiker and plasma rifle combos are particularly effective when ambushing players who exit the big gravity lift that faces the central platform.
- In the sniper tower's second-floor (overshield) room, it is possible to crouch-jump and wedge oneself high into the corner of the room above the Carbine spawn.
- If, at the start of a team game, your team spawns at the Sniper Tower, it is a good idea to have the team's sniper guard the gravity hammer until a teammate can grab it.
- If you are near the blue room at the start of a team game, picking up the shotgun and man-cannoning over to the sniper tower is a good way to disable the sniper and give your team a good start, but watch out for someone with the Overshield.
- The top of the center platform is often empty. If you need to make a quick escape from some part of the map, and have a bubble shield, then you can run across the center platform and deploy the bubble shield on it for cover.
- A cool jump, though not an easy one: While you are on the pathway from Elbow to S2, you can jump from where you are to the gravity hammer spawn.
- At the start of a Team SWAT match, it's usually a good idea to stay put at your spawn and watch the route of travel the enemy team is most likely to take.
- A team that spawns near the blue room should stay put and look at the elbow that connects the sniper tower to the green area.
- A team that spawns near the elbow should stay put and look at bottom blue's lift.
- If, at the start of a Team SWAT match, you spawn near the blue room, then it may be a good idea to go to the pathway that connects bottom blue to bottom gold. Look towards the lift in the green area; usually, you'll have a direct line of fire on players using that lift.
- If you get the gravity hammer then head to the yellow lift and wait at the top and hide in the corners of the room and wait for people to come.
- The gravity hammer's splash damage travels through the glass surrounding its spawn. If you get the hammer first, it may be worthwhile to stay at its spawn and use it to score easy kills on anyone else trying to obtain it.
- In a Team Hammers match, one can set a bubble shield in the middle of the center platform, making it an ideal spot to control when grenades can not be thrown into the circle and forcing other players to come into the middle.
- The bubble shield spawn point on the top of the tree stump is an extremely interesting point. If you activate the device on top of the root, anyone who wants to attack you must leap over to melee you. This could be helpful in games like Oddball. The gravity hammer is positioned at the center of the map. The sniper rifle is near it just down the hall. Make sure you know where each man cannon leads to. You can still get turned around in this small map. Get to the gravity hammer as soon as you can. When you have it stay indoors. You can knock people over the edge with it also. The gravity hammer can penetrate barriers like the glass where the hammer spawns.
Forge[edit]
- Main article: Forge
- Using gravity lifts, you can allow the players to move from the lower to the upper "decks" of the level without having to go to the ramps.
- It is possible to stick objects to the ceiling of the blue room.
- It is possible to get out of the map using Forge. First spawn a sender node in the lift room. Then, by the power cores, look in the corner and spawn a receiver node. Go through and you'll be out.
- The Forerunner structure above the center platform is an excellent sniping position, and can be accessed if you set up teleporters. It is helpful to place pallets over the openings on either side, to give the sniper more room to shoot.
- There is a secret area. In Forge, you need to float to the tallest tree stump and float over the broken tree and on the other side, there is a small ledge for you to hide in, but it's a small area because of invisible walls, to get back out you float over the tree again.
Production notes[edit]
- "Guardian was never intended to replace Lockout, but it does share approximate scale and game type suitability. Guardian is Guardian."
- — Frank O'Connor[3]

Guardian started development as a level of the Halo 3 campaign called "Guardian Forest". This level was to take place in the eponymous forest, with the player flying an AV-14 Hornet through the trees. The level would have featured the aptly-named Guardian, a Sentinel construct featured in several pieces of Halo 3 concept art; an idea that was later revisited, albeit vastly redesigned, as the Guardian Custode in Halo 5: Guardians. The level ultimately was one of a number of casualties of scope reduction mid-way through the development of Halo 3, as Bungie had realized they wouldn't be able to ship all planned features in time. The aerial Hornet battle was moved into the final battle at the Citadel on the level The Covenant, and the jungle aesthetic was re purposed for the eventual multiplayer map Guardian.[4][2]
Steve Cotton picked the Guardian Forest level for creating Guardian due thinking about the kinds of themes and concepts that could suit a level with lots of floating platforms similar to Lockout. He was drawn to several pieces of concept art by Frank Capezzuto and Chris Barrett for the Guardian Forest level, which inspired some of the shapes seen on Guardian. Cotton did another concept which was more moody in nature, which led to the map being "locked in" for development. Cotton worked on Guardian alongside the early versions of Valhalla and High Ground, and received flak when he pitched Guardian as it wasn't a style of map he had attempted before. Due to the map's setting resembling the forest moon of Endor from Star Wars: Return of the Jedi, Chris Carney played the Ewoks' theme from the film when Cotton got up to present the map, resulting in the map's codename of Jub-Jub [5][6] (or to Luke Timmins, "Lukeout").[7]
One of the early drafts for the map placed Guardian inside a single enormous tree, with the players travelling through the inside of the tree to traverse the map. This central tree eventually became the middle platform as the map evolved.[5] By March 9, 2007, Guardian had not been worked on in "ages", and didn't have any graphical polish but did have some geometry.[8] By March 23, Cotton had started work on map's art pass.[9] The Quadwings were implemented around April.[10]
Guardian was not selected for inclusion in the Halo 3 Beta,[11] but was referenced in the game's hexadecimal code leading fans to learn the final name of Guardian.[12]
Guardian was later recreated in the Halo Mash-Up: Minecraft Evolved pack.[13]
Guardian has been slightly altered for Matchmaking. Two of the Maulers were removed and the flare was swapped for the power drain. In addition, invisible barriers have blocked off some areas, such as the ledge above the active camo spawn.[citation needed]
Trivia[edit]

- Players that jump below the man cannons will levitate beneath them. This is an excellent sniping spot and may be a Carney hole. If a player in this position moves inward, they will be shot to the center of the map. If they move outward, they will plummet to their death.
- There is a Carney hole located above the active camo spawn that can be reached by jumping. A similar Carney hole is located above the needler spawn, but can only be reached if one uses the plasma batteries nearby.
- A scene from Origins Part 2 depicts a Gravemind giving John-117 an Data crystal chip (presumably Cortana) on a Forerunner building strongly resembling Guardian; the context of this scene is unknown. As Cortana was slowly descending into rampancy, it's possible it was her incorrectly depicting how she was returned to John.
Gallery[edit]

|
Browse more images in this article's gallery page. |
Development images[edit]
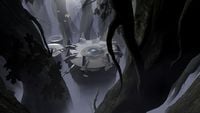
A concept image of Guardian Forest, the cut level which Guardian is based on.
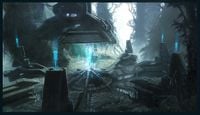
Concept art for the map.
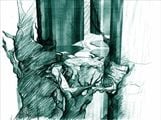
A concept sketch of the map.

Steve Cotton's "mood" concept for Guardian.
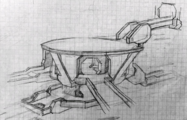
A concept sketch for one of the structures on the map.

Initial floor plan for Guardian.
![Early pre-production-era Guardian.[14]](https://halo.wiki.gallery/images/thumb/3/37/H3_Guardian_PrePro_Screenshot_1.jpg/200px-H3_Guardian_PrePro_Screenshot_1.jpg)
Early pre-production-era Guardian.[14]
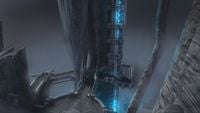
Concept art for the final Guardian map.
Concept art for the final Guardian map.
Players fighting on the center platform in an early build of Halo 3.


![Early pre-production-era Guardian.[14]](/File:H3_Guardian_PrePro_Screenshot_1.jpg)


Screenshots[edit]
A free-for-all on Guardian.
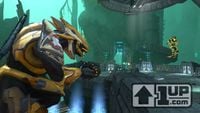
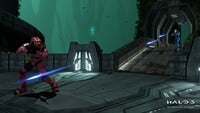
A Sangheili wielding a Mauler in combat.
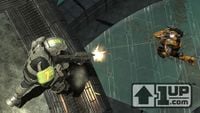
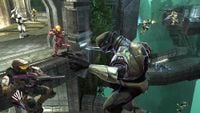
A Spartan attacks an Elite from above.
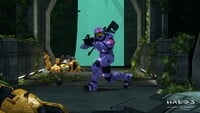
A Spartan taking fire from a plasma rifle while on the center platform.
A match of Oddball.
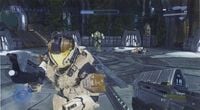
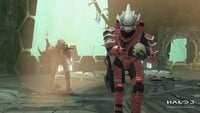
A Spartan surrounded by bodies on a walkway.
A battle on the center platform.


Sources[edit]
- ^ Halo 3 Editing Kit, game file
H3EK\tags\levels\multi\guardian\guardian.scenario - ^ a b c Official Xbox Magazine: June 2009 (Archive.org transcript)
- ^ Bungie.net: 10/05/07 Bungie Weekly What's Update!
- ^ IGN: GDC 09: The Halo 3 Level You Never Played (defunct, Archive.org backup)
- ^ a b Bungie.net: Forest For The Trees - Postmortem
- ^ Electronic Gaming Monthly: September 2007
- ^ Bungie.net: Bungie Weekly Update - 08/24/07
- ^ Bungie.net: Bungie Weekly Update 03/09/07
- ^ Bungie.net: Bungie Weekly Update 03/23/07
- ^ Bungie.net: Bungie Weekly Update 04/27/07
- ^ Bungie.net: Bungie Weekly Update 05/11/07
- ^ Xbox 360 Fanboy: Halo 3 multiplayer map names discovered (defunct, Archive.org backup)
- ^ Halo Waypoint: More Master Chief and Minecraft
- ^ Twitter, Max Hoberman (@MaxHoberman): "Those who said Guardian: excellent work! Here's the full image. Again, this was the state of the map at the end of preproduction." (Retrieved on Apr 11, 2023) [archive]
| ||||||||||||||||||||||||||||||||||||||||||||||||||||


