The Silent Cartographer: Difference between revisions
From Halopedia, the Halo wiki
(Expansion of Production notes section and updating references) |
|||
| Line 1: | Line 1: | ||
{{Era|RW}} | {{Era|RW}} | ||
{{ | {{disambig header|the campaign level|the map room of Installation 04|Cartographer}} | ||
{{Level infobox | {{Level infobox | ||
|pagegamelabel=CE | |pagegamelabel=CE | ||
| Line 13: | Line 13: | ||
|place= On the surface of [[Installation 04]] | |place= On the surface of [[Installation 04]] | ||
|objective=Find and access the [[Cartographer]] | |objective=Find and access the [[Cartographer]] | ||
{{C|''Master Chief Collection'' | {{C|''Master Chief Collection''}} | ||
|partime=00:15:00 {{C|''Master Chief Collection'' | |partime=00:15:00 {{C|''Master Chief Collection''}} | ||
|parscore=18,000 {{C|''Master Chief Collection'' | |parscore=18,000 {{C|''Master Chief Collection''}} | ||
}} | }} | ||
| Line 23: | Line 23: | ||
The [[Covenant]] believe that [[Installation 04|Halo]]'s map room, the [[Silent Cartographer]], is located somewhere under an island, with multiple structures concealing the installation. The [[John-117|Master Chief]] leads the [[United Nations Space Command|UNSC]] [[UNSC Marine Corps|Marines]] in an [[Battle of the Silent Cartographer|assault]] on that island in order to locate the [[Control Room]]. | The [[Covenant]] believe that [[Installation 04|Halo]]'s map room, the [[Silent Cartographer]], is located somewhere under an island, with multiple structures concealing the installation. The [[John-117|Master Chief]] leads the [[United Nations Space Command|UNSC]] [[UNSC Marine Corps|Marines]] in an [[Battle of the Silent Cartographer|assault]] on that island in order to locate the [[Control Room]]. | ||
==Transcript== | ==Transcript== | ||
| Line 250: | Line 246: | ||
''Level ends.'' | ''Level ends.'' | ||
==Achievements== | |||
The following [[achievement]]s can be unlocked on The Silent Cartographer across the [[Xbox 360]] and ''[[Halo: The Master Chief Collection]]'' editions of ''Halo: Combat Evolved Anniversary''. The original [[Xbox]] and [[Halo: Combat Evolved (PC port)|PC]] and [[Halo: Combat Evolved for Macintosh|Macintosh]] releases of ''Halo: Combat Evolved'' did not contain achievement unlocks. | |||
{| class="wikitable" | |||
|- | |||
! scope="col" style="width:135px;text-align:center;" |'''''Halo: Combat Evolved Anniversary'' (Xbox 360)''' | |||
! scope="col" style="width:135px;text-align:center;" |'''''Halo: MCC'' (Xbox One)''' | |||
! scope="col" style="width:135px;text-align:center;" |'''''Halo: MCC'' (Steam)''' | |||
! scope="col" style="width:175px;height:20px;text-align:center;" |'''Title''' | |||
! scope="col" style="width:350px;height:20px;text-align:center;" |'''Unlock requirement''' | |||
! scope="col" style="width:200px;height:20px;text-align:center;" |'''Games''' | |||
|- | |||
|[[File:HCEA Achievement The Silent Cartographer.png|center|64px]] | |||
|[[File:HTMCC HCEA Achievement TheSilentCartographer.png|center|114px]] | |||
|[[File:HTMCC HCEA Achievement Steam TheSilentCartographer.jpg|center|64px]] | |||
|<center>'''[[The Silent Cartographer (achievement)|The Silent Cartographer]]'''</center> | |||
|Beat The Silent Cartographer on any difficulty. | |||
|<center>''[[Halo: Combat Evolved Anniversary]]''<br/>''[[Halo: The Master Chief Collection]]''</center> | |||
|- | |||
|[[File:ACH24.png|center|64px]] | |||
|[[File:HTMCC HCEA Achievement Beachhead.png|center|114px]] | |||
|[[File:HTMCC Achievement Beachhead Steam.jpg|center|64px]] | |||
|<center>'''[[Beachhead (achievement)|Beachhead]]'''</center> | |||
|Storm The Silent Cartographer beach with no Marine casualties on Heroic or Legendary. | |||
|<center>''[[Halo: Combat Evolved Anniversary]]''<br/>''[[Halo: The Master Chief Collection]]''</center> | |||
|- | |||
|[[File:ACH25.png|center|64px]] | |||
|<center>N/A</center> | |||
|<center>N/A</center> | |||
|<center>'''[[Grenadier (achievement)|Grenadier]]'''</center> | |||
|Escape the map room in The Silent Cartographer without firing a shot on Heroic or Legendary. | |||
|<center>''[[Halo: Combat Evolved Anniversary]]''</center> | |||
|- | |||
|<center>N/A</center> | |||
|[[File:HTMCC HCEA Achievement Pacifist.png|center|114px]] | |||
|[[File:HTMCC HCEA Achievement Pacifist.jpg|center|64px]] | |||
|<center>'''[[Pacifist]]'''</center> | |||
|Finish The Silent Cartographer without shooting, grenades, melee, dying or restarting. | |||
|<center>''[[Halo: The Master Chief Collection]]''</center> | |||
|- | |||
|<center>N/A</center> | |||
|[[File:HTMCC HCEA Achievement HitTheBeach.png|center|114px]] | |||
|[[File:HTMCC HCEA Achievement Steam Hit The Beach.jpg|center|64px]] | |||
|<center>'''[[Hit The Beach]]'''</center> | |||
|Beat the par time on The Silent Cartographer. | |||
|<center>''[[Halo: The Master Chief Collection]]''</center> | |||
|- | |||
|<center>N/A</center> | |||
|[[File:HTMCC HCEA Achievement Charted.png|center|114px]] | |||
|[[File:HTMCC HCEA Achievement Steam Charted.jpg|center|64px]] | |||
|<center>'''[[Charted]]'''</center> | |||
|Beat the par score on The Silent Cartographer. | |||
|<center>''[[Halo: The Master Chief Collection]]''</center> | |||
|- | |||
|<center>N/A</center> | |||
|[[File:HTMCC HCEA Achievement IdleHands.png|center|114px]] | |||
|[[File:HTMCC HCEA Achievement Steam IdleHands.jpg|center|64px]] | |||
|<center>'''[[Idle Hands]]'''</center> | |||
|Find the [[Terminal (Halo: Combat Evolved Anniversary)|Terminal]] on The Silent Cartographer. | |||
|<center>''[[Halo: The Master Chief Collection]]''</center> | |||
|- | |||
|<center>N/A</center> | |||
|[[File:HTMCC HCEA Achievement SkulltakerBandana.png|center|114px]] | |||
|[[File:HTMCC HCEA Achievement Steam SkulltakerBandana.jpg|center|64px]] | |||
|<center>'''[[Skulltaker Halo: CE: Bandana]]'''</center> | |||
|Find the [[Halo: Combat Evolved Anniversary Skulls#Bandana|Bandana Skull]] on The Silent Cartographer. | |||
|<center>''[[Halo: The Master Chief Collection]]''</center> | |||
|- | |||
|<center>N/A</center> | |||
|[[File:HTMCC HCEA Achievement SkulltakerFamine.png|center|114px]] | |||
|[[File:HTMCC HCEA Achievement Steam SkulltakerFamine.jpg|center|64px]] | |||
|<center>'''[[Skulltaker Halo: CE: Famine]]'''</center> | |||
|Find the [[Halo: Combat Evolved Anniversary Skulls#Famine|Famine Skull]] on The Silent Cartographer. | |||
|<center>''[[Halo: The Master Chief Collection]]''</center> | |||
|} | |||
==Production notes== | |||
Known as "B-30" during development, the level geometry for ''The Silent Cartographer'' went through multiple design iterations by Bungie employees, including Art Director [[Marcus Lehto]] and Environmental Artist [[Paul Russel]].{{Ref/YouTube|Id=IGN|9ndZbg8Mr-Q|IGN|Halo: Combat Evolved Devs React to Speedrun (Martin O’Donnell, Marcus Lehto)}} | |||
As one of the first levels constructed, it was originally a testbed sandbox where Bungie tested lighting, graphics, weapons or vehicles.{{Ref/Film|Id=Commentary|[[Halo 3 Legendary Edition|''Halo 3'' Legendary Edition]], Halo: Combat Evolved developer commentary}} | |||
The level geometry was given to designer [[Jaime Griesemer]], who then led the design on level objective and combat encounters.{{Ref/Reuse|Id=IGN}} The wave-advancing artificial intelligence for the opening beach assault, in particular, became one of the two AI scripts Griesemer and programmer [[Chris Butcher]] developed for the game, the other being the defensive AI seen throughout other levels.{{Ref/Film|[[Bungie ViDoc: O Brave New World]]}} The original objective of the level was to assassinate a Covenant [[San'Shyuum|Prophet]] who was searching for the Silent Cartographer. This early iteration of Prophet was described as "an Elite with a funny hat". The idea was partly reused in ''[[Halo 2]]'' campaign level ''[[Regret (Halo 2 level)|Regret]]''.{{Ref/Reuse|Id=Commentary}} The [[Huragok]] were meant to appear on this level, but were removed from the game, though their tags remained in the map file. | |||
The level was first showcased by Project Lead [[Jason Jones]] and Director of Cinematics [[Joseph Staten]] during the gameplay demo of ''Halo Combat Evolved'' at Microsoft Gamestock 2001. In the demo, John-117 arrived at the island on a Banshee, and drove a Warthog to the Cartographer facility. The Spartan ventured deeper into the facility, defeating Covenant defences before reaching the Cartographer. When activated, the Cartographer displayed the spinning hologram that became the hologram at the security override station in the final game. The demo did not feature any cinematics or scripted dialogue. Instead, Staten narrated the game’s premise as an introduction while the full track ''[[Truth and Reconciliation Suite]]'' plays as background music.{{Ref/YouTube|Id=gamestock|6uvDdjN7qKE|Martin O’Donnell|Halo Gamestock 2001}}{{Ref/Site|URL=https://www.gamespot.com/articles/gamestock-2001-hands-on-halo/1100-2696082|Site=GameSpot|Page=Gamestock 2001: Hands-on: Halo}} | |||
By [[Halo: Combat Evolved Beta 1749|''Halo: Combat Evolved'' Beta 1749]], the general level design has been completed. Minor changes and additions were made prior to the final release: for example, Steve Abeyta added a unique sitting animation for the Marine sitting opposite of John-117 in the Pelican at the beginning of the level, and [[Shi Kai Wang]] animated the Halo ring breaking into pieces when the Cartographer was being accessed by John-117.{{Ref/Reuse|Id=Commentary}} | |||
A level was supposed to take place between this level and ''[[Assault on the Control Room]]'', however it was cut and instead replaced by the cinematic in which ''Echo 419'' enters the tunnel to explain the drastic change in settings from a tropical island to a snowy canyon.{{Ref/Reuse|Id=Commentary}} | |||
The events of the level were expanded in the novel ''[[Halo: The Flood]]'', including the appearances of two ODSTs ([[Hosky]] and an [[unidentified corporal]]) while the two Mgalekgolo at the Cartographer’s entrance were given the names [[Ogada Nosa Fasu]] and [[Igido Nosa Hurru]].{{Ref/Novel|Halo: The Flood|Page=162}} The appearance of Gunnery Sergeant [[Marcus Stacker]] was substituted by Sergeant [[Waller]]. | |||
The remastered ''The Silent Cartographer'' was the first level revealed for ''Halo: Combat Evolved Anniversary'' in 2011.{{Ref/YouTube|f1PkUrEggu4|HALO|Halo: Anniversary Campaign Demo}} In ''Halo: Combat Evolved Anniversary'', the stone at the end of the platform during the "Shafted" chapter cinematic has been removed. Instead, the Master Chief kicks an Unggoy methane mask over the edge. | |||
''The Silent Cartographer'' would be repurposed or referenced in the later ''Halo'' games. The level geometry became the basis for the ''[[Halo PC]]'' [[multiplayer]] map ''[[Death Island]]''. In the ''[[Halo 2]]'' campaign level ''[[The Great Journey]]'', the landing pad of the [[Bastion of the Brutes]] heavily resembled entrance of the Cartographer. In ''[[Halo 3]]'', the layout of the two rooms immediately following the locked door inside the Cartographer facility were recreated by Paul Russel for the Cartographer of [[Installation 00]] in the campaign level ''[[The Ark (level)|The Ark]]''. Additionally, a similar shaped island can be found in [[Halo (Halo 3 level)|the final level of ''Halo 3'']], depicted as an unfinished island that is a major feature of the landscape as the player drives along the collapsing [[Installation 08]]. The island, like the rest of the visible landscape, is still snowy, surrounded by metal structures and unfinished, but from above it is nearly identical in shape. John-117 drives around it just before the final jump into the {{UNSCShip|Forward Unto Dawn}}. In ''[[Halo 5: Guardians]]'', the [[Warzone]] map ''[[Raid on Apex 7]]'' was designed as a spiritual successor of ''The Silent Cartographer'', featuring a similar tropical island with Forerunner structures.{{Ref/Site|URL=https://www.gamespot.com/articles/halo-5-new-warzone-map-is-biggest-ever-inspired-by/1100-6428728|Site=GameSpot|Page=Halo 5 New Warzone Map Is Biggest Ever, Inspired By Original Halo}} | |||
<center> | |||
<gallery heights="300"> | |||
File:HTMCC Cartographer Comparison1.jpg|A comparison between the Cartographers of Installation 04 and Installation 00. | |||
File:HTMCC Cartographer Comparison2.jpg|Another comparison between the Cartographers of Installation 04 and Installation 00. | |||
File:IslandCompare.jpg|A comparison between The Silent Cartographer and a landscape similar to it at the end of the ''Halo 3'' level [[Halo (Halo 3 level)|Halo]]. | |||
</gallery> | |||
</center> | |||
==Trivia== | ==Trivia== | ||
| Line 256: | Line 352: | ||
*The Zealot in the first part of level who stands behind the door can be killed using several Magnum magazines or a lucky plasma grenade; however, he will still appear later in the level. | *The Zealot in the first part of level who stands behind the door can be killed using several Magnum magazines or a lucky plasma grenade; however, he will still appear later in the level. | ||
*It is possible to get on top of the island by grenade jumping, or via a a Mgalekgolo melee boost. | *It is possible to get on top of the island by grenade jumping, or via a a Mgalekgolo melee boost. | ||
*It is also possible to drive the Warthog into the door before it locks near the beginning of the level. The door will close through the midsection of the Warthog, with the driver and passenger seats on the other side of the locked door. The person driving is able to get out of the Warthog at this point and stay on the other side of the doorway, skipping a large chunk of the level. If done, the Zealot on the other side will not move or act, and can be killed easily, though he will appear again upon coming back up when exiting the Cartographer. This glitch is quite hard to do, requiring that the Warthog be driven at full speed and with perfect accuracy into the doorway, and requires a bit of luck and knowledge of the path. The trick also can be done as player can dismount quickly before the door closes without having a Warthog get past through the door. | *It is also possible to drive the Warthog into the door before it locks near the beginning of the level. The door will close through the midsection of the Warthog, with the driver and passenger seats on the other side of the locked door. The person driving is able to get out of the Warthog at this point and stay on the other side of the doorway, skipping a large chunk of the level. If done, the Zealot on the other side will not move or act, and can be killed easily, though he will appear again upon coming back up when exiting the Cartographer. This glitch is quite hard to do, requiring that the Warthog be driven at full speed and with perfect accuracy into the doorway, and requires a bit of luck and knowledge of the path. The trick also can be done as player can dismount quickly before the door closes without having a Warthog get past through the door.{{Ref/Reuse|Id=IGN}} | ||
*A Warthog can be driven down into the main structure to where the locked door is. If the Marines in the Warthog stay in the tunnels they will survive the [[Covenant]] attack at the end of the level. If the player manages to get the Warthog even further into the tunnel, where they first met the Zealot, and get inside, the Marines will freeze. | *A Warthog can be driven down into the main structure to where the locked door is. If the Marines in the Warthog stay in the tunnels they will survive the [[Covenant]] attack at the end of the level. If the player manages to get the Warthog even further into the tunnel, where they first met the Zealot, and get inside, the Marines will freeze. | ||
*All Marines inside the tunnel that leads to the main structure will survive regardless of whether they are riding the Warthog or not at the end of the level. The player can save as many Marines as they can, although one should make sure not to let the Marines mount the Warthog again when dismounting them inside the tunnel. | *All Marines inside the tunnel that leads to the main structure will survive regardless of whether they are riding the Warthog or not at the end of the level. The player can save as many Marines as they can, although one should make sure not to let the Marines mount the Warthog again when dismounting them inside the tunnel. | ||
| Line 267: | Line 363: | ||
===References=== | ===References=== | ||
*The beginning of the level resembles the beach landings, or [[Wikipedia:Normandy Landings|D-Day]], from [[Wikipedia:World War II|World War II]], with the Marines and Master Chief landing on a beach, pushing forward into enemy fortifications. | *The beginning of the level resembles the beach landings, or [[Wikipedia:Normandy Landings|D-Day]], from [[Wikipedia:World War II|World War II]], with the Marines and Master Chief landing on a beach, pushing forward into enemy fortifications. | ||
*The level was recreated in the [[Halo Mash-Up: Minecraft Evolved]].{{Ref/Site|URL=https://www.halowaypoint.com/en-us/news/halo-mash-up-pack-available-now|Site=Halo Waypoint|Page=Halo Mash-Up Pack Available Now}} | |||
*Captain Keyes' quote "failure, people, is not an option" is a reference to the original quote by Ed Harris in the movie ''[[Wikipedia:Apollo 13 (film)|Apollo 13]]''. | |||
*The level was recreated in the [[Halo Mash-Up: Minecraft Evolved]]. | |||
*Captain Keyes' quote "failure, people, is not an option" is a reference to the original quote by Ed Harris in the movie '' | |||
===Miscellaneous=== | ===Miscellaneous=== | ||
* This is the only level in Halo CE to feature an Ocean. players will ''not'' drown if they drive a [[Warthog]] out into the sea, which extends out roughly half a kilometer in every direction from the shore before abruptly ending at an invisible wall. At these distances, the Warthog will be fully submerged, and underwater, there are odd effects on lighting, in that the flashlight has no effect and everything is pitch black, including most of the player's arm and gun. This lack of a kill-area also applies to NPCs; enemies lured out into the sea will not die, and any marines riding on the Warthog will not only survive being submerged, they can even freely speak underwater. This curious feature of ocean exploration remains fully intact in ''Anniversary''. | * This is the only level in Halo CE to feature an Ocean. players will ''not'' drown if they drive a [[Warthog]] out into the sea, which extends out roughly half a kilometer in every direction from the shore before abruptly ending at an invisible wall. At these distances, the Warthog will be fully submerged, and underwater, there are odd effects on lighting, in that the flashlight has no effect and everything is pitch black, including most of the player's arm and gun. This lack of a kill-area also applies to NPCs; enemies lured out into the sea will not die, and any marines riding on the Warthog will not only survive being submerged, they can even freely speak underwater. This curious feature of ocean exploration remains fully intact in ''Anniversary''. | ||
* Interestingly, [[Sergeant Waller]] can be brought into the facility as a passenger in the Warthog. However, he will still talk on the radio to Cortana and ''Echo 419'' as though he is back at the Landing Zone. | * Interestingly, [[Sergeant Waller]] can be brought into the facility as a passenger in the Warthog. However, he will still talk on the radio to Cortana and ''Echo 419'' as though he is back at the Landing Zone. | ||
* At the flipped Warthog at the interior path there are four dead Marines, one more than the Hog can carry. This may have occurred through a similar circumstance to when [[Corporal Harland]] had [[Cochran|one of]] his soldiers lie under the LAAG during the [[Battle of Sigma Octanus IV]]. | * At the flipped Warthog at the interior path there are four dead Marines, one more than the Hog can carry. This may have occurred through a similar circumstance to when [[Corporal Harland]] had [[Cochran|one of]] his soldiers lie under the LAAG during the [[Battle of Sigma Octanus IV]].{{Ref/Novel|Halo: The Fall of Reach|Page=165}} | ||
* On Easy and Normal difficulties, in the initial Pelican ride, the Chief sits next to Sergeant Waller on ''Echo 419''; however, on Heroic and Legendary difficulties, the Chief sits next to an Asian Marine. | * On Easy and Normal difficulties, in the initial Pelican ride, the Chief sits next to Sergeant Waller on ''Echo 419''; however, on Heroic and Legendary difficulties, the Chief sits next to an Asian Marine. | ||
* This level is the most popular to perform [[Warthog Jumping]] on, due to the large number of Marines, Warthogs, and the presence of rocket launchers. Its popularity lead to the creation of the flash game called Pelican.{{citation needed}} | * This level is the most popular to perform [[Warthog Jumping]] on, due to the large number of Marines, Warthogs, and the presence of rocket launchers. Its popularity lead to the creation of the flash game called Pelican.{{citation needed}} | ||
* Strangely, there are Shotgun ammo boxes scattered in some points of the island, though they are only meant to appear [[343 Guilty Spark (level)|two levels later.]] The same happens in the [[Truth and Reconciliation (level)|previous level]] and in the [[Assault on The Control Room|next one | * Strangely, there are Shotgun ammo boxes scattered in some points of the island, though they are only meant to appear [[343 Guilty Spark (level)|two levels later.]] The same happens in the [[Truth and Reconciliation (level)|previous level]] and in the [[Assault on The Control Room|next one]]. | ||
* If the player returns to the circular open area where the pair Hunters are confronted before boarding onto [[Echo-419]], there will be a landed Spirit dropship with a lance of Grunts and Jackals guarding it. These lances were probably part of the forces that overwhelmed the Marines guarding the beach. | * If the player returns to the circular open area where the pair Hunters are confronted before boarding onto [[Echo-419]], there will be a landed Spirit dropship with a lance of Grunts and Jackals guarding it. These lances were probably part of the forces that overwhelmed the Marines guarding the beach. | ||
*When entering the chamber of the unlocked door in the Cartographer building, there is a large locked vent-like installation in the wall of the first room with sleeping Grunts. This vent-like component may be some sort of inactive [[Sentinel launcher]]. | *When entering the chamber of the unlocked door in the Cartographer building, there is a large locked vent-like installation in the wall of the first room with sleeping Grunts. This vent-like component may be some sort of inactive [[Sentinel launcher]]. | ||
* In ''Anniversary'', the beginning of the level (during the ride on a Pelican) is treated as a cutscene. On [[cooperative play]], the screen will remain as one HUD until the Pelicans land. This is similar to the ''[[Halo: Reach]]'' campaign level ''[[The Package]]'', though the second player has no control of the HUD in this case. | * In ''Anniversary'', the beginning of the level (during the ride on a Pelican) is treated as a cutscene. On [[cooperative play]], the screen will remain as one HUD until the Pelicans land. This is similar to the ''[[Halo: Reach]]'' campaign level ''[[The Package]]'', though the second player has no control of the HUD in this case. | ||
==Gallery== | ==Gallery== | ||
{{Linkbox|gallery=yes|gallerypage= Images of Silent Cartographer}} | |||
===Halo: Combat Evolved=== | ===Halo: Combat Evolved=== | ||
<gallery> | <gallery> | ||
| Line 302: | Line 387: | ||
File:Sangheili Beach.jpg|[[Covenant]] forces confronting the passengers of [[Pelicans]] ''[[Echo 419]]'' and ''[[Bravo 022]]''. | File:Sangheili Beach.jpg|[[Covenant]] forces confronting the passengers of [[Pelicans]] ''[[Echo 419]]'' and ''[[Bravo 022]]''. | ||
File:Carto02.jpg|John-117 accesses the Cartographer. | File:Carto02.jpg|John-117 accesses the Cartographer. | ||
</gallery> | </gallery> | ||
===Halo: Combat Evolved Anniversary=== | ===Halo: Combat Evolved Anniversary=== | ||
<gallery> | <gallery> | ||
File:HCEA-Concept-SilentCartographer.jpg|Concept art of the beach attack | File:HCEA-Concept-SilentCartographer.jpg|Concept art of the beach attack. | ||
File:HCEA-Concept-SilentCartographer-Chief.jpg|Concept art of the Chief traversing the island. | File:HCEA-Concept-SilentCartographer-Chief.jpg|Concept art of the Chief traversing the island. | ||
File:HCEA MakeMyDay Concept.jpg|OXM magazine cover of John-117 on the level. | File:HCEA MakeMyDay Concept.jpg|OXM magazine cover of John-117 on the level. | ||
| Line 313: | Line 397: | ||
File:HCEA-TheSilentCartographerWarthog.png|John-117 and two Marines on a Warthog. | File:HCEA-TheSilentCartographerWarthog.png|John-117 and two Marines on a Warthog. | ||
</gallery> | </gallery> | ||
{{clear}} | {{clear}} | ||
Revision as of 13:37, March 5, 2021
|
Prev: |
|
|
Next: |
|
| The Silent Cartographer | |
|---|---|

| |
|
Game: |
|
|
Player: |
|
|
Date: |
|
|
Location: |
On the surface of Installation 04 |
|
Objective(s): |
Find and access the Cartographer (Master Chief Collection) |
|
Par Time: |
00:15:00 (Master Chief Collection) |
|
Par Score: |
18,000 (Master Chief Collection) |
 |
Halopedia has a walkthrough guide for this level; see The Silent Cartographer/Walkthrough. |
| “ | Search for the map room that will lead you to the secrets of Halo. | ” |
The Silent Cartographer is the fourth campaign level in Halo: Combat Evolved.
The Covenant believe that Halo's map room, the Silent Cartographer, is located somewhere under an island, with multiple structures concealing the installation. The Master Chief leads the UNSC Marines in an assault on that island in order to locate the Control Room.
Transcript
The Silent Cartographer
{Original Cutscene} {Anniversary Cutscene}

Two Pelican dropships, Echo 419, in front, and Bravo 022, in back, approach an island, low over the water. The Master Chief is inside Echo 419.
{Gameplay}
- Cortana: "The Covenant believe that what they call the "Silent Cartographer" is somewhere under this island. The Cartographer is a map room that will lead us to Halo's control center. The island has multiple structures and installations. One of them contains the map room."
The Pelican dropships descend on the beach's corner. Covenant troops begin firing at them.
- Flight Captain Carol Rawley (COM): "We're approaching the LZ, it's gonna be hot! Get set to come out swingin'. Touchdown! Hit it, Marines!"
- Gunnery Sergeant Waller: "Go, go, go!"
or
- Gunnery Sergeant Waller: "Pile out people, let's move!"
or
- Marine #1: "Pile out! Go, go, go!"
The UNSC forces move forward, and eventually the beach is cleared of Covenant hostiles.
- Marine #1: "Area's secure. All hostiles have been eliminated."
or
- Cortana: "Area's secure."
- Rawley (COM): "Affirmative. Echo 419 inbound. Somebody order a Warthog?"
- Marine #2 (COM): "Hey, I didn't know you made house calls, Foehammer!"
or
- Marine #1 (COM): "Music to my ears, Foehammer!"
- Rawley (COM): "You know our motto: We Deliver."

As the Chief boards the driver seat of the Warthog, two Marines occupy the passenger seat and the turret.
- Cortana: "Okay, let's move out. Let's go find the map room that will show us the location of Halo's control center."
The Warthog proceeds to drive off around the island, encountering Covenant resistance. The vehicle approaches a structure protruding out of the cliff wall. A Spirit dropship beside it takes off.
- Cortana: "There, in the cliff wall; I'll bet the Silent Cartographer is somewhere inside that facility."
- Cortana: "They're already inside! We need to get in there quick, before they discover the location of Halo's control center!"
- Marine: "Anyone else see what I see? How are we supposed to get around that, huh?"
They eliminate the patrolling troops outside the structure.
- Cortana: "The Covenant are putting up a real fight! The Cartographer must be here. My analysis indicates that the map room should be at the bottom floor of this facility. Let's keep going inside."
The Chief enters the structure and reaches the top a slope that leads to an open door. A group of Covenant stand guard at the door, with a Sangheili Zealot blocking the way in.
- Cortana: "Don't let them lock the doors!"
The doors close as the guards, except for the Zealot, are eliminated.
- Cortana: "Interesting... I underestimated the Covenant's understanding of Halo's subsystems. They've locked the doors, and we don't have enough firepower to get through them."
- Cortana (COM): "Cortana to Keyes."
- Captain Jacob Keyes (COM): "Go ahead, Cortana. Have you found the control center?"
- Cortana (COM): "Negative, Captain. The Covenant have impeded our progress. We can't proceed unless we can disable this installation's security system."
- Keyes (COM): (slight pause) "Understood. We're still en route to the objective. I may be out of contact when we get there. (pause) Here are your orders. I want you to use any means necessary to force your way into the facility and find Halo's control center. We have to get to the center before the Covenant, and failure, people, is not an option."
- Rawley (COM): "Echo 419 to ground teams. I'll stay on station and keep an eye out for Covenant bogies."
- Waller (COM): "Second squad, ready to roll! Soon as everybody's topside!"
- Marine #3 (COM): "LZ looks secure, Sir, nothing moving."
- Keyes (COM): "Good luck, people. Keyes out."
- Cortana: "We need to find the security override to get this door open."

The Chief returns to the surface and explores the island on the Warthog. He eventually passes the substation, which juts out of a cliff.
- Cortana: "Well, there's the entrance to the security substation, but it looks like we'll have to look for another way up."
They come across a path guarded by Covenant leading up into the island.
- Cortana: "It looks like there is a path leading to the interior of the island."
The Chief makes his way towards the security substation, fighting past multiple Covenant troops including a pair of Mgalekgolo. Eventually, he reaches the substation. Once inside, he has to deal with another pair of Mgalekgolo.
He proceeds into the facility, meeting the security override panel.
- Cortana: "Use the holo-panel to shut down the security system."
If the Security Station is entered before going to the auto-locking door to the Cartographer:
- Cortana: "This isn't the map room. Analyzing... (pause) This is a security override station for the main facility, located somewhere else on this island. Shut the system down so the Covenant won't be able to lock us out."
The Chief shuts down the system.
{Original Cutscene} {Anniversary Cutscene}

The previously locked door opens to reveal the Sangheili Zealot, who dashes out of the door in surprise, his energy sword at the ready.
- Cortana: "Good. That should open the door that leads into the main shaft."
It's Quiet...
{Gameplay}
The Chief moves down the hall from the security substation, towards the exit.
- Bravo 022 Pilot (COM): "Mayday, mayday! Dropship Bravo 022 taking enemy fire! Repeat! We are under heavy fire and are losing altitude!"
- Cortana (COM): "Understood. We're on our way."
A group of Stealth Sangheili attempt to ambush the Chief. The Chief defeats them and heads back up.
The Chief exits the substation and sees Bravo 022's wreckage on the beach below. Marine bodies and Covenant forces can be seen around it.
- Cortana: "Chief, Bravo 022 was bringing us some heavy weapons. After I saw we were up against Hunters, I thought you could use them. Let's move down the beach. Keep an eye out for any cargo we can salvage."
The Chief returns to the entrance to the Cartographer which is now guarded by another pair of Mgalekgolo. The Chief defeats them and enters the structure again. He enters through the now-unlocked door leading to the shaft. The Zealot is not present.
Shafted
{Original Cutscene} {Anniversary Cutscene}
The Master Chief walks out onto the platform overlooking the shaft and kicks a loose piece of debris (an Unggoy methane mask in Anniversary) down into the seemingly bottomless shaft. No sound is heard back. The Chief looks up and around.
{Gameplay}
The Chief moves farther down into the facility, wiping out any Covenant resistance. He moves into the third of four levels.
- Rawley (COM): "Foehammer to ground teams, you got two enemy dropships coming in fast!"
- Gunnery Sergeant Waller (COM): "Dammit! Okay, people, we got company comin', let's set the table. Engage enemy forces on sight!"
- Cortana (COM): "It'll be easier to hold them off from inside the structure. Can you get inside?"
- Waller (COM): "Negative! They're closin' in too fast, negative! (pause) Chief! You gotta find the Cartographer! We'll keep 'em busy as long as we can!"
- Cortana (COM): "Give 'em hell, Marine."
- Cortana: "We'll be in a tight spot if we don't get out of here before additional reinforcements arrive. Let's find that map."
The Chief finally reaches the Cartographer, which is guarded by multiple Sangheili. The Chief soon takes them out.
- Cortana: "There. That holo-panel should activate the map."
The Chief activates the holo-panel.
{Original Cutscene} {Anniversary Cutscene}

The Cartographer hologram display begins to spin, and the diagram of Halo begins to break into sections.
- Cortana: "Analyzing... Halo's control center is located there. That structure appears to be some sort of temple or shrine, if I've interpreted this correctly. (pause) Interesting. A shrine is an unlikely place to put such a significant installation."
{Gameplay}
- Cortana (COM): "Cortana to Captain Keyes."
No response.
- Rawley (COM): "The Captain has dropped out of contact, Cortana. His ship may be out of range or having equipment problems."
- Cortana (COM): "Keep trying. Let me know when you've reestablished contact, and then tell him that the Master Chief and I have determined the location of the control center. We'll be heading there as soon as we're topside."
- Rawley (COM): "Affirmative. Foehammer out."
Covenant reinforcements, including the Sangheili Zealot seen previously, have retaken the upper levels of the facility, forcing the Chief to fight his way back up.
The Chief reaches to the exit of the facility. Any Marines on the Warthog will have been killed by a squad of Stealth Sangheili, who the Chief quickly deals with.
- Cortana (COM): "Cortana to Echo 419. The Chief and I are topside, requesting pickup."
- Rawley (COM): "Roger. On my way."
The Pelican arrives. The Chief boards it.
{Original Cutscene} {Anniversary Cutscene}
Echo 419 lifts off from the platform and rises quickly, circling the center of the island.
- Cortana (COM): "Let's get moving. Foehammer. Here are coordinates and a flight plan I've worked up."
- Rawley (COM): "Uh, Cortana - these coordinates are underground!"

- Cortana (COM): "The Covenant did a thorough seismic scan. My analysis shows that Halo is honeycombed with deep tunnels - which circle the whole ring."
The structure where the first pair of Mgalekgolo appeared lifts up, revealing a vertical underground tunnel; Echo 419 lowers into it as the structure returns to its original position.
- Rawley (COM): "I hope your analysis is on-the-money, Cortana. This Pelican won't turn on a dime."
- Cortana (COM): "Look on the bright side, Foehammer. The last thing the Covenant will expect is an aerial insertion...from underground."
Echo 419 continues to lower through the structure. The top closes with a crash.
Fade to black.
Level ends.
Achievements
The following achievements can be unlocked on The Silent Cartographer across the Xbox 360 and Halo: The Master Chief Collection editions of Halo: Combat Evolved Anniversary. The original Xbox and PC and Macintosh releases of Halo: Combat Evolved did not contain achievement unlocks.
| Halo: Combat Evolved Anniversary (Xbox 360) | Halo: MCC (Xbox One) | Halo: MCC (Steam) | Title | Unlock requirement | Games |
|---|---|---|---|---|---|
 |
 |
 |
Beat The Silent Cartographer on any difficulty. | Halo: The Master Chief Collection | |
 |
 |
 |
Storm The Silent Cartographer beach with no Marine casualties on Heroic or Legendary. | Halo: The Master Chief Collection | |
 |
Escape the map room in The Silent Cartographer without firing a shot on Heroic or Legendary. | ||||
 |
 |
Finish The Silent Cartographer without shooting, grenades, melee, dying or restarting. | |||
 |
 |
Beat the par time on The Silent Cartographer. | |||
 |
 |
Beat the par score on The Silent Cartographer. | |||
 |
 |
Find the Terminal on The Silent Cartographer. | |||
 |
 |
Find the Bandana Skull on The Silent Cartographer. | |||
 |
 |
Find the Famine Skull on The Silent Cartographer. |
Production notes
Known as "B-30" during development, the level geometry for The Silent Cartographer went through multiple design iterations by Bungie employees, including Art Director Marcus Lehto and Environmental Artist Paul Russel.[1] As one of the first levels constructed, it was originally a testbed sandbox where Bungie tested lighting, graphics, weapons or vehicles.[2]
The level geometry was given to designer Jaime Griesemer, who then led the design on level objective and combat encounters.[1] The wave-advancing artificial intelligence for the opening beach assault, in particular, became one of the two AI scripts Griesemer and programmer Chris Butcher developed for the game, the other being the defensive AI seen throughout other levels.[3] The original objective of the level was to assassinate a Covenant Prophet who was searching for the Silent Cartographer. This early iteration of Prophet was described as "an Elite with a funny hat". The idea was partly reused in Halo 2 campaign level Regret.[2] The Huragok were meant to appear on this level, but were removed from the game, though their tags remained in the map file.
The level was first showcased by Project Lead Jason Jones and Director of Cinematics Joseph Staten during the gameplay demo of Halo Combat Evolved at Microsoft Gamestock 2001. In the demo, John-117 arrived at the island on a Banshee, and drove a Warthog to the Cartographer facility. The Spartan ventured deeper into the facility, defeating Covenant defences before reaching the Cartographer. When activated, the Cartographer displayed the spinning hologram that became the hologram at the security override station in the final game. The demo did not feature any cinematics or scripted dialogue. Instead, Staten narrated the game’s premise as an introduction while the full track Truth and Reconciliation Suite plays as background music.[4][5]
By Halo: Combat Evolved Beta 1749, the general level design has been completed. Minor changes and additions were made prior to the final release: for example, Steve Abeyta added a unique sitting animation for the Marine sitting opposite of John-117 in the Pelican at the beginning of the level, and Shi Kai Wang animated the Halo ring breaking into pieces when the Cartographer was being accessed by John-117.[2]
A level was supposed to take place between this level and Assault on the Control Room, however it was cut and instead replaced by the cinematic in which Echo 419 enters the tunnel to explain the drastic change in settings from a tropical island to a snowy canyon.[2]
The events of the level were expanded in the novel Halo: The Flood, including the appearances of two ODSTs (Hosky and an unidentified corporal) while the two Mgalekgolo at the Cartographer’s entrance were given the names Ogada Nosa Fasu and Igido Nosa Hurru.[6] The appearance of Gunnery Sergeant Marcus Stacker was substituted by Sergeant Waller.
The remastered The Silent Cartographer was the first level revealed for Halo: Combat Evolved Anniversary in 2011.[7] In Halo: Combat Evolved Anniversary, the stone at the end of the platform during the "Shafted" chapter cinematic has been removed. Instead, the Master Chief kicks an Unggoy methane mask over the edge.
The Silent Cartographer would be repurposed or referenced in the later Halo games. The level geometry became the basis for the Halo PC multiplayer map Death Island. In the Halo 2 campaign level The Great Journey, the landing pad of the Bastion of the Brutes heavily resembled entrance of the Cartographer. In Halo 3, the layout of the two rooms immediately following the locked door inside the Cartographer facility were recreated by Paul Russel for the Cartographer of Installation 00 in the campaign level The Ark. Additionally, a similar shaped island can be found in the final level of Halo 3, depicted as an unfinished island that is a major feature of the landscape as the player drives along the collapsing Installation 08. The island, like the rest of the visible landscape, is still snowy, surrounded by metal structures and unfinished, but from above it is nearly identical in shape. John-117 drives around it just before the final jump into the UNSC Forward Unto Dawn. In Halo 5: Guardians, the Warzone map Raid on Apex 7 was designed as a spiritual successor of The Silent Cartographer, featuring a similar tropical island with Forerunner structures.[8]
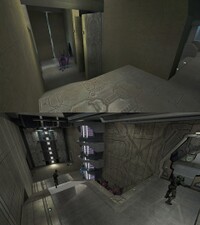
A comparison between the Cartographers of Installation 04 and Installation 00.
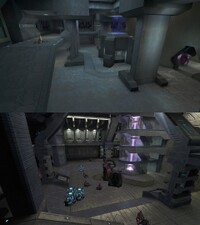
Another comparison between the Cartographers of Installation 04 and Installation 00.
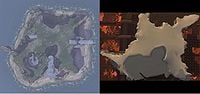
A comparison between The Silent Cartographer and a landscape similar to it at the end of the Halo 3 level Halo.


Trivia
Glitches
- If the player doesn't move from the very beginning of the level until the Marines have cleared the beach and the Warthog is down, the normal dialogue will start with Cortana saying to move up the beach, without you being there to start it by getting in the driver seat of the Warthog.
- The Zealot in the first part of level who stands behind the door can be killed using several Magnum magazines or a lucky plasma grenade; however, he will still appear later in the level.
- It is possible to get on top of the island by grenade jumping, or via a a Mgalekgolo melee boost.
- It is also possible to drive the Warthog into the door before it locks near the beginning of the level. The door will close through the midsection of the Warthog, with the driver and passenger seats on the other side of the locked door. The person driving is able to get out of the Warthog at this point and stay on the other side of the doorway, skipping a large chunk of the level. If done, the Zealot on the other side will not move or act, and can be killed easily, though he will appear again upon coming back up when exiting the Cartographer. This glitch is quite hard to do, requiring that the Warthog be driven at full speed and with perfect accuracy into the doorway, and requires a bit of luck and knowledge of the path. The trick also can be done as player can dismount quickly before the door closes without having a Warthog get past through the door.[1]
- A Warthog can be driven down into the main structure to where the locked door is. If the Marines in the Warthog stay in the tunnels they will survive the Covenant attack at the end of the level. If the player manages to get the Warthog even further into the tunnel, where they first met the Zealot, and get inside, the Marines will freeze.
- All Marines inside the tunnel that leads to the main structure will survive regardless of whether they are riding the Warthog or not at the end of the level. The player can save as many Marines as they can, although one should make sure not to let the Marines mount the Warthog again when dismounting them inside the tunnel.
Easter eggs
- In Halo: Combat Evolved Anniversary, the fourth terminal can be found against the Marathon-symbol-shaped structure where the first pair of Mgalekgolo is fought, on the circular part and beneath the horizontal column.
- In Anniversary, the Famine skull can be found on the small plateau where the Pelican Bravo 022 crashed into. The skull is right on the corner in between three bushes.
- In Anniversary, Bandanna skull can be found at the end of the tunnel, on the ceiling in the security console chamber. The player needs to use explosive jump to reach the column. An alternative method is for the first player to crouch on the window strip in the tunnel below the skull, then having a second player kill himself and subsequently respawn on top of the first player. The skull would then be instantly acquired.
- In Anniversary, the image for the level features an Arbiter in the top left corner.
References
- The beginning of the level resembles the beach landings, or D-Day, from World War II, with the Marines and Master Chief landing on a beach, pushing forward into enemy fortifications.
- The level was recreated in the Halo Mash-Up: Minecraft Evolved.[9]
- Captain Keyes' quote "failure, people, is not an option" is a reference to the original quote by Ed Harris in the movie Apollo 13.
Miscellaneous
- This is the only level in Halo CE to feature an Ocean. players will not drown if they drive a Warthog out into the sea, which extends out roughly half a kilometer in every direction from the shore before abruptly ending at an invisible wall. At these distances, the Warthog will be fully submerged, and underwater, there are odd effects on lighting, in that the flashlight has no effect and everything is pitch black, including most of the player's arm and gun. This lack of a kill-area also applies to NPCs; enemies lured out into the sea will not die, and any marines riding on the Warthog will not only survive being submerged, they can even freely speak underwater. This curious feature of ocean exploration remains fully intact in Anniversary.
- Interestingly, Sergeant Waller can be brought into the facility as a passenger in the Warthog. However, he will still talk on the radio to Cortana and Echo 419 as though he is back at the Landing Zone.
- At the flipped Warthog at the interior path there are four dead Marines, one more than the Hog can carry. This may have occurred through a similar circumstance to when Corporal Harland had one of his soldiers lie under the LAAG during the Battle of Sigma Octanus IV.[10]
- On Easy and Normal difficulties, in the initial Pelican ride, the Chief sits next to Sergeant Waller on Echo 419; however, on Heroic and Legendary difficulties, the Chief sits next to an Asian Marine.
- This level is the most popular to perform Warthog Jumping on, due to the large number of Marines, Warthogs, and the presence of rocket launchers. Its popularity lead to the creation of the flash game called Pelican.[citation needed]
- Strangely, there are Shotgun ammo boxes scattered in some points of the island, though they are only meant to appear two levels later. The same happens in the previous level and in the next one.
- If the player returns to the circular open area where the pair Hunters are confronted before boarding onto Echo-419, there will be a landed Spirit dropship with a lance of Grunts and Jackals guarding it. These lances were probably part of the forces that overwhelmed the Marines guarding the beach.
- When entering the chamber of the unlocked door in the Cartographer building, there is a large locked vent-like installation in the wall of the first room with sleeping Grunts. This vent-like component may be some sort of inactive Sentinel launcher.
- In Anniversary, the beginning of the level (during the ride on a Pelican) is treated as a cutscene. On cooperative play, the screen will remain as one HUD until the Pelicans land. This is similar to the Halo: Reach campaign level The Package, though the second player has no control of the HUD in this case.
Gallery

|
Browse more images in this article's gallery page. |
Halo: Combat Evolved
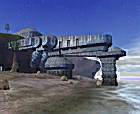
Preview of the level in Halo: Combat Evolved menu.
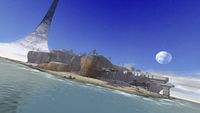
An overview of the island.
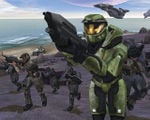
John-117 leads the charge on the beach.
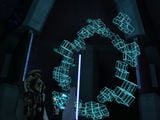
John-117 accesses the Cartographer.


Halo: Combat Evolved Anniversary
Concept art of the beach attack.

Concept art of the Chief traversing the island.

OXM magazine cover of John-117 on the level.
Marines storming the beach.
John-117 and two Marines on a Warthog.


Sources
- ^ a b c YouTube - IGN, Halo: Combat Evolved Devs React to Speedrun (Martin O’Donnell, Marcus Lehto)
- ^ a b c d Halo 3 Legendary Edition, Halo: Combat Evolved developer commentary
- ^ Bungie ViDoc: O Brave New World
- ^ YouTube - Martin O’Donnell, Halo Gamestock 2001
- ^ GameSpot, Gamestock 2001: Hands-on: Halo
- ^ Halo: The Flood, page 162
- ^ YouTube - HALO, Halo: Anniversary Campaign Demo
- ^ GameSpot, Halo 5 New Warzone Map Is Biggest Ever, Inspired By Original Halo
- ^ Halo Waypoint, Halo Mash-Up Pack Available Now
- ^ Halo: The Fall of Reach, page 165
| Preceded by The Truth and Reconciliation |
Halo Campaign Missions The Silent Cartographer |
Succeeded by Assault on the Control Room |
| |||||||||||||||||||||||


