User:JackVibe/Sandbox: Difference between revisions
From Halopedia, the Halo wiki
mNo edit summary |
|||
| (91 intermediate revisions by 3 users not shown) | |||
| Line 1: | Line 1: | ||
{{ | {{Status|Canon}} | ||
{{ | {{Center|''Are you looking for the Halo 4 [[Type-3 active camouflage|version]]? For other uses, see [[Camouflage (disambiguation)]].''}} | ||
[[File:HCE Camo Sniper.jpg|thumb|250px|A [[Spartan-II|Spartan]] using active camouflage.]] | |||
{{Quote|One of those [[Sangheili|things]] is inside, and it is ''invisible!''|Cadet [[Thomas Lasky]]{{Ref/Film|H4FUD|Episode=4}}}} | |||
'''Active camouflage''' (often shortened to '''active camo''') refers to a broad range of optical [[camouflage]] technologies that conceal or cloak its user or an object from visual detection by rapidly adapting to its surroundings.{{Ref/Book|Id=enc11|Enc11|Page=355}}{{Ref/Book|Id=h4evg|H4EVG|Page=136}} Although active camouflage originated from the [[Covenant]]—also inherited and adapted by [[Covenant remnants|its remnants]]—similar technology was employed by the [[United Nations Space Command]], with personal ppactive camouflage being directly reverse-engineered from its Covenant counterpart.{{Ref/Reuse|enc11}} | |||
Covenant active camouflage conceals by bending and refracting light around its surface. | |||
[[texture buffer]] and [[photoreactive panel]] | |||
=== | ==Personal active camouflage== | ||
===Covenant usage=== | |||
===Human usage=== | |||
==Personal active camouflage== | |||
===Covenant usage=== | |||
===Human usage=== | |||
---- | |||
Both the [[United Nations Space Command|UNSC]]<ref name="goo">'''[[Halo: Ghosts of Onyx]]''', ''page 291''</ref> and the [[Covenant]] use various forms of active camouflage technology, though the term is . | |||
[[ | |||
Technically, active camouflage is not quite invisibility, though it is very similar. Rather, the There are a variety of ways to do this, though the UNSC uses [[photoreactive panel]]s on its [[Semi-Powered Infiltration armor]] and [[prowler]] stealth ships for optical camouflage, adapting to the object's background to account for movement. Meanwhile, Covenant active camouflage actually ''bends light'' around the camouflaged object,<ref name="h4evg">'''[[Halo 4: The Essential Visual Guide]]''', ''page 136''</ref> a task well within the Covenant's [[Technological Achievement Tiers|tier two technology level]]. The technology can be utilized on human armor systems, such as the [[MJOLNIR Powered Assault Armor|MJOLNIR armor]], but the UNSC has only developed rough equivalents.<ref>'''[[Halo: The Fall of Reach]]'''</ref> | |||
The | ==Covenant active camouflage== | ||
{{Quote|Show yourselves, assassins! The scent of your cloak is faint, but it still fouls the air.|[[Atriox]] smelling active camouflage.<ref name="HP">'''[[Hunting Party]]'''</ref>}} | |||
[[File:HCE Stealth Elite in AC.png|thumb|200px|A camouflaged [[Stealth Sangheili]] aboard ''[[Cairo Station (station)|Cairo Station]]''.]] | |||
Covenant active camouflage technology uses a field of energy to bend light around the user, thus making them effectively invisible. The armor used by [[Special Operations Sangheili|Spec-Ops]] and [[Stealth Sangheili]], as well as that of [[Arbiter]]s, [[Jiralhanae Stalker]]s and even certain [[Sangheili Zealot]]s,<ref name="ReferenceA">'''Halo: Reach''', campaign level ''[[Tip of the Spear]]''</ref> include built-in active camouflage generators. These built-in generators have a severe drawback in that they divert power from shielding equipment. Troops equipped with permanent active camouflage generators tend to have weaker shielding than those not equipped with an active camouflage generator. | |||
Arbiter [[Ripa 'Moramee]] was equipped with an active camouflage generator capable of generating a near-perfect cloaking field indefinitely. Arbiter [[Thel 'Vadam]] was also equipped with an active camouflage generator, but the device was capable only of providing a cloak for a few seconds, and although 'Vadam was equipped with personal shielding, his shields were relatively weak for an individual of such high rank, equivalent to those of a [[Sangheili Minor]]. | |||
{{ | Aircraft or ships can also be equipped with active camouflage systems, including the {{Pattern|Ru'swum|Phantom}} that has its own active camouflage generators on board for various stealth missions,<ref>'''Halo 3''', campaign level ''[[The Covenant (level)|The Covenant]]''</ref> and the [[Klavbrig Workshop Shroud]] used by the [[Banished]] to cloak the advance of their armies.<ref name="HW2">'''[[Halo Wars 2]]'''</ref> Larger vessels such as [[Covenant supercarrier|supercarriers]], or entire armies, can be effectively hidden from both plain sight and sensors by using external stealth systems such as [[stealth pylon]]s and [[Cloaking Generator]]s.{{Ref/Reuse|ReferenceA}}{{Ref/Reuse|HW2}} | ||
For personnel not equipped with built-in active camouflage, it can be provided by a variety of devices. Typically, the energy used to provide the effect is suspended inside a small, transparent pyramidal container, or a larger spherical force-field. Personnel can use the light-bending energy by coming into physical contact with the container or force-field, which will cause it to break and release its contents. Upon release, the energy envelops the wearer and bends light around their skin; armor or [[energy shielding]], conforming to their form and rendering them almost invisible. After a short period of time, the energy will gradually dissipate and wear off, slowly revealing its user. The active camouflage provided by these devices lasts for ten seconds, and only prevents visual detection; those using active camouflage can be observed by other means, including motion tracking, noise, and environmental disturbances such as footprints on soft terrain. | |||
[[ | ===Function=== | ||
{{Quote|Trust me, because I heard… uhhh… from a friend, that if you have active camouflage on and do a crys, it makes a big sizzle sound and everybody can see me hidin' in the corner.|[[Dimkee Hotay]] shares his bad experience with active camo.<ref name="Alliance">'''[[Halo 5: Guardians]]''', campaign level ''[[Alliance]]''</ref>}} | |||
Covenant active camouflage will easily cloak its user, but its effect does not completely extend to items in the user's possession; [[human]] [[weapons]] are easily cloaked by active camouflage, but Covenant weapons are visible even with active camo, as the light-bending energy cannot mask the glow of the weapons' plasma. In ''Halo: Combat Evolved'', however, plasma glow is hidden quite well by the cloaking equipment. | |||
Though active camouflage is quite effective from a distance, it can faintly be seen if an observer is close enough to the wearer. However, it is difficult to spot a camouflaged opponent from a distance using a scoped weapon—actual physical proximity is required to reliably spot a person using active camo. It should be noted, though, that active camouflage does not mask environmental effects such as footprints, meaning that it is not as effective on soft terrain such as snow. | |||
The shielding provided by Covenant active camo can be disrupted if projectiles pass through it; such a disruption weakens the invisibility effect and temporarily reveals the wearer. The [[power-up]] can be disrupted if the wearer fires shots or if the wearer is hit. It also progressively worsens: the longer the wearer fires (or is hit), the more visible they become. Once the disruptions end, however, the wearer quickly regains their invisibility. | |||
[[ | Talcum powder and other atmospheric particles can disrupt the systems, causing the technology to overload and fail.<ref name="firststrike">'''[[Halo: First Strike]]'''</ref> The device also generates a considerable amount of heat, causing its user to be clearly visible on human thermal goggles and some variations of the [[SRS99C-S2 AM sniper rifle]].<ref>'''[[Halo: The Flood]]'''</ref> The humans of [[Alpha Base (Installation 04)|Alpha Base]] on [[Installation 04]] used this advantage when their base was infiltrated by stealth Elites, equipping their [[fireteam]]s with infrared goggles allowing them to easily see the attackers. In addition, [[SPARTAN-II program|SPARTAN-IIs]] [[William-043]] and [[Kelly-087]] employed talcum powder in order to overload the camouflage on [[Reach]] in order to find them.{{Ref/Reuse|firststrike}} [[Atriox]] was able to detect the use of active camouflage through smell.{{Ref/Reuse|HP}} However, it is possible he was just smelling the users themselves rather than the cloaking field, and was calling them out for its use. | ||
During the [[Requiem Campaign]], active camouflage was used to shield the [[seven]] [[HAVOK tactical nuclear weapon]]s smuggled aboard the {{UNSCShip|Infinity}} from detection by the ship's AI [[Roland]]. After [[Fireteam Crimson]] took out a Sangheili holding a cloaking remote, Roland realized this tactic. By tracking the energy signature from the cloaking generator, Roland was able to locate the warheads in the Engine Room and direct Crimson where to go to disarm them before they could be used to destroy the ''Infinity''. Unlike conventional active camouflage, this type shielded the warheads from sensors but they could be physically seen by nearby persons without any issue.<ref>'''Spartan Ops''', [[S1/Invasion/Engine of Destruction|S107 ''Invasion'', ''Engine of Destruction'']]</ref> Later, in the [[Warrens]], the Covenant hooked up active camouflage to their shield generators to prevent the human forces from finding and destroying them. Spartan [[Jared Miller]] was eventually able to identify the Sangheili who controlled the active camouflage and after Crimson took him out, the active camouflage dropped, revealing the generators.<ref>'''Spartan Ops''', [[Expendable/Lancer|S108 ''Lancer'']]</ref> | |||
After | After the death of [[Gek 'Lhar]], his corpse was looted by [[Fireteam Majestic]]. Spartan [[Gabriel Thorne]] took Gek's active camouflage module<ref>'''Spartan Ops''', [[Expendable|S108 ''Expendable'']]</ref> which he subsequently used during the attempted rescue of Dr. [[Catherine Halsey]].<ref>'''Spartan Ops''', [[S1/Key|S109 ''Key'']]</ref> | ||
'' | ==UNSC active camouflage== | ||
[[File:ONIPRO 01.png|thumb|250px|''[[ONI PRO-49776]]'' disengaging its advanced cloaking field, an outlier in UNSC camouflaging technology during the [[Covenant War]].]] | |||
The UNSC has developed several varieties of active-camouflage technology. These do not utilize the same light-bending energy as Covenant active camouflage and are generally less effective. The most common form of human active camouflage technology operates on a different principle than the Covenant counterpart, using [[photoreactive panel]]s to impersonate the surrounding environment like a chameleon. A device known as the [[camouflage cloak]] can hide the wearer's infrared signature, beside serving as a form of camouflage.{{Ref/Reuse|goo}} | |||
[[File:Headhunters Roland camo.jpg|thumb|250px|[[Roland-B210]] with his camouflage activated.]] | |||
The [[Semi-Powered Infiltration armor]] used by the [[SPARTAN-III program|Spartan-IIIs]] utilizes photo-reactive panels to conceal the wearer's infrared signature and to blend in with the surrounding environment. When combined with their natural talent and training for stealth, it can be a very effective tool. Some [[Headhunters]] used a prototype camouflage almost identical to the Covenant version, rendering them almost invisible, except that it only lasted 3–5 minutes and other systems have their power drained while it recharged. This feature saw very limited use in field tests by [[Orbital Drop Shock Trooper|ODSTs]].<ref>'''[[Halo: Evolutions - Essential Tales of the Halo Universe]]''', ''[[Headhunters]]''</ref> | |||
A common human active camouflage device, copied from similar Covenant technology, comes in the form of a "plug" which attaches to a socket located on the lower back of compatible armor. The non-integral nature of the device allows it to be added or removed at will for improved operational flexibility. The device provides a conditionally effective cloak; as long as the user remains still or moves slowly, the camouflage will be highly efficient, providing near-total invisibility for minimal energy loss. However, if the user moves more quickly, the camouflage will only provide rudimentary coverage and drain its energy very rapidly. Firing a weapon will also disrupt the camouflage and reveal the user. Furthermore, external sounds will be highly muffled to the user while this camouflage is in use, and if the user is equipped with motion tracking equipment, the detection capability of the motion tracker will be severely compromised, jamming the display with "ghost" targets.<ref>'''[[Halo: Reach]]'''</ref> | |||
Much like the SPI armor, UNSC [[prowler]]s use [[texture buffer]]s or "active camouflage skin" in conjunction with [[stealth ablative coating]]s to conceal themselves from view in addition to masking their heat and radar signatures.{{Ref/Reuse|goo}} This camouflage is not perfect, however, and cannot keep up with a constantly changing background such as a gas giant's atmosphere.<ref>'''Halo: Evolutions - Essential Tales of the Halo Universe''', "The Impossible Life and the Possible Death of Preston J. Cole", ''page 477''</ref> However, more advanced stealth ships were developed, such as ''[[ONI PRO-49776]]'' using a form of cloak "bubble" similar to the light-bending energy fields used by the Covenant. This technology has not been observed in widespread use.<ref>'''[[Halo Legends]]''', ''[[The Package (animated short)|The Package]]''</ref> | |||
{{ | |||
[[ | |||
The [[MJOLNIR Powered Assault Armor (GEN2)|MJOLNIR Powered Assault Armor [GEN2]]] system is capable of incorporating Covenant [[Type-3 active camouflage|T-3 Refraction Dissonance Modifier/Camouflage]] modules for stealth.<ref name="Waypoint">[http://www.halowaypoint.com/en-US/Halo4Guide '''Halo Waypoint:''' ''Halo 4 Interactive Guide'']</ref> | |||
==Changes throughout ''Halo''== | |||
{{Cleanup|Section}} | |||
If the active camo is active during [[Campaign]], the player is completely invisible to the AI enemies unless they fire their weapon. Active camouflage is only usable in Campaign when playing as the [[Thel 'Vadam|Arbiter]] in ''[[Halo 2]]'', or if the player obtains the [[Halo 2 skulls#Envy|Envy Skull]] and restarts Campaign (active camo replaces Master Chief's flashlight). In ''[[Halo 3]]'', rather than Active Camouflage, the slightly different [[Cloaking]] is available. It is also available as a powerup in five levels during ''[[Halo: Combat Evolved]]'': [[The Truth and Reconciliation]], [[Silent Cartographer]], [[343 Guilty Spark (level)|343 Guilty Spark]], [[Keyes]], and [[Assault on the Control Room]]. | |||
[[ | An interesting fact about Active Camouflage is that although the player can see the [[Type-1 energy sword]]-wielding Active Camo Elites in ''Halo: Combat Evolved'' (due to the sword), the [[UNSC Marine Corps|Marines]] cannot see them; this is likely because the developers did not realize that the energy sword showed through the Active Camo, leading them to code the Marines' AI to be oblivious to it. This advantage is removed in ''Halo 2''—the Elites now wait, only activating their swords when they're about to kill the player. | ||
===''Halo 2''=== | |||
In ''Halo 2'', it is noted that the Arbiter's armor, while possessing a built-in active camouflage generator, is not permanent, unlike the more modern generators used by Special Operations Elites. There is a circle on the player's HUD that shows the amount of time left (unfortunately, not shown numerically) for both the usage of the active camouflage and the recharging sequence. The Master Chief can gain this ability with the Envy Skull on Legendary only; however, his screen will lack the meter, forcing you to remember the time allowed for use. | |||
When playing as the Arbiter, using any attack will cause the active camouflage to deactivate, and the player must wait for it to recharge before using it again.<ref>'''[[Halo 2]]'''</ref> | |||
===''Halo 3''=== | |||
{{Main|Cloaking}} | |||
In ''Halo 3'', the Active Camo is no longer contained inside a pyramid construct. Instead it appears as a large, glowing sphere with what appears to be containment devices around it, enclosing the powerup in ''[[Halo 3]]'' [[multiplayer]]; but unlike past Halo games, active camo is ''not'' found in campaign. In campaign, Active Camouflage is replaced by the [[Cloaking]] [[equipment]], which functions in the same way as active camouflage once did. Melee attacks, shooting, throwing grenades and using equipment will negate the effect of the power-up. Also, wearing the [[Armor customization (Halo 3)#Spartan Armor Permutations|Flaming Helmet]] is an obvious give-away to the opponent because the fire is still visible. | |||
By default, the pick-up lasts 30 seconds and doesn't dissipate with movement, unlike in Reach. | |||
The quality of camouflage in custom games may be set to two different settings:<ref>[http://www.gametrailers.com/player/20131.html '''Game Trailers''': ''Custom Games Glitch Gameplay'']</ref> | |||
*'''Poor Camo''': The player has camouflage that might fool a [[Unggoy|Grunt]]. | |||
**The player is still somewhat visible. | |||
*'''Good Camo''': The player has camouflage that will fool an attentive [[Sangheili|Elite]]. | |||
**This makes the player almost invisible, but the light is distorted within the player's shape. | |||
The | ===''Halo: Reach''=== | ||
The Active Camo in ''[[Halo: Reach]]'' has undergone many major changes. It is now available as an [[Armor abilities|Armor Ability]] to both Spartan and Elite players. As a secondary effect, when used, it acts as a Radar Jammer, scrambling the radar of the user and all enemies within 25 meters, making the user harder for enemies to detect on their motion trackers. This function can be both beneficial and detrimental to the player; on the one hand, it can make enemies easier to ambush, however, it also informs the enemy team that someone is using Camo nearby. This can backfire on the player by making the enemy team more perceptive to possible ambushes. The Active Camo also greatly reduces the volume of all sounds for its user, making it more difficult to notice a grenade being thrown or a nearby enemy firing a weapon. | |||
The strength or effectiveness of the Camo also varies depending on whether/how fast the user is moving. When standing still, the player is rendered almost completely invisible. Moving slowly or crouch-walking will slightly decrease the quality of cloaking, although the user is still hard to spot. When moving faster than crouch-walking speed, the Active Camo becomes much less effective, cloaking the user only partially (similar to the Poor Camo from Halo 3). The player's movement speed does not affect the rate at which the Armor Ability meter drains. | |||
The freedom for the player to control when they activate their camouflage makes it much more effective, as it allows for use in the most opportune situations, instead of restricting the player to activate it on pickup. However, the reduced hearing and radar jamming effects require the player to be more aware of his surroundings than usual,<ref>[http://halo.bungie.net/News/content.aspx?type=topnews&cid=26366 '''Bungie.net''': ''Halo: Reach Beta Survival Guide '']</ref> and must also take care not to move too fast. | |||
Enemies in campaign and Firefight will detect the user after a while. As such, it is far less effective than previous iterations. | |||
===''Halo: Combat Evolved Anniversary''=== | |||
Active camouflage now makes the user extremely hard to spot due to the enhanced graphics. Distortion also covers more the exact shape of the user, unlike previous iterations. | |||
=== | ===''Halo 4''=== | ||
The '''[[Type-3 active camouflage|Type-3 Refraction Dissonance Modifier/Camouflage]]''' bends light around a structure, hiding it via advanced pattern realignment. It is similar to the version in ''Halo: Reach'', however the jammer no longer makes false hostile contacts appear on the motion sensor, rather it makes neutral contacts appear and in a much tighter grouping than before, therefore not only preventing the user from using it to trick enemies, but possibly giving away their location. Despite this, it still is an effective tool for hiding outside of cover and ambushing enemies. | |||
===''Halo 5: Guardians''=== | |||
Active camouflage is now a powerup that can be picked up in Arena or requisitioned in Warzone. While active the user is invisible to the motion sensors of enemies as long as they are not sprinting. Moving while crouched no longer deteriorates the quality of camouflage, though moving faster would. It now displays a meter on the HUD that shows the remaining duration of the power up, and shortly before it runs out, the player will be notified via a quiet beeping sound. | |||
=== | ===''Halo Wars 2''=== | ||
Shrouds are able to cloak themselves and other units. [[Let 'Volir]] is able to cloak units with leader abilities. | |||
===''Halo Infinite''=== | |||
Active Camouflage is activated via an animation similarly to ''Halo 5: Guardians'', although it can now be used at will. If the player is killed before they can use it, or while in the process of activating it, they will drop the powerup which can now be picked up by another player. Active camouflage in ''Halo Infinite'' behaves like a hybrid of the active camouflage seen in the original trilogy, and the active camo seen in all the games since ''Halo: Reach''. If the player is simply moving and strafing, the camouflage remains consistent, but if they sprint or fire their weapon, the camo fades out. {{Ref/YouTube|Id=mpoverview|n-O7OuliQRY|HALO|Halo Infinite <nowiki>|</nowiki> Multiplayer Overview|D=4|M=7|Y=2021}} | |||
== | ==Non-canon and dubious canon appearances== | ||
{{ | ===Silver Timeline=== | ||
{{Main|Silver Timeline}} | |||
== | Active camouflage is used by Covenant Sangheili.{{Ref/Film|[[Halo: The Television Series Season One]], [[Contact]]}} | ||
==Trivia== | |||
*Changing the graphics card settings on [[Halo: Combat Evolved (PC port)|''Halo: Combat Evolved'' for PC]] (lowering the quality and effects) makes active camouflage users appear as an easily-seen gray, opaque silhouette. | |||
*In ''Halo: Combat Evolved'', the flood can still see you if you use active camo. | |||
*Oddly enough, a group of Major and Minor Grunts in the ''Halo 2'' level [[Delta Halo]] used Active Camouflage as they fought alongside a group of [[Stealth Sangheili|Stealth Elites]]. Spec Ops Grunts are also seen using this in the level [[The Arbiter]] just before entering the gas mine. This suggests that at least some Grunts have this equipment. | |||
*When used in association with an [[Overshield]], the Active Camo becomes completely useless due to the charges of the overshield washing over the player's body (except in ''Halo: Combat Evolved''). In ''[[Halo 3]]'', the same effect occurs when Active Camouflage and Overshields are both working. | |||
*The active camouflage has no effect on the flames on the [[Bungie Armor]], allowing enemies to more easily locate the user of the chest piece. | |||
*With the [[Halo 2 skulls#Envy|Envy]] skull on in ''[[Halo 2]]'', the [[John-117|Master Chief]]'s flashlight will be replaced with active camouflage. This can also be combined with a glitch which allows you to reload from a checkpoint, after saving and quitting, and turning off your console, with infinite active camouflage. This makes the Campaign on ''Halo 2'' considerably easier, even on Legendary difficulty. | |||
*In any Halo game, when you have active camouflage on and you get in a vehicle, the camouflage stays on and appears as if there was a ghost driving it or that it was driving itself (works particularly well with the Warthog LAAG). It works with any vehicle which exposes the occupants to view. | |||
*In ''Halo 2'' for Windows Vista, when playing on Threshold, your comrades are not picked up by radar when camouflaged. | |||
*The lights on a [[Gravity hammer (fiction)|gravity hammer]] can be seen clearly when camouflaged. It is not recommended to have a Gravity Hammer either as your primary weapon or secondary weapon when using active camo, as the lights make you an easy target for experienced snipers. | |||
*In ''Halo 3'', go in Monitor mode and find an Active Camouflage. Go inside it. After about 10–20 seconds, the Active Camo will stop making its shimmering noise and you'll hear a brief whispering sound (like a sigh or breath), and then it will continue its shimmering noise. | |||
*Strangely, the active camo module in the ''Halo: Reach'' [[Halo: Reach Multiplayer Beta|Beta]] had "UNSC" printed on it, even when being used by Elites, though this is likely because it was a placeholder file. | |||
*The Overshield as well as Active camouflage were requested by Hardy LeBel as a feature for Halo: CE's multiplayer. The team working on the campaign saw that they were and added them too. | |||
*[[ | |||
* | |||
| | |||
* | |||
==Gallery== | ==Gallery== | ||
<gallery> | <gallery> | ||
File: | File:HaloCE-ActiveCamouflage.jpg|A Stealth Elite using active camouflage in ''Halo: Combat Evolved''. | ||
File: | File:HCE_Campaign_ActiveCamo_Pickup.jpg|Active Camo in ''Halo: Combat Evolved'' campaign. | ||
File: | File:HCE_MP_ActiveCamo_Pickup.png|Active Camo in ''Halo: Combat Evolved'' multiplayer. | ||
File: | File:HCEPC ActiveCamoflage.png|Active camouflage on ''[[Halo: Combat Evolved (PC port)|''Halo: Combat Evolved'' for PC]]''. | ||
File: | File:H2 Active Camouflage.png|The Active Camouflage in ''Halo 2''. | ||
File: | File:H3_ActiveCamo.jpg|The Active Camouflage in ''Halo 3''. | ||
File: | File:H3_Bungie_Camo.jpg|Bungie Armor and Active Camouflage in ''Halo 3''. | ||
File: | File:HReach Active Camouflage.jpg|The Active Camouflage powerup in ''Halo: Reach''. | ||
File: | File:HR SpecOpsElites.jpg|Multiple SpecOps Sangheili using active camouflage, with one also possessing [[Overshield]]. | ||
File: | File:H4 ActiveCamo_Spartan.jpg|Active Camouflage in use in ''[[Halo 4]]''. | ||
File: | File:H2A-ActiveCamo.png|Active camouflage in ''[[Halo 2: Anniversary]]'' multiplayer. | ||
File: | File:H2A-CloakedSpartan.png|A Spartan using active camouflage in ''Halo 2: Anniversary'' multiplayer. | ||
File:REQ Card - Active Camo I.png|REQ card for Active Camouflage in [[Halo 5: Guardians]]. | |||
File:Activecamo2.png|REQ Card for Active Camouflage II. | |||
File:Activecamo3.png|REQ Card for Active Camouflage III. | |||
File:H5G-Camo.png|A Spartan-IV using active camouflage in ''Halo 5: Guardians''. | |||
File:HINF ActiveCamouflage Icon.png|HUD icon for the active camouflage in ''[[Halo Infinite]]''. | |||
File:HINF-CamoOrko.png|[[Okro 'Vagaduun]] using active camo in ''Halo Infinite''. | |||
File:HINF-Deadlockcamo.jpg|A Spartan-IV carrying an active camo module in ''Halo Infinite''. | |||
File:HINF-Camo1.png|A Spartan-IV activating an active camo module in ''Halo Infinite''. | |||
File:HINF-CamodSpartan.png|A Spartan-IV with active camo in ''Halo Infinite''. | |||
File:HTV-Contact-ActiveCamomodule.jpg|A Sangheili with an active camo module in ''[[Halo: The Television Series]]''. | |||
File:HTV-Contact-ActiveCamo.jpg|The same Sangheili activating the active camo. | |||
</gallery> | </gallery> | ||
==List of appearances== | ==List of appearances== | ||
*''[[Halo: The Fall of Reach]]'' {{1st}} | |||
*''[[Halo: Combat Evolved]]'' | |||
*''[[Halo: The Flood]]'' | |||
*''[[Halo: First Strike]]'' | *''[[Halo: First Strike]]'' | ||
**''[[ | *''[[Halo 2]]'' | ||
*''[[Halo 3]]'' | *''[[Halo: Ghosts of Onyx]]'' | ||
*''[[Halo 3]]'' | |||
*''[[Halo Wars]]'' | |||
*''[[Halo 3: ODST]]'' | |||
*''[[Halo Legends]]'' | *''[[Halo Legends]]'' | ||
**''[[ | **''[[The Package (animated short)|The Package]]'' | ||
*''[[Halo | *''[[Halo Evolutions - Essential Tales of the Halo Universe]]'' | ||
**''[[ | **''[[Headhunters (short story)|Headhunters]]'' | ||
*''[[Halo: | **''[[The Impossible Life and the Possible Death of Preston J. Cole]]'' | ||
*''[[Halo: | *''[[Halo: Reach]]'' | ||
*''[[Halo | *''[[Halo: Combat Evolved Anniversary]]'' | ||
*''[[Halo: Tales from Slipspace]] | *''[[Halo 4: Forward Unto Dawn]]'' | ||
**''[[ | *''[[Halo 4]]'' | ||
*''[[Halo Wars 2]]'' | **''[[Spartan Ops]]'' | ||
*''[[Halo: Envoy]]'' | *''[[Halo: Spartan Assault]]'' | ||
*''[[Halo: | *''[[Halo 2: Anniversary]]'' | ||
*''[[Halo: | **''[[Terminal (Halo 2: Anniversary)|Terminals]]'' | ||
*''[[Halo: Shadows of Reach]]'' | *''[[Halo: New Blood]]'' {{Mo}} | ||
**''[[ | *''[[Halo: Last Light]]'' | ||
*''[[Halo 5: Guardians]]'' | |||
*''[[Halo: Fractures]]'' | |||
**''[[Oasis]]'' | |||
*''[[Halo: Smoke and Shadow]]'' | |||
*''[[Halo: Tales from Slipspace]] | |||
**''[[Hunting Party]]'' | |||
*''[[Halo Wars 2]]'' | |||
*''[[Halo: Envoy]]'' | |||
*''[[Halo: Collateral Damage]]'' | |||
*''[[Halo: Official Spartan Field Manual]]'' {{Mo}} | |||
*''[[Halo: Shadows of Reach]]'' | |||
*''[[Halo: Divine Wind]]'' | |||
*''[[Halo Infinite]]'' | |||
*''[[Halo: The Television Series]]'' | |||
**''[[Contact]]'' | |||
*''[[Halo: The Rubicon Protocol]]'' | |||
*''[[Halo: Outcasts]]'' | |||
==Sources== | ==Sources== | ||
{{Ref/Sources}} | {{Ref/Sources}} | ||
{{ | {{Navbox/Pickups/Gameplay}} | ||
[[Category:Camouflage]] | |||
[[Category: | [[Category:Armor abilities]] | ||
[[Category: | [[Category:Power ups]] | ||
[[Category: | |||
Latest revision as of 17:46, April 5, 2024

- "One of those things is inside, and it is invisible!'"
- — Cadet Thomas Lasky[1]
Active camouflage (often shortened to active camo) refers to a broad range of optical camouflage technologies that conceal or cloak its user or an object from visual detection by rapidly adapting to its surroundings.[2][3] Although active camouflage originated from the Covenant—also inherited and adapted by its remnants—similar technology was employed by the United Nations Space Command, with personal ppactive camouflage being directly reverse-engineered from its Covenant counterpart.[2]
Covenant active camouflage conceals by bending and refracting light around its surface.
texture buffer and photoreactive panel
Personal active camouflage
Covenant usage
Human usage
Personal active camouflage
Covenant usage
Human usage
Both the UNSC[4] and the Covenant use various forms of active camouflage technology, though the term is .
Technically, active camouflage is not quite invisibility, though it is very similar. Rather, the There are a variety of ways to do this, though the UNSC uses photoreactive panels on its Semi-Powered Infiltration armor and prowler stealth ships for optical camouflage, adapting to the object's background to account for movement. Meanwhile, Covenant active camouflage actually bends light around the camouflaged object,[3] a task well within the Covenant's tier two technology level. The technology can be utilized on human armor systems, such as the MJOLNIR armor, but the UNSC has only developed rough equivalents.[5]
Covenant active camouflage
- "Show yourselves, assassins! The scent of your cloak is faint, but it still fouls the air."
- — Atriox smelling active camouflage.[6]

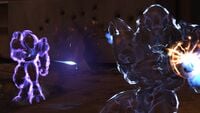
Covenant active camouflage technology uses a field of energy to bend light around the user, thus making them effectively invisible. The armor used by Spec-Ops and Stealth Sangheili, as well as that of Arbiters, Jiralhanae Stalkers and even certain Sangheili Zealots,[7] include built-in active camouflage generators. These built-in generators have a severe drawback in that they divert power from shielding equipment. Troops equipped with permanent active camouflage generators tend to have weaker shielding than those not equipped with an active camouflage generator.
Arbiter Ripa 'Moramee was equipped with an active camouflage generator capable of generating a near-perfect cloaking field indefinitely. Arbiter Thel 'Vadam was also equipped with an active camouflage generator, but the device was capable only of providing a cloak for a few seconds, and although 'Vadam was equipped with personal shielding, his shields were relatively weak for an individual of such high rank, equivalent to those of a Sangheili Minor.
Aircraft or ships can also be equipped with active camouflage systems, including the Ru'swum-pattern Phantom that has its own active camouflage generators on board for various stealth missions,[8] and the Klavbrig Workshop Shroud used by the Banished to cloak the advance of their armies.[9] Larger vessels such as supercarriers, or entire armies, can be effectively hidden from both plain sight and sensors by using external stealth systems such as stealth pylons and Cloaking Generators.[7][9]
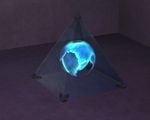
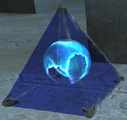
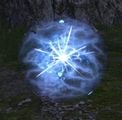
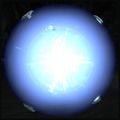
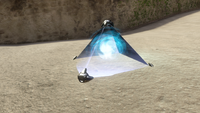
For personnel not equipped with built-in active camouflage, it can be provided by a variety of devices. Typically, the energy used to provide the effect is suspended inside a small, transparent pyramidal container, or a larger spherical force-field. Personnel can use the light-bending energy by coming into physical contact with the container or force-field, which will cause it to break and release its contents. Upon release, the energy envelops the wearer and bends light around their skin; armor or energy shielding, conforming to their form and rendering them almost invisible. After a short period of time, the energy will gradually dissipate and wear off, slowly revealing its user. The active camouflage provided by these devices lasts for ten seconds, and only prevents visual detection; those using active camouflage can be observed by other means, including motion tracking, noise, and environmental disturbances such as footprints on soft terrain.
Function
- "Trust me, because I heard… uhhh… from a friend, that if you have active camouflage on and do a crys, it makes a big sizzle sound and everybody can see me hidin' in the corner."
- — Dimkee Hotay shares his bad experience with active camo.[10]
Covenant active camouflage will easily cloak its user, but its effect does not completely extend to items in the user's possession; human weapons are easily cloaked by active camouflage, but Covenant weapons are visible even with active camo, as the light-bending energy cannot mask the glow of the weapons' plasma. In Halo: Combat Evolved, however, plasma glow is hidden quite well by the cloaking equipment.
Though active camouflage is quite effective from a distance, it can faintly be seen if an observer is close enough to the wearer. However, it is difficult to spot a camouflaged opponent from a distance using a scoped weapon—actual physical proximity is required to reliably spot a person using active camo. It should be noted, though, that active camouflage does not mask environmental effects such as footprints, meaning that it is not as effective on soft terrain such as snow.
The shielding provided by Covenant active camo can be disrupted if projectiles pass through it; such a disruption weakens the invisibility effect and temporarily reveals the wearer. The power-up can be disrupted if the wearer fires shots or if the wearer is hit. It also progressively worsens: the longer the wearer fires (or is hit), the more visible they become. Once the disruptions end, however, the wearer quickly regains their invisibility.
Talcum powder and other atmospheric particles can disrupt the systems, causing the technology to overload and fail.[11] The device also generates a considerable amount of heat, causing its user to be clearly visible on human thermal goggles and some variations of the SRS99C-S2 AM sniper rifle.[12] The humans of Alpha Base on Installation 04 used this advantage when their base was infiltrated by stealth Elites, equipping their fireteams with infrared goggles allowing them to easily see the attackers. In addition, SPARTAN-IIs William-043 and Kelly-087 employed talcum powder in order to overload the camouflage on Reach in order to find them.[11] Atriox was able to detect the use of active camouflage through smell.[6] However, it is possible he was just smelling the users themselves rather than the cloaking field, and was calling them out for its use.
During the Requiem Campaign, active camouflage was used to shield the seven HAVOK tactical nuclear weapons smuggled aboard the UNSC Infinity from detection by the ship's AI Roland. After Fireteam Crimson took out a Sangheili holding a cloaking remote, Roland realized this tactic. By tracking the energy signature from the cloaking generator, Roland was able to locate the warheads in the Engine Room and direct Crimson where to go to disarm them before they could be used to destroy the Infinity. Unlike conventional active camouflage, this type shielded the warheads from sensors but they could be physically seen by nearby persons without any issue.[13] Later, in the Warrens, the Covenant hooked up active camouflage to their shield generators to prevent the human forces from finding and destroying them. Spartan Jared Miller was eventually able to identify the Sangheili who controlled the active camouflage and after Crimson took him out, the active camouflage dropped, revealing the generators.[14]
After the death of Gek 'Lhar, his corpse was looted by Fireteam Majestic. Spartan Gabriel Thorne took Gek's active camouflage module[15] which he subsequently used during the attempted rescue of Dr. Catherine Halsey.[16]
UNSC active camouflage

The UNSC has developed several varieties of active-camouflage technology. These do not utilize the same light-bending energy as Covenant active camouflage and are generally less effective. The most common form of human active camouflage technology operates on a different principle than the Covenant counterpart, using photoreactive panels to impersonate the surrounding environment like a chameleon. A device known as the camouflage cloak can hide the wearer's infrared signature, beside serving as a form of camouflage.[4]

The Semi-Powered Infiltration armor used by the Spartan-IIIs utilizes photo-reactive panels to conceal the wearer's infrared signature and to blend in with the surrounding environment. When combined with their natural talent and training for stealth, it can be a very effective tool. Some Headhunters used a prototype camouflage almost identical to the Covenant version, rendering them almost invisible, except that it only lasted 3–5 minutes and other systems have their power drained while it recharged. This feature saw very limited use in field tests by ODSTs.[17]
A common human active camouflage device, copied from similar Covenant technology, comes in the form of a "plug" which attaches to a socket located on the lower back of compatible armor. The non-integral nature of the device allows it to be added or removed at will for improved operational flexibility. The device provides a conditionally effective cloak; as long as the user remains still or moves slowly, the camouflage will be highly efficient, providing near-total invisibility for minimal energy loss. However, if the user moves more quickly, the camouflage will only provide rudimentary coverage and drain its energy very rapidly. Firing a weapon will also disrupt the camouflage and reveal the user. Furthermore, external sounds will be highly muffled to the user while this camouflage is in use, and if the user is equipped with motion tracking equipment, the detection capability of the motion tracker will be severely compromised, jamming the display with "ghost" targets.[18]
Much like the SPI armor, UNSC prowlers use texture buffers or "active camouflage skin" in conjunction with stealth ablative coatings to conceal themselves from view in addition to masking their heat and radar signatures.[4] This camouflage is not perfect, however, and cannot keep up with a constantly changing background such as a gas giant's atmosphere.[19] However, more advanced stealth ships were developed, such as ONI PRO-49776 using a form of cloak "bubble" similar to the light-bending energy fields used by the Covenant. This technology has not been observed in widespread use.[20]
The MJOLNIR Powered Assault Armor [GEN2] system is capable of incorporating Covenant T-3 Refraction Dissonance Modifier/Camouflage modules for stealth.[21]
Changes throughout Halo
| This Section does not meet the wiki's general standards and/or standards on layouts. You can help by cleaning this Section. |
If the active camo is active during Campaign, the player is completely invisible to the AI enemies unless they fire their weapon. Active camouflage is only usable in Campaign when playing as the Arbiter in Halo 2, or if the player obtains the Envy Skull and restarts Campaign (active camo replaces Master Chief's flashlight). In Halo 3, rather than Active Camouflage, the slightly different Cloaking is available. It is also available as a powerup in five levels during Halo: Combat Evolved: The Truth and Reconciliation, Silent Cartographer, 343 Guilty Spark, Keyes, and Assault on the Control Room.
An interesting fact about Active Camouflage is that although the player can see the Type-1 energy sword-wielding Active Camo Elites in Halo: Combat Evolved (due to the sword), the Marines cannot see them; this is likely because the developers did not realize that the energy sword showed through the Active Camo, leading them to code the Marines' AI to be oblivious to it. This advantage is removed in Halo 2—the Elites now wait, only activating their swords when they're about to kill the player.
Halo 2
In Halo 2, it is noted that the Arbiter's armor, while possessing a built-in active camouflage generator, is not permanent, unlike the more modern generators used by Special Operations Elites. There is a circle on the player's HUD that shows the amount of time left (unfortunately, not shown numerically) for both the usage of the active camouflage and the recharging sequence. The Master Chief can gain this ability with the Envy Skull on Legendary only; however, his screen will lack the meter, forcing you to remember the time allowed for use.
When playing as the Arbiter, using any attack will cause the active camouflage to deactivate, and the player must wait for it to recharge before using it again.[22]
Halo 3
- Main article: Cloaking
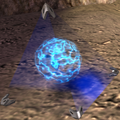
In Halo 3, the Active Camo is no longer contained inside a pyramid construct. Instead it appears as a large, glowing sphere with what appears to be containment devices around it, enclosing the powerup in Halo 3 multiplayer; but unlike past Halo games, active camo is not found in campaign. In campaign, Active Camouflage is replaced by the Cloaking equipment, which functions in the same way as active camouflage once did. Melee attacks, shooting, throwing grenades and using equipment will negate the effect of the power-up. Also, wearing the Flaming Helmet is an obvious give-away to the opponent because the fire is still visible. By default, the pick-up lasts 30 seconds and doesn't dissipate with movement, unlike in Reach.
The quality of camouflage in custom games may be set to two different settings:[23]
- Poor Camo: The player has camouflage that might fool a Grunt.
- The player is still somewhat visible.
- Good Camo: The player has camouflage that will fool an attentive Elite.
- This makes the player almost invisible, but the light is distorted within the player's shape.
Halo: Reach
The Active Camo in Halo: Reach has undergone many major changes. It is now available as an Armor Ability to both Spartan and Elite players. As a secondary effect, when used, it acts as a Radar Jammer, scrambling the radar of the user and all enemies within 25 meters, making the user harder for enemies to detect on their motion trackers. This function can be both beneficial and detrimental to the player; on the one hand, it can make enemies easier to ambush, however, it also informs the enemy team that someone is using Camo nearby. This can backfire on the player by making the enemy team more perceptive to possible ambushes. The Active Camo also greatly reduces the volume of all sounds for its user, making it more difficult to notice a grenade being thrown or a nearby enemy firing a weapon.
The strength or effectiveness of the Camo also varies depending on whether/how fast the user is moving. When standing still, the player is rendered almost completely invisible. Moving slowly or crouch-walking will slightly decrease the quality of cloaking, although the user is still hard to spot. When moving faster than crouch-walking speed, the Active Camo becomes much less effective, cloaking the user only partially (similar to the Poor Camo from Halo 3). The player's movement speed does not affect the rate at which the Armor Ability meter drains. The freedom for the player to control when they activate their camouflage makes it much more effective, as it allows for use in the most opportune situations, instead of restricting the player to activate it on pickup. However, the reduced hearing and radar jamming effects require the player to be more aware of his surroundings than usual,[24] and must also take care not to move too fast.
Enemies in campaign and Firefight will detect the user after a while. As such, it is far less effective than previous iterations.
Halo: Combat Evolved Anniversary
Active camouflage now makes the user extremely hard to spot due to the enhanced graphics. Distortion also covers more the exact shape of the user, unlike previous iterations.
Halo 4
The Type-3 Refraction Dissonance Modifier/Camouflage bends light around a structure, hiding it via advanced pattern realignment. It is similar to the version in Halo: Reach, however the jammer no longer makes false hostile contacts appear on the motion sensor, rather it makes neutral contacts appear and in a much tighter grouping than before, therefore not only preventing the user from using it to trick enemies, but possibly giving away their location. Despite this, it still is an effective tool for hiding outside of cover and ambushing enemies.
Halo 5: Guardians
Active camouflage is now a powerup that can be picked up in Arena or requisitioned in Warzone. While active the user is invisible to the motion sensors of enemies as long as they are not sprinting. Moving while crouched no longer deteriorates the quality of camouflage, though moving faster would. It now displays a meter on the HUD that shows the remaining duration of the power up, and shortly before it runs out, the player will be notified via a quiet beeping sound.
Halo Wars 2
Shrouds are able to cloak themselves and other units. Let 'Volir is able to cloak units with leader abilities.
Halo Infinite
Active Camouflage is activated via an animation similarly to Halo 5: Guardians, although it can now be used at will. If the player is killed before they can use it, or while in the process of activating it, they will drop the powerup which can now be picked up by another player. Active camouflage in Halo Infinite behaves like a hybrid of the active camouflage seen in the original trilogy, and the active camo seen in all the games since Halo: Reach. If the player is simply moving and strafing, the camouflage remains consistent, but if they sprint or fire their weapon, the camo fades out. [25]
Non-canon and dubious canon appearances
Silver Timeline
- Main article: Silver Timeline
Active camouflage is used by Covenant Sangheili.[26]
Trivia
- Changing the graphics card settings on Halo: Combat Evolved for PC (lowering the quality and effects) makes active camouflage users appear as an easily-seen gray, opaque silhouette.
- In Halo: Combat Evolved, the flood can still see you if you use active camo.
- Oddly enough, a group of Major and Minor Grunts in the Halo 2 level Delta Halo used Active Camouflage as they fought alongside a group of Stealth Elites. Spec Ops Grunts are also seen using this in the level The Arbiter just before entering the gas mine. This suggests that at least some Grunts have this equipment.
- When used in association with an Overshield, the Active Camo becomes completely useless due to the charges of the overshield washing over the player's body (except in Halo: Combat Evolved). In Halo 3, the same effect occurs when Active Camouflage and Overshields are both working.
- The active camouflage has no effect on the flames on the Bungie Armor, allowing enemies to more easily locate the user of the chest piece.
- With the Envy skull on in Halo 2, the Master Chief's flashlight will be replaced with active camouflage. This can also be combined with a glitch which allows you to reload from a checkpoint, after saving and quitting, and turning off your console, with infinite active camouflage. This makes the Campaign on Halo 2 considerably easier, even on Legendary difficulty.
- In any Halo game, when you have active camouflage on and you get in a vehicle, the camouflage stays on and appears as if there was a ghost driving it or that it was driving itself (works particularly well with the Warthog LAAG). It works with any vehicle which exposes the occupants to view.
- In Halo 2 for Windows Vista, when playing on Threshold, your comrades are not picked up by radar when camouflaged.
- The lights on a gravity hammer can be seen clearly when camouflaged. It is not recommended to have a Gravity Hammer either as your primary weapon or secondary weapon when using active camo, as the lights make you an easy target for experienced snipers.
- In Halo 3, go in Monitor mode and find an Active Camouflage. Go inside it. After about 10–20 seconds, the Active Camo will stop making its shimmering noise and you'll hear a brief whispering sound (like a sigh or breath), and then it will continue its shimmering noise.
- Strangely, the active camo module in the Halo: Reach Beta had "UNSC" printed on it, even when being used by Elites, though this is likely because it was a placeholder file.
- The Overshield as well as Active camouflage were requested by Hardy LeBel as a feature for Halo: CE's multiplayer. The team working on the campaign saw that they were and added them too.
Gallery
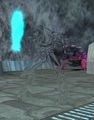
A Stealth Elite using active camouflage in Halo: Combat Evolved.
Active Camo in Halo: Combat Evolved campaign.
Active Camo in Halo: Combat Evolved multiplayer.

Active camouflage on Halo: Combat Evolved for PC.
The Active Camouflage in Halo 2.
The Active Camouflage in Halo 3.

Bungie Armor and Active Camouflage in Halo 3.
The Active Camouflage powerup in Halo: Reach.
Multiple SpecOps Sangheili using active camouflage, with one also possessing Overshield.

Active Camouflage in use in Halo 4.
Active camouflage in Halo 2: Anniversary multiplayer.
A Spartan using active camouflage in Halo 2: Anniversary multiplayer.
REQ card for Active Camouflage in Halo 5: Guardians.
REQ Card for Active Camouflage II.
REQ Card for Active Camouflage III.
A Spartan-IV using active camouflage in Halo 5: Guardians.

HUD icon for the active camouflage in Halo Infinite.
Okro 'Vagaduun using active camo in Halo Infinite.
A Spartan-IV carrying an active camo module in Halo Infinite.
A Spartan-IV activating an active camo module in Halo Infinite.
A Spartan-IV with active camo in Halo Infinite.

A Sangheili with an active camo module in Halo: The Television Series.
The same Sangheili activating the active camo.


List of appearances
- Halo: The Fall of Reach (First appearance)
- Halo: Combat Evolved
- Halo: The Flood
- Halo: First Strike
- Halo 2
- Halo: Ghosts of Onyx
- Halo 3
- Halo Wars
- Halo 3: ODST
- Halo Legends
- Halo Evolutions - Essential Tales of the Halo Universe
- Halo: Reach
- Halo: Combat Evolved Anniversary
- Halo 4: Forward Unto Dawn
- Halo 4
- Halo: Spartan Assault
- Halo 2: Anniversary
- Halo: New Blood (Mentioned only)
- Halo: Last Light
- Halo 5: Guardians
- Halo: Fractures
- Halo: Smoke and Shadow
- Halo: Tales from Slipspace
- Halo Wars 2
- Halo: Envoy
- Halo: Collateral Damage
- Halo: Official Spartan Field Manual (Mentioned only)
- Halo: Shadows of Reach
- Halo: Divine Wind
- Halo Infinite
- Halo: The Television Series
- Halo: The Rubicon Protocol
- Halo: Outcasts
Sources
- ^ Halo 4: Forward Unto Dawn, episode 4
- ^ a b Halo Encyclopedia (2011 edition), page 355
- ^ a b Halo 4: The Essential Visual Guide, page 136
Cite error: Invalid
<ref>tag; name "h4evg" defined multiple times with different content - ^ a b c Halo: Ghosts of Onyx, page 291
- ^ Halo: The Fall of Reach
- ^ a b Hunting Party
- ^ a b Halo: Reach, campaign level Tip of the Spear
- ^ Halo 3, campaign level The Covenant
- ^ a b Halo Wars 2
- ^ Halo 5: Guardians, campaign level Alliance
- ^ a b Halo: First Strike
- ^ Halo: The Flood
- ^ Spartan Ops, S107 Invasion, Engine of Destruction
- ^ Spartan Ops, S108 Lancer
- ^ Spartan Ops, S108 Expendable
- ^ Spartan Ops, S109 Key
- ^ Halo: Evolutions - Essential Tales of the Halo Universe, Headhunters
- ^ Halo: Reach
- ^ Halo: Evolutions - Essential Tales of the Halo Universe, "The Impossible Life and the Possible Death of Preston J. Cole", page 477
- ^ Halo Legends, The Package
- ^ Halo Waypoint: Halo 4 Interactive Guide
- ^ Halo 2
- ^ Game Trailers: Custom Games Glitch Gameplay
- ^ Bungie.net: Halo: Reach Beta Survival Guide
- ^ YouTube - HALO, Halo Infinite | Multiplayer Overview (Retrieved on Jul 4, 2021)
- ^ Halo: The Television Series Season One, Contact
|
| |||||||||||