Valhalla: Difference between revisions
From Halopedia, the Halo wiki
Antony X1000 (talk | contribs) (→Trivia) |
(→Halo 4) |
||
| (346 intermediate revisions by more than 100 users not shown) | |||
| Line 1: | Line 1: | ||
{{ | {{Status|Gameplay}} | ||
{{ | {{Multiplayer map infobox | ||
|pagegamelabel=H3 | |||
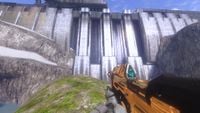
|image=[[File:Val ext3.jpg|300px]] | |||
|name=Valhalla | |name=Valhalla | ||
|game=''[[Halo 3]]'' | |game=''[[Halo 3]]'' | ||
|location=[[ | |devname=<code>riverworld</code> | ||
|terrain=Valley, grass, rocks, snow, and rivers | |map= | ||
| | |location=[[Installation 00]] | ||
|terrain=Valley, grass, rocks, snow, and rivers all contained within a canyon. | |||
|symmetry= | |||
|playernumber=6-16 | |||
|gametypes=*[[Team Slayer]] (large population) | |||
*[[Multi Flag CTF]] | |||
| | |||
|gametypes=*[[Team Slayer]] | |||
*[[ | |||
*[[Assault]] | *[[Assault]] | ||
}} | }} | ||
{{Article | {{Article quote|The crew of [[V-398]] barely survived their unplanned landing in this gorge...this curious gorge.}} | ||
'''Valhalla''' is a multiplayer map in ''[[Halo 3]]''. | '''Valhalla''' is a multiplayer map in ''[[Halo 3]]'' and ''[[Halo Online]]'', known as '''Riverworld''' in the latter. The map is set on [[Installation 00|the Ark]]. Structurally, it is reminiscent of ''[[Blood Gulch]]'' from ''[[Halo: Combat Evolved]]''. The map is a sparsely forested valley with mountains in the distance, featuring a river, rocky outcroppings, hills and a large [[Forerunner]]-built wall. | ||
==Universe and lore== | |||
Valhalla is set on [[Installation 00|the Ark]]. Structures similar to this canyon are echoed on many Forerunner installations including the [[Halo Array]] and [[Shield world|shield]] [[world]]s, with the site known as "[[Two Giants]]" of particular note on [[Requiem]]. Buried within deep canyons, these towers are not only sheltered from off-world debris, but their positions allowed them to leverage the steep environment's natural harmonics to amplify their signals when firing deep into space. Most scientists believe the spires - at their base function - act as communication channels, sending specific commands to other remote locations. The full operation and overarching purpose of these mysterious objects, however, remains a source of speculation.<ref name="HU">[https://www.halowaypoint.com/en-us/universe/locations/requiem '''Halo Waypoint''': ''Requiem'']</ref> Canyons like these were often reused based on the specific tastes of their creator, their function and as the result of other semi-random variables in the chosen design template.<ref>[https://www.halowaypoint.com/en-us/forums/db05ce78845f4120b062c50816008e5d/topics/how-did-valhalla-get-to-requiem/8cff90a9-7d22-413e-aebf-e35800653cc6/posts?page=1#post15 '''Halo Waypoint forums''': ''Catalog's response''] - ''[Serendipitous] or [pleasing] patterns are often represented at different scales and locales, based on the tastes of the [pattern weaver] or as a result of [semi-stochastic] initial conditions inherent in the chosen template.''</ref> | |||
==Overview== | ==Overview== | ||
===Layout=== | |||
The map is similar in shape to Blood Gulch but has unique elements of its own. Valhalla is not a remake of Coagulation, nor is the downloadable [[Standoff]] either. Valhalla also has features from the Halo: Combat Evolved level | The map is similar in shape to [[Blood Gulch]] but has unique elements of its own. Valhalla is not a remake of [[Coagulation]], nor is the downloadable [[Standoff]] either. Valhalla also has features from the ''[[Halo: Combat Evolved]]'' level, [[Halo (Halo: Combat Evolved Level)|Halo]]. The most obvious feature is both the river and the bases themselves. The river starts in the mountains behind the blue base, and comes out as a waterfall. The river then flows in front of the base, under an outcrop, then down between the two prominent hills on which players find the [[M6 Spartan Laser|Spartan Laser]] and the [[AIE-486H machine gun|machine gun turret]]. Finally, it bends around the base, and empties into a large lake. Also, there are two caves in the map: one that goes through the hill between the crashed [[D77H-TCI Pelican|Pelican]] and blue base, and another that goes through the hill between the Pelican and the red base. Do note that if weapons are dropped into the river, they might drift downstream. | ||
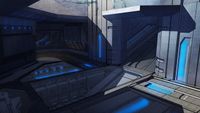
The | The distinguished beam emitter bases are Forerunner technology. They are similar to the structures seen in the [[Halo: Combat Evolved (PC port)|''Halo: Combat Evolved'' for PC]] multiplayer map [[Infinity (Halo: Combat Evolved map)|Infinity]], [[Timberland]] and in the campaign level Halo, while the lower portion is reminiscent of the bases in Blood Gulch. There are three entrances to the inside of the base; two on the sides as seen in many screenshots, and another located behind that dips down into the base. Replacing the [[teleporters]] are the [[man cannon]]s. The largest one, on the front of the base, will send you out a third of the way out into the main battle area, while the smaller ones on the side of each base send you a short distance to the nearby cliff for a quick getaway. The bases feature a shiny glass floor on the interior, allowing players on opposite sides of the floor to see each other. | ||
As previously stated, there are two similar hills on either side of the river. On the higher one spawns the Spartan Laser, while the lower hill holds a machine gun turret. Each base holds a [[SRS99D-S2 AM sniper rifle|sniper rifle]] inside the rear entrance, a pair of [[Fragmentation Grenade]]s, and a pair of [[Anskum-pattern plasma grenade|plasma grenade]]s. Numerous [[BR55HB battle rifle|battle rifles]] spawn around the map: two on top of the base next to the smaller man cannons, two underneath the base alongside each entrance along with two [[Type-25 plasma pistol|plasma pistols]], two on the terrain where you land after taking off from the man cannons, and one that spawns in each cave. A [[M90 shotgun|shotgun]] spawns inside each of the caves as well, and [[Paegaas Workshop Spiker|Spikers]] spawn on the top of both bases near the [[LAU-65D/SGM-151 missile pod|Missile Pod]]. A pair [[M7 SMG|SMG]]s also spawn on each base and are located next to the plasma grenades. Valhalla is a very good sniper map since you can snipe opponents clear across the other side of the map, and when players take the bases' man cannons for rapid transportation, they become easy targets for experienced snipers. | |||
The Missile Pod spawns on top of each base to provide initial anti-vehicle defense. The [[vehicle]] set per base is a [[Banshee]], [[M12 Warthog|Warthog]], [[Wraith]], and two [[Mongoose]]s. However, in the [[Matchmaking]] [[playlists]] the vehicles are limited to a Warthog, a pair of Mongooses, and a Banshee per base (in 4v4 matches, most notably in Team BRs, the Banshee is sometimes removed). The [[power drain]] spawns on top of each base next to the Missile Pod, while the [[Z-4190 bubble shield|bubble shield]] spawns at the neutral Mongoose near the Forerunner wall. | |||
[[ | <gallery> | ||
File:HMCC H3 Valhalla Map.png|Valhalla Map. | |||
File:Halo-3-20070515043400029.jpg|The layout of Valhalla. | |||
File:Valhalla-HeatMap.jpeg|A birds-eye view of Valhalla. | |||
</gallery> | |||
====Callouts==== | |||
*Lake Base | *Lake Base | ||
<gallery> | |||
File:Halo-3-20070430093121870.jpg|Lake Base, from a distance away. | |||
File:H3 Valhalla Lake.jpg|The titular lake, as viewed from roughly where the Banshee spawns. | |||
</gallery> | |||
*Waterfall Base | *Waterfall Base | ||
<gallery> | |||
File:Halo-3-20070511004948915.jpg|The Beam Emitter prior to firing. | |||
</gallery> | |||
*Waterfall | *Waterfall | ||
<gallery> | |||
File:Valhalla Waterfall.jpg|The inaccessible waterfall on Valhalla. | |||
</gallery> | |||
*Canyon Bend | *Canyon Bend | ||
*Ravine | *Ravine | ||
| Line 66: | Line 55: | ||
*Turret Side | *Turret Side | ||
*Pelican | *Pelican | ||
<gallery> | |||
File:H3 Valhalla PelicanCrash.jpg|The crashed dropship Victor 398. | |||
</gallery> | |||
*Pelican Rear Cave | *Pelican Rear Cave | ||
*Pelican Nose Cave | *Pelican Nose Cave | ||
* | *Center Ridge | ||
*River | *River | ||
There are also points on the top of the spires that can be reached by Banshee, Hornet, or in Forge, but these areas will not be listed. | There are also points on the top of the spires that can be reached by Banshee, Hornet, or in Forge, but these areas will not be listed. | ||
==Strategies== | ===Strategies=== | ||
<!--This is STRATEGIES, not Trivia, only strategies belong here, please put trivia above in the Trivia section--> | <!--This is STRATEGIES, not Trivia, only strategies belong here, please put trivia above in the Trivia section--> | ||
*Use the Banshee only when the Spartan Laser is safely in your control. | |||
* | *A good strategy in Assault is to secure the enemy base and the bomb spawn. Simply bring the bomb over to the base, plant it, and camp with Shotguns to protect it. Have a player stay near the spawn to pick it up and repeat this process. | ||
*The Banshee can make a great hit and run aircraft as it can fly in on the enemy base, fire, turn around the tower and head back, then turn around at the friendly base for another attack run. | |||
*A good trick is to use the man cannon while driving the Mongoose then jumping off, as it will not go as far as the player. This will confuse the enemy firing at the empty Mongoose, so that the player can flank them. Only players who look closely will realize that the driver has jumped off. | |||
* | *For a team-based game, it is imperative to control the Spartan Laser and the ground around it. The Laser allows your team to fire upon the enemy base from a distance, or kill them coming down from the man cannon, stopping them from being able to fight with a little breathing space. However, sometimes a mad rush for the Spartan Laser leaves your base open. | ||
*When in a dogfight in the Banshees, it is advantageous to fly low and strafe at the higher Banshee. The pilot will have to turn around giving you more than enough time to disable it or destroy it, although this leaves you open to being hijacked, lasered, or locked on with a Missile Pod. | |||
* | *If you can, try stealing the enemy's Banshee. With your Banshee and your captured ones, you will have complete control of air support. This works better with Warthogs, allowing you to flank enemies trying to escape with the Warthogs. | ||
*If you have the | *While the central hill does provide an excellent view of the map, be aware that this makes you a target for snipers. | ||
* | *Try not to use the Spartan Laser on lone targets such as one person charging the hill with no back up; instead, save the charge for higher-priority targets, such as incoming vehicles or a player wielding a Missile Pod. | ||
*If you have the flag, unpredictability is key to survival, especially if the opposing team has the Spartan Laser - one deception or erratic movement is often the difference between victory and defeat. | |||
* | *Since this map has many hills and corners, tanks are better utilized as a defensive force backed up in the corner. | ||
* | *Try to secure the Spartan Laser first and foremost to allow you to take out infantry and vehicles with ease. If you're on defense, fall back to the base and use it on assaulting vehicles, using a battle rifle or something similar to take out distant-enemies before they reach the base. If you're on offense, use the Spartan Laser to cover the rest of your team, then go help retrieve the flag or protect the bomb from being disarmed. | ||
*When a bomb is planted, bring a regenerator to increase your durability from [[grenade]]s and power drains that are often tossed inside. | |||
* | *Have your VIP stay inside the lower level in the base and jam the center with the Warthog. Have a teammate with a shotgun cover one entrance and an SMG wielder cover the other. Always have some sort of support when doing this (i.e. bubble shield, regenerator). Have another player man the Warthog turret and a friendly Banshee pilot impede the enemy's advance. Be sure to have a few teammates watching the base from somewhere else. Some players have commented that this strategy has almost no weaknesses. | ||
* | *The initial rush straight for the Spartan Laser once the game starts can be swung your way by throwing grenades to land just beyond the Laser's spawn point, knocking down shields or even killing members of the other team with the same objective in mind. Throwing a power drain is also wise. | ||
* | *Be extremely careful while driving a Banshee; if you swerve off too late while strafing, it could cost you the vehicle. | ||
* | *Try sniping in less commonly used areas, like right behind the turret where players would think a sniper would never venture. | ||
* | *For [[Territories]], sticking together is the best way to win; usually, an offensive team will stay in one large group moving from territory to territory, making it hard for a team to defend all of the territories at once. For defense, move up to the bases that will be easiest for the attackers to capture (the crashed Pelican, the shotgun-spawning points) and try to protect those with a larger group, and keep a few of the back ready to move to another territory while the rest deal with other attackers. | ||
**As a note, Territory 4 is a very dangerous Territory due to the fact it is in a cave, and multiple grenades can be thrown in to kill the attacking force. Try to always bring a bubble shield and/or regenerator. | |||
* | *If your flag gets stolen, guard the primary man cannon, as that is where the carrier is most likely to go after they steal the flag. | ||
*An interesting tactic to do on [[Capture the Flag|CTF]] is to drop it on top of the [[Fusion coil]] at the stump on the base and shoot it. This will launch the flag at least halfway across the map, making the trip a lot less hectic. | |||
*The crashed Pelican provides a great place to snipe, since the player has a decent view of both bases. It is also recommended because of a regenerator that spawns under the wing, should the sniper be in trouble. | |||
*You can have your VIP jump on your Banshee and move it to the top of the base where the VIP has a vantage point, although this tactic makes the VIP prone to the Spartan Laser and its lethal range. | |||
*As in any [[Team Slayer]] game, move as a pack, and do not get separated. Controlling the Spartan Laser and the Missile Pods are the key to this level because vehicles will not have to worry about getting destroyed so easily. | |||
*If you are in the Coastal Base and you use the man cannon, you can actually jump across the river from where you land, with at least some momentum left from your launch. You must land pretty much on the edge of the land before you would fall into the river. If this can be performed correctly, it may be helpful to get closer to the Spartan Laser on the hill. | |||
*Try to use the Warthog when taking out enemies on the hill, especially if they have a Spartan Laser and are trying to kill a teammate of yours in a Banshee, as they won't focus on you as much. | |||
*Rushing for the Spartan Laser is wise especially if you have a Warthog and a Banshee on the offensive. The center should be secure, but the outskirts will be unprotected and enemy Warthogs and Banshees will be already firing. | |||
*At the start of the game, if you are going for the Spartan Laser, pick up the power drain and throw it as you man cannon towards the hill. This should deter, weaken, or at least hold back the enemies while you pick up the Laser. Also be sure to have a sniper in the base and/or other players to protect as you get to a safe distance with the Spartan Laser. | |||
*A good sniper tactic in Valhalla is to jump as you approach the Spartan Laser hill. Even if you don't have a good aim, you can still badly injure a few of the other team, making the Spartan Laser easy to claim. | |||
*Go to the Pelican with a sniper rifle and you can kill anyone trying to grab the Spartan Laser. You can delay them until your team has possession of the Laser. | |||
*A good sniping position is to get the Banshee and ride up to the top of the base. If you do it correctly you will be able to snipe people across the whole map. But remember to look out for the mortar that the bases fire. Another way to get there is by positioning a Wraith beside the back entrance of a base and jumping on top of it, then jumping up to the slippery platform. Be sure you keep jumping forward until you reach the location. This tactic is harder and can also be done with a Warthog or by [[Team Jumping]]/butterflying. | |||
*In CTF or Assault, have someone camp with the Missile Pod. It can destroy incoming vehicles, or at close-medium ranges, it can be used as a compensation for a rocket launcher. | |||
*The Missile Pod is surprisingly effective inside the lower area of the base. | |||
*In CTF, if you manage to kill the carrier in a Wraith, park it on top of the carriers corpse and destroy it. Just melee the back engine a few times; this puts the flag underneath the wreckage and makes it nearly impossible to retrieve, depending on your parking job. Be careful, however, because if you stand too close, the flag will respawn at your base. The wreckage will disappear after a while. | |||
*Sometimes, some weapons will float down the river; players can pick up shotguns, Spartan Lasers, and even Missile Pods or extra ammo, though this isn't a strategy you should count on. | |||
*An excellent base-defense strategy is having a Wraith guarding the outside and having a player sniping from a nearby ledge. It can be more solid if you have a few players armed with SMGs or shotguns. | |||
*The plasma grenades and battle rifles have fast respawn times at each base. Unless the need to move out is urgent, it's usually worthwhile to wait for them. | |||
*The caves are notorious for having campers with shotguns inside. Unless the other routes to the enemy base are guarded, throw a few grenades and flank to where the camper will fall back, causing you to catch him off guard. | |||
*The power drain should be useful when numerous foes are arriving at the arming spot or flag in Assault and CTF games, respectively. Just hold your nerve and deploy it when you've almost touched their objective. | |||
*A defensive player should move to the caves and grab a shotgun to use in the basement floor of the base. | |||
*When using a power drain and man cannon, please note that the power drain will not reach the hill if thrown in the man cannon. This is a common mistake and can be rectified if you yourself use the man cannon and fling the power drain while in "flight." | |||
*The Pelican is notorious in Territories for the regenerator and close proximity to Territory 4 and the Spartan Laser. The only practical way to deal with this territory is to control the hill and maybe save a power drain to cancel the regenerator's effects. | |||
*The rock laying on its side near the waterfall base can serve as an outpost. A sniper can crouch there and eliminate anybody heading that way. | |||
*Another good tactic is to grab the Missile Pod at the start of the match. This is because somebody on the other team often gets in their Banshee immediately after the game starts. The Missile Pod can easily destroy the enemy Banshee, which can be a real advantage. | |||
*Another useful tactic for assaulting the waterfall base is to take a sniper rifle, and camp in the bushes on the cliff next to the waterfall. This position gives the shooter a good view of the waterfall base, and the spawns around it. | |||
==Remakes== | |||
===''Halo 4''=== | |||
Valhalla was remade as [[Ragnarok]] in ''[[Halo 4]]''. | |||
===''Halo 5''=== | |||
Valhalla was remade as Viking using [[Forge]] in ''[[Halo 5: Guardians]]''. | |||
===''Halo: Infinite''=== | |||
Valhalla was remade as Valahiem using [[Forge]] in ''[[Halo Infinite]]''.<ref | |||
name="HW">[https://www.halowaypoint.com/en-us/community/blog-posts/november-sneak-peek '''Halo Waypoint''', ''Halo Community Update - November Sneak Peek'']</ref> | |||
==Variants== | |||
===Valhalla Heavy=== | |||
*An additional Warthog spawns alongside the default Warthog spawn at each base. | |||
*A [[M808C Scorpion|Scorpion]] Tank spawns in front of each base. | |||
*A [[M6 Spartan Laser|Spartan Laser]] spawns alongside the default sniper rifle spawn point at each base, another spawns at the Pelican site, and another at the Turret site. | |||
*An additional bubble shield replaces the [[regenerator]] spawn at the Pelican site. | |||
*Teleporters are added to the map. Each base's lower deck has a Sender Node teleporter which teleports players to other Receiver Node teleporters either near the Pelican side or the Turret site, functioning similarly to Blood Gulch's and Coagulation's teleporters. | |||
*The formerly default Spartan Laser spawn has been replaced by a [[M41 SPNKR|rocket launcher]]. | |||
==Production notes== | |||
[[File:H3 Valhalla Exterior Concept 2.jpg|thumb|250px|Concept art of Valhalla.]] | |||
When developing ''Halo 3'', Valhalla started out as a napkin sketch drawn by designer [[Steve Cotton]] in roughly five minutes, showing a snaking river cutting through a gulch - intended to evoke some of [[Blood Gulch]]'s team v. team and base v. base combat with vehicles and infantry. A large additional design goal was to make the map traversable for infantry alongside vehicles - this was the origin of the [[man cannon]]s, which were designed to let the players traverse the map quickly with a risk-reward element of being helpless in the air.{{Ref/Mag|Id=PCG348|Magazine=PC Gamer|Issue=348|Year=2020|Month=October|Title=Special Report: Theaters of War|Page=12-13}} | |||
During the game's development, the map was created under the development name of <code>riverworld</code>, which remains in game files as the map's filename. As [[Bungie]] got closer to finalising the names of the ''Halo 3'' multiplayer maps, Cotton jokingly suggested the name "Curious Gorge" for Valhalla - a name which nearly stuck. However, the map was eventually finalised to Valhalla, but the "Curious Gorge" name stuck in the map description.{{Ref/Reuse|PCG348}}<ref>Bungie Podcast 8-10-2007</ref> The name Riverworld later returned for the map's inclusion in ''Halo Online''. | |||
During the concept of this map, Bungie intended to make the map more of a snowy map than a forest one. Because of Snowbound, Bungie decided to make a forest map instead. However, some snow can still be seen near the base located near the waterfall. There is also snow atop the cliffs surrounding the majority of the map.{{Ref|[[:File:Valhalla.jpg|Overhead view of Valhalla]]}} | |||
Valhalla, along with [[Snowbound]] and [[High Ground]], was one of the maps available for play in the [[Halo 3 Beta]]. It was possible to fly into outer space in a Banshee by exploiting a glitch.{{citation needed}} Each base spawned a [[TR/9 trip mine|trip mine]]. Unfortunately, due to players' inexperience with [[equipment]], using it as an ambush for unwary enemy team members often resulted in the deaths of those friendly units still around it, and so it was removed from the final game. | |||
==Trivia== | ==Trivia== | ||
<!--This is a TRIVIA section, not for Strategies, only trivia belongs here, please put strategies | <!--This is a TRIVIA section, not for Strategies, only trivia belongs here, please put strategies above in the Strategies section--> | ||
[[ | *Vahalla was recreated in the [[Halo Mash-Up: Minecraft Evolved]].<ref>[https://blogs.halowaypoint.com/en-us/blogs/waypoint/posts/more-master-chief-and-minecraft '''Halo Waypoint -''' ''More Master Chief and Minecraft'']</ref> | ||
*[[Wikipedia:Valhalla|Valhalla]] (Old Norse Valhalla, "Hall of the Slain") is Odin's hall of the dead in Norse mythology, the home of those slain gloriously in battle. It is similar to [[MJOLNIR Powered Assault Armor|MJOLNIR]], as they are both of the same mythological origin. Interestingly, Valhalla was home to dead warriors that rose with the sun each day to fight each other and enjoy the thrill of battle, while during the night they had great feasts and healed their wounds. This is remarkably similar to the overall process of multiplayer gameplay. | |||
*The energy beam shooting from the towers on each side fires every 49 seconds, another [[Seven|7]] reference (7x7=49). The energy beam can also kill you if flying in a Banshee, doing this will cause you to be killed by [[The Guardians]]. | |||
*Like the ''[[Halo 2]]'' map [[Zanzibar]], there is [[Valhalla wall Easter egg|writing]] on the wall that changes according to the date. | |||
*Valhalla (Old Norse Valhalla, "Hall of the Slain") is Odin's hall in | *The river that runs through the center of the map has a fully functional current. A light enough object, or a dead Spartan, will flow down the river from the waterfall towards the lake. If the object floats far enough in the lake, it will drop underwater when it reaches the "death border". | ||
*The map’s description is a reference to popular children’s book character, Curious George. | |||
*The | |||
* | |||
*The river that runs through the center of the map has a fully functional current. A light enough object, | |||
*The | |||
==Gallery== | ==Gallery== | ||
{{Linkbox|gallery=yes}} | |||
===Concept art=== | |||
<gallery> | <gallery> | ||
File:H3_Valhalla_Sketch.jpg|An early sketch of the map layout. | |||
File:H3_Valhalla_Exterior_Concept_1.jpg|Concept art of a base, featuring a bridge-like structure at the front. | |||
File:H3 Valhalla Exterior Concept 2.jpg|Concept art of the map. | |||
File:H3_Valhalla_Base_Concept.jpg|Concept art of the base exterior. | |||
File:H3_Valhalla_Interior_Concept.jpg|Concept art of the base interior. | |||
H3 Valhalla PrePro Screenshot.jpg|An early blockout of the map, still using many ''Halo 2'' assets and the [[Blood Gulch]] environment texture as placeholder. | |||
</gallery> | </gallery> | ||
== | ===''Halo 3''=== | ||
< | <gallery> | ||
File:H3Beta Valhalla Mongoose.jpg|Valhalla during the Beta. | |||
File:Halo3 Valhalla 3rd-person-06.jpg|A multiplayer game in progress on Valhalla. | |||
File:Halo3 Valhalla 3rd-person-04.jpg|A multiplayer game in progress on Valhalla. | |||
File:Halo3 Valhalla-env-02.jpg|The Forerunner wall. | |||
File:Halo-3-20070430093127026.jpg|View from the side of the Beam Emitter. | |||
File:Funny death, valhalla.jpg|A battle on Valhalla. | |||
File:Spartan Laser2.jpg|A player fires a Spartan Laser towards Blue Base in Valhalla. | |||
File:H3 Valhalla Kilroy EasterEgg Screenshot.jpg|The picture of Kilroy as seen on a rock near Blue Base. | |||
File:Valhalla Sniping spot.jpg|The sniping spot in the cliffs. | |||
File:Valhalla.jpg|Valhalla from viewed from space. | |||
File:H3 Valhalla out of bounds.jpg|A view from outside Valhalla. | |||
</gallery> | |||
== | ===''Halo Online''=== | ||
<gallery> | |||
File:HO-GoldenMA5D.jpeg|The Forerunner wall in ''Halo Online''. | |||
</gallery> | |||
==Sources== | |||
{{Ref/Sources}} | |||
{{ | {{Levels|H3|mode=yes}} | ||
{{Levels|HO|mode=yes}} | |||
Latest revision as of 17:16, February 18, 2024
| Valhalla | |
|---|---|

| |
| Map overview | |
|
Game: |
|
|
Map file name (?): |
|
| Lore information | |
|
Location: |
|
| Gameplay overview | |
|
Terrain: |
Valley, grass, rocks, snow, and rivers all contained within a canyon. |
|
Recommended number of players: |
6-16 |
|
Recommended gametype(s): |
|
| “ | The crew of V-398 barely survived their unplanned landing in this gorge...this curious gorge. | ” |
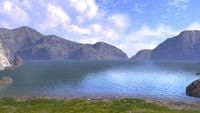
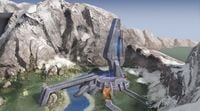
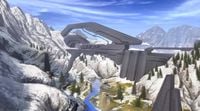
Valhalla is a multiplayer map in Halo 3 and Halo Online, known as Riverworld in the latter. The map is set on the Ark. Structurally, it is reminiscent of Blood Gulch from Halo: Combat Evolved. The map is a sparsely forested valley with mountains in the distance, featuring a river, rocky outcroppings, hills and a large Forerunner-built wall.
Universe and lore[edit]
Valhalla is set on the Ark. Structures similar to this canyon are echoed on many Forerunner installations including the Halo Array and shield worlds, with the site known as "Two Giants" of particular note on Requiem. Buried within deep canyons, these towers are not only sheltered from off-world debris, but their positions allowed them to leverage the steep environment's natural harmonics to amplify their signals when firing deep into space. Most scientists believe the spires - at their base function - act as communication channels, sending specific commands to other remote locations. The full operation and overarching purpose of these mysterious objects, however, remains a source of speculation.[1] Canyons like these were often reused based on the specific tastes of their creator, their function and as the result of other semi-random variables in the chosen design template.[2]
Overview[edit]
Layout[edit]
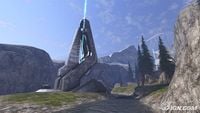
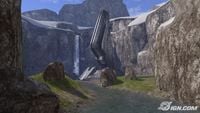
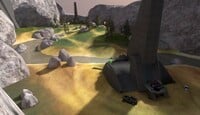
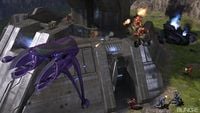
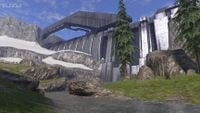
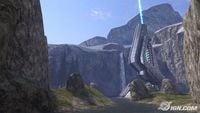
The map is similar in shape to Blood Gulch but has unique elements of its own. Valhalla is not a remake of Coagulation, nor is the downloadable Standoff either. Valhalla also has features from the Halo: Combat Evolved level, Halo. The most obvious feature is both the river and the bases themselves. The river starts in the mountains behind the blue base, and comes out as a waterfall. The river then flows in front of the base, under an outcrop, then down between the two prominent hills on which players find the Spartan Laser and the machine gun turret. Finally, it bends around the base, and empties into a large lake. Also, there are two caves in the map: one that goes through the hill between the crashed Pelican and blue base, and another that goes through the hill between the Pelican and the red base. Do note that if weapons are dropped into the river, they might drift downstream.
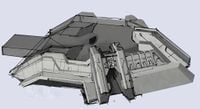
The distinguished beam emitter bases are Forerunner technology. They are similar to the structures seen in the Halo: Combat Evolved for PC multiplayer map Infinity, Timberland and in the campaign level Halo, while the lower portion is reminiscent of the bases in Blood Gulch. There are three entrances to the inside of the base; two on the sides as seen in many screenshots, and another located behind that dips down into the base. Replacing the teleporters are the man cannons. The largest one, on the front of the base, will send you out a third of the way out into the main battle area, while the smaller ones on the side of each base send you a short distance to the nearby cliff for a quick getaway. The bases feature a shiny glass floor on the interior, allowing players on opposite sides of the floor to see each other.
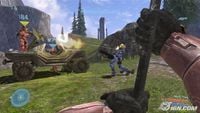
As previously stated, there are two similar hills on either side of the river. On the higher one spawns the Spartan Laser, while the lower hill holds a machine gun turret. Each base holds a sniper rifle inside the rear entrance, a pair of Fragmentation Grenades, and a pair of plasma grenades. Numerous battle rifles spawn around the map: two on top of the base next to the smaller man cannons, two underneath the base alongside each entrance along with two plasma pistols, two on the terrain where you land after taking off from the man cannons, and one that spawns in each cave. A shotgun spawns inside each of the caves as well, and Spikers spawn on the top of both bases near the Missile Pod. A pair SMGs also spawn on each base and are located next to the plasma grenades. Valhalla is a very good sniper map since you can snipe opponents clear across the other side of the map, and when players take the bases' man cannons for rapid transportation, they become easy targets for experienced snipers.
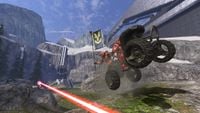
The Missile Pod spawns on top of each base to provide initial anti-vehicle defense. The vehicle set per base is a Banshee, Warthog, Wraith, and two Mongooses. However, in the Matchmaking playlists the vehicles are limited to a Warthog, a pair of Mongooses, and a Banshee per base (in 4v4 matches, most notably in Team BRs, the Banshee is sometimes removed). The power drain spawns on top of each base next to the Missile Pod, while the bubble shield spawns at the neutral Mongoose near the Forerunner wall.
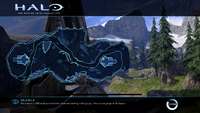
Valhalla Map.
The layout of Valhalla.
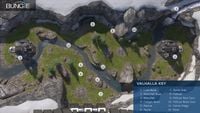
A birds-eye view of Valhalla.


Callouts[edit]
- Lake Base
Lake Base, from a distance away.
The titular lake, as viewed from roughly where the Banshee spawns.


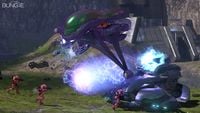
- Waterfall Base
The Beam Emitter prior to firing.

- Waterfall
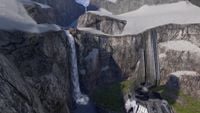
The inaccessible waterfall on Valhalla.

- Canyon Bend
- Ravine
- Turret
- Turret Side
- Pelican
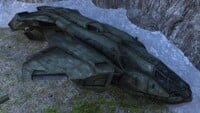
The crashed dropship Victor 398.

- Pelican Rear Cave
- Pelican Nose Cave
- Center Ridge
- River
There are also points on the top of the spires that can be reached by Banshee, Hornet, or in Forge, but these areas will not be listed.
Strategies[edit]
- Use the Banshee only when the Spartan Laser is safely in your control.
- A good strategy in Assault is to secure the enemy base and the bomb spawn. Simply bring the bomb over to the base, plant it, and camp with Shotguns to protect it. Have a player stay near the spawn to pick it up and repeat this process.
- The Banshee can make a great hit and run aircraft as it can fly in on the enemy base, fire, turn around the tower and head back, then turn around at the friendly base for another attack run.
- A good trick is to use the man cannon while driving the Mongoose then jumping off, as it will not go as far as the player. This will confuse the enemy firing at the empty Mongoose, so that the player can flank them. Only players who look closely will realize that the driver has jumped off.
- For a team-based game, it is imperative to control the Spartan Laser and the ground around it. The Laser allows your team to fire upon the enemy base from a distance, or kill them coming down from the man cannon, stopping them from being able to fight with a little breathing space. However, sometimes a mad rush for the Spartan Laser leaves your base open.
- When in a dogfight in the Banshees, it is advantageous to fly low and strafe at the higher Banshee. The pilot will have to turn around giving you more than enough time to disable it or destroy it, although this leaves you open to being hijacked, lasered, or locked on with a Missile Pod.
- If you can, try stealing the enemy's Banshee. With your Banshee and your captured ones, you will have complete control of air support. This works better with Warthogs, allowing you to flank enemies trying to escape with the Warthogs.
- While the central hill does provide an excellent view of the map, be aware that this makes you a target for snipers.
- Try not to use the Spartan Laser on lone targets such as one person charging the hill with no back up; instead, save the charge for higher-priority targets, such as incoming vehicles or a player wielding a Missile Pod.
- If you have the flag, unpredictability is key to survival, especially if the opposing team has the Spartan Laser - one deception or erratic movement is often the difference between victory and defeat.
- Since this map has many hills and corners, tanks are better utilized as a defensive force backed up in the corner.
- Try to secure the Spartan Laser first and foremost to allow you to take out infantry and vehicles with ease. If you're on defense, fall back to the base and use it on assaulting vehicles, using a battle rifle or something similar to take out distant-enemies before they reach the base. If you're on offense, use the Spartan Laser to cover the rest of your team, then go help retrieve the flag or protect the bomb from being disarmed.
- When a bomb is planted, bring a regenerator to increase your durability from grenades and power drains that are often tossed inside.
- Have your VIP stay inside the lower level in the base and jam the center with the Warthog. Have a teammate with a shotgun cover one entrance and an SMG wielder cover the other. Always have some sort of support when doing this (i.e. bubble shield, regenerator). Have another player man the Warthog turret and a friendly Banshee pilot impede the enemy's advance. Be sure to have a few teammates watching the base from somewhere else. Some players have commented that this strategy has almost no weaknesses.
- The initial rush straight for the Spartan Laser once the game starts can be swung your way by throwing grenades to land just beyond the Laser's spawn point, knocking down shields or even killing members of the other team with the same objective in mind. Throwing a power drain is also wise.
- Be extremely careful while driving a Banshee; if you swerve off too late while strafing, it could cost you the vehicle.
- Try sniping in less commonly used areas, like right behind the turret where players would think a sniper would never venture.
- For Territories, sticking together is the best way to win; usually, an offensive team will stay in one large group moving from territory to territory, making it hard for a team to defend all of the territories at once. For defense, move up to the bases that will be easiest for the attackers to capture (the crashed Pelican, the shotgun-spawning points) and try to protect those with a larger group, and keep a few of the back ready to move to another territory while the rest deal with other attackers.
- As a note, Territory 4 is a very dangerous Territory due to the fact it is in a cave, and multiple grenades can be thrown in to kill the attacking force. Try to always bring a bubble shield and/or regenerator.
- If your flag gets stolen, guard the primary man cannon, as that is where the carrier is most likely to go after they steal the flag.
- An interesting tactic to do on CTF is to drop it on top of the Fusion coil at the stump on the base and shoot it. This will launch the flag at least halfway across the map, making the trip a lot less hectic.
- The crashed Pelican provides a great place to snipe, since the player has a decent view of both bases. It is also recommended because of a regenerator that spawns under the wing, should the sniper be in trouble.
- You can have your VIP jump on your Banshee and move it to the top of the base where the VIP has a vantage point, although this tactic makes the VIP prone to the Spartan Laser and its lethal range.
- As in any Team Slayer game, move as a pack, and do not get separated. Controlling the Spartan Laser and the Missile Pods are the key to this level because vehicles will not have to worry about getting destroyed so easily.
- If you are in the Coastal Base and you use the man cannon, you can actually jump across the river from where you land, with at least some momentum left from your launch. You must land pretty much on the edge of the land before you would fall into the river. If this can be performed correctly, it may be helpful to get closer to the Spartan Laser on the hill.
- Try to use the Warthog when taking out enemies on the hill, especially if they have a Spartan Laser and are trying to kill a teammate of yours in a Banshee, as they won't focus on you as much.
- Rushing for the Spartan Laser is wise especially if you have a Warthog and a Banshee on the offensive. The center should be secure, but the outskirts will be unprotected and enemy Warthogs and Banshees will be already firing.
- At the start of the game, if you are going for the Spartan Laser, pick up the power drain and throw it as you man cannon towards the hill. This should deter, weaken, or at least hold back the enemies while you pick up the Laser. Also be sure to have a sniper in the base and/or other players to protect as you get to a safe distance with the Spartan Laser.
- A good sniper tactic in Valhalla is to jump as you approach the Spartan Laser hill. Even if you don't have a good aim, you can still badly injure a few of the other team, making the Spartan Laser easy to claim.
- Go to the Pelican with a sniper rifle and you can kill anyone trying to grab the Spartan Laser. You can delay them until your team has possession of the Laser.
- A good sniping position is to get the Banshee and ride up to the top of the base. If you do it correctly you will be able to snipe people across the whole map. But remember to look out for the mortar that the bases fire. Another way to get there is by positioning a Wraith beside the back entrance of a base and jumping on top of it, then jumping up to the slippery platform. Be sure you keep jumping forward until you reach the location. This tactic is harder and can also be done with a Warthog or by Team Jumping/butterflying.
- In CTF or Assault, have someone camp with the Missile Pod. It can destroy incoming vehicles, or at close-medium ranges, it can be used as a compensation for a rocket launcher.
- The Missile Pod is surprisingly effective inside the lower area of the base.
- In CTF, if you manage to kill the carrier in a Wraith, park it on top of the carriers corpse and destroy it. Just melee the back engine a few times; this puts the flag underneath the wreckage and makes it nearly impossible to retrieve, depending on your parking job. Be careful, however, because if you stand too close, the flag will respawn at your base. The wreckage will disappear after a while.
- Sometimes, some weapons will float down the river; players can pick up shotguns, Spartan Lasers, and even Missile Pods or extra ammo, though this isn't a strategy you should count on.
- An excellent base-defense strategy is having a Wraith guarding the outside and having a player sniping from a nearby ledge. It can be more solid if you have a few players armed with SMGs or shotguns.
- The plasma grenades and battle rifles have fast respawn times at each base. Unless the need to move out is urgent, it's usually worthwhile to wait for them.
- The caves are notorious for having campers with shotguns inside. Unless the other routes to the enemy base are guarded, throw a few grenades and flank to where the camper will fall back, causing you to catch him off guard.
- The power drain should be useful when numerous foes are arriving at the arming spot or flag in Assault and CTF games, respectively. Just hold your nerve and deploy it when you've almost touched their objective.
- A defensive player should move to the caves and grab a shotgun to use in the basement floor of the base.
- When using a power drain and man cannon, please note that the power drain will not reach the hill if thrown in the man cannon. This is a common mistake and can be rectified if you yourself use the man cannon and fling the power drain while in "flight."
- The Pelican is notorious in Territories for the regenerator and close proximity to Territory 4 and the Spartan Laser. The only practical way to deal with this territory is to control the hill and maybe save a power drain to cancel the regenerator's effects.
- The rock laying on its side near the waterfall base can serve as an outpost. A sniper can crouch there and eliminate anybody heading that way.
- Another good tactic is to grab the Missile Pod at the start of the match. This is because somebody on the other team often gets in their Banshee immediately after the game starts. The Missile Pod can easily destroy the enemy Banshee, which can be a real advantage.
- Another useful tactic for assaulting the waterfall base is to take a sniper rifle, and camp in the bushes on the cliff next to the waterfall. This position gives the shooter a good view of the waterfall base, and the spawns around it.
Remakes[edit]
Halo 4[edit]
Valhalla was remade as Ragnarok in Halo 4.
Halo 5[edit]
Valhalla was remade as Viking using Forge in Halo 5: Guardians.
Halo: Infinite[edit]
Valhalla was remade as Valahiem using Forge in Halo Infinite.[3]
Variants[edit]
Valhalla Heavy[edit]
- An additional Warthog spawns alongside the default Warthog spawn at each base.
- A Scorpion Tank spawns in front of each base.
- A Spartan Laser spawns alongside the default sniper rifle spawn point at each base, another spawns at the Pelican site, and another at the Turret site.
- An additional bubble shield replaces the regenerator spawn at the Pelican site.
- Teleporters are added to the map. Each base's lower deck has a Sender Node teleporter which teleports players to other Receiver Node teleporters either near the Pelican side or the Turret site, functioning similarly to Blood Gulch's and Coagulation's teleporters.
- The formerly default Spartan Laser spawn has been replaced by a rocket launcher.
Production notes[edit]

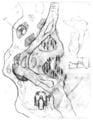
When developing Halo 3, Valhalla started out as a napkin sketch drawn by designer Steve Cotton in roughly five minutes, showing a snaking river cutting through a gulch - intended to evoke some of Blood Gulch's team v. team and base v. base combat with vehicles and infantry. A large additional design goal was to make the map traversable for infantry alongside vehicles - this was the origin of the man cannons, which were designed to let the players traverse the map quickly with a risk-reward element of being helpless in the air.[4]
During the game's development, the map was created under the development name of riverworld, which remains in game files as the map's filename. As Bungie got closer to finalising the names of the Halo 3 multiplayer maps, Cotton jokingly suggested the name "Curious Gorge" for Valhalla - a name which nearly stuck. However, the map was eventually finalised to Valhalla, but the "Curious Gorge" name stuck in the map description.[4][5] The name Riverworld later returned for the map's inclusion in Halo Online.
During the concept of this map, Bungie intended to make the map more of a snowy map than a forest one. Because of Snowbound, Bungie decided to make a forest map instead. However, some snow can still be seen near the base located near the waterfall. There is also snow atop the cliffs surrounding the majority of the map.[6]
Valhalla, along with Snowbound and High Ground, was one of the maps available for play in the Halo 3 Beta. It was possible to fly into outer space in a Banshee by exploiting a glitch.[citation needed] Each base spawned a trip mine. Unfortunately, due to players' inexperience with equipment, using it as an ambush for unwary enemy team members often resulted in the deaths of those friendly units still around it, and so it was removed from the final game.
Trivia[edit]
- Vahalla was recreated in the Halo Mash-Up: Minecraft Evolved.[7]
- Valhalla (Old Norse Valhalla, "Hall of the Slain") is Odin's hall of the dead in Norse mythology, the home of those slain gloriously in battle. It is similar to MJOLNIR, as they are both of the same mythological origin. Interestingly, Valhalla was home to dead warriors that rose with the sun each day to fight each other and enjoy the thrill of battle, while during the night they had great feasts and healed their wounds. This is remarkably similar to the overall process of multiplayer gameplay.
- The energy beam shooting from the towers on each side fires every 49 seconds, another 7 reference (7x7=49). The energy beam can also kill you if flying in a Banshee, doing this will cause you to be killed by The Guardians.
- Like the Halo 2 map Zanzibar, there is writing on the wall that changes according to the date.
- The river that runs through the center of the map has a fully functional current. A light enough object, or a dead Spartan, will flow down the river from the waterfall towards the lake. If the object floats far enough in the lake, it will drop underwater when it reaches the "death border".
- The map’s description is a reference to popular children’s book character, Curious George.
Gallery[edit]

|
Browse more images in this article's gallery page. |
Concept art[edit]
An early sketch of the map layout.
Concept art of a base, featuring a bridge-like structure at the front.
Concept art of the map.
Concept art of the base exterior.
Concept art of the base interior.
An early blockout of the map, still using many Halo 2 assets and the Blood Gulch environment texture as placeholder.


Halo 3[edit]
Valhalla during the Beta.
A multiplayer game in progress on Valhalla.
A multiplayer game in progress on Valhalla.
The Forerunner wall.
View from the side of the Beam Emitter.
A battle on Valhalla.
A player fires a Spartan Laser towards Blue Base in Valhalla.
The picture of Kilroy as seen on a rock near Blue Base.
The sniping spot in the cliffs.
Valhalla from viewed from space.

A view from outside Valhalla.


Halo Online[edit]
The Forerunner wall in Halo Online.

Sources[edit]
- ^ Halo Waypoint: Requiem
- ^ Halo Waypoint forums: Catalog's response - [Serendipitous] or [pleasing] patterns are often represented at different scales and locales, based on the tastes of the [pattern weaver] or as a result of [semi-stochastic] initial conditions inherent in the chosen template.
- ^ Halo Waypoint, Halo Community Update - November Sneak Peek
- ^ a b PC Gamer, October 2020 (Issue #348) - Special Report: Theaters of War, page 12-13
- ^ Bungie Podcast 8-10-2007
- ^ Overhead view of Valhalla
- ^ Halo Waypoint - More Master Chief and Minecraft
| ||||||||||||||||||||||||||||||||||||||||
| ||||||||||||||||||||


