Control room: Difference between revisions
From Halopedia, the Halo wiki
Sith Venator (talk | contribs) |
BaconShelf (talk | contribs) |
||
| (38 intermediate revisions by 21 users not shown) | |||
| Line 1: | Line 1: | ||
{{ | {{Status|Canon}} | ||
{{ | {{Center|''Were you looking for [[installation 00|the Ark]]'s control room, the [[Installation 00 Citadel|Citadel]]?''}} | ||
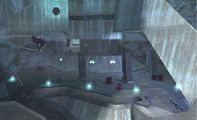
[[File:Rep-Installation04 Control Room Overview.jpg|thumb|300px|The control room of [[Installation 08]].]] | |||
[[File:Rep- | |||
A '''control room''' is a crucial facility featured on many [[Forerunner]] installations, most prominently those of the [[Halo Array]]. The control room of a Halo contains the installation's [[Core]] data center, and is used to manage the entirety of the Halo's systems, including its primary weapon, which can be activated by inserting the [[Activation Index]] into the Core or even disabled, given sufficient expertise.<ref name="hw2 last">'''Halo Wars 2''', campaign level ''[[Last Stand (Halo Wars 2 level)|Last Stand]]''</ref> Other functions include the management of the installation's safety protocols,<ref name="esca10">'''Halo: Escalation''', ''[[Halo: Escalation Issue 10|Issue #10]]''</ref> and control over the Halo's [[gravity anchor]]s, enabling the ejection of select environmental sections into space.{{Ref/Reuse|hw2 last}} The Halos' control rooms are typically located within a pyramidal temple-like structure.<ref name="twoB">'''Halo: Combat Evolved''', campaign level ''[[Two Betrayals]]''</ref> | |||
Control rooms are featured on other installations as well; [[shield world]]s, for example, possess dedicated control centers for the [[Forerunner fleet]]s or weapons they may contain.<ref name="evg">'''[[Halo: The Essential Visual Guide]]''', ''page 35''</ref> | |||
==Installation 00== | |||
{{main|Installation 00 Citadel}} | |||
The Citadel served as a control room that could fire all seven of the Halo Installations at once. | |||
==Installation 03== | |||
{{main|Control Room (Installation 03)}} | |||
The interior of [[Installation 03|Gamma Halo]]'s control room resembles that of Installation 04 in general layout. It was here that John-117 defeated the [[Ur-Didact]] following the [[New Phoenix Incident]]. The Master Chief utilized the ring's activation index to manually disable the installation's safety protocols, allowing monitor [[859 Static Carillon]] to eject the fragment of the ring housing the control room into the planet below, seemingly incinerating the Didact in the impact but keeping the control room intact.{{Ref/Reuse|esca10}} | |||
==Installation 04== | ==Installation 04== | ||
{{main|Control Room (Installation 04)}} | {{main|Control Room (Installation 04)}} | ||
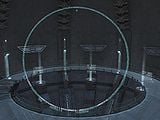
Installation 04's Control Room was located in a snowy chasm. The main console and Core was located within a massive spherical chamber behind a set of | [[File:Control Room2.jpg|thumb|250px|The central chamber of Installation 04's control room.]] | ||
Installation 04's Control Room was a [[Wikipedia:Ziggurat|ziggurat]]-like structure located in a snowy chasm. The main console and Core was located within a massive spherical chamber behind a set of [[door]]s and connecting corridors. The room features a massive [[Holography|hologram]] of Installation 04 and the [[Threshold]] system in its center. Suspended in the air is a large circular catwalk.{{Ref/Reuse|twoB}} | |||
The [[John-117|Master Chief]] reached the main console and inserted [[Cortana]], who sent him to the installation's [[Flood containment facility]] to attempt to stop [[Jacob Keyes|Captain Keyes]] from unleashing the Flood. He returned to the Control Room at the start of [[Two Betrayals]] to insert the Index as prompted by [[343 Guilty Spark]], but was stopped by Cortana. 343 Guilty Spark then sent [[Sentinel]]s to stop the Chief. After the Chief destroyed the Sentinels, he took Cortana and left. | The [[John-117|Master Chief]] reached the main console and inserted [[Cortana]], who sent him to the installation's [[Flood containment facility]] to attempt to stop [[Jacob Keyes|Captain Keyes]] from unleashing the Flood.<ref>'''[[Halo: Combat Evolved]]''', campaign level ''[[Assault on the Control Room]]''</ref> He returned to the Control Room at the start of ''[[Two Betrayals]]'' to insert the Index as prompted by [[343 Guilty Spark]], but was stopped by Cortana. 343 Guilty Spark then sent [[Sentinel]]s to stop the Chief. After the Chief destroyed the Sentinels, he took Cortana and left.{{Ref/Reuse|twoB}} | ||
==Installation 05== | ==Installation 05== | ||
{{main|Control Room (Installation 05)}} | {{main|Control Room (Installation 05)}} | ||
[[Installation 05]]'s Control Room is located on an offshore island in a large body of water. It bears significant structural differences from Installation 04's room. | [[Installation 05]]'s Control Room is located on an offshore island in a large body of water. It bears significant structural differences from Installation 04's room.<ref name="TgreatJ">'''Halo 2''', campaign level ''[[The Great Journey]]''</ref> | ||
Here, the [[Jiralhanae Chieftain]] [[Tartarus]] brought [[Miranda Keyes]] to the Control Room along with [[343 Guilty Spark]] to attempt to activate Delta Halo. He succeeded in initiating the activation sequence of the installation, but was slain by [[Arbiter]] [[Thel 'Vadam]]ee and [[Avery Johnson|Sergeant Johnson]]. The Index was removed by Miranda before the weapon could fire. Upon activation of the firing sequence, the control room's central chamber reconfigured from its inert state into a three-leveled structure with a [[gravity lift]] in the middle.{{Ref/Reuse|TgreatJ}} | |||
==Installation 08== | |||
{{Main|Control Room (Installation 04)}} | |||
[[File:H3-Halo.png|thumb|300px|The hologram of [[Installation 08]].]] | |||
The Control Room for the [[Installation 08|replacement Alpha Halo]] is a nearly identical copy of the original ring's Control Room. The temple structure has the same basic triangular shape as Installation 04's Control Room, with a long support beam running from the ground to the top of the structure. There are minor aesthetic differences, including the walkways on each level being more narrow, as well as the tower at the top being replaced by a large flat landing.<ref name="hh3">'''Halo 3''', campaign level ''[[Halo (Halo 3 level)|Halo]]''</ref> | |||
Inside the control room, the corridors and doorways are reminiscent of Installation 04, while offering minimal changes. The actual control room and control panel is scarcely different from the original. The large dome-shaped room still shows a holographic image of the Halo ring, although Threshold is missing from this image (as the ring has not been moved to that point).{{Ref/Reuse|hh3}} | |||
The | |||
The | The differences in design from the original Installation 04 may be due to the ring's incomplete state, as suggested by Cortana's observation, "Halo. It's so new...unfinished."{{Ref/Reuse|hh3}} | ||
==Installation 09== | |||
{{Main|Control Room (Installation 09)}} | |||
The control room for [[Installation 09]] is different from that of its predecessors, both in design and location. It now lies below the surface of the installation, and can be accessed by descending from a circular aboveground structure. The control room also features an energy shield for protection. Instead of placed at the corner of a cliff, it appears to be on a large landmass.<ref>'''[[Halo Wars 2]]''', campaign level ''[[Last Stand (Halo Wars 2 level)|Last Stand]]''</ref> | |||
{{Expand-section}} | |||
The | ==Etran Harborage== | ||
{{Main|Apex Site}} | |||
The [[Trove|Etran Harborage's]] [[Apex Site]] was classified as a form of control room.{{Ref/Reuse|evg}} This facility was an elongated platform suspended in the air high above the interior surface of the miniature [[Dyson sphere]], surrounded by docking towers housing [[Forerunner dreadnought]]s. At one end of the platform was a control panel which, like many Forerunner artifacts, could only be operated by a [[Reclaimer]].<ref>'''Halo Wars''', campaign level ''[[Beachhead]]'' (opening cutscene ''"Judgment Day"'')</ref> | |||
==Trivia== | ==Trivia== | ||
{{Linkbox|gallery=yes|gallerypage=Images of Control Room}} | {{Linkbox|gallery=yes|gallerypage=Images of Control Room}} | ||
The control room was first seen in the [[pre-Xbox Halo]] demo in 1999. In the video, the control room was about one third the size of the version later seen in ''[[Halo: Combat Evolved]]''. | |||
==Gallery== | ==Gallery== | ||
<gallery> | <gallery> | ||
File: | File:H3_Installation08_ControlRoom_Concept_1.jpg|Early concept art of Installation 08's control room, with the Ark in the background. | ||
File: | File:H3_Installation08_ControlRoom_Concept_2.jpg|Finalized concept art of the structure, now bearing clear similarities to the original ring's control room. | ||
File:Controlroom.jpg|Exterior view of Installation 04's control room. | File:Controlroom.jpg|Exterior view of Installation 04's control room. | ||
File:Control Room 04.jpg|The entrance to the control room of [[ | File:Control Room 04.jpg|The entrance to the control room of [[Installation 04]]. | ||
File:AnniversaryControlRoom.png|Interior view of Installation 04's control room. | File:AnniversaryControlRoom.png|Interior view of Installation 04's control room. | ||
File:Control | File:H2A-Control room.png|Installation 05's control room. | ||
File:Control Room Entrance.jpg|The entrance hall of Installation | File:H2A - Delta Halo activated.jpg|Installation 05's control room initiating the installation's firing sequence. | ||
File:Halo Hologram.jpg|Inside the control room of Installation | File:H2A-SevenRings.jpg|Installation 05's control room activates its holographic readout of the Halo Array upon shutdown. | ||
File:Control Room Entrance.jpg|The entrance hall of Installation 08's control room. | |||
File:Halo Hologram.jpg|Inside the control room of Installation 08. | |||
</gallery> | </gallery> | ||
==List of appearances== | ==List of appearances== | ||
*''[[Halo: Combat Evolved]]'' {{1st}} | *''[[Halo: Combat Evolved]]'' {{1st}} | ||
*''[[Halo 2]]'' | *''[[Halo 2]]'' | ||
*''[[Halo 3]]'' | *''[[Halo 3]]'' | ||
*''[[Halo Wars]]'' | |||
*''[[Halo Legends]]'' | *''[[Halo Legends]]'' | ||
**''[[Origins]]'' | **''[[Origins]]'' | ||
*''[[Halo: Combat Evolved Anniversary]]'' | |||
*''[[Halo: Silentium]]'' | *''[[Halo: Silentium]]'' | ||
*''[[Halo: Escalation]]'' | |||
*''[[Halo: Broken Circle]]'' {{Mo}} | |||
*''[[Halo 2: Anniversary]]'' | |||
*''[[Halo: Hunters in the Dark]]'' {{Mo}} | |||
*''[[Halo Wars 2]]'' | |||
*''[[Halo: Official Spartan Field Manual]]'' {{Mo}} | |||
==Sources== | ==Sources== | ||
{{Ref/Sources}} | |||
{{ | {{Forerunner|array}} | ||
[[Category:Forerunner buildings]] | [[Category:Forerunner buildings]] | ||
Latest revision as of 11:20, January 1, 2024

A control room is a crucial facility featured on many Forerunner installations, most prominently those of the Halo Array. The control room of a Halo contains the installation's Core data center, and is used to manage the entirety of the Halo's systems, including its primary weapon, which can be activated by inserting the Activation Index into the Core or even disabled, given sufficient expertise.[1] Other functions include the management of the installation's safety protocols,[2] and control over the Halo's gravity anchors, enabling the ejection of select environmental sections into space.[1] The Halos' control rooms are typically located within a pyramidal temple-like structure.[3]
Control rooms are featured on other installations as well; shield worlds, for example, possess dedicated control centers for the Forerunner fleets or weapons they may contain.[4]
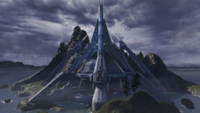
Installation 00[edit]
- Main article: Installation 00 Citadel
The Citadel served as a control room that could fire all seven of the Halo Installations at once.
Installation 03[edit]
- Main article: Control Room (Installation 03)
The interior of Gamma Halo's control room resembles that of Installation 04 in general layout. It was here that John-117 defeated the Ur-Didact following the New Phoenix Incident. The Master Chief utilized the ring's activation index to manually disable the installation's safety protocols, allowing monitor 859 Static Carillon to eject the fragment of the ring housing the control room into the planet below, seemingly incinerating the Didact in the impact but keeping the control room intact.[2]
Installation 04[edit]
- Main article: Control Room (Installation 04)

Installation 04's Control Room was a ziggurat-like structure located in a snowy chasm. The main console and Core was located within a massive spherical chamber behind a set of doors and connecting corridors. The room features a massive hologram of Installation 04 and the Threshold system in its center. Suspended in the air is a large circular catwalk.[3]
The Master Chief reached the main console and inserted Cortana, who sent him to the installation's Flood containment facility to attempt to stop Captain Keyes from unleashing the Flood.[5] He returned to the Control Room at the start of Two Betrayals to insert the Index as prompted by 343 Guilty Spark, but was stopped by Cortana. 343 Guilty Spark then sent Sentinels to stop the Chief. After the Chief destroyed the Sentinels, he took Cortana and left.[3]
Installation 05[edit]
- Main article: Control Room (Installation 05)
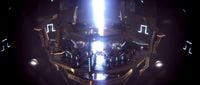
Installation 05's Control Room is located on an offshore island in a large body of water. It bears significant structural differences from Installation 04's room.[6]
Here, the Jiralhanae Chieftain Tartarus brought Miranda Keyes to the Control Room along with 343 Guilty Spark to attempt to activate Delta Halo. He succeeded in initiating the activation sequence of the installation, but was slain by Arbiter Thel 'Vadamee and Sergeant Johnson. The Index was removed by Miranda before the weapon could fire. Upon activation of the firing sequence, the control room's central chamber reconfigured from its inert state into a three-leveled structure with a gravity lift in the middle.[6]
Installation 08[edit]
- Main article: Control Room (Installation 04)

The Control Room for the replacement Alpha Halo is a nearly identical copy of the original ring's Control Room. The temple structure has the same basic triangular shape as Installation 04's Control Room, with a long support beam running from the ground to the top of the structure. There are minor aesthetic differences, including the walkways on each level being more narrow, as well as the tower at the top being replaced by a large flat landing.[7]
Inside the control room, the corridors and doorways are reminiscent of Installation 04, while offering minimal changes. The actual control room and control panel is scarcely different from the original. The large dome-shaped room still shows a holographic image of the Halo ring, although Threshold is missing from this image (as the ring has not been moved to that point).[7]
The differences in design from the original Installation 04 may be due to the ring's incomplete state, as suggested by Cortana's observation, "Halo. It's so new...unfinished."[7]
Installation 09[edit]
- Main article: Control Room (Installation 09)
The control room for Installation 09 is different from that of its predecessors, both in design and location. It now lies below the surface of the installation, and can be accessed by descending from a circular aboveground structure. The control room also features an energy shield for protection. Instead of placed at the corner of a cliff, it appears to be on a large landmass.[8]
 This section needs expansion. You can help Halopedia by expanding it.
Etran Harborage[edit]
- Main article: Apex Site
The Etran Harborage's Apex Site was classified as a form of control room.[4] This facility was an elongated platform suspended in the air high above the interior surface of the miniature Dyson sphere, surrounded by docking towers housing Forerunner dreadnoughts. At one end of the platform was a control panel which, like many Forerunner artifacts, could only be operated by a Reclaimer.[9]
Trivia[edit]

|
Browse more images in this article's gallery page. |
The control room was first seen in the pre-Xbox Halo demo in 1999. In the video, the control room was about one third the size of the version later seen in Halo: Combat Evolved.
Gallery[edit]

Early concept art of Installation 08's control room, with the Ark in the background.

Finalized concept art of the structure, now bearing clear similarities to the original ring's control room.

Exterior view of Installation 04's control room.
The entrance to the control room of Installation 04.

Interior view of Installation 04's control room.
Installation 05's control room.
Installation 05's control room initiating the installation's firing sequence.

Installation 05's control room activates its holographic readout of the Halo Array upon shutdown.
The entrance hall of Installation 08's control room.
Inside the control room of Installation 08.


List of appearances[edit]
- Halo: Combat Evolved (First appearance)
- Halo 2
- Halo 3
- Halo Wars
- Halo Legends
- Halo: Combat Evolved Anniversary
- Halo: Silentium
- Halo: Escalation
- Halo: Broken Circle (Mentioned only)
- Halo 2: Anniversary
- Halo: Hunters in the Dark (Mentioned only)
- Halo Wars 2
- Halo: Official Spartan Field Manual (Mentioned only)
Sources[edit]
- ^ a b Halo Wars 2, campaign level Last Stand
- ^ a b Halo: Escalation, Issue #10
- ^ a b c Halo: Combat Evolved, campaign level Two Betrayals
- ^ a b Halo: The Essential Visual Guide, page 35
- ^ Halo: Combat Evolved, campaign level Assault on the Control Room
- ^ a b Halo 2, campaign level The Great Journey
- ^ a b c Halo 3, campaign level Halo
- ^ Halo Wars 2, campaign level Last Stand
- ^ Halo Wars, campaign level Beachhead (opening cutscene "Judgment Day")


