Last Resort: Difference between revisions
From Halopedia, the Halo wiki
(Added Halo Online) |
No edit summary |
||
| (18 intermediate revisions by 8 users not shown) | |||
| Line 1: | Line 1: | ||
{{ | {{Status|Gameplay}} | ||
{{Multiplayer | {{Multiplayer map infobox | ||
|pagegamelabel=H3 | |pagegamelabel=H3 | ||
|name=Last Resort | |name=Last Resort | ||
|image=[[File:H3 LastResort Overview.jpg|300px]] | |image=[[File:H3 LastResort Overview.jpg|300px]] | ||
|game=''[[Halo 3]]'' | |game=''[[Halo 3]]'' | ||
|devname=<code>zanzibar</code> | |||
|map= | |map= | ||
|location=[[Zanzibar Municipal Turbine 7]], [[Zanzibar Island]], [[Earth]] | |location=[[Zanzibar Municipal Turbine 7]], [[Zanzibar Island]], [[Earth]] | ||
| Line 13: | Line 14: | ||
*[[Assault|One Bomb]] | *[[Assault|One Bomb]] | ||
*[[Team Slayer]] | *[[Team Slayer]] | ||
*[[One Sided VIP]] | *[[VIP|One Sided VIP]] | ||
}} | }} | ||
{{Article quote|Remote industrial sites like this one are routinely requisitioned and razed as part of Spartan training exercises.}} | {{Article quote|Remote industrial sites like this one are routinely requisitioned and razed as part of Spartan training exercises.}} | ||
'''Last Resort'''<ref>[http://halo.bungie.net/News/content.aspx?type=topnews&cid=12616 '''Bungie.net''' ''Way Beyond the Beta: Screenshots Galore'']</ref> is a ''[[Halo 3]]'' [[multiplayer]] map, which was also included in ''[[Halo Online]]'' as '''Refuge'''. It is remake of the ''[[Halo 2]]'' map, [[Zanzibar]]. | '''Last Resort'''<ref>[http://halo.bungie.net/News/content.aspx?type=topnews&cid=12616 '''Bungie.net''' ''Way Beyond the Beta: Screenshots Galore'']</ref> is a ''[[Halo 3]]'' [[multiplayer]] map, which was also included in ''[[Halo Online]]'' as '''Refuge'''. It is remake of the ''[[Halo 2]]'' map, [[Zanzibar]]. | ||
== | ==Universe and lore== | ||
{{Main|Wind Power Station 7}} | {{Main|Wind Power Station 7}} | ||
Last Resort is one of [[Zanzibar|many]] [[Stonetown|similar]] power stations situated on [[Zanzibar Island]], following the [[East African Protectorate]]'s attempts at re-nationalisation in the 24th century.<ref>'''[[Halo 2]]''', ''Zanzibar'' map description</ref><ref name="HU">[https://www.halowaypoint.com/en-us/universe/locations/earth '''Halo Waypoint''': ''Earth'']</ref> When Wind Power Station 7 was decommissioned in the 26th century, it was taken over for military training exercises, with detailed scans of the sites contributing to a number of notable [[War Games]] maps, including Last Resort. | Last Resort is one of [[Zanzibar|many]] [[Stonetown|similar]] power stations situated on [[Zanzibar Island]], following the [[East African Protectorate]]'s attempts at re-nationalisation in the 24th century.<ref>'''[[Halo 2]]''', ''Zanzibar'' map description</ref><ref name="HU">[https://www.halowaypoint.com/en-us/universe/locations/earth '''Halo Waypoint''': ''Earth'']</ref> When Wind Power Station 7 was decommissioned in the 26th century, it was taken over for military training exercises, with detailed scans of the sites contributing to a number of notable [[War Games]] maps, including Last Resort.{{Ref/Reuse|HU}} Signage around the facility reads '''Sector K2433'''. | ||
The installation itself, [[Zanzibar Municipal Turbine 7]], was constructed by [[Buelterman Carney Cotton & Hayward Inc.]], and [[Traxus Heavy Industries]] was also heavily involved in the location. Unlike the other facilities, Last Resort is built amongst an old stone fortress. Despite this, the facility maintains a very similar layout to the other wind power stations observed on Zanzibar Island, with the notable exception of a larger area in the "courtyard" and an extension to the interior of the facility. | The installation itself, [[Zanzibar Municipal Turbine 7]], was constructed by [[Buelterman Carney Cotton & Hayward Inc.]], and [[Traxus Heavy Industries]] was also heavily involved in the location. Unlike the other facilities, Last Resort is built amongst an old stone fortress. Despite this, the facility maintains a very similar layout to the other wind power stations observed on Zanzibar Island, with the notable exception of a larger area in the "courtyard" and an extension to the interior of the facility. | ||
== | ==Overview== | ||
[[File:H3 LastResort | ===Layout=== | ||
===Fortress=== | <gallery> | ||
File:HMCC Last Resort.PNG|Layout of the map in ''[[Halo: The Master Chief Collection]]''. | |||
File:H3 LastResort HeatMap.jpg|A birds-eye view of Last Resort. | |||
</gallery> | |||
====Fortress==== | |||
''Last Resort'' is extremely similar to ''Zanzibar''. At one end of the map is a generator station, a larger more expanded version of the one featured in ''Zanzibar'', offering more defensible positions and points of digress. The "prison bars" gate that once blocked the vulnerable right flank of the station is now replaced by three barriers, preventing vehicles from intruding and giving defenders more cover. There is, however, an internal switch to lower these barriers. The "flag room" of the station has also been maximized by a factor of three or four in terms of surface area, making it more spacious. The single generator from ''Halo 2'' has been replaced with nine generators inaccessible from within the map, but visible. | ''Last Resort'' is extremely similar to ''Zanzibar''. At one end of the map is a generator station, a larger more expanded version of the one featured in ''Zanzibar'', offering more defensible positions and points of digress. The "prison bars" gate that once blocked the vulnerable right flank of the station is now replaced by three barriers, preventing vehicles from intruding and giving defenders more cover. There is, however, an internal switch to lower these barriers. The "flag room" of the station has also been maximized by a factor of three or four in terms of surface area, making it more spacious. The single generator from ''Halo 2'' has been replaced with nine generators inaccessible from within the map, but visible. | ||
The two passages that allowed attackers at the "front door" of the station to enter have been widened and elongated. A secondary point of entrance for vehicles has been added to the far wall (perpendicular to the main gate entrance). The internal switch located in the “flag room” of the fortress also controls the gate here. This switch contains one of the more known Easter Eggs in ''Halo 2'' and ''3'', the BSOD (Blue Screen of Death) is shown on the computer after it is activated. | The two passages that allowed attackers at the "front door" of the station to enter have been widened and elongated. A secondary point of entrance for vehicles has been added to the far wall (perpendicular to the main gate entrance). The internal switch located in the “flag room” of the fortress also controls the gate here. This switch contains one of the more known Easter Eggs in ''Halo 2'' and ''3'', the BSOD (Blue Screen of Death) is shown on the computer after it is activated. | ||
<gallery> | |||
===Camp Froman=== | File:H3 LastResort Beach Overlook.jpg|A vista from the beach to the towering fortress in the distance. | ||
</gallery> | |||
====Camp Froman==== | |||
Camp Froman, familiar to many Zanzibar players as the [[SRS99D-S2 AM sniper rifle|sniper rifle]] spawn, is still mid-map, but is now more accessible. There is an open room underneath Camp Froman that is accessible from four different fronts (a drop-down from above, a door under each set of stairs, and a primary door in-between the stairs). Furthermore, a second catwalk stems from the second story of the fortress to Camp Froman, which allows base defenders to reach the sniper rifle just as quickly as attackers. In ''Zanzibar'', players could exit the fortress on the right hand side by jumping down from the windows, or walking down a dirt ramp. This alternative catwalk replaces the dirt ramp and edges along the cement wall that walls off the map, makes a perpendicular turn midway and connects to Camp Froman. | Camp Froman, familiar to many Zanzibar players as the [[SRS99D-S2 AM sniper rifle|sniper rifle]] spawn, is still mid-map, but is now more accessible. There is an open room underneath Camp Froman that is accessible from four different fronts (a drop-down from above, a door under each set of stairs, and a primary door in-between the stairs). Furthermore, a second catwalk stems from the second story of the fortress to Camp Froman, which allows base defenders to reach the sniper rifle just as quickly as attackers. In ''Zanzibar'', players could exit the fortress on the right hand side by jumping down from the windows, or walking down a dirt ramp. This alternative catwalk replaces the dirt ramp and edges along the cement wall that walls off the map, makes a perpendicular turn midway and connects to Camp Froman. | ||
<gallery> | |||
File:H3 LastResort CampFroman.png|Camp Froman. | |||
</gallery> | |||
====Transformers==== | |||
Next to Camp Froman, there are three large transformers that provide much better cover than the rocks in ''Zanzibar''. This is an adequate fighting spot, considering the only possible places of attack are the Fortress and the Wheel. The transformers protect players from a majority of fire from the Wheel, though. The Sea Wall is not a threat, due to the protection Camp Froman offers. These large transformers presumably convert voltages from the generators in the station. While moderate cover is provided, these transformers can easily be flanked or rushed, leaving the player vulnerable to close-range enemies that can approach from the sideways passages leading from the bridge, or Sea Wall. | Next to Camp Froman, there are three large transformers that provide much better cover than the rocks in ''Zanzibar''. This is an adequate fighting spot, considering the only possible places of attack are the Fortress and the Wheel. The transformers protect players from a majority of fire from the Wheel, though. The Sea Wall is not a threat, due to the protection Camp Froman offers. These large transformers presumably convert voltages from the generators in the station. While moderate cover is provided, these transformers can easily be flanked or rushed, leaving the player vulnerable to close-range enemies that can approach from the sideways passages leading from the bridge, or Sea Wall. | ||
<gallery> | |||
File:H3 LastResort Transformers.png|The expanded courtyard and transformers. | |||
</gallery> | |||
====Beach==== | |||
At the other end of the map is the beach, next to a cinematic seashore, where the [[M12 Warthog|Warthog]], [[Karo'etba-pattern Ghost|Ghost]], and two [[M274 Mongoose|Mongooses]] spawn. There is a large chunk of land between the fortress and the beach, which is home to the Sea Wall. Now more easily defended, the Sea Wall runs along the length of the beach as it did in ''[[Halo 2]]'', and moves up towards the middle of the map (opposite from Camp Froman) with a path to the fortress or wind wheel. The middle tower in between the wheel and the beach is now accessible from the beach, and an archway is formed from the water to the tower. | |||
<gallery> | |||
File:H3 LastResort Coastal View.png|The view along the beach. | |||
</gallery> | |||
= | ====Wind Wheel==== | ||
===Wind Wheel=== | |||
The iconic Wind Wheel still is placed squarely between the Sea Wall and the fortress. The [[Type-1 energy sword|energy sword]] that was present in the small wheel on the center of the windmill, has now been replaced with [[active camouflage]]. A [[Z-4190 bubble shield|bubble shield]] now resides where the active camouflage was in Zanzibar, the tower to the wind wheel via the Sea Wall. | The iconic Wind Wheel still is placed squarely between the Sea Wall and the fortress. The [[Type-1 energy sword|energy sword]] that was present in the small wheel on the center of the windmill, has now been replaced with [[active camouflage]]. A [[Z-4190 bubble shield|bubble shield]] now resides where the active camouflage was in Zanzibar, the tower to the wind wheel via the Sea Wall. | ||
| Line 49: | Line 60: | ||
The Wind Wheel itself can be used to get up to the [[M6 Spartan Laser|Spartan Laser]], which replaced the [[M41 SPNKR|rocket launcher]], and the Active Camouflage. If you are at the bottom, you can ride the wind wheel's 'blades' and then walk on them when they are horizontal. If you try to drive a vehicle over the blades, it may kill you and count as a suicide. | The Wind Wheel itself can be used to get up to the [[M6 Spartan Laser|Spartan Laser]], which replaced the [[M41 SPNKR|rocket launcher]], and the Active Camouflage. If you are at the bottom, you can ride the wind wheel's 'blades' and then walk on them when they are horizontal. If you try to drive a vehicle over the blades, it may kill you and count as a suicide. | ||
<gallery> | |||
File:H3 LastResort Driveway.png|thumb|250px|The area around the Wind Wheel. | |||
</gallery> | |||
==Strategy== | ===Strategy=== | ||
[[File:H3 LastResort Courtyard.png|250px|thumb|The inner courtyard area.]] | [[File:H3 LastResort Courtyard.png|250px|thumb|The inner courtyard area.]] | ||
<!--This is STRATEGIES, not Trivia, only strategies belong here, please put trivia below in the Trivia section--> | <!--This is STRATEGIES, not Trivia, only strategies belong here, please put trivia below in the Trivia section--> | ||
| Line 72: | Line 86: | ||
*A good tactic during Team Slayer games is to have a teammate with a shotgun hold down the tower to the left of the fortress. Having a battle rifle or sniper rifle at this area will also assist in skirmishes on both sides of the windwheel. | *A good tactic during Team Slayer games is to have a teammate with a shotgun hold down the tower to the left of the fortress. Having a battle rifle or sniper rifle at this area will also assist in skirmishes on both sides of the windwheel. | ||
*Using a sniper rifle, you can easily see the other sniper rifle and pick off enemy snipers until you can collect their ammo. | *Using a sniper rifle, you can easily see the other sniper rifle and pick off enemy snipers until you can collect their ammo. | ||
*By deploying a gravity lift onto the landing at the top of the stairs above Camp Froman (by the [[ | *By deploying a gravity lift onto the landing at the top of the stairs above Camp Froman (by the [[fusion coil]]s—be careful they don't get caught in the lift), a sniper can position themselves on the pipes that run along the wall. An edge toward the front is a good hiding place. There isn't much cover, so once you are found you will probably be killed, but it usually takes quite a while for anyone to figure out where you are shooting from (less time if you have a battle rifle or Spartan laser). If your team begins in Froman you can snag the sniper rifle, drop down the hole to get the grav lift, and be out and up the stairs before the other team gets to your side of the map. | ||
*Try to get places you shouldn’t be. Useing grenade jumping, equipment, and other glitches, you can find a good sniping or hiding spot. | *Try to get places you shouldn’t be. Useing grenade jumping, equipment, and other glitches, you can find a good sniping or hiding spot. | ||
== | ==Forge== | ||
<!--This section is for Forge tips, do not put things like "Add a brute shot, its more fun" Give good reasons WHY and WHERE to add the object(s), like "Adding shield doors in the main hallway will change the flow of battle to the sides of it, allowing for more heated firefights in the side allies." Thank you for keeping Halopedia neat--> | <!--This section is for Forge tips, do not put things like "Add a brute shot, its more fun" Give good reasons WHY and WHERE to add the object(s), like "Adding shield doors in the main hallway will change the flow of battle to the sides of it, allowing for more heated firefights in the side allies." Thank you for keeping Halopedia neat--> | ||
{{Main|Forge}} | |||
*Under Camp Froman in the small room, if you place a portable gravity lift at the back wall it will allow players to go up the "chute", making snipers think twice before camping there. | *Under Camp Froman in the small room, if you place a portable gravity lift at the back wall it will allow players to go up the "chute", making snipers think twice before camping there. | ||
*Putting a gravity lift under either or both of the turret spawns will allow quick access to the top level of the fortress. | *Putting a gravity lift under either or both of the turret spawns will allow quick access to the top level of the fortress. | ||
*It is possible to get up on top of the roof if a receiver node is placed correctly. | *It is possible to get up on top of the roof if a receiver node is placed correctly. | ||
*You can barricade off the various buildings quite easily with crates, single crates, barricades, containers, etc.. This is very useful for [[Infection]], [[CTF]], [[King of The Hill]], or [[VIP]] based games. | *You can barricade off the various buildings quite easily with crates, single crates, barricades, containers, etc.. This is very useful for [[Infection]], [[CTF]], [[King of The Hill]], or [[VIP]] based games. | ||
==Production notes== | |||
The name "Camp Froman" came from [[Bungie]] employee [[Luke Timmins]]' gamertag "Abe Froman". During early tests for the E3 demo of ''[[Halo 2]]'', Timmins was able to find the spot on Last Resort's predecessor [[Zanzibar]], resulting in extensive nerfs added to balance the dominant sniping spot. The plaque was placed in his honour.{{Ref/Twitter|MaxHoberman|1646325621084024835|Max Hoberman|Quote=Yes, it's Zanzibar, our E3 showcase. Luke aka Abe Froman immediately discovered a dominant camping spot in playtests, and we tried to balance it without nerfing it completely by adding a rear rock ramp and fusion cores. But we also named it in his honor. Check replies for images.|D=13|M=04|Y=2023}} | |||
Last Resort was in the ''Halo 3'' Internal Multiplayer beta, but was not placed in the ''Halo 3'' Public Multiplayer Beta.{{Citation needed}} | |||
A remake of Last Resort was considered for inclusion in a [[Cut Halo 4 levels|cancelled ''Halo 4'' map pack]], with at least one paintover being released. | |||
==Trivia== | |||
<!--This is TRIVIA, not Strategies, only trivia belongs here, please put strategies above in the Strategies section--> | |||
*The name Last Resort is a joking reference to Zanzibar's idyllic, island setting. Another possibility as to the time period of Last Resort, is hinted at in the description text. It is possible that this is the representation of Zanzibar during the training of the Spartan super-soldiers, before the [[Human-Covenant War]], as ''Halo 3'' also features [[The Pit (level)|The Pit]], another [[UNSC]] training facility. | |||
*When you go out the left entrance to the beach, look outside the map towards some trees and structures on the left side and you will see some birds, you can shoot and kill these birds; making for fun sniper competitions. | |||
==Gallery== | ==Gallery== | ||
{{Linkbox|gallery=yes}} | |||
===Concept art=== | |||
<gallery> | <gallery> | ||
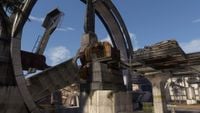
File: | File:H3_LastResort_Exterior_Concept.jpg|Concept art of the map's main structure. | ||
File:H3 LastResort Interior Concept.jpg|Concept art of the generator. | File:H3 LastResort Interior Concept.jpg|Concept art of the generator. | ||
File:H3 ResortBeachConcept.jpg|Concept art of the beach. | |||
File:H3 ResortBeachConcept2.jpg|Another beach concept. | |||
</gallery> | |||
===Screenshots=== | |||
<gallery> | |||
File:H3 LastResort Wheel Back.jpg|An underside look at the wind wheel. | File:H3 LastResort Wheel Back.jpg|An underside look at the wind wheel. | ||
File:H3 | File:H3 Blue flag capture.jpg|Some members of the blue team about to capture an enemy flag. | ||
File:H3 | File:H3 Security with Katana.jpg|A Spartan sniping from Camp Froman. | ||
File:H3 LastResort Generators.png|The generators inside the base. | File:H3 LastResort Generators.png|The generators inside the base. | ||
File:Flag kill.jpg|A Spartan getting a Flag melee kill. | |||
</gallery> | </gallery> | ||
==Sources== | ==Sources== | ||
{{Ref/Sources}} | |||
{{Levels|H3|mode=yes}} | {{Levels|H3|mode=yes}} | ||
{{Levels|HO|mode=yes}} | |||
Latest revision as of 05:07, January 20, 2024
| Last Resort | |
|---|---|

| |
| Map overview | |
|
Game: |
|
|
Map file name (?): |
|
| Lore information | |
|
Location: |
|
| Gameplay overview | |
|
Terrain: |
Urban fortress, beach, rock, grass |
|
Recommended number of players: |
4-12 |
|
Recommended gametype(s): |
|
| “ | Remote industrial sites like this one are routinely requisitioned and razed as part of Spartan training exercises. | ” |
Last Resort[1] is a Halo 3 multiplayer map, which was also included in Halo Online as Refuge. It is remake of the Halo 2 map, Zanzibar.
Universe and lore[edit]
- Main article: Wind Power Station 7
Last Resort is one of many similar power stations situated on Zanzibar Island, following the East African Protectorate's attempts at re-nationalisation in the 24th century.[2][3] When Wind Power Station 7 was decommissioned in the 26th century, it was taken over for military training exercises, with detailed scans of the sites contributing to a number of notable War Games maps, including Last Resort.[3] Signage around the facility reads Sector K2433.
The installation itself, Zanzibar Municipal Turbine 7, was constructed by Buelterman Carney Cotton & Hayward Inc., and Traxus Heavy Industries was also heavily involved in the location. Unlike the other facilities, Last Resort is built amongst an old stone fortress. Despite this, the facility maintains a very similar layout to the other wind power stations observed on Zanzibar Island, with the notable exception of a larger area in the "courtyard" and an extension to the interior of the facility.
Overview[edit]
Layout[edit]
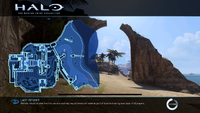
Layout of the map in Halo: The Master Chief Collection.
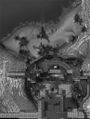
A birds-eye view of Last Resort.


Fortress[edit]
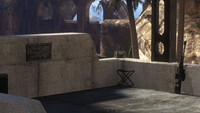
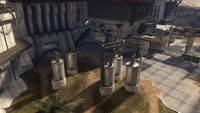
Last Resort is extremely similar to Zanzibar. At one end of the map is a generator station, a larger more expanded version of the one featured in Zanzibar, offering more defensible positions and points of digress. The "prison bars" gate that once blocked the vulnerable right flank of the station is now replaced by three barriers, preventing vehicles from intruding and giving defenders more cover. There is, however, an internal switch to lower these barriers. The "flag room" of the station has also been maximized by a factor of three or four in terms of surface area, making it more spacious. The single generator from Halo 2 has been replaced with nine generators inaccessible from within the map, but visible.
The two passages that allowed attackers at the "front door" of the station to enter have been widened and elongated. A secondary point of entrance for vehicles has been added to the far wall (perpendicular to the main gate entrance). The internal switch located in the “flag room” of the fortress also controls the gate here. This switch contains one of the more known Easter Eggs in Halo 2 and 3, the BSOD (Blue Screen of Death) is shown on the computer after it is activated.
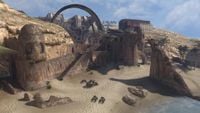
A vista from the beach to the towering fortress in the distance.

Camp Froman[edit]
Camp Froman, familiar to many Zanzibar players as the sniper rifle spawn, is still mid-map, but is now more accessible. There is an open room underneath Camp Froman that is accessible from four different fronts (a drop-down from above, a door under each set of stairs, and a primary door in-between the stairs). Furthermore, a second catwalk stems from the second story of the fortress to Camp Froman, which allows base defenders to reach the sniper rifle just as quickly as attackers. In Zanzibar, players could exit the fortress on the right hand side by jumping down from the windows, or walking down a dirt ramp. This alternative catwalk replaces the dirt ramp and edges along the cement wall that walls off the map, makes a perpendicular turn midway and connects to Camp Froman.
Camp Froman.

Transformers[edit]
Next to Camp Froman, there are three large transformers that provide much better cover than the rocks in Zanzibar. This is an adequate fighting spot, considering the only possible places of attack are the Fortress and the Wheel. The transformers protect players from a majority of fire from the Wheel, though. The Sea Wall is not a threat, due to the protection Camp Froman offers. These large transformers presumably convert voltages from the generators in the station. While moderate cover is provided, these transformers can easily be flanked or rushed, leaving the player vulnerable to close-range enemies that can approach from the sideways passages leading from the bridge, or Sea Wall.
The expanded courtyard and transformers.

Beach[edit]
At the other end of the map is the beach, next to a cinematic seashore, where the Warthog, Ghost, and two Mongooses spawn. There is a large chunk of land between the fortress and the beach, which is home to the Sea Wall. Now more easily defended, the Sea Wall runs along the length of the beach as it did in Halo 2, and moves up towards the middle of the map (opposite from Camp Froman) with a path to the fortress or wind wheel. The middle tower in between the wheel and the beach is now accessible from the beach, and an archway is formed from the water to the tower.
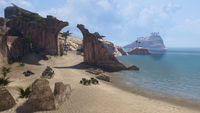
The view along the beach.

Wind Wheel[edit]
The iconic Wind Wheel still is placed squarely between the Sea Wall and the fortress. The energy sword that was present in the small wheel on the center of the windmill, has now been replaced with active camouflage. A bubble shield now resides where the active camouflage was in Zanzibar, the tower to the wind wheel via the Sea Wall.
The tower on the right hand side of the Sea Wall still allows players onto the wind wheel, although now an unknown red-colored mechanism replaces the yellow-colored fusion mechanism to stabilize (drop the bridge) the pathway from the tower to the wheel. The broken pathway from the tower to the fortress has not changed much aesthetically, but has been lengthened. There are now stairs and gratings around the base of the wind wheel giving players more mobility and freedom to move around the map.
The Wind Wheel itself can be used to get up to the Spartan Laser, which replaced the rocket launcher, and the Active Camouflage. If you are at the bottom, you can ride the wind wheel's 'blades' and then walk on them when they are horizontal. If you try to drive a vehicle over the blades, it may kill you and count as a suicide.
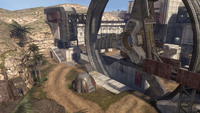
The area around the Wind Wheel.

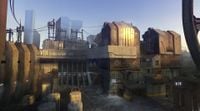
Strategy[edit]

- In team games, The Generators are the best place to gain and control. The team should acquire the sniper rifle, battle rifle, and Brute Shot from Camp Froman. Have another player get the Battle Rifle from the Fortress. This way, the team is protected from close to long range. Then, have the Brute Shot protect the sniper, and have the Battle Rifle watch the catwalk near the Wheel. Have another battle rifle watch the Fortress and have the sniper take out long-range threats before they get too close to attack. In the case of a close range threat or vehicle, have your Brute Shot clean up with support fire from the Battle Rifle. Be sure to use grenades and equipment when required.
- An effective strategy for attackers is to grab the shotgun, bubble shield and active camo. Then go to the base and open the door. Once that is done, your allies will hopefully charge in with a Warthog and Ghost and distract the enemies while you plant the Shield and kill any surviving defenders.
- A good strategy in Slayer is to set up ambushes. Now there are several ways to do this. The best way is to get about two people to get on the very top of the sea wall, and one to the ruins of the archway at the end of the beach (the one that's half way in the water). Now when the opposing team comes to get the Warthog and the Ghost, just spring the trap and pick them off. The second place to set an ambush is at the main base. Have all your teammates spread relatively close, but throughout the base, now when the enemy comes, they're trapped with no where to run.
- Upon grabbing the flag, hide in their base, preferably behind the other entrance. The other team will then head towards your base. When they do this, escape!
- If starting from the beach grab a battle rifle, shotgun, or sniper rifle. This is vital during objective games because you can snipe, go in, cover carrier, or hunt the other team for fun and to weaken them for the main attack. If starting at the base try and grab a sniper rifle, brute shot, battle rifle, or the Spartan Laser. This can be vital for defense in objective games.
- In team snipers try to hide/snipe in Camp Froman, on the walkway (be careful here, there isn't a whole lot of cover), on top of the beach wall, in the building where the bubble shield spawns, and if you are a really good sniper sit where the active camo spawns. Although this does come at a risk, you are in a confined space and it may be hard to get out due to the wind wheel if someone starts to shoot back at you.
- On the defending side, pick up the active camo so the attackers can't use it to stealthily take the Flag or plant the bomb
- To make it easier on your team and harder for opponents, have all teammates enter the enemy base guns blazing, it will be hard for one or two campers to eliminate all of you.
- In any Team Slayer game on this map, if you are on the team that starts at Camp Froman, you should pick up the gravity lift in the building go up near the shotgun spawn and use it to get straight to the Spartan Laser, this will save time and hopefully get you to the Spartan Laser before the enemy team.
- A popular sniping spot is above the sniper spawn near the beach, when up here, a player has a view of all but the defended base. This also leaves a careless sniper open to needler fire.
- When it comes to bomb planting or flag capturing, the sniper on the attacking will be most useful on the walkway that allows a clear view into the flag room but, as a note, the enemy can still spawn below you, although this can be used to camp and keep the rest of your team safe while they do their job.
- When defending in Capture The Flag or Assault, the first priority should be the Spartan Laser; this leaves your opponents to only a few ways to enter and exit, meaning the attackers can't risk a fast approach or exit without being slaughtered.
- This map is considered by some, to be overpowered with Power Weapons, if you have a shotgun, Spartan Laser, sniper rifle, Brute shot or spike grenades then you've got a power weapon. Pair your power weapon with something like an SMG or assault rifle to expand your versatility.
- During a One Bomb game, when you are on defense, it is possible to use a power drain to flip the container into a vertical position. You can then have someone that can disarm the bomb with out being subject to enemy fire. This can also be used to block the bomb site from the attacking team.
- On most types of gameplay the inside of the Wind Wheel can be an interesting to set up camp with a Spartan Laser or sniper rifle, but only for accomplished marksmen; compensating for the movement of the wheel while aiming will be difficult for some players.
- In Assault games, the recess beside the staircase is a good place to lurk when you're defending the bomb-arming site
- On CTF games, though it may seem like the best option, you don't always need to jump on board a Warthog to make an escape with the enemy flag. If the vehicle has a good driver and an experienced gunner, they can instead run rampant inside the base, creating a distraction that enables the flag carrier to escape on foot.
- A good tactic during Team Slayer games is to have a teammate with a shotgun hold down the tower to the left of the fortress. Having a battle rifle or sniper rifle at this area will also assist in skirmishes on both sides of the windwheel.
- Using a sniper rifle, you can easily see the other sniper rifle and pick off enemy snipers until you can collect their ammo.
- By deploying a gravity lift onto the landing at the top of the stairs above Camp Froman (by the fusion coils—be careful they don't get caught in the lift), a sniper can position themselves on the pipes that run along the wall. An edge toward the front is a good hiding place. There isn't much cover, so once you are found you will probably be killed, but it usually takes quite a while for anyone to figure out where you are shooting from (less time if you have a battle rifle or Spartan laser). If your team begins in Froman you can snag the sniper rifle, drop down the hole to get the grav lift, and be out and up the stairs before the other team gets to your side of the map.
- Try to get places you shouldn’t be. Useing grenade jumping, equipment, and other glitches, you can find a good sniping or hiding spot.
Forge[edit]
- Main article: Forge
- Under Camp Froman in the small room, if you place a portable gravity lift at the back wall it will allow players to go up the "chute", making snipers think twice before camping there.
- Putting a gravity lift under either or both of the turret spawns will allow quick access to the top level of the fortress.
- It is possible to get up on top of the roof if a receiver node is placed correctly.
- You can barricade off the various buildings quite easily with crates, single crates, barricades, containers, etc.. This is very useful for Infection, CTF, King of The Hill, or VIP based games.
Production notes[edit]
The name "Camp Froman" came from Bungie employee Luke Timmins' gamertag "Abe Froman". During early tests for the E3 demo of Halo 2, Timmins was able to find the spot on Last Resort's predecessor Zanzibar, resulting in extensive nerfs added to balance the dominant sniping spot. The plaque was placed in his honour.[4]
Last Resort was in the Halo 3 Internal Multiplayer beta, but was not placed in the Halo 3 Public Multiplayer Beta.[citation needed]
A remake of Last Resort was considered for inclusion in a cancelled Halo 4 map pack, with at least one paintover being released.
Trivia[edit]
- The name Last Resort is a joking reference to Zanzibar's idyllic, island setting. Another possibility as to the time period of Last Resort, is hinted at in the description text. It is possible that this is the representation of Zanzibar during the training of the Spartan super-soldiers, before the Human-Covenant War, as Halo 3 also features The Pit, another UNSC training facility.
- When you go out the left entrance to the beach, look outside the map towards some trees and structures on the left side and you will see some birds, you can shoot and kill these birds; making for fun sniper competitions.
Gallery[edit]

|
Browse more images in this article's gallery page. |
Concept art[edit]
Concept art of the map's main structure.
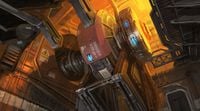
Concept art of the generator.
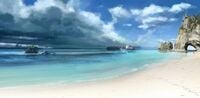
Concept art of the beach.
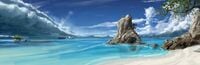
Another beach concept.


Screenshots[edit]
An underside look at the wind wheel.
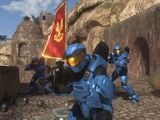
Some members of the blue team about to capture an enemy flag.
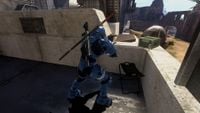
A Spartan sniping from Camp Froman.
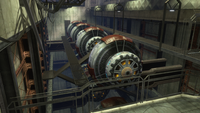
The generators inside the base.
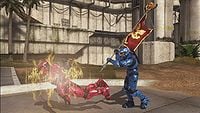
A Spartan getting a Flag melee kill.


Sources[edit]
- ^ Bungie.net Way Beyond the Beta: Screenshots Galore
- ^ Halo 2, Zanzibar map description
- ^ a b Halo Waypoint: Earth
- ^ Twitter, Max Hoberman (@MaxHoberman): "Yes, it's Zanzibar, our E3 showcase. Luke aka Abe Froman immediately discovered a dominant camping spot in playtests, and we tried to balance it without nerfing it completely by adding a rear rock ramp and fusion cores. But we also named it in his honor. Check replies for images." (Retrieved on Apr 13, 2023) [archive]
| ||||||||||||||||||||||||||||||||||||||||
| ||||||||||||||||||||


