Installation 04 (map)
From Halopedia, the Halo wiki
Template:Multiplayer Map Infobox Template:Article Quote
Installation 04 is a Firefight map included in Halo: Combat Evolved Anniversary for Halo: Reach. The level is based on the cliff edge section of the campaign level Halo from Halo: Combat Evolved. Friendly AI — ODSTs — will aid the player in both solo and cooperative play; this is the first time that friendly NPCs have appeared in a Firefight map.
Locations
The following are locations on the map that are so named on the player's heads-up display during gameplay:
- Landslide
- North Drop Zone
- Field
- Station 1
- Station 1 Interior
- East Drop Zone
- Station 2
- Station 2 Interior
- Gateway
- South Drop Zone
- West Drop Zone
- West Ramp
- East Ramp
- Upper Deck
Tactics
- The best place to stay in for this map is the central structure. Even though the player would have the higher ground as well as back up, there are four openings for the Covenant: the west ramp, the east ramp, the man cannon, and the tunnel leading to the upper deck. One player might need to patrol around, but four players could cover all entrances.
- Unlike most Firefight levels, there are five health packs in the entire map and their locations are quite separated around the map. One is right next to the ammunition crate on the "Upper Deck", another is in the tunnel leading to "Upper Deck", the third one is on a wall directly ahead of the initial spawn area, one next to some green lights batons on the "Field", and the last one is in "Station 2 Interior". Having Drop shield as the armor ability would be a good idea.
- The ODSTs are not invincible, and will die from too much fire. If you want them to be more contributive in defending the area, give them better weapons. The ODSTs with DMRs should be the first ones to acquire better weapons, since the DMRs are only useful when the projectile is aimed at the target's head, and the AI isn't programmed to make accurate headshots.
- Watch out for the Banshee, it will fire its weapons at you if you get in its sights. Destroy it when you are free, since it also worth some points and credits.
- The Warthog is useful in this large map, but don't drive into the tight spaces. Grenades and heavy weapons will destroy this useful asset if the Covenant are given the opportunity. Also watch out for the Sangheili and Jiralhanae, since they can board and kill the ODST manning the turret.
- When you are away from the central structure (either for driving the Warthog or collecting weapons), Covenant troops who are able to man the heavy machine gun will use it against you, and it can kill you within a few seconds.
- When the Spirit drops troop near the man cannon, the troops would usually converge around the cannon, so use the Target Locator when you think you can kill most of them.
- Players can use the Warthog and Mongoose to block the side ramps, funneling the Covenant to the far end. The Covenant will not attempt to climb over the vehicles, though Brutes will sometimes knock the Mongoose out of the way. The player can also use the antenna at the far end of the structure. This tactic is particularly useful in Score Attack as it limits the Covenant's access to the top of the structure and prevents the player from being surrounded.
Trivia
- The idea of including friendly NPCs originated when Certain Affinity was developing the Defiant Map Pack. They had experimented with the idea of adding friendly AI units to Unearthed but did not have time to implement them into the final map.[1]
- Elite players in Firefight Versus are unable to perform assassination animations against the ODSTs; they can only perform the traditional one-hit kill from behind.
- The design of the Forerunner beam emitter found on this level is noticeably different from the one seen in the remastered campaign. Rather than have the beams of energy shoot out of the structure from underground, they are emitted by a large turbine-like structure which emits bursts of energy upon reaching high enough speeds.
- Due to the fact that AI is almost never present at the same time as Man Cannons, the AI tend to hesitate before entering them.
- At the part of the map where in the campaign level the marines are hiding, 343 Guilty Spark can be seen flying back and forth between the two doors. Oddly enough, he appears to have a Marathon symbol within his "eye" despite the fact that 343 Industries deliberately omitted this feature with Halo: Combat Evolved Anniversary's campaign. An explanation for this could be that Monitor model included in the level was simply imported from Halo: Reach's Forge in order to avoid having to increase the file sizes of the DLC rather than having to completely add another Monitor model to the files for the map packs since the version used in Anniversary was made specifically for the game and not for Halo: Reach.
- In some cases, one may see a (non-functional) prompt to exchange weapons with Spark, who is shown as holding a Focus Rifle.[2] This seems to be related to a Forge bug involving Monitors, desyncs, and Focus Rifle beams.
- This is the only Firefight level to feature a Monitor.
- The only times ODSTs are ever seen leaving the main structure is when they are pushed off, boarding a friendly vehicle, or if the difficulty is set to Easy. However, the ODSTs will almost never respond to the player or board vehicles. In fact, the only ODSTs who would board the Warthog are the ones who are dropped along with the Warthog.
- The radio set found on this level is indestructible.
- This is the only map in which one of the weapon drops is a Warthog. This Warthog is brought in by a Pelican.
- This level is based off the book "The Flood" in that a group of ODSTs were on the Pillar of Autumn and made it land side. These seem to be a detachment of them.
- If pan cam is used, the player will find the GA-TL1 Longsword that performs the supply drop at the edge of the map. Curiously enough, even when supply drops are disabled, the Longsword will still spawn, but will be frozen and remain where it is. The Longsword is not a physical object however, and is not fully textured.
Gallery

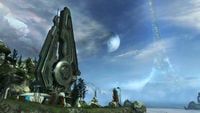
Concept art of the map.
Another view of the map.
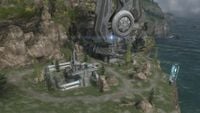
The structures comprising the map.
Another shot of the beam emitter.
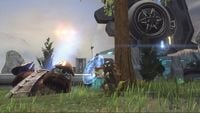
A Spartan and an ODST riding a Mongoose.
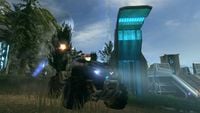
A jackal standing by a Man Cannon.
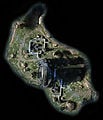
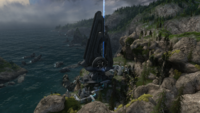
An overhead view of the map.
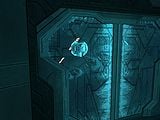
The 343 Guilty Spark Easter egg, as it appears in the tunnels.
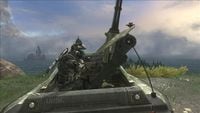
An ODST gunning a Warthog.


Sources
| ||||||||||||||||||||||||||||||||||||||||||


