Corvette
From Halopedia, the Halo wiki
| “ | Fight for air superiority inside the belly of the beast. | ” |
| Corvette | |
|---|---|

| |
| Map overview | |
|
Game: |
|
|
Map file name (?): |
|
| Lore information | |
|
Location: |
Inside the Ardent Prayer over Reach |
| Gameplay overview | |
|
Terrain: |
Covenant ship |
|
Recommended number of players: |
1-4 |
|
Recommended gametype(s): |
|
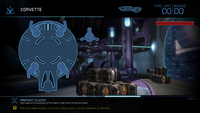
Corvette is a Firefight map in Halo: Reach. It is set inside the Covenant corvette Ardent Prayer over planet Reach and centered around the hangar bay of the ship.[2] It is one of the smallest Firefight maps in the game.[3] It is based on the campaign level Long Night of Solace.
Overview[edit]
Corvette is the smallest Firefight map in Halo: Reach. It is a circular map, with overhanging ledges on each side and a big open playing field in the center. On one side of the map, in the middle of the two symmetrical ledges, is the room where the players spawn, which has two corridors that lead to the main area. Just outside, there are two shields to provide cover for the corridors. The other side has a ramp and a single corridor through which enemies come out. The area also has a large walkway that circles the ramp, from one end to another, which also contains a Plasma Cannon on top that can be used to suppress enemies in the center. The map has a lot of cover such as eight large pillars, four low ledges around the center and numerous plasma batteries.
Locations[edit]
The following are known locations on the map that are so named on the player's heads-up display during gameplay:
- Aft Wall
- Upper Level
- Port Flank
- Safe Room
- Starboard Flank
- Hangar
Tactics[edit]
- Stay away from the center, as one can be easily surrounded there.
- Due to the small size of the map, using the Sniper Rifle is not recommended unless more than one player is playing. One player can act as distraction while the other can snipe from the upper levels.
- Even though the Plasma Cannon is effective on troops like Grunts and Jackals, it is not recommended on high difficulties or when Catch skull is activated, as Plasma grenades will be flying to the gunner.
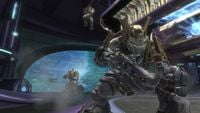
- Keep a heavy weapon handy at all times, as a Hunter's melee is fatal in a small space.
- When camping on the upper levels, keep an eye on the stairs. Elites and suicidal Grunts can be fatal if one is caught off guard.
- The Wraith is a powerful tool of destruction, and is a helpful asset. Kill all enemies except the wraith and then board it. The Wraith though is not invincible, as lots of damage will be dealt by the turrets of the Spirit dropships.
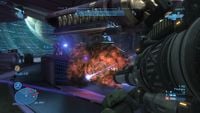
- When troops are deployed from the dropships they usually land in a small area, and a well-placed grenade, rocket or fuel rod shot will quickly eliminate many enemies and result in a multi-kill medal.
- Baiting enemies into the corridors is risky, but a well-placed grenade will cause massive damage, as enemies cannot evade the blast. This also works with rockets.
Trivia[edit]
- Spirit dropships are the primary Covenant dropship on this map, as opposed to Phantoms on other Firefight maps.
- Ordnance appears in this map during the beginning of a round, appearing as resupply canisters.
- At the start of a Firefight match, Grunts can be found sleeping on the upper levels even before the first wave is dropped off.
- Corvette is currently the only Firefight map to feature Engineers.
- Wraiths are occasionally deployed despite the map's small size.
- Upon exiting the initial spawn room, one can see Seraphs hanging from the opposite side of the roof. They are not easily noticeable and one might need to turn the night vision on to see them. Banshees are also visible on the top walls behind shield doors.
- There is a rare glitch that can happen on this level. When the Spirits fly through the Shield Doors, if the turret is blown off, it may become stuck in the shield door, and stay there until the next round.
Gallery[edit]

|
Browse more images in this article's gallery page. |
Corvette Map.

Concept art of the level.

Covenant forces dropping from a Spirit.
Two Brutes on Corvette.
A Firefight match on Corvette.

A Spartan manning a plasma turret.
A heatmap of Corvette.


Sources[edit]
- ^ Halo: Reach Editing Kit, game file
HREK\tags\levels\firefight\ff50_park\ff50_park.scenario - ^ Xbox UK's Facebook: Halo: Reach 'Corvette' Firefight Map Screenshots
- ^ IGN: Gamescom: A New Firefight Map in Halo: Reach
| ||||||||||||||||||||||||||||||||||||||||||


