Season 01: Heroes of Reach: Difference between revisions
From Halopedia, the Halo wiki
BaconShelf (talk | contribs) No edit summary |
(→Battle Pass: This helps other versions down the line.) |
||
| Line 87: | Line 87: | ||
|[[File:HINF MARKVB Icon.png|100px]] | |[[File:HINF MARKVB Icon.png|100px]] | ||
|- align="center" | |- align="center" | ||
|2 | |2 | ||
|Premium | |Premium | ||
| Line 92: | Line 93: | ||
|[[File:HINF UATYPEB1 Helmet Attachment Icon.png|100px]] | |[[File:HINF UATYPEB1 Helmet Attachment Icon.png|100px]] | ||
|- align="center" | |- align="center" | ||
|rowspan=2|3 | |rowspan=2|3 | ||
|Free | |Free | ||
| Line 101: | Line 103: | ||
|[[File:HINF UAD0-01-CCR Breaching Kit Chest Icon.png|100px]] | |[[File:HINF UAD0-01-CCR Breaching Kit Chest Icon.png|100px]] | ||
|- align="center" | |- align="center" | ||
|4 | |4 | ||
|Premium | |Premium | ||
| Line 106: | Line 109: | ||
|[[File:HINF UAP1DA Bracer Wrist Icon.png|100px]] | |[[File:HINF UAP1DA Bracer Wrist Icon.png|100px]] | ||
|- align="center" | |- align="center" | ||
|rowspan=2|5 | |rowspan=2|5 | ||
|Free | |Free | ||
| Line 115: | Line 119: | ||
|[[File:HINF Blue Rampage Coating Icon.png|100px]] | |[[File:HINF Blue Rampage Coating Icon.png|100px]] | ||
|- align="center" | |- align="center" | ||
|rowspan=2|6 | |rowspan=2|6 | ||
|Free | |Free | ||
| Line 124: | Line 129: | ||
|[[File:HINF XP Boost Icon.png|100px]] | |[[File:HINF XP Boost Icon.png|100px]] | ||
|- align="center" | |- align="center" | ||
|7 | |7 | ||
|Premium | |Premium | ||
| Line 129: | Line 135: | ||
|[[File:HINF SAPEVA LShoulder Icon.png|100px]] | |[[File:HINF SAPEVA LShoulder Icon.png|100px]] | ||
|- align="center" | |- align="center" | ||
|rowspan=2|8 | |rowspan=2|8 | ||
|Free | |Free | ||
| Line 138: | Line 145: | ||
|[[File:HINF SAPEVA RShoulder Icon.png|100px]] | |[[File:HINF SAPEVA RShoulder Icon.png|100px]] | ||
|- align="center" | |- align="center" | ||
|9 | |9 | ||
|Premium | |Premium | ||
| Line 143: | Line 151: | ||
|[[File:HINF TACRSWILLOW Helmet Attachment Icon.png|100px]] | |[[File:HINF TACRSWILLOW Helmet Attachment Icon.png|100px]] | ||
|- align="center" | |- align="center" | ||
|rowspan=2|10 | |rowspan=2|10 | ||
|Free | |Free | ||
| Line 169: | Line 178: | ||
|[[File:HINF XP Boost Icon.png|100px]] | |[[File:HINF XP Boost Icon.png|100px]] | ||
|- align="center" | |- align="center" | ||
|12 | |12 | ||
|Premium | |Premium | ||
| Line 174: | Line 184: | ||
|[[File:HINF TACMAT-2519C Communicator Chest Icon.png|100px]] | |[[File:HINF TACMAT-2519C Communicator Chest Icon.png|100px]] | ||
|- align="center" | |- align="center" | ||
|rowspan=2|13 | |rowspan=2|13 | ||
|Free | |Free | ||
| Line 183: | Line 194: | ||
|[[File:HINF TACMC5 TACPAD Wrist Icon.png|100px]] | |[[File:HINF TACMC5 TACPAD Wrist Icon.png|100px]] | ||
|- align="center" | |- align="center" | ||
|14 | |14 | ||
|Premium | |Premium | ||
| Line 188: | Line 200: | ||
|[[File:HINF Noble Principle Coating Icon.png|100px]] | |[[File:HINF Noble Principle Coating Icon.png|100px]] | ||
|- align="center" | |- align="center" | ||
|rowspan=2|15 | |rowspan=2|15 | ||
|Free | |Free | ||
| Line 197: | Line 210: | ||
|[[File:HINF Commando Helmet Icon.png|100px]] | |[[File:HINF Commando Helmet Icon.png|100px]] | ||
|- align="center" | |- align="center" | ||
|rowspan=2|16 | |rowspan=2|16 | ||
|Free | |Free | ||
| Line 206: | Line 220: | ||
|[[File:HINF XP Boost Icon.png|100px]] | |[[File:HINF XP Boost Icon.png|100px]] | ||
|- align="center" | |- align="center" | ||
|17 | |17 | ||
|Premium | |Premium | ||
| Line 211: | Line 226: | ||
|[[File:HINF Noble Visor Icon.png|100px]] | |[[File:HINF Noble Visor Icon.png|100px]] | ||
|- align="center" | |- align="center" | ||
|rowspan=2|18 | |rowspan=2|18 | ||
|Free | |Free | ||
| Line 220: | Line 236: | ||
|[[File:HINF Hul-3-BNR COURIER PEARL Helmet Attachment Icon.png|100px]] | |[[File:HINF Hul-3-BNR COURIER PEARL Helmet Attachment Icon.png|100px]] | ||
|- align="center" | |- align="center" | ||
|19 | |19 | ||
|Premium | |Premium | ||
| Line 225: | Line 242: | ||
|[[File:HINF Noble Command Stance Icon.png|100px]] | |[[File:HINF Noble Command Stance Icon.png|100px]] | ||
|- align="center" | |- align="center" | ||
|rowspan=2|20 | |rowspan=2|20 | ||
|Free | |Free | ||
| Line 251: | Line 269: | ||
|[[File:HINF XP Boost Icon.png|100px]] | |[[File:HINF XP Boost Icon.png|100px]] | ||
|- align="center" | |- align="center" | ||
|22 | |22 | ||
|Premium | |Premium | ||
| Line 256: | Line 275: | ||
|[[File:HINF Noble Emblem.png|100px]] | |[[File:HINF Noble Emblem.png|100px]] | ||
|- align="center" | |- align="center" | ||
|rowspan=2|23 | |rowspan=2|23 | ||
|Free | |Free | ||
| Line 265: | Line 285: | ||
|[[File:HINF Noble Charm Icon.png|100px]] | |[[File:HINF Noble Charm Icon.png|100px]] | ||
|- align="center" | |- align="center" | ||
|24 | |24 | ||
|Premium | |Premium | ||
| Line 270: | Line 291: | ||
|[[File:HINF UADO-06-FGM Tactical Kit Chest Icon.png|100px]] | |[[File:HINF UADO-06-FGM Tactical Kit Chest Icon.png|100px]] | ||
|- align="center" | |- align="center" | ||
|rowspan=2|25 | |rowspan=2|25 | ||
|Free | |Free | ||
| Line 279: | Line 301: | ||
|[[File:HINF FC-I FASCIA Helmet Attachment Icon.png|100px]] | |[[File:HINF FC-I FASCIA Helmet Attachment Icon.png|100px]] | ||
|- align="center" | |- align="center" | ||
|rowspan=2|26 | |rowspan=2|26 | ||
|Free | |Free | ||
| Line 288: | Line 311: | ||
|[[File:HINF XP Boost Icon.png|100px]] | |[[File:HINF XP Boost Icon.png|100px]] | ||
|- align="center" | |- align="center" | ||
|27 | |27 | ||
|Premium | |Premium | ||
| Line 293: | Line 317: | ||
|[[File:HINF TACSRT UGPS Wrist Icon.png|100px]] | |[[File:HINF TACSRT UGPS Wrist Icon.png|100px]] | ||
|- align="center" | |- align="center" | ||
|rowspan=2|28 | |rowspan=2|28 | ||
|Free | |Free | ||
| Line 302: | Line 327: | ||
|[[File:HINF System of Systems Backdrop.png|class=blackbg|100px]] | |[[File:HINF System of Systems Backdrop.png|class=blackbg|100px]] | ||
|- align="center" | |- align="center" | ||
|29 | |29 | ||
|Premium | |Premium | ||
| Line 307: | Line 333: | ||
|[[File:HINF TACT-MAGS Chest Icon.png|100px]] | |[[File:HINF TACT-MAGS Chest Icon.png|100px]] | ||
|- align="center" | |- align="center" | ||
|rowspan=2|30 | |rowspan=2|30 | ||
|Free | |Free | ||
| Line 333: | Line 360: | ||
|[[File:HINF XP Boost Icon.png|100px]] | |[[File:HINF XP Boost Icon.png|100px]] | ||
|- align="center" | |- align="center" | ||
|32 | |32 | ||
|Premium | |Premium | ||
| Line 338: | Line 366: | ||
|[[File:HINF SAPSNP LShoulder Icon.png|100px]] | |[[File:HINF SAPSNP LShoulder Icon.png|100px]] | ||
|- align="center" | |- align="center" | ||
|rowspan=2|33 | |rowspan=2|33 | ||
|Free | |Free | ||
| Line 347: | Line 376: | ||
|[[File:HINF SAPSNP RShoulder Icon.png|100px]] | |[[File:HINF SAPSNP RShoulder Icon.png|100px]] | ||
|- align="center" | |- align="center" | ||
|34 | |34 | ||
|Premium | |Premium | ||
| Line 361: | Line 391: | ||
|[[File:HINF Scout Helmet Icon.png|100px]] | |[[File:HINF Scout Helmet Icon.png|100px]] | ||
|- align="center" | |- align="center" | ||
|rowspan=2|36 | |rowspan=2|36 | ||
|Free | |Free | ||
| Line 370: | Line 401: | ||
|[[File:HINF XP Boost Icon.png|100px]] | |[[File:HINF XP Boost Icon.png|100px]] | ||
|- align="center" | |- align="center" | ||
|37 | |37 | ||
|Premium | |Premium | ||
| Line 375: | Line 407: | ||
|[[File:HINF HUL-I RS ARGON Helmet Attachment Icon.png|100px]] | |[[File:HINF HUL-I RS ARGON Helmet Attachment Icon.png|100px]] | ||
|- align="center" | |- align="center" | ||
|rowspan=2|38 | |rowspan=2|38 | ||
|Free | |Free | ||
| Line 384: | Line 417: | ||
|[[File:HINF UTIL Desert Patrol Chest Icon.png|100px]] | |[[File:HINF UTIL Desert Patrol Chest Icon.png|100px]] | ||
|- align="center" | |- align="center" | ||
|39 | |39 | ||
|Premium | |Premium | ||
| Line 389: | Line 423: | ||
|[[File:HINF Noble Strike Stance Icon.png|100px]] | |[[File:HINF Noble Strike Stance Icon.png|100px]] | ||
|- align="center" | |- align="center" | ||
|rowspan=2|40 | |rowspan=2|40 | ||
|Free | |Free | ||
| Line 415: | Line 450: | ||
|[[File:HINF XP Boost Icon.png|100px]] | |[[File:HINF XP Boost Icon.png|100px]] | ||
|- align="center" | |- align="center" | ||
|42 | |42 | ||
|Premium | |Premium | ||
| Line 420: | Line 456: | ||
|[[File:HINF Noble Emblem.png|100px]] | |[[File:HINF Noble Emblem.png|100px]] | ||
|- align="center" | |- align="center" | ||
|rowspan=2|43 | |rowspan=2|43 | ||
|Free | |Free | ||
| Line 429: | Line 466: | ||
|[[File:HINF TACRecon Package Chest Icon.png|100px]] | |[[File:HINF TACRecon Package Chest Icon.png|100px]] | ||
|- align="center" | |- align="center" | ||
|44 | |44 | ||
|Premium | |Premium | ||
| Line 434: | Line 472: | ||
|[[File:HINF Search And Assess Stance Icon.png|100px]] | |[[File:HINF Search And Assess Stance Icon.png|100px]] | ||
|- align="center" | |- align="center" | ||
|rowspan=2|45 | |rowspan=2|45 | ||
|Free | |Free | ||
| Line 443: | Line 482: | ||
|[[File:HINF Recon Helmet Icon.png|100px]] | |[[File:HINF Recon Helmet Icon.png|100px]] | ||
|- align="center" | |- align="center" | ||
|rowspan=2|46 | |rowspan=2|46 | ||
|Free | |Free | ||
| Line 452: | Line 492: | ||
|[[File:HINF XP Boost Icon.png|100px]] | |[[File:HINF XP Boost Icon.png|100px]] | ||
|- align="center" | |- align="center" | ||
|47 | |47 | ||
|Premium | |Premium | ||
| Line 457: | Line 498: | ||
|[[FIle:HINF MK59E CBRN Glance Helmet Attachment Icon.png|100px]] | |[[FIle:HINF MK59E CBRN Glance Helmet Attachment Icon.png|100px]] | ||
|- align="center" | |- align="center" | ||
|rowspan=2|48 | |rowspan=2|48 | ||
|Free | |Free | ||
| Line 466: | Line 508: | ||
|[[File:HINF Challenger Glove Icon.png|100px]] | |[[File:HINF Challenger Glove Icon.png|100px]] | ||
|- align="center" | |- align="center" | ||
|rowspan=2|49 | |rowspan=2|49 | ||
|Free | |Free | ||
| Line 475: | Line 518: | ||
|[[File:HINF Critical Path Backdrop.png|class=blackbg|100px]] | |[[File:HINF Critical Path Backdrop.png|class=blackbg|100px]] | ||
|- align="center" | |- align="center" | ||
|rowspan=2|50 | |rowspan=2|50 | ||
|Free | |Free | ||
| Line 501: | Line 545: | ||
|[[File:HINF XP Boost Icon.png|100px]] | |[[File:HINF XP Boost Icon.png|100px]] | ||
|- align="center" | |- align="center" | ||
|52 | |52 | ||
|Premium | |Premium | ||
| Line 506: | Line 551: | ||
|[[File:HINF UAType FJ Knee Icon.png|100px]] | |[[File:HINF UAType FJ Knee Icon.png|100px]] | ||
|- align="center" | |- align="center" | ||
|rowspan=2|53 | |rowspan=2|53 | ||
|Free | |Free | ||
| Line 515: | Line 561: | ||
|[[File:HINF M45 Hardcase Utility Icon.png|100px]] | |[[File:HINF M45 Hardcase Utility Icon.png|100px]] | ||
|- align="center" | |- align="center" | ||
|54 | |54 | ||
|Premium | |Premium | ||
| Line 520: | Line 567: | ||
|[[File:HINF Noble Intercessor Coating Icon.png|100px]] | |[[File:HINF Noble Intercessor Coating Icon.png|100px]] | ||
|- align="center" | |- align="center" | ||
|rowspan=2|55 | |rowspan=2|55 | ||
|Free | |Free | ||
| Line 529: | Line 577: | ||
|[[File:HINF Air Assault Helmet Icon.png|100px]] | |[[File:HINF Air Assault Helmet Icon.png|100px]] | ||
|- align="center" | |- align="center" | ||
|rowspan=2|56 | |rowspan=2|56 | ||
|Free | |Free | ||
| Line 538: | Line 587: | ||
|[[File:HINF XP Boost Icon.png|100px]] | |[[File:HINF XP Boost Icon.png|100px]] | ||
|- align="center" | |- align="center" | ||
|57 | |57 | ||
|Premium | |Premium | ||
| Line 543: | Line 593: | ||
|[[File:HINF Noble Emblem.png|100px]] | |[[File:HINF Noble Emblem.png|100px]] | ||
|- align="center" | |- align="center" | ||
|rowspan=2|58 | |rowspan=2|58 | ||
|Free | |Free | ||
| Line 552: | Line 603: | ||
|[[File:HINF TAC RS STARLIGHT Helmet Attachment Icon.png|100px]] | |[[File:HINF TAC RS STARLIGHT Helmet Attachment Icon.png|100px]] | ||
|- align="center" | |- align="center" | ||
|59 | |59 | ||
|Premium | |Premium | ||
| Line 557: | Line 609: | ||
|[[File:HINF Noble Confidence Stance Icon.png|100px]] | |[[File:HINF Noble Confidence Stance Icon.png|100px]] | ||
|- align="center" | |- align="center" | ||
|rowspan=2|60 | |rowspan=2|60 | ||
|Free | |Free | ||
| Line 583: | Line 636: | ||
|[[File:HINF XP Boost Icon.png|100px]] | |[[File:HINF XP Boost Icon.png|100px]] | ||
|- align="center" | |- align="center" | ||
|62 | |62 | ||
|Premium | |Premium | ||
| Line 588: | Line 642: | ||
|[[File:HINF SAP ODST LShoulder Icon.png|100px]] | |[[File:HINF SAP ODST LShoulder Icon.png|100px]] | ||
|- align="center" | |- align="center" | ||
|rowspan=2|63 | |rowspan=2|63 | ||
|Free | |Free | ||
| Line 597: | Line 652: | ||
|[[File:HINF SAP ODST RShoulder Icon.png|100px]] | |[[File:HINF SAP ODST RShoulder Icon.png|100px]] | ||
|- align="center" | |- align="center" | ||
|64 | |64 | ||
|Premium | |Premium | ||
| Line 602: | Line 658: | ||
|[[File:HINF Helljumper Visor Icon.png|100px]] | |[[File:HINF Helljumper Visor Icon.png|100px]] | ||
|- align="center" | |- align="center" | ||
|rowspan=2|65 | |rowspan=2|65 | ||
|Free | |Free | ||
| Line 611: | Line 668: | ||
|[[File:HINF ODST Helmet Icon.png|100px]] | |[[File:HINF ODST Helmet Icon.png|100px]] | ||
|- align="center" | |- align="center" | ||
|rowspan=2|66 | |rowspan=2|66 | ||
|Free | |Free | ||
| Line 620: | Line 678: | ||
|[[File:HINF XP Boost Icon.png|100px]] | |[[File:HINF XP Boost Icon.png|100px]] | ||
|- align="center" | |- align="center" | ||
|67 | |67 | ||
|Premium | |Premium | ||
| Line 625: | Line 684: | ||
|[[File:HINF UA ODST Chest Icon.png|100px]] | |[[File:HINF UA ODST Chest Icon.png|100px]] | ||
|- align="center" | |- align="center" | ||
|rowspan=2|68 | |rowspan=2|68 | ||
|Free | |Free | ||
| Line 634: | Line 694: | ||
|[[File:HINF Keep It Clean Charm Icon.png|100px]] | |[[File:HINF Keep It Clean Charm Icon.png|100px]] | ||
|- align="center" | |- align="center" | ||
|69 | |69 | ||
|Premium | |Premium | ||
| Line 639: | Line 700: | ||
|[[File:HINF Super Tone AI Color Icon.png|100px]] | |[[File:HINF Super Tone AI Color Icon.png|100px]] | ||
|- align="center" | |- align="center" | ||
|rowspan=2|70 | |rowspan=2|70 | ||
|Free | |Free | ||
| Line 665: | Line 727: | ||
|[[File:HINF XP Boost Icon.png|100px]] | |[[File:HINF XP Boost Icon.png|100px]] | ||
|- align="center" | |- align="center" | ||
|72 | |72 | ||
|Premium | |Premium | ||
| Line 670: | Line 733: | ||
|[[File:HINF UA Type JOR Knee Icon.png|100px]] | |[[File:HINF UA Type JOR Knee Icon.png|100px]] | ||
|- align="center" | |- align="center" | ||
|rowspan=2|73 | |rowspan=2|73 | ||
|Free | |Free | ||
| Line 679: | Line 743: | ||
|[[File:HINF UA VAUNTLOCK Chest Icon.png|100px]] | |[[File:HINF UA VAUNTLOCK Chest Icon.png|100px]] | ||
|- align="center" | |- align="center" | ||
|74 | |74 | ||
|Premium | |Premium | ||
| Line 684: | Line 749: | ||
|[[File:HINF Noble Defender Coating Icon.png|100px]] | |[[File:HINF Noble Defender Coating Icon.png|100px]] | ||
|- align="center" | |- align="center" | ||
|rowspan=2|75 | |rowspan=2|75 | ||
|Free | |Free | ||
| Line 693: | Line 759: | ||
|[[File:HINF Grenadier Helmet Icon.png|100px]] | |[[File:HINF Grenadier Helmet Icon.png|100px]] | ||
|- align="center" | |- align="center" | ||
|rowspan=2|76 | |rowspan=2|76 | ||
|Free | |Free | ||
| Line 702: | Line 769: | ||
|[[File:HINF XP Boost Icon.png|100px]] | |[[File:HINF XP Boost Icon.png|100px]] | ||
|- align="center" | |- align="center" | ||
|77 | |77 | ||
|Premium | |Premium | ||
| Line 707: | Line 775: | ||
|[[File:HINF Stalwart Visor Icon.png|100px]] | |[[File:HINF Stalwart Visor Icon.png|100px]] | ||
|- align="center" | |- align="center" | ||
|rowspan=2|78 | |rowspan=2|78 | ||
|Free | |Free | ||
| Line 716: | Line 785: | ||
|[[File:HINF UA Type E3 Helmet Attachment Icon.png|100px]] | |[[File:HINF UA Type E3 Helmet Attachment Icon.png|100px]] | ||
|- align="center" | |- align="center" | ||
|79 | |79 | ||
|Premium | |Premium | ||
| Line 721: | Line 791: | ||
|[[File:HINF Noble Justice Stance Icon.png|100px]] | |[[File:HINF Noble Justice Stance Icon.png|100px]] | ||
|- align="center" | |- align="center" | ||
|rowspan=2|80 | |rowspan=2|80 | ||
|Free | |Free | ||
| Line 747: | Line 818: | ||
|[[File:HINF XP Boost Icon.png|100px]] | |[[File:HINF XP Boost Icon.png|100px]] | ||
|- align="center" | |- align="center" | ||
|82 | |82 | ||
|Premium | |Premium | ||
| Line 752: | Line 824: | ||
|[[File:HINF SAP MKVI LShoulder Icon.png|100px]] | |[[File:HINF SAP MKVI LShoulder Icon.png|100px]] | ||
|- align="center" | |- align="center" | ||
|rowspan=2|83 | |rowspan=2|83 | ||
|Free | |Free | ||
| Line 761: | Line 834: | ||
|[[File:HINF SAP MKVI RShoulder Icon.png|100px]] | |[[File:HINF SAP MKVI RShoulder Icon.png|100px]] | ||
|- align="center" | |- align="center" | ||
|rowspan=2|84 | |rowspan=2|84 | ||
|Free | |Free | ||
| Line 770: | Line 844: | ||
|[[File:HINF Mark VI Helmet Icon.png|100px]] | |[[File:HINF Mark VI Helmet Icon.png|100px]] | ||
|- align="center" | |- align="center" | ||
|rowspan=2|85 | |rowspan=2|85 | ||
|Free | |Free | ||
| Line 779: | Line 854: | ||
|[[File:HINF Judgement Mantle Armor FX Icon.png|100px]] | |[[File:HINF Judgement Mantle Armor FX Icon.png|100px]] | ||
|- align="center" | |- align="center" | ||
|rowspan=2|86 | |rowspan=2|86 | ||
|Free | |Free | ||
| Line 788: | Line 864: | ||
|[[File:HINF XP Boost Icon.png|100px]] | |[[File:HINF XP Boost Icon.png|100px]] | ||
|- align="center" | |- align="center" | ||
|87 | |87 | ||
|Premium | |Premium | ||
| Line 793: | Line 870: | ||
|[[File:HINF M10 Tactical Soft Case Utility Icon.png|100px]] | |[[File:HINF M10 Tactical Soft Case Utility Icon.png|100px]] | ||
|- align="center" | |- align="center" | ||
|rowspan=2|88 | |rowspan=2|88 | ||
|Free | |Free | ||
| Line 802: | Line 880: | ||
|[[File:HINF TAC CASC Wrist Icon.png|100px]] | |[[File:HINF TAC CASC Wrist Icon.png|100px]] | ||
|- align="center" | |- align="center" | ||
|rowspan=2|89 | |rowspan=2|89 | ||
|Free | |Free | ||
| Line 811: | Line 890: | ||
|[[File:HINF Noble Executioner Coating Icon.png|100px]] | |[[File:HINF Noble Executioner Coating Icon.png|100px]] | ||
|- align="center" | |- align="center" | ||
|rowspan=2|90 | |rowspan=2|90 | ||
|Free | |Free | ||
| Line 837: | Line 917: | ||
|[[File:HINF XP Boost Icon.png|100px]] | |[[File:HINF XP Boost Icon.png|100px]] | ||
|- align="center" | |- align="center" | ||
|92 | |92 | ||
|Premium | |Premium | ||
| Line 842: | Line 923: | ||
|[[File:HINF Visigoth Visor Icon.png|100px]] | |[[File:HINF Visigoth Visor Icon.png|100px]] | ||
|- align="center" | |- align="center" | ||
|rowspan=2|93 | |rowspan=2|93 | ||
|Free | |Free | ||
| Line 851: | Line 933: | ||
|[[File:HINF TAC Sapper Rig Chest Icon.png|100px]] | |[[File:HINF TAC Sapper Rig Chest Icon.png|100px]] | ||
|- align="center" | |- align="center" | ||
|rowspan=2|94 | |rowspan=2|94 | ||
|Free | |Free | ||
| Line 860: | Line 943: | ||
|[[File:HINF Noble Fury Stance Icon.png|100px]] | |[[File:HINF Noble Fury Stance Icon.png|100px]] | ||
|- align="center" | |- align="center" | ||
|rowspan=2|95 | |rowspan=2|95 | ||
|Free | |Free | ||
| Line 869: | Line 953: | ||
|[[File:HINF EMILE-A239 Armor Kit Icon.png|100px]] | |[[File:HINF EMILE-A239 Armor Kit Icon.png|100px]] | ||
|- align="center" | |- align="center" | ||
|rowspan=2|96 | |rowspan=2|96 | ||
|Free | |Free | ||
| Line 878: | Line 963: | ||
|[[File:HINF XP Boost Icon.png|100px]] | |[[File:HINF XP Boost Icon.png|100px]] | ||
|- align="center" | |- align="center" | ||
|rowspan=2|97 | |rowspan=2|97 | ||
|Free | |Free | ||
| Line 887: | Line 973: | ||
|[[File:HINF Judgement Helm Armor FX Icon.png|100px]] | |[[File:HINF Judgement Helm Armor FX Icon.png|100px]] | ||
|- align="center" | |- align="center" | ||
|rowspan=2|98 | |rowspan=2|98 | ||
|Free | |Free | ||
| Line 896: | Line 983: | ||
|[[File:HINF MIA Visor Icon.png|100px]] | |[[File:HINF MIA Visor Icon.png|100px]] | ||
|- align="center" | |- align="center" | ||
|rowspan=2|99 | |rowspan=2|99 | ||
|Free | |Free | ||
| Line 905: | Line 993: | ||
|[[File:HINF Redacted Records Coating Icon.png|100px]] | |[[File:HINF Redacted Records Coating Icon.png|100px]] | ||
|- align="center" | |- align="center" | ||
|rowspan=2|100 | |rowspan=2|100 | ||
|Free | |Free | ||
Revision as of 12:01, June 29, 2022
| “ | Because of you we found Halo, unlocked its secrets, shattered our enemy's resolve. | ” |
|
Previous: |
|
|
Next: |
|
| Heroes of Reach | |
|---|---|

| |
|
Start date: |
November 15, 2021[1] |
|
End date: |
May 3, 2022[1] |
|
Number of tiers: |
100 |
|
Total unlock cost: |
|
|
Pass purchase cost: |
|
|
Includes content for: |
|
Heroes of Reach was the first season of Halo Infinite multiplayer.[2] The Season launched on November 15, 2021 alongside the release of the Halo Infinite Multiplayer Beta, and lasted until May 3, 2022, when it was succeeded by Season 02: Lone Wolves.[1]
The season followed Season 00: For Our Tomorrow, which was utilised during the game's Technical Previews for testing purposes.
Season content
Many of the customization options available in this season are exclusive for the Mark V(B) armor core, based on Halo: Reach's armor permutations, including armor kits based on NOBLE Team's permutations. The Season also features customization options for the Mark VII armor core and other options for players, such as Death animations.[3]
The Yoroi armor was free for players to unlock by participating in in-game Fractures events during the season.[2]
Content overview
XP Boosts and Challenge Swaps
- 40 Challenge Swaps
- 19 XP Boosts
General Customization
- 5 Backdrops: FUI, System of Systems, Critical Path, Kill Count, and Claw Marks
- 1 Nameplate: Noble
- 8 Stances: Calm Blossom, Noble Command, Noble Strike, Search and Assess, Noble Confidence, Noble Justice, Special Delivery, and Noble Fury
- 1 Armor Emblem: Noble
- 1 Vehicle Emblem: Noble
- 2 AI Colors: Ancient Code, and Super Tone
- 2 AI Models: Superintendent, and LUMU
- 2 Charms: Noble, and Keep It Clean
- 1 Kill Effect: Judgement Phoenix
- 2 Armor Effect: Judgement Mantle, and Judgement Helm
- 1 Mythic Armor Effect Set: Judgement Flame
Mark VII Core
- 3 Helmets: AVIATOR, TRAILBLAZER, and Mark VII
- 2 Helmet Attachments: FCI-I/AIRWOLF, MK59E CBRN/GLANCE, and UA/ARMET
- 3 Chests: UTIL/ENAV BEACON, UA/M557 JACKPLATE, and UA/M2550M HALFPLATE
- 1 Shoulder Pads: UA/AGATHIUS
- 1 Wrist: UA/TYPE II-AI BUCKLER
- 6 Armor Coatings: Blue Rampage, Stone Green, Tempest Liac, Ghost Grey, Karaba Sirocco, and Noble Portal
- 4 Visors: Bryce, Vandal, Dynasty, and Dragoon
Mark V (B) Core
- 1 Armor Core: Mark V (B)
- 8 Helmets: EVA, COMMANDO, SCOUT, RECON, AIR ASSAULT, ODST, GRENADIER, Mark VI, and EVA (C)
- 8 Helmet Attachments: UA/TYPE B1, TAC/RS/WILLOW, HUL[3]/BNR/COURIER PEARL, FC-I/FASCIA, HUL-I/RS/ARGON, TAC/RS/STARLIGHT, UA/TYPE E3,
- 9 Chests: UA/D0-01-CCR Breaching Kit, TAC/MAT-2519C COMMUNICATOR, UA/D0-06-FGM TACTICAL KIT, TAC/T-MAGS, UTIL/DESERT PATROL, TAC/RECON PACKAGE, UA/ODST, UA/VAUNTLOCK, and TAC/SAPPER RIG
- 4 Shoulder Pads: SAP/EVA, SAP/SNP, SAP/ODST, and SAP/MKVI
- 4 Wrists: UA/P1DA Bracer, TAC/MC5 TACPAD, TAC/SRT UGPS, TAC/CASC
- 2 Knee Pads: UA/TYPE FJ, and UA/TYPE JOR
- 2 Utility: M45 HARDCASE, and M10 TACTICAL SOFT CASE
- 6 Coatings: Noble Principle, Noble Observer, Noble Intercessor, Noble Defender, Noble Executioner, and Redacted Records
- 5 Visors: Noble, Helljumper, Stalwart, Visigoth, and MIA
- 5 Armor Kits: Carter-A259 Kit, Jun-A266 Kit, Catherine-B320 Kit, Jorge-052 Kit, and Emile-A239 Kit
Battle Pass
Tiers 1 to 10
| Level | Tier | Unlocks | Images |
|---|---|---|---|
| 1 | Free | Backdrop - FUI | 
|
| Premium | Armor Core - Mark V [B] | ||
| 2 | Premium | Helmet Attachment - UA/TYPE B1 | |
| 3 | Free | Challenge Swap | |
| Premium | Chest (Mark V [B]) - UA/D0-01-CCR Breaching Kit | ||
| 4 | Premium | Wrist (Mark V [B]) - UA/P1DA Bracer | |
| 5 | Free | Challenge Swap | |
| Premium | Armor Coating (Mark VII) - Blue Rampage | ||
| 6 | Free | Visor (Mark VII) - Bryce | |
| Premium | XP Boost | ||
| 7 | Premium | Left Shoulder Pad (Mark V [B]) - SAP/EVA | |
| 8 | Free | Challenge Swap | |
| Premium | Right Shoulder Pad (Mark V [B]) - SAP/EVA | ||
| 9 | Premium | Helmet Attachment - TAC/RS/WILLOW | |
| 10 | Free | Challenge Swap | |
| Premium | Helmet (Mark V [B]) - EVA |
Tiers 11 to 20
| Level | Tier | Unlocks | Images |
|---|---|---|---|
| 11 | Free | Armor Coating (Mark VII) - Stone Green | |
| Premium | XP Boost | ||
| 12 | Premium | Chest (Mark V [B]) - TAC/MAT-2519C COMMUNICATOR | |
| 13 | Free | Challenge Swap | |
| Premium | Wrist (Mark V [B]) - TAC/MC5 TACPAD | ||
| 14 | Premium | Armor Coating (Mark V [B]) - Noble Principle | |
| 15 | Free | Challenge Swap | |
| Premium | Helmet (Mark V [B]) - COMMANDO | ||
| 16 | Free | Stance - Calm Blossom | |
| Premium | XP Boost | ||
| 17 | Premium | Visor (Mark V [B]) - Noble | |
| 18 | Free | Challenge Swap | |
| Premium | Helmet Attachment - HUL[3]/BNR/COURIER PEARL | ||
| 19 | Premium | Stance - Noble Command | |
| 20 | Free | Challenge Swap | |
| Premium | Armor Kit (Mark V [B]) - Carter-A259 Kit |
Tiers 21 to 30
| Level | Tier | Unlocks | Images |
|---|---|---|---|
| 21 | Free | Chest (Mark VII) - UTIL/ENAV BEACON | |
| Premium | XP Boost | ||
| 22 | Premium | Nameplate - Noble | 
|
| 23 | Free | Challenge Swap | |
| Premium | Charm - Noble | ||
| 24 | Premium | Chest (Mark V [B]) - UA/D0-06-FGM TACTICAL KIT | |
| 25 | Free | Challenge Swap | |
| Premium | Helmet Attachment - FC-I/FASCIA | ||
| 26 | Free | Visor (Mark VII) - Vandal | |
| Premium | XP Boost | ||
| 27 | Premium | Wrist (Mark V [B]) - TAC/SRT UGPS | |
| 28 | Free | Challenge Swap | |
| Premium | Backdrop - System of Systems | 
| |
| 29 | Premium | Chest (Mark V [B]) - TAC/T-MAGS | |
| 30 | Free | Challenge Swap | |
| Premium | Helmet (Mark VII) - AVIATOR |
Tiers 31 to 40
| Level | Tier | Unlocks | Images |
|---|---|---|---|
| 31 | Free | AI Color - Ancient Code | |
| Premium | XP Boost | ||
| 32 | Premium | Left Shoulder Pad (Mark V [B]) - SAP/SNP | |
| 33 | Free | Challenge Swap | |
| Premium | Right Shoulder Pad (Mark V [B]) - SAP/SNP | ||
| 34 | Premium | Armor Coating (Mark V [B]) - Noble Observer | |
| 35 | Free | Challenge Swap | |
| Premium | Helmet (Mark V [B]) - SCOUT | ||
| 36 | Free | AI Model - LUMU | |
| Premium | XP Boost | ||
| 37 | Premium | Helmet Attachment - HUL-I/RS/ARGON | |
| 38 | Free | Challenge Swap | |
| Premium | Chest (Mark V [B]) - UTIL/DESERT PATROL | ||
| 39 | Premium | Stance - Noble Strike | |
| 40 | Free | Challenge Swap | |
| Premium | Armor Kit (Mark V [B]) - Jun-A266 Kit |
Tiers 41 to 50
| Level | Tier | Unlocks | Images |
|---|---|---|---|
| 41 | Free | Armor Coating (Mark VII) - Tempest Lilac | |
| Premium | XP Boost | ||
| 42 | Premium | Armor Emblem - Noble |
|
| 43 | Free | Challenge Swap | |
| Premium | Chest (Mark V [B]) - TAC/RECON PACKAGE | ||
| 44 | Premium | Stance - Search and Assess | |
| 45 | Free | Challenge Swap | |
| Premium | Helmet (Mark V [B]) - RECON | ||
| 46 | Free | Left Shoulder Pad (Mark V [B]) - UA/AGATHIUS | |
| Premium | XP Boost | ||
| 47 | Premium | Helmet Attachment - MK59E CBRN/GLANCE | |
| 48 | Free | Challenge Swap | |
| Premium | Gloves (Mark V [B]) - Challenger | ||
| 49 | Free | Right Shoulder Pad (Mark V [B]) - UA/AGATHIUS | |
| Premium | Backdrop - Critical Path | 
| |
| 50 | Free | Challenge Swap | |
| Premium | Kill Effect - Judgement Phoenix |
Tiers 51 to 60
| Level | Tier | Unlocks | Images |
|---|---|---|---|
| 51 | Free | Visor (Mark VII) - Dynasty | |
| Premium | XP Boost | ||
| 52 | Premium | Knee Pads (Mark V [B]) - UA/TYPE FJ | |
| 53 | Free | Challenge Swap | |
| Premium | Utility (Mark V [B]) - M45 HARDCASE | ||
| 54 | Premium | Armor Coating (Mark V [B]) - Noble Intercessor | |
| 55 | Free | Challenge Swap | |
| Premium | Helmet (Mark V [B]) - AIR ASSAULT | ||
| 56 | Free | Armor Coating (Mark VII) - Ghost Grey | |
| Premium | XP Boost | ||
| 57 | Premium | Vehicle Emblem - Noble |
|
| 58 | Free | Challenge Swap | |
| Premium | Helmet Attachment - TAC/RS/STARLIGHT | ||
| 59 | Premium | Stance - Noble Confidence | |
| 60 | Free | Challenge Swap | |
| Premium | Armor Kit (Mark V [B]) - Catherine-B320 Kit |
Tiers 61 to 70
| Level | Tier | Unlocks | Images |
|---|---|---|---|
| 61 | Free | Backdrop - Kill Count | 
|
| Premium | XP Boost | ||
| 62 | Premium | Left Shoulder Pad (Mark V [B]) - SAP/ODST | |
| 63 | Free | Challenge Swap | |
| Premium | Right Shoulder Pad (Mark V [B]) - SAP/ODST | ||
| 64 | Premium | Visor (Mark V [B]) - Helljumper | |
| 65 | Free | Challenge Swap | |
| Premium | Helmet (Mark V [B]) - ODST | ||
| 66 | Free | Armor Coating (Mark VII) - Karaba Sirocco | |
| Premium | XP Boost | ||
| 67 | Premium | Chest (Mark V [B]) - UA/ODST | |
| 68 | Free | Challenge Swap | |
| Premium | Charm - Keep It Clean | ||
| 69 | Premium | AI Color - Super Tone | |
| 70 | Free | Challenge Swap | |
| Premium | AI Model - Superintendent |
Tiers 71 to 80
| Level | Tier | Unlocks | Images |
|---|---|---|---|
| 71 | Free | Chest (Mark VII) - UA/M557 JACKPLATE | |
| Premium | XP Boost | ||
| 72 | Premium | Knee Pads (Mark V [B]) - UA/TYPE JOR | |
| 73 | Free | Challenge Swap | |
| Premium | Chest (Mark V [B]) - UA/VAUNTLOCK | ||
| 74 | Premium | Armor Coating (Mark V [B]) - Noble Defender | |
| 75 | Free | Challenge Swap | |
| Premium | Helmet (Mark V [B]) - GRENDADIER | ||
| 76 | Free | Armor Coating (Mark VII) - Noble Portal | |
| Premium | XP Boost | ||
| 77 | Premium | Visor (Mark V [B]) - Stalwart | |
| 78 | Free | Challenge Swap | |
| Premium | Helmet Attachment - UA/TYPE E3 | ||
| 79 | Premium | Stance - Noble Justice | |
| 80 | Free | Challenge Swap | |
| Premium | Armor Kit (Mark V [B]) - Jorge-052 Kit |
Tiers 81 to 90
| Level | Tier | Unlocks | Images |
|---|---|---|---|
| 81 | Free | Helmet (Mark VII) - TRAILBLAZER | |
| Premium | XP Boost | ||
| 82 | Premium | Left Shoulder Pad (Mark V [B]) - SAP/MKVI | |
| 83 | Free | Challenge Swap | |
| Premium | Right Shoulder Pad (Mark V [B]) - SAP/MKVI | ||
| 84 | Free | Helmet Attachment - FCI-I/AIRWOLF | |
| Premium | Helmet (Mark V [B]) - MARK VI | ||
| 85 | Free | Challenge Swap | |
| Premium | Armor Effect - Judgement Mantle | ||
| 86 | Free | Backdrop - Claw Marks | 
|
| Premium | XP Boost | ||
| 87 | Premium | Utility (Mark V [B]) - M10 TACTICAL SOFT CASE | |
| 88 | Free | Challenge Swap | |
| Premium | Wrist (Mark V [B]) - TAC/CASC | ||
| 89 | Free | Chest (Mark VII) - UA/M2550M HALFPLATE | |
| Premium | Armor Coating (Mark V [B]) - Noble Executioner | ||
| 90 | Free | Challenge Swap | |
| Premium | Helmet (Mark V [B]) - EVA [C] |
Tiers 91 to 100
| Level | Tier | Unlocks | Images |
|---|---|---|---|
| 91 | Free | Stance - Special Delivery | |
| Premium | XP Boost | ||
| 92 | Premium | Visor (Mark V [B]) - Visigoth | |
| 93 | Free | Challenge Swap | |
| Premium | Chest (Mark V [B]) - TAC/SAPPER RIG | ||
| 94 | Free | Visor (Mark VII) - Dragoon | |
| Premium | Stance - Noble Fury | ||
| 95 | Free | Challenge Swap | |
| Premium | Armor Kit (Mark V [B]) - Emile-A239 Kit | ||
| 96 | Free | Helmet (Mark VII) - Mark VII | |
| Premium | XP Boost | ||
| 97 | Free | Challenge Swap | |
| Premium | Armor Effect - Judgement Helm | ||
| 98 | Free | Helmet Attachment - UA/ARMET | 
|
| Premium | Visor (Mark V [B]) - MIA | ||
| 99 | Free | Challenge Swap | |
| Premium | Armor Coating (Mark V [B]) - Redacted Records | ||
| 100 | Free | Wrist (Mark VII) - UA/TYPE II-AI BUCKLER | |
| Premium | Mythic Armor Effect Set - Judgement Flame |
Production notes
Halo Infinite's Head of Design Jerry Hook and Lead Progression Designer Chris Blohm stated that Infinite's first Season being based on Halo: Reach's designs was a beat 343 Industries started after Halo 5: Guardians, starting with Halo: Shadows of Reach and the fact 343 Industries "know people like [Halo] Reach and we knew the story was going to have another Reach beat".[3]
Gallery
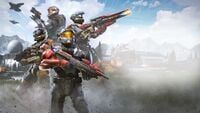
Season 1 key art without logos.
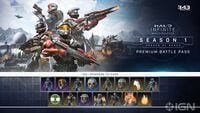
A preview of Season 1's Premium Battle Pass Content.

The Season 1 multiplayer main menu.


Sources
- ^ a b c Halo Waypoint, Welcome to the Halo Infinite MP Beta (Retrieved on Nov 15, 2021) [archive]
- ^ a b Xbox Wire, Halo Infinite: The Great Journey So Far (Retrieved on Jun 13, 2021) [archive]
- ^ a b IGN, Halo Infinite Multiplayer Battle Pass Plans Revealed - IGN First (Retrieved on Nov 5, 2021) [archive]
| ||||||||||||||


