High Ground: Difference between revisions
From Halopedia, the Halo wiki
BaconShelf (talk | contribs) |
No edit summary |
||
| (25 intermediate revisions by 9 users not shown) | |||
| Line 1: | Line 1: | ||
{{ | {{Status|Gameplay}} | ||
{{Multiplayer | {{Multiplayer map infobox | ||
|pagegamelabel=H3 | |||
|name=High Ground | |name=High Ground | ||
|image=[[File:H3 High Ground Sniper-Gate View.jpg|center|300px]] | |image=[[File:H3 High Ground Sniper-Gate View.jpg|center|300px]] | ||
|game=''[[Halo 3]]'' | |game=''[[Halo 3]]'' | ||
|devname=<code>deadlock</code> | |||
|map= | |map= | ||
|location=[[Outpost C9]], [[Africa]], [[Earth]] | |location=[[Outpost C9]], [[Africa]], [[Earth]] | ||
| Line 10: | Line 12: | ||
|playernumber=4-12 | |playernumber=4-12 | ||
|gametypes=*[[1 Flag CTF|One Flag]] | |gametypes=*[[1 Flag CTF|One Flag]] | ||
*[[ | *[[Assault|One Bomb]] | ||
*[[Territories]] | *[[Territories]] | ||
*[[One Sided VIP]] | *[[VIP|One Sided VIP]] | ||
*[[Team Slayer]] | *[[Team Slayer]] | ||
}} | }} | ||
{{Article quote|A relic of older conflicts, this base was reactivated after the New Mombasa Slipspace Event.}} | {{Article quote|A relic of older conflicts, this base was reactivated after the New Mombasa Slipspace Event.}} | ||
'''''High Ground''''' is a [[multiplayer]] | '''''High Ground''''' is a [[multiplayer]] map in ''[[Halo 3]]'', and later included in ''[[Halo Online]]'' where it was known as '''Elevation'''. It was one of the maps playable in the [[Halo 3 Beta|''Halo 3'' Beta]].<ref name="HGBeta">[https://halo.bungie.net/content.aspx?link=h3betaHighGround '''Bungie.net''': ''High Ground: The Beta guide'']</ref> | ||
== | ==Universe and lore== | ||
{{Main|Outpost C9}} | {{Main|Outpost C9}} | ||
High Ground is located around Outpost C9, a former-[[NATO]] military base in [[Voi]], [[Africa]], designed to combat "earlier and simpler enemies" than those later faced by the [[UNSC]] in the 26th Century. The base was reactivated after the [[New Mombasa Slipspace Event]] in [[2552#October|October 2552]]. | High Ground is located around Outpost C9, a former-[[NATO]] military base in [[Voi]], [[Africa]], designed to combat "earlier and simpler enemies" than those later faced by the [[UNSC]] in the 26th Century. The base was reactivated after the [[New Mombasa Slipspace Event]] in [[2552#October|October 2552]].{{Ref/Reuse|HGBeta}}<ref>'''[[Halo 3]]''', ''High Ground map description''</ref> The base was utilized by the UNSC to test captured examples of the [[Paegaas Workshop Spiker]] recovered from fallen [[Jiralhanae]] in the wake of the [[Great Schism]].<ref>[http://halo.bungie.net/news/content.aspx?cid=12237 '''Bungie.net''': ''The Spiker'']</ref> | ||
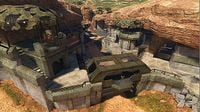
Due to the old NATO architecture and newer UNSC technology, the facility has a mix of crumbling bulwarks and high-tech military equipment. | Due to the old NATO architecture and newer UNSC technology, the facility has a mix of crumbling bulwarks and high-tech military equipment.{{Ref/Reuse|HGBeta}} The base has a concrete bunker and large partitioning wall to divide the beachhead and base itself, with a single large blast gate overlooked by an [[AIE-486H machine gun]]. A single watchtower is above the bunker, while the other side of the wall has decayed due to time. The back of the base has a small courtyard with an [[Advanced Short-Range Ground-to-Air Missile 10X|ASRGAM-10X]] [[Surface-to-air missile launcher]]. | ||
== Layout == | ==Overview== | ||
===Layout=== | |||
High Ground is an asymmetric map featuring an elevated, crumbling | High Ground is an asymmetric map featuring an elevated, crumbling UNSC base positioned along a beach. Low, eroded cliffs lie to the north, east, and west of the base, with the beach lying south of the base. There are multiple ways to approach and enter the base; through the main gate (that is closed only in asymmetric gametypes), or through side passages, which offer more protection and discretion. As one of the few asymmetric maps in the game, High Ground is great for one-sided objective games such as [[Assault|Single Bomb|One Bomb]], [[1 Flag CTF|One Flag]], and [[Territories]]. | ||
<gallery> | |||
=== Beach === | File:HMCC H3 High Ground Map.png|High Ground Map. | ||
File:H3 High Ground Overview.jpg|An annotated overview of ''High Ground'' | |||
File:H3 HighGround HeatMap.jpg|An overview of ''High Ground''. | |||
</gallery> | |||
====Beach==== | |||
Attacking players spawn at the south side of the map, aptly named "the beach". If the main gate is open, it can be used as a quick entrance to or exit from the base. | Attacking players spawn at the south side of the map, aptly named "the beach". If the main gate is open, it can be used as a quick entrance to or exit from the base. | ||
A variety of weaponry and [[equipment]] has been placed near the beach to aid attackers in storming the base. Perhaps the two most valuable weapons are the [[SRS99D-S2 AM sniper rifle|sniper rifle]] and the [[M41 SPNKR|rocket launcher]], though the latter can be reached by the base defenders if they use vehicles. In most games, a battle for control of the rocket launcher ensues at the start of the game, and repeats whenever the weapon respawns. Players can also find a [[M90 shotgun|shotgun]], [[Portable gravity lift|gravity lift]], [[Z-4190 bubble shield|bubble shield]], [[Active camouflage|active camo]], and [[overshield]] to aid in their attack. In addition to the weapons and equipment, players can choose between a [[M274 Mongoose|Mongoose]] or [[ | A variety of weaponry and [[equipment]] has been placed near the beach to aid attackers in storming the base. Perhaps the two most valuable weapons are the [[SRS99D-S2 AM sniper rifle|sniper rifle]] and the [[M41 SPNKR|rocket launcher]], though the latter can be reached by the base defenders if they use vehicles. In most games, a battle for control of the rocket launcher ensues at the start of the game, and repeats whenever the weapon respawns. Players can also find a [[M90 shotgun|shotgun]], [[Portable gravity lift|gravity lift]], [[Z-4190 bubble shield|bubble shield]], [[Active camouflage|active camo]], and [[overshield]] to aid in their attack. In addition to the weapons and equipment, players can choose between a [[M274 Mongoose|Mongoose]] or [[Karo'etba-pattern Ghost|Ghost]] to get to the base wall faster. | ||
=== Fortress === | ====Fortress==== | ||
This large, crumbling base on the northern side of the map is where defending players spawn. In the back of the base, there is an unusable [[surface-to-air missile launcher]]. Several vehicles, including Mongooses and a Ghost, spawn just east of the launcher, allowing defenders to quickly catch fleeing attackers, or for attackers to make a quick getaway. | This large, crumbling base on the northern side of the map is where defending players spawn. In the back of the base, there is an unusable [[surface-to-air missile launcher]]. Several vehicles, including Mongooses and a Ghost, spawn just east of the launcher, allowing defenders to quickly catch fleeing attackers, or for attackers to make a quick getaway. | ||
A broken down control room is located in the center of the base, complete with computers and a radio set. This control room is the objective area for [[Capture the Flag|CTF]] and [[Assault]] | A broken-down control room is located in the center of the base, complete with computers and a radio set. This control room is the objective area for [[Capture the Flag|CTF]] and [[Assault]] game types, containing the flag spawn point and bomb plant point, respectively. Farther east is the "Pipe Room", where attackers can enter the base via a small pipe that connects to the front of the base. | ||
The western half of the base is mostly indoors | The western half of the base is mostly indoors and offers two levels of play. The lower level connects the base to a [[Wikipedia:Bunker#Pillbox|pillbox bunker]] lying just outside the base's walls; the level also has multiple entry points inside the base. The upper level is used as a choke point to keep attackers from reaching the gate controls on the catwalk. If a player is able to access the gate controls, the base wall gate will be permanently opened, as is the case with the gates in [[Zanzibar]] and [[Last Resort]]. The base is designed to promote [[dual wielding]], and as such, a number of dual-wieldable weaponry can be found behind the base wall. | ||
The base wall is an important area for defenders, as it gives them a view of most of the beach. Defenders on the wall, however, are vulnerable to [[BR55HB battle rifle|battle rifle]] and sniper rifle fire from the beach. The wall acts as a bridge, connecting the base's eastern side to its western side. On the western edge of the wall, there is a tower where a [[M6 Spartan Laser|Spartan Laser]] and two [[ | The base wall is an important area for defenders, as it gives them a view of most of the beach. Defenders on the wall, however, are vulnerable to [[BR55HB battle rifle|battle rifle]] and sniper rifle fire from the beach. The wall acts as a bridge, connecting the base's eastern side to its western side. On the western edge of the wall, there is a tower where a [[M6 Spartan Laser|Spartan Laser]] and two [[fusion coil]]s spawn. In addition, a [[AIE-486H machine gun|machine gun turret]] is mounted above the main gate, which is useful for beating back approaching rushes and vehicles. The rocket launcher can be accessed by defenders as well, if they quickly rush up and over the base wall, beating the attackers. | ||
== | ===Callouts=== | ||
*'''Beach''' | |||
*'''Base''' | |||
*'''Bunker''' | |||
*'''Bunker Cave''' | |||
*'''Broken Wall''' | |||
*'''Missile Launcher''' | |||
*'''Bunker Cave''' | |||
*'''Beach Tunnel''' | |||
*'''Broken Tunnel''' | |||
*'''Ledge''' | |||
*'''Tower''' | |||
*'''Gate''' | |||
*'''Gate Switch''' | |||
*'''Pipe Room''' | |||
*'''Backside''' | |||
===Strategies=== | |||
<!--This is STRATEGIES, not Trivia, only strategies belong here, please put trivia below in the Trivia section--> | <!--This is STRATEGIES, not Trivia, only strategies belong here, please put trivia below in the Trivia section--> | ||
*A good defensive tactic for Territory 5 is to get a shotgun, and then pick up the active camo (default). Quickly go to Territory 5, jump into the pipe, and wait. When someone comes to try to take the Territory, [[melee]] them or shoot them with the Shotgun. When your active camo wears off, either wait for another teammate with active camo to replace you, or re-obtain it when it respawns. | *A good defensive tactic for Territory 5 is to get a shotgun, and then pick up the active camo (default). Quickly go to Territory 5, jump into the pipe, and wait. When someone comes to try to take the Territory, [[melee]] them or shoot them with the Shotgun. When your active camo wears off, either wait for another teammate with active camo to replace you, or re-obtain it when it respawns. | ||
*A good place to hide is behind the Laser Tower; there is a small opening in the wall with a stone ledge, where players can simply jump over and camp with the Spartan Laser, sniper rifle, or rocket launcher. | *A good place to hide is behind the Laser Tower; there is a small opening in the wall with a stone ledge, where players can simply jump over and camp with the Spartan Laser, sniper rifle, or rocket launcher. | ||
*The many [[ | *The many [[Vostu-pattern carbine|carbines]] on this map could be a substitute for the BR. Do so because there are only 3 BRs on this map, and they're all on the offensive side. | ||
*A good place to snipe enemies exiting the pipes and enemies on the ledge is in the tree South East of the bunker (see annotated map to the right). | *A good place to snipe enemies exiting the pipes and enemies on the ledge is in the tree South East of the bunker (see annotated map to the right). | ||
*The grav lift can be used to drive vehicles and jump people over the tower. | *The grav lift can be used to drive vehicles and jump people over the tower. | ||
| Line 75: | Line 96: | ||
*From on top of the base with the computer, you can slightly crouch walk under the rock behind you. Walk toward the pipe room. You can stand on a small pipe above this room. You are very open to gunfire, but many people will not notice you. | *From on top of the base with the computer, you can slightly crouch walk under the rock behind you. Walk toward the pipe room. You can stand on a small pipe above this room. You are very open to gunfire, but many people will not notice you. | ||
*If you use forge, the defensive team can add lots of MG positions on the wall, in the bunker, and near the beach, thus forcing the offensive team into cover. The beach will essentially become an Omaha replication. | *If you use forge, the defensive team can add lots of MG positions on the wall, in the bunker, and near the beach, thus forcing the offensive team into cover. The beach will essentially become an Omaha replication. | ||
==Production notes== | |||
[[File:H3 HighGround BigAssMortarGun.jpg|thumb|300px|A diagram of the "big ass mortar gun" and AI-controlled turrets from early development.]] | |||
Originally called given the name "Deadlock" during early development,{{Ref/Twitter|Id=IsaacTweet|Isaac_Hannaford|1582840542014365696|Isaac Hannaford|Quote=Concept art for Deadlock Halo 3 multiplayer map.|D=20|M=10|Y=2022}}{{Ref/Twitter|Id=Hoberman|MaxHoberman|1646711580472516612|Max Hoberman|Quote=Yes, this is High Ground, which we called Deadlock at the time. It was an attempt to make a Zanzibar-esque map (but different). Here's the full prepro image.|D=14|M=04|Y=2023}} High Ground started off as an idea exploration from designer [[Steve Cotton]]; ''"Could we build a wall that one team had to take from the other team?"'' Later inspiration came from the D-Day landings,{{Ref/Mag|Id=PCG348|Magazine=PC Gamer|Issue=348|Year=2020|Month=October|Title=Special Report: Theaters of War|Page=12-13}} and the ''[[Halo 2]]'' map [[Zanzibar]].{{Ref/Reuse|Hoberman}} | |||
During development of the map, the SAM Launcher in the back of the base was originally to be an AI-controlled "big-ass mortar gun" that would fire down on players attempting to advance up the beach.<ref name="vidoc">[[Halo 3 ViDoc: Is Quisnam Protero Damno!|'''Halo 3 ViDoc''': ''Is Quisnam Protero Damno!'']]</ref> The map would have also featured AI-controlled machine guns in the watchtowers firing down on the attacking team, though these features were cut as they made the map impossibly stacked against the attacking team and too difficult to play on. The watchtowers were scaled back to just the one watchtower - now the spawn of the Spartan Laser - and the one player-controlled chaingun above the main gate.{{Ref/Reuse|vidoc}} | |||
High Ground was one of the first multiplayer maps unveiled for ''Halo 3'', alongside [[Snowbound]] and [[Valhalla]]. These three maps were playable in the game's beta.{{Ref/Reuse|HGBeta}} | |||
==Trivia== | ==Trivia== | ||
<!--This is TRIVIA, not Strategies, only trivia belongs here, please put strategies above in the Strategies section--> | <!--This is TRIVIA, not Strategies, only trivia belongs here, please put strategies above in the Strategies section--> | ||
*The [[Cortana on High Ground]] easter egg can be found on this level. | *The [[Cortana on High Ground]] easter egg can be found on this level. | ||
*The radio inside the fort where the flag spawns transmits three different [[Morse Code]] messages. When translated they are: | *The radio inside the fort where the flag spawns transmits three different [[Morse Code]] messages. When translated they are: | ||
| Line 89: | Line 113: | ||
**"''Don't Make us Kick Your Ass''" - a classic Bungie saying. | **"''Don't Make us Kick Your Ass''" - a classic Bungie saying. | ||
*The radio inside the fort where the flag spawns also transmits a musical piece from ''[[Halo: Combat Evolved]]'', entitled "[[Under Cover of Night]]". | *The radio inside the fort where the flag spawns also transmits a musical piece from ''[[Halo: Combat Evolved]]'', entitled "[[Under Cover of Night]]". | ||
*There are small [[list of animals|fish]] that can be seen and killed, and will wash up on the shore. | *There are small [[list of animals|fish]] that can be seen and killed, and will wash up on the shore. | ||
*It is possible to go deep into the water on this map by [[Overload | *It is possible to go deep into the water on this map by [[Overload glitch (Halo 3)|overloading]] it with [[TR/9 Antipersonnel Mine|Trip Mines]] then sticking a respawn point out side, or by using [[teleporter]]s and having one player go through a Sender Node while another [[Forge|holds]] a Receiver Node beyond the map. | ||
==Gallery== | ==Gallery== | ||
{{Linkbox|gallery=yes}} | |||
===Development images=== | |||
<gallery> | <gallery> | ||
File: | File:H3 Concept HighGroundExterior.jpg|Concept art of the exterior of the base on High Ground. | ||
File: | File:H3 Concept HighGroundInterior1.jpg|Concept art of the interior of the base. | ||
File: | File:H3 Concept HighGroundInterior2.jpg|More concept art of the base interior. | ||
File:H3_HighGround_EarlyLayout.jpg|An early layout for the map. | File:H3_HighGround_EarlyLayout.jpg|An early layout for the map. | ||
File:H3 HighGround PrePro Screenshot.jpg|A screenshot of High Ground, at the end of ''Halo 3'' pre-production.{{Ref/Reuse|Hoberman}} | |||
</gallery> | |||
===Pre-release screenshots=== | |||
<gallery> | |||
File:H3_Alpha_HighGround.jpg|The Base Wall in the Alpha, showing the [[M247 machine gun]] in place of the final release AIE-486H chaingun. | File:H3_Alpha_HighGround.jpg|The Base Wall in the Alpha, showing the [[M247 machine gun]] in place of the final release AIE-486H chaingun. | ||
File:H3_Alpha_HighGround_Above.jpg|The base from above in the Alpha. | File:H3_Alpha_HighGround_Above.jpg|The base from above in the Alpha. | ||
File:H3_HighGround_Early.jpg|An early ''Halo 3'' multiplayer Spartan on High Ground. | File:H3_HighGround_Early.jpg|An early ''Halo 3'' multiplayer Spartan on High Ground. | ||
</gallery> | |||
===Final release screenshots=== | |||
<gallery> | |||
File:H3_HighGround_FrontView.jpg|The calm before the storm. | File:H3_HighGround_FrontView.jpg|The calm before the storm. | ||
File:H3_HighGround_Territory.jpg|Territories on High Ground. | File:H3_HighGround_Territory.jpg|Territories on High Ground. | ||
| Line 112: | Line 144: | ||
==Sources== | ==Sources== | ||
{{Ref/Sources}} | |||
{{ | {{Levels|H3|mode=yes}} | ||
{{Levels|HO|mode=yes}} | |||
Latest revision as of 21:31, January 22, 2024
| High Ground | |
|---|---|
 | |
| Map overview | |
|
Game: |
|
|
Map file name (?): |
|
| Lore information | |
|
Location: |
|
| Gameplay overview | |
|
Terrain: |
Beach, Urban Fortress, and plateaus |
|
Recommended number of players: |
4-12 |
|
Recommended gametype(s): |
|
| “ | A relic of older conflicts, this base was reactivated after the New Mombasa Slipspace Event. | ” |
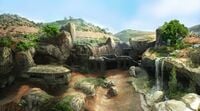
High Ground is a multiplayer map in Halo 3, and later included in Halo Online where it was known as Elevation. It was one of the maps playable in the Halo 3 Beta.[1]
Universe and lore[edit]
- Main article: Outpost C9
High Ground is located around Outpost C9, a former-NATO military base in Voi, Africa, designed to combat "earlier and simpler enemies" than those later faced by the UNSC in the 26th Century. The base was reactivated after the New Mombasa Slipspace Event in October 2552.[1][2] The base was utilized by the UNSC to test captured examples of the Paegaas Workshop Spiker recovered from fallen Jiralhanae in the wake of the Great Schism.[3]
Due to the old NATO architecture and newer UNSC technology, the facility has a mix of crumbling bulwarks and high-tech military equipment.[1] The base has a concrete bunker and large partitioning wall to divide the beachhead and base itself, with a single large blast gate overlooked by an AIE-486H machine gun. A single watchtower is above the bunker, while the other side of the wall has decayed due to time. The back of the base has a small courtyard with an ASRGAM-10X Surface-to-air missile launcher.
Overview[edit]
Layout[edit]
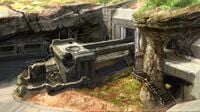
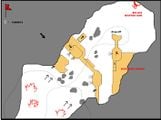
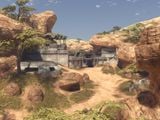
High Ground is an asymmetric map featuring an elevated, crumbling UNSC base positioned along a beach. Low, eroded cliffs lie to the north, east, and west of the base, with the beach lying south of the base. There are multiple ways to approach and enter the base; through the main gate (that is closed only in asymmetric gametypes), or through side passages, which offer more protection and discretion. As one of the few asymmetric maps in the game, High Ground is great for one-sided objective games such as Single Bomb|One Bomb, One Flag, and Territories.
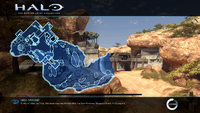
High Ground Map.
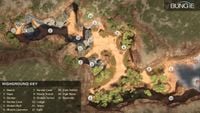
An annotated overview of High Ground
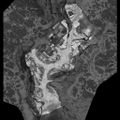
An overview of High Ground.


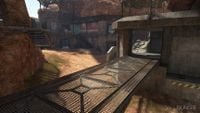
Beach[edit]
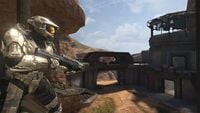
Attacking players spawn at the south side of the map, aptly named "the beach". If the main gate is open, it can be used as a quick entrance to or exit from the base.
A variety of weaponry and equipment has been placed near the beach to aid attackers in storming the base. Perhaps the two most valuable weapons are the sniper rifle and the rocket launcher, though the latter can be reached by the base defenders if they use vehicles. In most games, a battle for control of the rocket launcher ensues at the start of the game, and repeats whenever the weapon respawns. Players can also find a shotgun, gravity lift, bubble shield, active camo, and overshield to aid in their attack. In addition to the weapons and equipment, players can choose between a Mongoose or Ghost to get to the base wall faster.
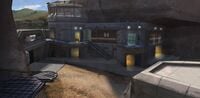
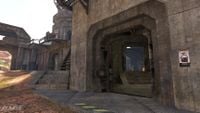
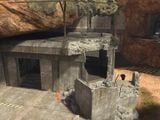
Fortress[edit]
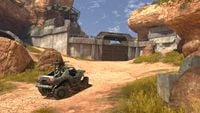
This large, crumbling base on the northern side of the map is where defending players spawn. In the back of the base, there is an unusable surface-to-air missile launcher. Several vehicles, including Mongooses and a Ghost, spawn just east of the launcher, allowing defenders to quickly catch fleeing attackers, or for attackers to make a quick getaway.
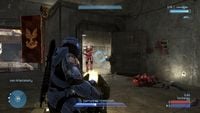
A broken-down control room is located in the center of the base, complete with computers and a radio set. This control room is the objective area for CTF and Assault game types, containing the flag spawn point and bomb plant point, respectively. Farther east is the "Pipe Room", where attackers can enter the base via a small pipe that connects to the front of the base.
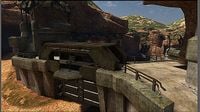
The western half of the base is mostly indoors and offers two levels of play. The lower level connects the base to a pillbox bunker lying just outside the base's walls; the level also has multiple entry points inside the base. The upper level is used as a choke point to keep attackers from reaching the gate controls on the catwalk. If a player is able to access the gate controls, the base wall gate will be permanently opened, as is the case with the gates in Zanzibar and Last Resort. The base is designed to promote dual wielding, and as such, a number of dual-wieldable weaponry can be found behind the base wall.
The base wall is an important area for defenders, as it gives them a view of most of the beach. Defenders on the wall, however, are vulnerable to battle rifle and sniper rifle fire from the beach. The wall acts as a bridge, connecting the base's eastern side to its western side. On the western edge of the wall, there is a tower where a Spartan Laser and two fusion coils spawn. In addition, a machine gun turret is mounted above the main gate, which is useful for beating back approaching rushes and vehicles. The rocket launcher can be accessed by defenders as well, if they quickly rush up and over the base wall, beating the attackers.
Callouts[edit]
- Beach
- Base
- Bunker
- Bunker Cave
- Broken Wall
- Missile Launcher
- Bunker Cave
- Beach Tunnel
- Broken Tunnel
- Ledge
- Tower
- Gate
- Gate Switch
- Pipe Room
- Backside
Strategies[edit]
- A good defensive tactic for Territory 5 is to get a shotgun, and then pick up the active camo (default). Quickly go to Territory 5, jump into the pipe, and wait. When someone comes to try to take the Territory, melee them or shoot them with the Shotgun. When your active camo wears off, either wait for another teammate with active camo to replace you, or re-obtain it when it respawns.
- A good place to hide is behind the Laser Tower; there is a small opening in the wall with a stone ledge, where players can simply jump over and camp with the Spartan Laser, sniper rifle, or rocket launcher.
- The many carbines on this map could be a substitute for the BR. Do so because there are only 3 BRs on this map, and they're all on the offensive side.
- A good place to snipe enemies exiting the pipes and enemies on the ledge is in the tree South East of the bunker (see annotated map to the right).
- The grav lift can be used to drive vehicles and jump people over the tower.
- Ghosts can splatter enemies in the base, but it has limited use when the enemy team goes inside the base.
- Be sure to eliminate the Laser before charging with a Mongoose or Ghost. The laser is the biggest hazard to vehicles.
- The high areas can make a huge vantage point, you can easily hijack a Ghost from the top.
- In SWAT, the defending team should take control of the sniper tower. It is a good position to see the entire field of play. Duck every so often to avoid providing opponents with easy headshots.
- The Spartan laser user can watch the camo cave and the rockets until they are taken.
- The player with the rockets should go after the sniper or the player with the objective. Let the laser player handle the vehicles.
- The turret can easily mow down attackers advancing up the middle, but watch out for a sniper.
- There is a lot of vegetation further down the base, a sniper can hide here and see defenders, but the defenders will most likely not see the sniper.
- On the beach, there are several trees one can jump on and hide among the branches. Several of these overlook the base and other parts of the map, so this is a pretty good sniper position. The one problem is that you cannot see the ground under you very well, but the advantage to this is your opponents have the same view of you, so it's generally easy to go unnoticed.
- The rocket wall is where most enemies except the sniper will likely venture in hopes to obtain the rockets and SMGs when they appear and retreat, throw grenades in the cave to kill them in their so-called safe zone.
- If someone is in the tower with the Spartan Laser, and you have a rocket launcher, if you fire with good aim, your rocket can destroy the tower's fusion coils and kill anyone inside of it.
- Throw a grenade in the camo cave and get a teammate to ambush anyone trying to take the camo from behind.
- On top of the tower, there is a ceiling made of some sort of fence. Players can reach this ceiling by crouch jumping or by using a grav lift. This can be a good sniper-spot.
- The tight areas of the base can cause difficulties for the Ghost, it is easy to board one here. If you are in a Ghost, be sure your team has control of the base. The splatter targets are the ones charging up the hill.
- Attackers with a bomb will most likely take the camo and crawl through the pipe. Toss grenades to flush them out, have another player watch the other end with the laser to prevent the carrier from escaping.
- Bringing the turret on the catwalks in the back can soften up potential targets for teammates to finish off.
- On Shotty Snipers, it is sometimes a good idea to wait in the middle of the pipe with your sniper rifle out, and watch your motion tracker. When you see someone coming close to you, snipe them—they will most likely have their Shotgun out.
- Using the machine gun turret on the gate wall while it's mounted is not always a good idea, because you are very vulnerable to sniper or battle rifle fire. Unless the sniper rifle is uncontested or is under control of your team, rip off the turret and walk with it among the base.
- The hatch on the bunker can be opened by melee or by gunfire, but the people inside will most likely notice and be ready to attack. A quicker and easier way to open it is simply to crouch and melee the hatch twice, thus falling through and surprising those inside.
- Dual wield weapons are often effective in the bunkers, use them to your advantage or when your rifle is out of ammo.
- A great sniping place is on top of the small base with the computer in it. You can get on top of here by getting on the bridge and walk towards the pipe area. You can then run and crouch jump on to it.
- From on top of the base with the computer, you can slightly crouch walk under the rock behind you. Walk toward the pipe room. You can stand on a small pipe above this room. You are very open to gunfire, but many people will not notice you.
- If you use forge, the defensive team can add lots of MG positions on the wall, in the bunker, and near the beach, thus forcing the offensive team into cover. The beach will essentially become an Omaha replication.
Production notes[edit]

Originally called given the name "Deadlock" during early development,[4][5] High Ground started off as an idea exploration from designer Steve Cotton; "Could we build a wall that one team had to take from the other team?" Later inspiration came from the D-Day landings,[6] and the Halo 2 map Zanzibar.[5]
During development of the map, the SAM Launcher in the back of the base was originally to be an AI-controlled "big-ass mortar gun" that would fire down on players attempting to advance up the beach.[7] The map would have also featured AI-controlled machine guns in the watchtowers firing down on the attacking team, though these features were cut as they made the map impossibly stacked against the attacking team and too difficult to play on. The watchtowers were scaled back to just the one watchtower - now the spawn of the Spartan Laser - and the one player-controlled chaingun above the main gate.[7]
High Ground was one of the first multiplayer maps unveiled for Halo 3, alongside Snowbound and Valhalla. These three maps were playable in the game's beta.[1]
Trivia[edit]
- The Cortana on High Ground easter egg can be found on this level.
- The radio inside the fort where the flag spawns transmits three different Morse Code messages. When translated they are:
- "frogblast the ventcore"
- "SABABWL"
- "Don't Make us Kick Your Ass" - a classic Bungie saying.
- The radio inside the fort where the flag spawns also transmits a musical piece from Halo: Combat Evolved, entitled "Under Cover of Night".
- There are small fish that can be seen and killed, and will wash up on the shore.
- It is possible to go deep into the water on this map by overloading it with Trip Mines then sticking a respawn point out side, or by using teleporters and having one player go through a Sender Node while another holds a Receiver Node beyond the map.
Gallery[edit]

|
Browse more images in this article's gallery page. |
Development images[edit]
Concept art of the exterior of the base on High Ground.
Concept art of the interior of the base.
More concept art of the base interior.
An early layout for the map.
![A screenshot of High Ground, at the end of Halo 3 pre-production.[5]](https://halo.wiki.gallery/images/thumb/d/d4/H3_HighGround_PrePro_Screenshot.jpg/200px-H3_HighGround_PrePro_Screenshot.jpg)
A screenshot of High Ground, at the end of Halo 3 pre-production.[5]


![A screenshot of High Ground, at the end of Halo 3 pre-production.[5]](/File:H3_HighGround_PrePro_Screenshot.jpg)
Pre-release screenshots[edit]
The Base Wall in the Alpha, showing the M247 machine gun in place of the final release AIE-486H chaingun.
The base from above in the Alpha.
An early Halo 3 multiplayer Spartan on High Ground.


Final release screenshots[edit]
The calm before the storm.
Territories on High Ground.
Flag bridge.
To the bunker.
High Ground front view.
Inside the base.
The NATO symbol in the base.


Sources[edit]
- ^ a b c d Bungie.net: High Ground: The Beta guide
- ^ Halo 3, High Ground map description
- ^ Bungie.net: The Spiker
- ^ Twitter, Isaac Hannaford (@Isaac_Hannaford): "Concept art for Deadlock Halo 3 multiplayer map." (Retrieved on Oct 20, 2022) [archive]
- ^ a b c Twitter, Max Hoberman (@MaxHoberman): "Yes, this is High Ground, which we called Deadlock at the time. It was an attempt to make a Zanzibar-esque map (but different). Here's the full prepro image." (Retrieved on Apr 14, 2023) [archive]
- ^ PC Gamer, October 2020 (Issue #348) - Special Report: Theaters of War, page 12-13
- ^ a b Halo 3 ViDoc: Is Quisnam Protero Damno!
| ||||||||||||||||||||||||||||||||||||||||
| ||||||||||||||||||||


