Moa statue (Halo 3)
From Halopedia, the Halo wiki

Moa statues are a collectible available in the campaign of Halo 3. The statues were added to Halo 3's campaign in the Series 8: Mythic update for Halo: The Master Chief Collection, and are not present in the original Xbox 360 edition of the game.[1]
Overview[edit]
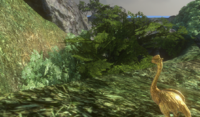
Several moa statues can be found in each level on any difficulty and take the form of a small golden Moa. Upon being discovered, the statues can be destroyed, with the weekly challenge Eye Spy requiring the destruction of three such Moa for completion. Three levels are chosen to spawn Moa within each week (observable on the challenge itself), with each level getting three statues chosen, meaning they are not all consistently placed all the time.[2] As such, this page lists all potential statue locations. Statues marked as (Broken) spawn every week and don't count towards the challenge, even when the challenge selects the level the statues are placed on. Statues marked as (Unobtainable) denote statues placed in cutscene rooms that aren't accessible.
Statue locations[edit]
There are a grand total of 122 statues in the level files, though that number becomes 117 when excluding the unobtainable and broken ones.
Sierra 117[edit]
Sierra 117 has 17 Moa Statues, which can be found in the following locations:
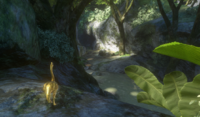
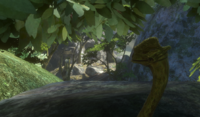
- At the start, nestled in the roots of a tree behind chief's impact crater.
- Nestled into the greenery on the left side wall where the brute howling is heard.
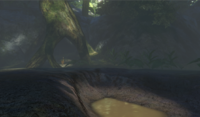
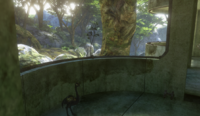
- In the water pool just afterwards, at the edge closest to where the player came from.
- Atop the cliff face beside a waterfall that Johnson's squad scales when they split up with the Master Chief.
- Inside the small structure near the first Brute encounter.
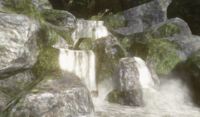
- Amidst the cluster of rocks where the stream makes its first drop.
- After the first flare tunnel, when you drop into another short tunnel, the statue is behind you.
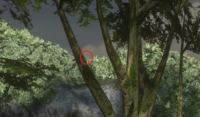
- In the area where a marine informs you of "sleepers", the statue is in the branches of a tree in the middle right of the section.
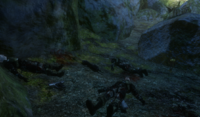
- In the section where Gunnery Sergeant Reynolds is being interrogated by a Jiralhanae, the Moa is behind the large boulder near the bodies of Reynolds' squad.
- Immediately following Reynolds' squad there is a Moa atop a large overhead pipe.
- (Broken) In the section where Sgt. Johnson's Pelican gets shot down, a Moa is hiding under the ramp down from the small structures toward the river.
- In the cliffside structure, the Moa is up high in the pipe.
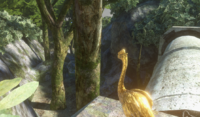
- In the area where Johnson says "If you want breakfast, you gotta catch it", there's a Moa in the bush atop the outcropping to the left of the starting overlook. Due to the bush and the placement height, it is not normally observable without using a sniper from the other end of the area.
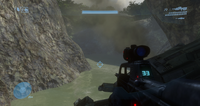
- From the crashed pelican, walk onto the white concrete square on the right side of the metal bridge. Turn right to face the cave, and look up into the tree branches at the bushes along the room's upper boundary. There is a lighter patch with two darker patches coming up from either end; aim near the tip of the right patch.
- There is a Moa beneath the bend in the river between the crashed pelican and the final area. It can be gotten from either end, but has a better visual lineup from the crashed pelican side. Standing at the tip of the rock overlooking the crash and the river, a faint circle can be made out where the river meets the rock wall. You'll want to aim below it, just below the shadow on the river.
- After the cutscene where Johnson is being thrown in the cell, the statue is to the right of the building where Johnson is, near the water on some pipes.
- At the dam, on the farther end of the dam wall there's a No Fishing sign. If you stand against it, then look back with a sniper towards where chief and arbiter were in the cutscene overlooking the area, you should be able to make out bits of a Moa statue in a gap of the tree leaves. This one can be spotted from the area with the crashed pelican as well, but the area boundaries prevent it from being shot from over there.
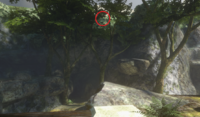
Ingame line-up for the previous Moa.
Ingame line-up for the previous Moa.
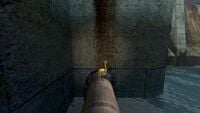

Ingame line-up for the previous Moa.
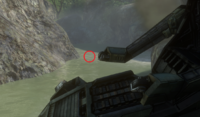
Alternate unobtainable angle for the previous Moa.


Crow's Nest[edit]
Crow's Nest has 14 Moa Statues, which can be found in the following locations:
- At the back of the Ops Center, up the stairs and in the corner with the two server racks and table.
- After you grab your weapons and head through the first door to where the bugger ambush occurs later, the statue is on your right at the back of the room resting below a weapon cache.
- When you enter the road tunnel where the warthog blows up, follow the road rightward to the end; the Moa is behind a stack of boxes with a tarp over them in the corner.
- At the farther end of the first road tunnel, where the RvB easter egg is, the statue is above the ventilation pipe where it connects to the wall.
- In the hangar, just below where the Phantom drops off troops, the statue is located behind some crates near the back of the room.
- In the hangar, on the right side above the farther of two red girders on the wall adjacent to where the pelican leaves.
- On the cliffs outside the hangar, directly below the opening.
- In the room with the first Brute Chieftain encounter, tucked away in the first alcove on the right side.
- After the Chieftain encounter, hang a left in the tunnel that opens. The statue will be beside the marine corpse.
- In the ventilation shaft with the buggers and the Cortana moment, the statue is in the middle left tube.
- In the section with the Jump-Pack Brutes, the statue is up high in the building overlooking the landing pad.
- Also in the section with the Jump-Pack Brutes, there is a statue under the central platform on the third underhang clockwise from the road.
- In the small elbow tunnel connecting the two road tunnels after the encounter with the Jump-Pack Brutes, to the right of the door leading to the second tunnel.
- At the end of the second road tunnel, above the ventilation pipe where it connects to the wall that opens back to the room where the chieftain encounter occurred.


Tsavo Highway[edit]
Tsavo Highway has ten Moa statues, which may be found in the following locations:
- To the left of the heavy door used to leave the garage, in the corner behind boxes.
- In front of the roadblock stashed to the right immediately after exiting the garage.
- Atop the entrance to the small building just before leaving the tunnel.
- In the ruined girders immediately after exiting the tunnel, where the top of the girder is removed and revealing a few smaller beams.
- In the section with turrets and sniper jackals, just before the first shield wall, the statue is on the opposite side of the dam.
- At the base of the cable tower just after the dam where the previous Moa is located.
- At the first shield door encounter, in the hut second closest to the destroyed highway.
- On a support beam at the destroyed highway in the first shield door encounter.
- After the destroyed bridge driving section, the statue is on the left as soon as you pass through the gate.
- After the destroyed bridge driving section, at the base of the cable tower behind the hut the marines are defending where the sniper is located.


The Storm[edit]
The Storm has seventeen Moa statues, which may be found in the following locations:
- Tucked around the left edge of the exit of the tunnel you start the level in.
- To the right of the same exit, across the broken highway in a gap in the road.
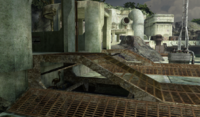
- On a pipe tucked around the corner of the Traxus building; Easily spotted by walking onto the broken wooden bridge and turning left toward the corner of the building.
- On the biohazard-marked pipes in the elevated walkway leading to the second room in the Traxus building; Go up the stairs and hook around to the right, the Moa should be in the corner.
- In the first large hallway in the Traxus building, under the second pipe covering on the right.
- In the first outside skirmish area, on the tower the phantom drops covenant troops off upon, a Moa Statue can be found on the walkway around the window.
- In the first outside skrimish area, in the end of the exposed pipe.
- Upon reentering the Traxus building, a Moa Statue is stashed under the stairs.
- Above the large door to the large hallway is a Moa Statue, placed in the end of the vent pipe.
- In the second outdoor encounter area, after going down the ramp at the start, check around the corner of the walkway to your left for a Moa Statue.
- In the end of the longer exposed pipe in the second outdoor encounter area.
- In the red room with the grate ceiling, a Moa Statue is above you to the left when you enter.
- In the large room with skylights and conveyor belts, a Moa Statue is inside one of the green metal containers held by cranes close to the ceiling (the left one upon entering the area).
- At the end of the large room, where the Hunters arrive, there is a Moa Statue on the other side of the wall to the right of the exit door, tucked between the wall and the yellow machinery.
- At the end of the large room, a Moa Statue is in the corner under the stairs to the rooms containing the sniper.
- Upon exiting the facility, following the road until you hit the fence, a Moa Statue is to your left, beside the generator.
- Outside the facility, once you've stepped off the metal plate ramps down to the grassy dirt, check the hole in the concrete below the missile battery for the level's final Moa Statue.


Floodgate[edit]
Floodgate has 13 Golden Moa statues, which may be found in the following locations:
- Inside the first garage on the left once you've left the grassy start.
- To the left of the fence blocking off the road leaving the Traxus building when the flood infection forms first drop in; this is the same location as a Moa Statue on The Storm.
- On yellow machinery to the right of the door in the wall marked Section K437.
- In a green shipping container held by a crane in the final section of the large room with skylights and conveyor belts; this is the same location as a Moa Statue on The Storm.
- Against the right corner of the back wall of the large room, elevated near some pipes.
- Crammed beside the panicking marine just past the red room with the mesh roof.
- At the start of the section Shadow of Intent, hooked around the corner of the room you exited on your left.
- At the end of the outdoor flood encounter, instead of reentering the Traxus building, turn a right and walk along the elevated path; a Moa Statue is at the end.
- In the final interior room of the Traxus building, marked Section 01, a Moa Statue can be found atop one of the red pipes in the central cylindrical structure.
- When you return outside and the mission hint "Search the ship for Cortana" is shown, a Moa Statue is located to the left of the door you exited, in a cubby in the wall.
- Easily visible in the large chunk of covenant cruiser wreckage you can jump on from the elevated concrete.
- Just before entering the final room, a Moa Statue is perched atop some flood tissue connecting the walls.
- Above the terminal where the Cortana fragment is retrieved, slightly to the right, there are three purple struts emerging from the wall. The Moa Statue is placed on a ledge where the leftmost connects to the wall.


The Ark[edit]
The Ark has fourteen Moa Statues, which may be found in the following locations:
- Atop the first natural arch at the start of the level; This Moa Statue is most easily seen from the small crater past the arch.
- Inside the crashed pelican in the canyon.
- In the next section of canyon with the ODST pods and the pelican debris, a Moa Statue is placed in the forerunner wall on the left side.
- Under the left wing of the crashed broadsword.
- Upon entering the area with the AA Wraiths you've been tasked with destroying, follow the wall around to the right to the corner, and around a rock is a Moa Statue.
- At the button to activate the bridge for your vehicle squad, a Moa Statue is perched along the left wall above the vehicles.
- At the end of the canyon where the Scarab skirmish occurs, at the leftmost inlet at the front of the structure you will scale to progress.
- Near the top of the structure beside the Scarab skirmish area, in an indent in the wall to the left of the final ramp.
- After the "Little bastard just stung me!" door, hook to the left to spot a Moa Statue in a small alcove in the wall.
- After the ramp down and a straight arched hallway, you'll find yourself in a room with another ramp and a purple conduit with fusion coils beside its base; From this spot in the room, look to the top segment of the conduit for the Moa Statue.
- After taking the first U-shaped ramp down a floor, a Moa Statue is placed in the upper cubbyhole behind the purple conduit.
- In the cartographer room, stand at the button, turn to the right and walk to the first lit feature encircling the hologram. Turn a little further to the right until you see a white-lit stripe on the walls surrounding the room; a Moa Statue is hidden on the ledge where the light ends.
- In the second U-shaped ramp, one can be found in the space above the bend.
- In the room with the stealth brutes and a beam connecting a pair of conduits, a Moa Statue can once again be seen in the uppermost space behind the main conduit.


The Covenant[edit]
The Covenant has nineteen Moa Statues, which may be found in the following locations:
- At the start of the level, atop the waterfall on the right cliff face
- Inside the crashed pelican beside the hill with the AA Wraith
- After clearing the AA Wraith and obtaining vehicles, a Moa Statue can be found around the first encounter in the canyon (with the shade turret), around the right side of the canyon wall beside a small tree.
- At the clearing where the first tower's entrance is situated, on the upper path where the player enters the area from, a Moa Statue is placed in the waterfall source of the stream that crosses the path, atop a rock jutting out from the waterfall.
- Another Moa Statue is placed in the waterfall between the raised path and the floor of the area at the entrance to the first tower.
- A Moa Statue is perched at the bottom of one of the support beams to the left of the exposed entrance to the first control tower.
- Inside the bottom of the tower, take the right path around the elevator room, a Moa Statue is atop one of the pillars just before the 2nd floor of the room overlaps the lower path.
- After riding the elevator to the control room of the tower, a Moa Statue is on the second farthest outcropping on the right hand side of the room.
- At the second tower (the ones the Elites cleared that houses a terminal), a Moa Statue is tucked away in the outside of the structure, up a short ramp on the right side behind the semicircle at the front of the external footpath area.
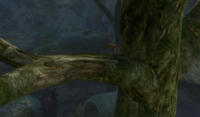
- Upon reaching the third tower, a Moa Statue is inside the shorter of the two broken trees beside the rightmost AA Wraith.
- Inside the bottom of the third tower, if you walk through the center of the room to the forerunner door and turn around to face where you entered the tower from, a Moa Statue is above the pillar at the right-side edge of the opening to the centre section of the room.
- In the control room of the third tower, a Moa Statue is perched high up on the first outcropping on the left side of the room.
- Upon entering the snowy canyon path to the citadel, the deep crack on the left wall face is just before a Moa Statue placed out of view atop the slight overhang on the right. Grenades can likely destroy it, but positioning and lineup for it is currently unknown.
- At the citadel scarab fight, a Moa Statue is placed where the beam from the third tower connected to the shield around the citadel. This is between the two metal prongs descending from the tower.
- In the antechamber of the citadel, a metal beam runs above the bridge to either side; A Moa Statue is at the far end of the beam on the right.
- Just before entering the second (and final) enclosed room breaking up the bridge with all the Halo holograms, turn left at the top of the ramp and look for where long metal fins protrude from the wall. A Moa Statue is placed to the left bottom of the second set of fins.
- Immediately after exiting the second enclosed room breaking up the bridge, walk to the right side of the raised platform and turn to face the exterior of the enclosed room, and look above it. A Moa Statue is placed atop it.
- (Unobtainable) In the cutscene room at the bottom of the shaft Chief descends at the end of the level, he follows Cortana to the right. If you head left instead, a Moa Statue is tucked into the top of the tunnel beside the door.
- (Unobtainable) In the bottom chamber of the elevator in the citadel, where Keyes asks "How close are you?" and Chief responds "Not close enough", a Moa Statue is tucked around one of the pillars on the right side.


Cortana[edit]
Cortana has nine Moa statues, which may be found in the following locations:
- Just before the first flood door, turn around. A Moa statue is high up above on a ledge.
- Inside the pelican bay.
- In the short hallway where Gravemind says "There may be some of her still", look out the gaps in the left wall to spot a Moa statue perched atop some High Charity wreckage.
- In the room with the Cortana terminal, on one of the ledges on the way to the skull.
- When exiting the room with the Cortana terminal, turn and look at the backside of the wall you entered.
- After the four-way intersection where the Flamethrower can be found, in a hole on the right-hand wall.
- In the large circular room where you have to climb up to the flood door, a Moa statue is placed on one of the lights in the tunnel where the invisibility equipments are found.
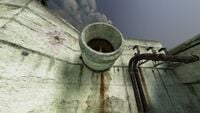
- In the reactor room, mounted on the reactor core that blows upon first entry.
- (Unobtainable) In the cutscene room for the start of the level, to the left.


Halo[edit]
Halo has nine Moa statues, which may be found in the following locations:
- At the start of the level, inside the pelican bay.
- Atop the third and final arch leading into the clearing where the flood first show up.
- At the top of the climb to the control room, up on the ledge where Johnson stays during the defense section, where the ledge meets the wall to the left of the door.
- In the first room of the control room, along the left wall.
- During the start of the escape, when you enter the circular room in the cliff wall, a statue is placed in the wall dividing the entrance from the exit.
- After getting Johnson's Warthog, follow the path to the left to the two large stone upcroppings; A Moa statue is atop the shorter one on the right.
- On the first of the falling metal islands, just before jumping off, a Moa statue is placed atop the wall dividing the entry area to the exit area.
- Inside the second tunnel of the warthog run, at the back of the upper left girder running along the tunnel sections.
- Just past the second tunnel, off to the left of the path are some panels along the wall with some large rocks on them. A statue is tucked away among the rocks.


Sources[edit]
- ^ Reddit, Halo 3 Insider Golden Moa Statue Locations (WIP) (Retrieved on Sep 3, 2021) [archive]
- ^ YouTube - Halo, Seasonal Sitrep: MCC Season 8, Mythic
| ||||||||||||||||||||
| ||||||||


