Construct
From Halopedia, the Halo wiki
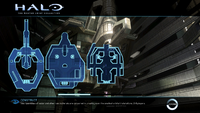
| Construct | |
|---|---|

| |
| Map overview | |
|
Game: |
|
|
Map file name (?): |
|
| Lore information | |
|
Location: |
|
| Gameplay overview | |
|
Terrain: |
|
|
Map layout: |
Asymmetrical |
|
Recommended number of players: |
2-8 |
|
Recommended gametype(s): |
|
| “ | Vast quantities of water and other raw materials are consumed in creating even the smallest orbital installations. | ” |
Construct is a Halo 3 multiplayer map that takes place at one of the Ark's "spokes". Its large asymmetric design makes it great for Slayer and Team Slayer gametypes.
Universe and lore
Construct is set in the same Forerunner structure as that housing the Cartographer in the campaign level The Ark, likely set above or below the area in which John-117 fights Cethegus at the end of the mission. Looking out from the map, the same waterfalls, ocean and view of the Ark's superstructure can be seen.
Overview
Layout
This level may appear symmetrical, but on closer inspection is really asymmetrical in nature. Construct has three distinct levels, each connected by a series of ramps and gravity lifts. As a result of its unique nature, Construct has a variety of weapons and equipment. The upper level can be reached by the main yellow gravity lift at the far side of the level (opposite the ocean) and two smaller, purple lifts. Also, two ramps extending up to hold the sword arm can be used to gain access to the upper level. A long, narrow channel stretches out overlooking the vast ocean below and the main level of the construct.
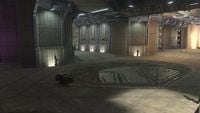
Construct Map.

A bird's-eye view of Construct.


Lower Level
The lowest level of Construct is split into 2 sections, that are similar in shape to a plus (+) sign. The main corridor leads to the middle level at one end, and the yellow gravity lift at the other. Players can find a power drain upon entrance to the yellow gravity lift. The smaller corridor intersects the main corridor at its center, and offers a ramp (one on each side), up to the middle level. A Spartan Laser and missile pod exist on each side of the small corridor on the ramps leading to the middle level, and the corridor leading to the Spartan Laser spawn also has a Brute Shot.
A flamethrower is present at this intersection. A small, c-shaped hallway connects the main corridor to the smaller corridor, which goes behind the purple gravity lifts. A Mauler can be found in each of these small hallways. Players also have the ability of reaching the top level via the yellow and purple gravity lifts from this low level.
The lowest level of Construct with the Flamethrower in sight.

Middle Level
The middle level is almost synchronous with the lowest level due to the ramps connecting these two levels. A portion of the middle level has been removed, offering a quick drop into the lowest level if a player chooses to not use the ramps. Players can also access the yellow and purple gravity lifts from this level of the map as well. This is the highest level of the map where the gravity lifts can be used, as they only travel upwards.
This level of the map, can often see fighting, but is mainly used as the "transport" level, getting players to their destination quicker. Players can also choose a slower and possibly safer route than the gravity lifts by traveling up the ramps. The main ramps circle around the yellow gravity lift and lead all the way to the top level. The map's second Brute Shot spawn lies on these ramps. There is also a way to get over the purple beams without dying. This tip will be a great tip for escaping enemies and killing them from a high view. First you must jump to a small edge and jump on the bigger edge above it. Then you must jump over the purple beam or power jump.
Note: An alternate route to the energy sword is a long narrow sloped ramp (which is quite possibly a support strut) next to both of the purple lifts on this section of Construct, it leads to the sides of the ramp that leads to the large walkway that leads to the sword.

A view of the middle level and partial view of the upper level.

Upper Level
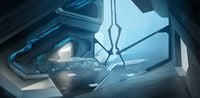
Remarkably, this area of the map sees practically all the action that takes place. This is for several reasons: first, there is little to no cover on the lower levels. Second, nearly the entire supply of weapons is located here, and third, the three power lifts lead to here and it is often of good strategy to camp at the top of these lifts in hopes of killing a player as they come up it (in such a situation the player already there has a distinct advantage over the player coming up the lift). There are three main areas of the upper level as well. The "yellow lift zone" contains the area where players exit the yellow gravity lift, as well as the paths leading to the purple lift zones. The second zones on the upper level are the "purple lift zones," which occur at two ends of the top level. The final aspect of the upper level is the long walkway extending into and outside the main parts of the map, containing the sniper rifle at one end and the energy sword on the other.
Yellow Lift Zone
In this zone, players can trap the opposing team from entering the top level of the structure via the yellow gravity lift or the ramps. It is often the object of much fighting as one team tries to storm the upper level, while the other team attempts to hold them off. A good tactic for those traveling up the lift is to destroy the fusion cores that are on the walls of each side of the yellow zone. On the left of players, as they're looking into the lift, are the ramps that lead up to the top level from the bottom. This is by far the most sought after position in the entire level. The purple lifts provide two ways to assault the yellow lift zone from either side but it is possible to defend this zone if the players stick one or both of the two following areas:
- The "angled" hallway to the right (if you are looking at the yellow lift) of the lift. Though people watch for defenders in this hallway the defender often has the advantage because he sits stationary waiting for an attacker to come into view while the attacker must be ready to train their sights on the defender when it slips into view.
- The overhang over the ramp to the left (if you are looking at the yellow lift) of the lift. You can cover both the ramp leading up, as well one of the purple lift zones from this position. If you start taking heavy fire just put the semi-transparent wall in between you and the attacker.
Purple Lift Zones
Players can rapidly travel up to the top level via one of the two purple lifts. These zones can also be a death-trap for players traveling up them. A helpful trick is to toss grenades up the lifts, hopefully softening the players, and then traveling up to kill them. Other than the ramps, this is the only way to reach this section of the top level. Despite being a heavily contested area, if player can effectively coordinate an assault, they can take the upper level with minimal casualties. If exploding barrels are at the lower lift entrance, it is normally a good strategy to push them up the lift and follow up with a grenade or two to kill any players hiding in wait.
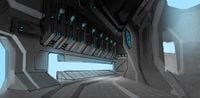
Narrow Walkway
This narrow walkway extends out over the level looking out into the vast ocean below, and has two levels. Players can find an energy sword and power drain at one end of this walkway. Players can easily access the middle or lower levels of the map by jumping from the edge of this walkway. There are two very narrow support struts that allow climbing up and down. At the opposite end of this walkway, players can find the sniper rifle (upper portion), and a bubble shield (lower portion). In the middle area, a player can get a Brute Shot and shoot up the wall and get on top of the archway towards the plasma grenades and sniper rifle. This is a good idea if you have the sniper rifle with you.
Strategies

- If you are behind the yellow lift, you can throw grenades at the wall ahead and they can bounce up to the higher level, where some players may be camping the lift. This is good if they are out of the lifts landing zone, avoiding grenades coming up the lift.
- On the right side of the yellow lift, there are a couple of power cores, you can use these to get you a kill or two.
- A power drain is present on the bottom most floor in front of the Yellow lift, as well as near the energy sword spawn. These, coupled with grenades, can be useful to throw into the lifts. It is important not to follow the power drain up too quickly as it will destroy your shield as well. Most opponents avoid standing in the area that would be affected by preemptive strikes with grenades or power drains.
- On the right side of the golden lift, there are racks of power cores one can shoot and explode killing any player nearby.
- It is possible to throw frag grenades from the lower levels on the sloped ceiling leading from the left purple lift to the orange lift, where the Hill is, this can be used to clear out the Hill one way or another.
- Have a player camp at a lift with an energy sword, another player camp with a Mauler at another lift, and a third player camp at the last lift with a flamethrower.
- There is a little nook beneath the sniper walkway, you can use this to snipe anyone who goes for the sword until a teammate or yourself gets it
- Sometimes that missile pod in the corner might be worth grabbing. In tight areas, the missile pod can be extremely effective, especially near the purple lifts. You can embarrass a sword carrier in this spot.
- Remember that power cores can be pushed up the purple lifts, and along with a tossed grenade, make it easier to soften and/or clear out enemies camping at these lifts.
- When trying to clear out the orange lift from the purple lifts, using frag grenades in conjunction with the angles of the walls can make this easier to achieve.
- The two metal beams that extend diagonally from the middle level to support the far end of the top floor are actually walkable and provide an excellent shortcut to the energy sword.
- Watching your motion tracker can sometimes be quite frustrating due to the many levels.
- If you throw a power drain up the gravity lifts you can drain or partially drain any camper's shields.
- If the enemy team is camped at the top of the orange lift, get a teammate to get the sniper and provide support from the areas where the purple lifts are.
- If you have a close combat weapon, like the energy sword or the Mauler, it is wise to get some easy kills by camping out at one of the lifts. Do not do this directly in front, for you are vulnerable there to grenades and other explosives traveling up the lift. If you don't have a close combat weapon, stay back with a battle rifle. When you see your opponent exit the gravity lift, throw a grenade at where they are going to land. The blast should take out some or all of their shields, and you can finish them off with battle rifle in just one headshot.
- Since the map has so many pieces of cover, the Spartan Laser and sniper are only good if you catch an opponent without cover nearby.
- If the opposing team has control of the top, just hide at the bottom until your foes look for you, if they have the lead then they will probably just sit there ending the game in their favor.
- A good thing to learn on this map is where players land after exiting a gravity lift. If you learn these locations approximately (you can be off by a foot or so), you can use this to your advantage. When you hear your enemy (make sure it's your enemy) coming up the lift, plant a plasma grenade approximately in a one-foot radius of where they will land. Now if you time it correctly, you will kill your opponent instantly. If you're off a little by the timing or the placement of the plasma grenade, your opponent should be hurt enough to be finished off easily.
- You can throw plasma grenades over the gold lift surprising campers there.
- Another good way to start off a game, if you spawn near the purple lifts, is to immediately rush up the gravity lifts. One player should get sniper rifle and provide cover for someone who would rush the energy sword. This usually helps the team control the top level, where a lot of the fighting takes place.
- A purple lift can conceal one player, if they stands still they can be practically invisible.
- The sniper platform can be jumped on from the adjacent walkways to access the sniper faster, or another area to fling grenades at campers in the center room.
- One strategy regarded by players as "noobish" is throwing grenades up the grav lifts on this level. It is regarded as annoying and a cheap kill strategy by many, as anyone near the grav lifts exits will be harmed by the grenades.
- Grenades are extremely effective on this map. You can bounce frags off of walls with ease, and many of these grenades will land between the feet of several opponents in the cramped grav lift rooms. If you are on the bottom floor and the energy sword is above you, you can climb the pillars to get up to the energy sword quicker and if there is a sniper you can kill him easier than on the bottom floor.
- The spartan laser can be an excellent substitute for the sniper. However you can be easily spotted by the pointer.
- Near the room where you can cross into the hanging platform, if you have an ally stand in the corner near the glass, and jump on his head, you can jump, then have him jump as well, and you jump again in mid air, and land on the glass wall. this will give you access to a snipers area, easy to use to ambush people in a room
- By the main grav-lift there are 2 support legs that hold up the map platform with a column on one side. During an infection game, you can jump down and slide down to a spot where you are braced against the column and can shoot zombies that try to get you.
- Seeing as this map is notorious for camping, in an FFA game, you want to control a lift as soon as possible.
Forge
- Using two-way teleporters, you can create a random network of teleporters, all you need to do is set more than two of the two way teleporters on the same channel, this creates a random teleport, and placing one or two on each level of Construct allows for easy getaways.
- The vehicles that can be added into this map are: Banshees, Hornets, and Mongooses.
- While in editing mode, you can reach a level above the third level. This can be done by going as high above the sniper rifle as you can, while looking towards the main yellow gravity lift, then look to your left or right, and you will see a small chamber in the wall.
- This same location can be reached by creating a grav lift (there are none that are on the map by default), and entering the third level room between the two purple gravity lifts. Now, deploy the grav lift and use it to fly up, you should then see two chambers on opposite sides of each other, simply jump into one or the other and you are there.
- Once there, you can camp out and shoot at unaware opponents, go back and repeat the process with a sniper rifle to snipe, throw grenades at hopeless victims, or just impress your friends.
- This spot is also ideal for camping, because you have view of a large portion of the map, it is almost unheard of, few know how to access it, it is hard to get a grenade in there, and is also hard to shoot at because of the angle.
- It is possible to fly into the Purple Gravity lift Generators in Forge. Simply boost into the small hole on the bottom and you will get through. The only way out is to die though.
Production notes

Construct was primarily designed by Chris Carney and Tyson Green. Originally, the level was to be set on and around a massive Strato-Sentinel hovering above a damaged and unknown Forerunner structure. This early iteration was described as being similar to Ascension, with another structure looming overhead relying on heavy use of man cannons and gravity lifts. This iterations was very vertical, allowing the use of aircraft like the Banshee to get between levels. Over the time, the map was redesigned to fill a need for more smaller maps in the roster.[2]
The Banshee was originally used on Construct for the map's aerial vehicle,[3] though was cut due to lessons learned from player experience on the vehicle's domineering presence on Ascension in Halo 2. The Hornet was considered for inclusion, but the final version of the vehicle came too late in the game's development and was never implemented, though the two aircraft are still available in Forge. Gradually, the map shrunk in size, though the upper levels of the map remained fairly consistent throughout development.[2] A teleporter was originally planned out for this map, as seen in the map's image provided for Matchmaking.[citation needed]
Construct was the final map finished for Halo 3 before the game finished.[2]
Construct was originally referenced in the Halo 3 Beta code. It was then confirmed in a leaked photo, and then explored in two videos before the game was released.[4]
Construct has been slightly altered for matchmaking. As of the December 11, 2007 update, the Maulers that spawned at the top of the purple lifts have been removed. Hiding spots, such as the one below the level near the orange lift and the spot behind the glass, have also been removed by invisible barriers that cause players to fall below.[citation needed]
Trivia
- If you jump over the hole, leading to the lower floor, you can see a Marathon symbol if you look down at the glass floor at the exact proper time.
- Players can easily fall off the lower level onto some lower beams below. This can be especially useful in games such as Oddball, Juggernaut and Infection as it is extremely difficult for the opposing force to reach you, but they can shoot at you, due to the sniper rifle and Spartan Laser that spawn by default on Construct. You can only exit this space via dying; this is possible by repeatedly jumping until the "you fell to your death" notice appears. (This exploit has been fixed in the Matchmaking variant of Construct.)
- Sentinels and Constructors float out far from the level, but can be destroyed with long-range weapons. This is a very good place to practice your skills with the Spartan Laser over long distances.
- If you spawn a Banshee on Forge you can fly onto one of the 'arms', where you can place spawn points and teleporters. The Sentinels fly about five meters past the instant kill wall or the "kill zone" as it is also known.
- If you fall off Construct and press Y in Theater mode you will see that the water from the falls comes right up to the level, but is invisible due to fog/watery mist.
- This is the smallest map in which you can create Hornets or Banshees.
- If you get in a Hornet or Banshee and you fly too high or too far you will be killed and fall to your death.
- It is possible to reach the normally inaccessible framework below the lower level by overloading the map and crouching through the mesh under the purple gravity lifts. After this has been achieved, it is now possible to set up teleporters to get in and out freely. Although it is possible without overloading by forcing downwards on the purple lifts in Monitor mode then turning back into player mode and falling through the small hole. It is also possible to get out onto the large "girders" that stick out into the open, outside the normal boundaries, by overloading the map.
- Gravity lifts on Construct are different than others found in multiplayer. Most lifts function like elevators, you enter and exit from the same side. For these lifts, however, you enter one way, and exit the opposite way, so you don't need to turn around.
- When inspected closely, players can see that the "characters" on the windows of the 2nd floor of complex scroll from the bottom to the top. Said "characters" are various and random letters and numbers, in different languages and in different positions.
- The Sentinels and Constructors on this map make the player's aiming reticule turn red if they get close, which is strange as the Campaign level this map is based on takes place before they turn on the Master Chief. However, they will not attack or flee, even when fired upon.
Gallery

|
Browse more images in this article's gallery page. |
Concept art of the battery hallway.
Concept art of the "control room".
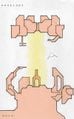
A side view of the early Construct idea.
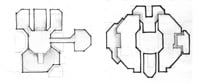
An early layout of the map.

A later layout of the map.
![An early screenshot of Construct from Halo 3 pre-production.[5]](https://halo.wiki.gallery/images/thumb/1/1c/H3_Construct_PrePro_Screenshot.jpg/200px-H3_Construct_PrePro_Screenshot.jpg)
An early screenshot of Construct from Halo 3 pre-production.[5]


![An early screenshot of Construct from Halo 3 pre-production.[5]](/File:H3_Construct_PrePro_Screenshot.jpg)
Sources
- ^ Halo 3 Editing Kit, game file
H3EK\tags\levels\multi\construct\construct.scenario - ^ a b c Bungie.net: Deconstructing Construct
- ^ The Bungie Podcast, episode August 2007 (4), timestamp 36:00
- ^ Xbox 360 Fanboy: Halo 3 multiplayer map names discovered (defunct, Archive.org backup)
- ^ Twitter, Max Hoberman (@MaxHoberman): "Alright, here's trivia Round 3, coming in hot because I have to run. This image is from a Halo 3 multiplayer map, at the end of preproduction. Which map is it?" (Retrieved on Apr 14, 2023) [archive]
| ||||||||||||||||||||||||||||||||||||||||


