Isolation: Difference between revisions
From Halopedia, the Halo wiki
BaconShelf (talk | contribs) m (Undo revision 1611144 by 76.90.148.131 (talk) continuing to remove information for no reason will be grounds for a block) Tag: Undo |
|||
| (26 intermediate revisions by 13 users not shown) | |||
| Line 1: | Line 1: | ||
{{ | {{Status|Gameplay}} | ||
{{Multiplayer | {{Multiplayer map infobox | ||
|pagegamelabel=H3 | |||
|name=Isolation | |name=Isolation | ||
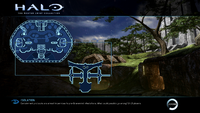
|image=[[File: | |image=[[File:H3 Isolation.jpg|265px]] | ||
|game=''[[Halo 3]]'' | |game=''[[Halo 3]]'' | ||
|devname=<code>isolation</code> | |||
|map= | |||
|location=[[Installation 00]] | |location=[[Installation 00]] | ||
|terrain=Grassy hilltops, Flood | |terrain=Grassy hilltops, Flood biomass, [[Forerunner]] architecture, caves | ||
| | |symmetry= | ||
|playernumber=2-10 | |||
| | |||
|gametypes=*[[Multi Flag CTF]] | |gametypes=*[[Multi Flag CTF]] | ||
*[[Assault]] | *[[Assault]] | ||
| Line 28: | Line 16: | ||
*[[Slayer]] | *[[Slayer]] | ||
*[[VIP]] | *[[VIP]] | ||
}} | }} | ||
{{Article | {{Article quote|[[Containment protocol]]s are almost impervious to pre-[[Gravemind]] infestations. What could possibly go wrong?}} | ||
'''Isolation''' is a [[multiplayer]] map featured in ''[[Halo 3]]'' that takes place at a [[Flood containment facility]] on [[Installation 00]]. The environment is a small, isolated bio-bubble that has contained the [[Flood]] on the Ark. The [[Milky Way Galaxy]] hangs in the sky. The top level is grassy and untainted, but in the underground caves, there is an obvious Flood contamination. Its open layout, with two bases, makes it a good map for [[Slayer]], [[Team Slayer]], and symmetrical objective gametypes. | |||
==Universe and lore== | |||
Isolation is set in a [[Flood containment facility]] on [[Installation 00]]. The environment is a small one, with a containment wall [[Quarantine zone|quarantining]] the development and spread of a Flood [[Blightlands|blightland]]. The perimeter wall surrounding the facility is constructed of shiny and new Forerunner metal, a stark contrast to the rusted and decayed Forerunner structures in the interior of the quarantine zone. The terrain is generally grassy, but the caves underneath have become the site of a [[Flood hive|hive]], with [[Flood blister|blisters]] growing on the walls and [[Flood spore|spores]] filling the air. A [[porta]] has grown into the hive on one end, while the other end has the Flood biomass beginning to grow out and spread to the surface. | |||
==Layout== | Outside the partitioning wall, [[Aggressor Sentinel]]s and [[Constructor]]s fly around in the sky above the map (though will never attack or otherwise interact), and the Ark and [[Milky Way]] galaxy can be seen in the sky. | ||
Despite its regular appearances in Free | |||
==Overview== | |||
===Layout=== | |||
Despite its regular appearances in [[Free-For-All]] and Team Slayer matches,{{Citation needed}} it was designed for symmetrical objective games. It features two symmetrical underground bases, a grassy hilltop above, Forerunner architecture, and the underground caves of Flood biomass. | |||
<gallery> | |||
File:HMCC H3 Isolation Map.png|Isolation Map. | |||
File:H3 Isolation HeatMap.jpg|Bird's eye view of ''Isolation''. | |||
</gallery> | |||
====Topside==== | ====Topside==== | ||
Isolation has an ovular shape to it when observed from above. It is a symmetrical map that consists of two levels: above and below. The upper level is a grassy hilltop with [[Forerunner]] architecture woven into the terrain. To the north, at the crest of the hill, lies a silver-Grey multi-level Forerunner structure. A [[BR55HB | Isolation has an ovular shape to it when observed from above. It is a symmetrical map that consists of two levels: above and below. The upper level is a grassy hilltop with [[Forerunner]] architecture woven into the terrain. To the north, at the crest of the hill, lies a silver-Grey multi-level Forerunner structure. A [[BR55HB battle rifle|battle rifle]] spawns at either side of this tower. It can be used either for shelter (underneath, where the [[M90 shotgun|shotgun]] spawns) or as a [[sniper]] perch (by standing on top). Directly behind this sniper perch is an escape chute that provides quick, one-way access to Isolation's lower level through a [[Porta]]. From here, the player can go to his left (east), right (west), or move forward (to the south); the player cannot regain entry to the sniper perch by going back up the chute, not even on a [[Karo'etba-pattern Ghost|Ghost]] or [[M274 Mongoose|Mongoose]]. | ||
<gallery> | |||
File:H3 Isolation Overview.jpg|The top areas. | |||
</gallery> | |||
====Underground==== | ====Underground==== | ||
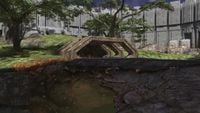
Going left or right will lead to one of the cave's side entrances. At either entrance is a man cannon, which will blast the player back to the top of the map. Going south will take the player towards the mouth of the cave. Midway through the cave, there is a concrete bunker on either side. The bunkers have portholes for weapons fire. The bunkers can't be entered here. A little further south is where the [[M41 | Going left or right will lead to one of the cave's side entrances. At either entrance is a [[man cannon]], which will blast the player back to the top of the map. Going south will take the player towards the mouth of the cave. Midway through the cave, there is a concrete bunker on either side. The bunkers have portholes for weapons fire. The bunkers can't be entered here. A little further south is where the [[M41 SPNKR|rocket launcher]] and Ghost spawn. At the southernmost end of the cave, a thin rock ridge extends upward around the map's wall. This makes for another excellent sniper spot. Directly above the mouth of the cave is another Forerunner structure in the shape of an archway, which is rusted-brown. There is another drop-down here, which will put the player near the Ghost/rockets. | ||
<gallery> | |||
File:H3 Isolation Blight.png|The spores thick in the air underground. | |||
</gallery> | |||
====Bunkers==== | ====Bunkers==== | ||
On the east and west sides of the map, in front of the two | On the east and west sides of the map, in front of the two man cannons, is a [[Type-52 Mauler|Mauler]], and next to that an entrance to each of the respective bases. A [[regenerator]] exists in the main pylon of each base, as well as a battle rifle, [[Type-2 spike grenade|spike grenades]], and a [[Paegaas Workshop Spiker|Spiker]]. The player can either take a ramp down or drop in from a hole above. Just above this area is the [[Type-25 Brute Shot|Brute Shot]], a battle rifle, [[M9 fragmentation grenade|frag grenades]], and a Mongoose. | ||
==Strategies== | ===Strategies=== | ||
<!--This is STRATEGIES, not Trivia, only strategies belong here, please put trivia above in the Trivia section--> | <!--This is STRATEGIES, not Trivia, only strategies belong here, please put trivia above in the Trivia section--> | ||
* | *Rush for the Ghost and the rocket launcher at the beginning. However, camping beside either of the two and waiting for others to ambush as they attempt to pick them up is also a good tactic if used well. | ||
*Isolation is a very unpredictable map. Try to assume how opponents will attack and surprise them with bold moves. | *Isolation is a very unpredictable map. Try to assume how opponents will attack and surprise them with bold moves. | ||
*If sniping is a preferred tactic, taking the | *If sniping is a preferred tactic, taking the [[SRS99D-S2 AM sniper rifle|sniper rifle]] and staying on the outermost edges of the map helps to prevent the player from being flanked. A Regenerator with an [[MA5C assault rifle|assault rifle]] is usually a good backup. Make a few kills then move to a different position. | ||
*Entering the lower levels through the "chute" is a good escape tactic. While being chased, strategically throwing | *Entering the lower levels through the "chute" is a good escape tactic. While being chased, strategically throwing [[grenade]]s toward the exit of the chute can kill or wound any would-be pursuers. | ||
*In the lower levels, there are the many "spore pods" that explode, with some power, which can be used to the player's advantage. | *In the lower levels, there are the many "spore pods" that explode, with some power, which can be used to the player's advantage. | ||
*Use the Ghost and find other players in the lower levels. As this is a tiny area that is hard to escape, it is easy to splatter opponents. | *Use the Ghost and find other players in the lower levels. As this is a tiny area that is hard to escape, it is easy to splatter opponents. | ||
*Climbing the trees in this map can provide good ambush points. If the player goes to the end branches and crouches with a suitable weapon they can sometimes and with practice, occasionally, score easy kills this way because opponents that are not extremely attentive will become disorientated thus easy targets. | *Climbing the trees in this map can provide good ambush points. If the player goes to the end branches and crouches with a suitable weapon they can sometimes and with practice, occasionally, score easy kills this way because opponents that are not extremely attentive will become disorientated thus easy targets. | ||
*In CTF, the player can pass the flag through the windows. If there is a teammate in the flag rooms and a teammate in the basement hallway, then a CTF match can be won really fast. | *In [[Capture the Flag|CTF]], the player can pass the flag through the windows. If there is a teammate in the flag rooms and a teammate in the basement hallway, then a CTF match can be won really fast. | ||
*Holding the structure at the top with a team is extremely effective, as the player cannot be flanked, especially if their team has good aim and plenty of | *Holding the structure at the top with a team is extremely effective, as the player cannot be flanked, especially if their team has good aim and plenty of battle rifle ammo. | ||
*A team member can stand on top of the structure can spot enemies and call out their position so the whole team can use the high ground to kill them. | *A team member can stand on top of the structure can spot enemies and call out their position so the whole team can use the high ground to kill them. | ||
*Get the | *Get the shotgun, preferably the battle rifle and a Regenerator to stay on the open field, and the player can get some kills using CQB and long-range shots. Use this technique and repeat it again, however, go to the shotgun spawn first because it respawns very quickly. | ||
*The side lifts can be a handy escape from attackers. Sometimes the player can land in a tree and their pursuer will be looking for them on the ground. | *The side lifts can be a handy escape from attackers. Sometimes the player can land in a tree and their pursuer will be looking for them on the ground. | ||
*A somewhat bold and insane tactic is to drive a Mongoose with a passenger wielding the Brute Shot. This is very effective for catching enemies’ off-guard, though the player is very vulnerable to | *A somewhat bold and insane tactic is to drive a Mongoose with a passenger wielding the Brute Shot. This is very effective for catching enemies’ off-guard, though the player is very vulnerable to battle rifle fire. | ||
*For FFA and Multi-Team matches, it is advisable to try to stay on the edges of the map. | *For FFA and Multi-Team matches, it is advisable to try to stay on the edges of the map. | ||
| Line 69: | Line 69: | ||
{{Main|Forge}} | {{Main|Forge}} | ||
<!--This section is for Forge tips, do not put things like "Add a brute shot, its more fun" Give good reasons WHY and WHERE to add the object(s), like "Adding shield doors in the main hallway will change the flow of battle to the sides of it, allowing for more heated firefights in the side allies." Thank you for keeping Halopedia neat--> | <!--This section is for Forge tips, do not put things like "Add a brute shot, its more fun" Give good reasons WHY and WHERE to add the object(s), like "Adding shield doors in the main hallway will change the flow of battle to the sides of it, allowing for more heated firefights in the side allies." Thank you for keeping Halopedia neat--> | ||
* | *[[Type-26 Banshee|Banshee]]s can be spawned on this map, adding an element of surprise to the game. | ||
**If the player flies upwards to the top of a wall, they will die, but the Banshee will glide over the wall, and it will not respawn. | **If the player flies upwards to the top of a wall, they will die, but the Banshee will glide over the wall, and it will not respawn. | ||
==Production notes== | |||
Isolation{{Ref/Site|URL=http://www.xbox360fanboy.com/2007/06/01/halo-3-multiplayer-map-names-discovered/|Site=Xbox 360 Fanboy|Page=Halo 3 multiplayer map names discovered|D=16|M=03|Y=2008}} is a map first referenced in the ''[[Halo 3 Beta]]'' code, and later appeared in a leaked photo of the list of ''Halo 3'' maps.{{Ref/Site|URL=https://www.ign.com/articles/2007/09/18/halo-3-welcome-to-isolation|Site=IGN|Page=Halo 3: Welcome to Isolation|D=11|M=04|Y=2023}} | |||
Isolation has been slightly altered for [[Matchmaking]]. The only immediately noticeable change is the removal of the [[flare]] from the Silver Structure on Topside. Flares now no longer occur in any matchmaking game.{{Citation needed}} | |||
==Trivia== | ==Trivia== | ||
<!--This is TRIVIA, not Strategies, only trivia belongs here, please put strategies in the Strategies section--> | <!--This is TRIVIA, not Strategies, only trivia belongs here, please put strategies in the Strategies section--> | ||
*[[Aggressor Sentinel|Sentinels]] and [[Constructors]] can be seen flying above the map and can be shot at and destroyed, however, it is difficult. This is most easily done from the eastern side of the map with the help of scoped weapons. They will not, however, drop sentinel beams when destroyed; they simply explode in a blue flash. | |||
*[[Aggressor Sentinel|Sentinels]] and [[Constructors]] can be seen flying above the map and can be shot at and destroyed, however it is difficult. This is most easily done from the eastern side of the map with the help of scoped weapons. They will not, however, drop sentinel beams when destroyed; they simply explode in a blue flash. | *The [[Flood blister]]s on the walls of the cavern do not contain Flood [[Infection Forms]] like those in the Flood Infested ''[[High Charity]]''. When popped, they scream or moan, rather than spew Infection Forms, but they do cause damage to anyone unfortunate enough to stand next to them when they are set off. | ||
*The [[Flood | *Over the course of a match Flood-like boils slowly grow on the grass hill, starting next to the sniper spawn and spreading outwards. | ||
* | |||
*Getting behind the [[Forerunner]] walls using [[Forge]] will lead to a full view of "The Ark" installation. Walking too far away from the wall will kill you. | *Getting behind the [[Forerunner]] walls using [[Forge]] will lead to a full view of "The Ark" installation. Walking too far away from the wall will kill you. | ||
*Strangely, the planetoid is missing from the Ark's core | **Strangely, the planetoid is missing from the Ark's core. | ||
==Gallery== | ==Gallery== | ||
{{Linkbox|gallery=yes}} | |||
<gallery> | <gallery> | ||
File:Isolation | File:H3 Isolation PrePro Screenshot 1.jpg|An early screenshot of Isolation, from the preproduction stage of ''Halo 3''.{{Ref/Twitter|MaxHoberman|1644839222514274306|Max Hoberman|Quote=OK, let's play a game. What's this? No cheating.|D=11|M=04|Y=2023}} | ||
File:Isolation | File:H3 Isolation PrePro Screenshot 2.jpg|An early screenshot of Isolation, from the preproduction stage of ''Halo 3''.{{Ref/Twitter|MaxHoberman|1644843116552224772|Max Hoberman|Quote=Ok, some of you are on the money. That's a screenshot of Isolation, at the end of Halo 3 preproduction. Here's another.|D=11|M=04|Y=2023}} | ||
File:Isolation | File:H3 Isolation SniperSpawn.jpg|Looking north from the rock ridge. | ||
File:The | File:H3 Isolation Mongoose Upside down.jpg|The [[Milky Way]] visible from the map. | ||
File:H3 Isolation Ark.jpg|The [[Ark]], as seen from Isolation. Note the missing planetoid in the middle. | |||
File:H3_Isolation_FloodGrowth.jpg|The growth of Flood overtime. | |||
File:H3 Isolation Hive.png|The Flood infestation. | |||
File:H3 Isolation Spread.png|The Flood infection's spread onto the surface of the installation. | |||
</gallery> | </gallery> | ||
==Sources== | ==Sources== | ||
{{Ref/Sources}} | |||
{{Levels|H3|mode=yes}} | {{Levels|H3|mode=yes}} | ||
Latest revision as of 05:04, January 19, 2024
| Isolation | |
|---|---|

| |
| Map overview | |
|
Game: |
|
|
Map file name (?): |
|
| Lore information | |
|
Location: |
|
| Gameplay overview | |
|
Terrain: |
Grassy hilltops, Flood biomass, Forerunner architecture, caves |
|
Recommended number of players: |
2-10 |
|
Recommended gametype(s): |
|
| “ | Containment protocols are almost impervious to pre-Gravemind infestations. What could possibly go wrong? | ” |
Isolation is a multiplayer map featured in Halo 3 that takes place at a Flood containment facility on Installation 00. The environment is a small, isolated bio-bubble that has contained the Flood on the Ark. The Milky Way Galaxy hangs in the sky. The top level is grassy and untainted, but in the underground caves, there is an obvious Flood contamination. Its open layout, with two bases, makes it a good map for Slayer, Team Slayer, and symmetrical objective gametypes.
Universe and lore[edit]
Isolation is set in a Flood containment facility on Installation 00. The environment is a small one, with a containment wall quarantining the development and spread of a Flood blightland. The perimeter wall surrounding the facility is constructed of shiny and new Forerunner metal, a stark contrast to the rusted and decayed Forerunner structures in the interior of the quarantine zone. The terrain is generally grassy, but the caves underneath have become the site of a hive, with blisters growing on the walls and spores filling the air. A porta has grown into the hive on one end, while the other end has the Flood biomass beginning to grow out and spread to the surface.
Outside the partitioning wall, Aggressor Sentinels and Constructors fly around in the sky above the map (though will never attack or otherwise interact), and the Ark and Milky Way galaxy can be seen in the sky.
Overview[edit]
Layout[edit]
Despite its regular appearances in Free-For-All and Team Slayer matches,[citation needed] it was designed for symmetrical objective games. It features two symmetrical underground bases, a grassy hilltop above, Forerunner architecture, and the underground caves of Flood biomass.
Isolation Map.
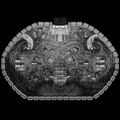
Bird's eye view of Isolation.


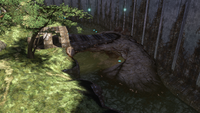
Topside[edit]
Isolation has an ovular shape to it when observed from above. It is a symmetrical map that consists of two levels: above and below. The upper level is a grassy hilltop with Forerunner architecture woven into the terrain. To the north, at the crest of the hill, lies a silver-Grey multi-level Forerunner structure. A battle rifle spawns at either side of this tower. It can be used either for shelter (underneath, where the shotgun spawns) or as a sniper perch (by standing on top). Directly behind this sniper perch is an escape chute that provides quick, one-way access to Isolation's lower level through a Porta. From here, the player can go to his left (east), right (west), or move forward (to the south); the player cannot regain entry to the sniper perch by going back up the chute, not even on a Ghost or Mongoose.
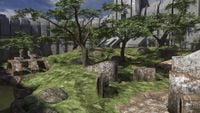
The top areas.

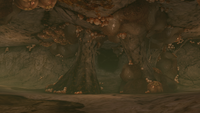
Underground[edit]
Going left or right will lead to one of the cave's side entrances. At either entrance is a man cannon, which will blast the player back to the top of the map. Going south will take the player towards the mouth of the cave. Midway through the cave, there is a concrete bunker on either side. The bunkers have portholes for weapons fire. The bunkers can't be entered here. A little further south is where the rocket launcher and Ghost spawn. At the southernmost end of the cave, a thin rock ridge extends upward around the map's wall. This makes for another excellent sniper spot. Directly above the mouth of the cave is another Forerunner structure in the shape of an archway, which is rusted-brown. There is another drop-down here, which will put the player near the Ghost/rockets.
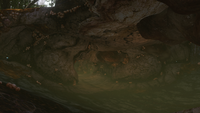
The spores thick in the air underground.

Bunkers[edit]
On the east and west sides of the map, in front of the two man cannons, is a Mauler, and next to that an entrance to each of the respective bases. A regenerator exists in the main pylon of each base, as well as a battle rifle, spike grenades, and a Spiker. The player can either take a ramp down or drop in from a hole above. Just above this area is the Brute Shot, a battle rifle, frag grenades, and a Mongoose.
Strategies[edit]
- Rush for the Ghost and the rocket launcher at the beginning. However, camping beside either of the two and waiting for others to ambush as they attempt to pick them up is also a good tactic if used well.
- Isolation is a very unpredictable map. Try to assume how opponents will attack and surprise them with bold moves.
- If sniping is a preferred tactic, taking the sniper rifle and staying on the outermost edges of the map helps to prevent the player from being flanked. A Regenerator with an assault rifle is usually a good backup. Make a few kills then move to a different position.
- Entering the lower levels through the "chute" is a good escape tactic. While being chased, strategically throwing grenades toward the exit of the chute can kill or wound any would-be pursuers.
- In the lower levels, there are the many "spore pods" that explode, with some power, which can be used to the player's advantage.
- Use the Ghost and find other players in the lower levels. As this is a tiny area that is hard to escape, it is easy to splatter opponents.
- Climbing the trees in this map can provide good ambush points. If the player goes to the end branches and crouches with a suitable weapon they can sometimes and with practice, occasionally, score easy kills this way because opponents that are not extremely attentive will become disorientated thus easy targets.
- In CTF, the player can pass the flag through the windows. If there is a teammate in the flag rooms and a teammate in the basement hallway, then a CTF match can be won really fast.
- Holding the structure at the top with a team is extremely effective, as the player cannot be flanked, especially if their team has good aim and plenty of battle rifle ammo.
- A team member can stand on top of the structure can spot enemies and call out their position so the whole team can use the high ground to kill them.
- Get the shotgun, preferably the battle rifle and a Regenerator to stay on the open field, and the player can get some kills using CQB and long-range shots. Use this technique and repeat it again, however, go to the shotgun spawn first because it respawns very quickly.
- The side lifts can be a handy escape from attackers. Sometimes the player can land in a tree and their pursuer will be looking for them on the ground.
- A somewhat bold and insane tactic is to drive a Mongoose with a passenger wielding the Brute Shot. This is very effective for catching enemies’ off-guard, though the player is very vulnerable to battle rifle fire.
- For FFA and Multi-Team matches, it is advisable to try to stay on the edges of the map.
Forge[edit]
- Main article: Forge
- Banshees can be spawned on this map, adding an element of surprise to the game.
- If the player flies upwards to the top of a wall, they will die, but the Banshee will glide over the wall, and it will not respawn.
Production notes[edit]
Isolation[1] is a map first referenced in the Halo 3 Beta code, and later appeared in a leaked photo of the list of Halo 3 maps.[2]
Isolation has been slightly altered for Matchmaking. The only immediately noticeable change is the removal of the flare from the Silver Structure on Topside. Flares now no longer occur in any matchmaking game.[citation needed]
Trivia[edit]
- Sentinels and Constructors can be seen flying above the map and can be shot at and destroyed, however, it is difficult. This is most easily done from the eastern side of the map with the help of scoped weapons. They will not, however, drop sentinel beams when destroyed; they simply explode in a blue flash.
- The Flood blisters on the walls of the cavern do not contain Flood Infection Forms like those in the Flood Infested High Charity. When popped, they scream or moan, rather than spew Infection Forms, but they do cause damage to anyone unfortunate enough to stand next to them when they are set off.
- Over the course of a match Flood-like boils slowly grow on the grass hill, starting next to the sniper spawn and spreading outwards.
- Getting behind the Forerunner walls using Forge will lead to a full view of "The Ark" installation. Walking too far away from the wall will kill you.
- Strangely, the planetoid is missing from the Ark's core.
Gallery[edit]

|
Browse more images in this article's gallery page. |
![An early screenshot of Isolation, from the preproduction stage of Halo 3.[3]](https://halo.wiki.gallery/images/thumb/6/64/H3_Isolation_PrePro_Screenshot_1.jpg/200px-H3_Isolation_PrePro_Screenshot_1.jpg)
An early screenshot of Isolation, from the preproduction stage of Halo 3.[3]
![An early screenshot of Isolation, from the preproduction stage of Halo 3.[4]](https://halo.wiki.gallery/images/thumb/0/00/H3_Isolation_PrePro_Screenshot_2.jpg/200px-H3_Isolation_PrePro_Screenshot_2.jpg)
An early screenshot of Isolation, from the preproduction stage of Halo 3.[4]
Looking north from the rock ridge.
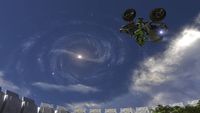
The Milky Way visible from the map.
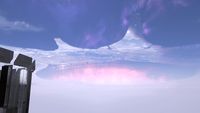
The Ark, as seen from Isolation. Note the missing planetoid in the middle.
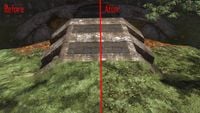
The growth of Flood overtime.
The Flood infestation.
The Flood infection's spread onto the surface of the installation.
![An early screenshot of Isolation, from the preproduction stage of Halo 3.[3]](/File:H3_Isolation_PrePro_Screenshot_1.jpg)
![An early screenshot of Isolation, from the preproduction stage of Halo 3.[4]](/File:H3_Isolation_PrePro_Screenshot_2.jpg)


Sources[edit]
- ^ Xbox 360 Fanboy, Halo 3 multiplayer map names discovered (Retrieved on Mar 16, 2008) [archive]
- ^ IGN, Halo 3: Welcome to Isolation (Retrieved on Apr 11, 2023) [archive]
- ^ Twitter, Max Hoberman (@MaxHoberman): "OK, let's play a game. What's this? No cheating." (Retrieved on Apr 11, 2023) [archive]
- ^ Twitter, Max Hoberman (@MaxHoberman): "Ok, some of you are on the money. That's a screenshot of Isolation, at the end of Halo 3 preproduction. Here's another." (Retrieved on Apr 11, 2023) [archive]
| ||||||||||||||||||||||||||||||||||||||||


