Ghost Town: Difference between revisions
From Halopedia, the Halo wiki
Kurt - O51 (talk | contribs) |
BaconShelf (talk | contribs) (Undo revision 1611143 by 76.90.148.131 (talk)) Tag: Undo |
||
| (100 intermediate revisions by 55 users not shown) | |||
| Line 1: | Line 1: | ||
{{ | {{Status|Gameplay}} | ||
{{ | {{Multiplayer map infobox | ||
|pagegamelabel=H3 | |||
|name=Ghost Town | |name=Ghost Town | ||
|image=[[ | |image=[[File:H3 GhostTownOverhead.jpg|250px]] | ||
|game=''[[Halo 3]]'' | |game=''[[Halo 3]]'' | ||
|location= | |devname=<code>ghosttown</code> | ||
|map=War Games Map_Set/: 673-15<ref name="waypoint">[https://www.halowaypoint.com/en-us/universe/locations/earth '''Halo Waypoint''': ''Earth'']</ref> | |||
|location=[[Mount Kilimanjaro Water Plant]], [[Africa]]{{Ref/Reuse|waypoint}} | |||
|terrain=Concrete ruins, vegetation | |terrain=Concrete ruins, vegetation | ||
| | |symmetry= | ||
|gametypes=*[[Team Slayer]] | |||
|gametypes= | |||
*[[Team Slayer]] | |||
*[[Slayer]] | *[[Slayer]] | ||
*[[1 Flag CTF|One Flag]] | *[[1 Flag CTF|One Flag]] | ||
*[[ | *[[Assault|One Bomb]] | ||
|playernumber=4-12 | |playernumber=4-12 | ||
}} | }} | ||
{{Article | {{Article quote|These fractured remains near Voi remind us that brave souls died here to buy our salvation.}} | ||
'''''Ghost Town''''' is a [[multiplayer]] map featured in [[Halo 3]] set in the same jungle near Voi as the campaign level ''[[Sierra 117]]''<ref>http:// | '''''Ghost Town''''' is a [[multiplayer]] map featured in [[Halo 3]] set in the same jungle near Voi as the campaign level ''[[Sierra 117]]''.<ref name="BWUGhostTown">[http://halo.bungie.net/News/content.aspx?type=topnews&cid=13287 '''Bungie.net''': ''Ghost Town Revealed'']</ref> It was released as part of the [[Legendary Map Pack]] alongside [[Avalanche]] and [[Blackout]]. | ||
==Setting== | |||
{{Main|Mount Kilimanjaro Water Plant}} | |||
Ghost Town is set in the Mount Kilimanjaro Water Plant, just north-west of the [[A2 Hydroelectric Facility]]. The facility was a [[Global Water Campaign]] water purification facility built in the 24th century that has since fallen into ruins. Its main function was to take melted water from [[Mount Kilimanjaro]], purify it, then pump it to the rest of Africa through the [[GWC Trans-African Pipelines]] running alongside [[Tsavo Highway]].{{Ref/Reuse|BWUGhostTown}} In the early 26th century, the Mount Kilimanjaro Water Plant was decommissioned and acquired by the [[UNSC]] in order to conduct classified military training exercises for ingress/egress operations and [[War Games]] simulations.{{Ref/Reuse|waypoint}} | |||
==Design== | |||
Ghost Town consists of three buildings surrounded by hills and trees. The inside of one building features rubble and vegetation that has overgrown during years of the desolation. The level is a bridge between nature and failed human civilization.<ref name="BWU010408">[http://halo.bungie.net/News/content.aspx?type=topnews&cid=13135 '''Bungie.net''': ''Bungie Weekly Update 01/04/08'']</ref> It has many levels and open air catwalks with sights down to semi-protected alleys where you can "rain death from above". These catwalks have entrances to the main building as well. | |||
==Bases== | Starting from the [[M274 Mongoose|Mongoose]] in the upper left corner of the image (see overview image in the image section) is one of the two bases (the other is in the bottom right of the image). The “Atrium” area (the building in the upper right corner, indicated with a 3) is a long, lean and overgrown two-story hallway with a catwalk that connects to the Pump Station, a three story building with catwalks that exit to the Interior Base (again in the lower right corner) and second level walkways to the shotgun (where the [[Z-4190 bubble shield|bubble shield]] is located). From the shotgun spawn, if players head to the right after coming from the Pump Station, they’ll be able to stay on a path that feeds down to the [[overshield]] and there’s a second level walkway overhead housing the [[M41 SPNKR|rocket launcher]] and [[grenade]]s. Directly to the left and under the [[Anskum-pattern plasma grenade|plasma grenades]] that spawn near the Rocket Launcher is a tunnel that curves behind and empties almost into the area where the number 2 camera was taken. | ||
The Pump Station’s main room is a bombed out shell of a structure with "God Rays" filtering through the ceiling - and that top floor has a walkway that leads toward the sniper in the Atrium and a walkway (where the Brute Shot spawns) that leads to the Interior base in the lower right corner. That multi-level base has a few connecting walkways that lead to an elevated and dilapidated structure that overlooks [[Active camouflage|active camo]], and a [[Portable gravity lift|gravity lift]] spawn and is positioned above a dark hallway that funnels into the Atrium. | |||
For the most part players have quick and dirty methods at their disposal, via quick jumps or equipment to get to the map’s second and third level catwalks and there are long sight lines from the Attackers’ base (rocket launcher side) down in front of Atrium and also down the Woods side (shotgun side). | |||
[[File:H3 GhostTown Layout.jpg|thumb|250px|Layout of the map.]] | |||
===Bases=== | |||
<!-- This section is still under construction, please add, modify, and correct it from Bungie article #13287, #13294 --> | <!-- This section is still under construction, please add, modify, and correct it from Bungie article #13287, #13294 --> | ||
''Ghost Town'' consists of three main buildings. The buildings are not symmetrical, as it is an asymmetrical map. The defenders spawn in the "Interior Base", seen in the lower right corner of the overhead image, while the attackers spawn in the Tunnel. Originally the attackers spawned in the building, and the defenders in the Tunnel, but it has since changed. | ''Ghost Town'' consists of three main buildings. The buildings are not symmetrical, as it is an asymmetrical map. The defenders spawn in the "Interior Base", seen in the lower right corner of the overhead image, while the attackers spawn in the Tunnel. Originally the attackers spawned in the building, and the defenders in the Tunnel, but it has since changed. | ||
'''The Atrium:''' | '''The Atrium:''' | ||
Is a long lean hallway with a walkway that connects to the Pump Station building. The Atrium area also houses the | Is a long lean hallway with a walkway that connects to the Pump Station building. The Atrium area also houses the [[SRS99D-S2 AM sniper rifle|sniper rifle]]. It features rubble and vegetation that has overgrown after years of desolation. Its ceiling is curved and is formed from several small windowpanes. | ||
'''The Pump Station:''' | '''The Pump Station:''' | ||
A three-story building with catwalks leading to the Interior Base. It has several entrances, and is connected to the Atrium via a wooden catwalk. On the opposite side of the building it is connected to the area where the [[ | A three-story building in the center of the map, with catwalks leading to the Interior Base. It has several entrances, and is connected to the Atrium via a wooden catwalk. On the opposite side of the building it is connected to the area where the [[M90 shotgun|shotgun]] spawns by a similar catwalk. | ||
'''The Interior Base:''' | '''The Interior Base:''' | ||
An interior section in the corner of the map. It connects to the Pump Station via a catwalk where a [[Type-25 Brute Shot|Brute Shot]] spawns, and has an exit leading towards the shotgun spawn. This is where the Defenders spawn. | |||
'''The Tunnel:''' | '''The Tunnel:''' | ||
This is where the Attackers respawn. The Tunnel has three entrances/exits, made up of ruined parts of pipes, similar to those running parallel to the Tsavo Highway. | This is where the Attackers respawn. The Tunnel has three entrances/exits, made up of ruined parts of pipes, similar to those running parallel to the Tsavo Highway. | ||
==Strategies== | ==Strategies== | ||
<!--This is STRATEGIES, not Trivia, only strategies belong here, please put trivia above in the Trivia section--> | <!--This is STRATEGIES, not Trivia, only strategies belong here, please put trivia above in the Trivia section--> | ||
*Grab the | *Grab the overshield when the game begins. It may not help against the rocket launcher, but with so many brutal weapons; you can easily die on this map. | ||
*Remember, there ''is'' a | *Getting the higher walkways is key to control, since you have the high ground, you can easily have a good advantage point on that area of the map. | ||
*The Atrium can be a great place to hide or [[ | *Remember, there ''is'' a shotgun on this map. It is near the cut-down tree near the municipal house. Take it and use it at your disposal. This also works well with the overshield and bubble shield being nearby. | ||
*Dual Spikers and | *The Atrium can be a great place to hide or [[Camping|camp]]. | ||
*As it is always suggested that the destined | *Dual [[Paegaas Workshop Spiker|Spikers]] and [[Okarda'phaa-pattern plasma rifle|plasma rifles]] work great on this map. | ||
* | *When you have an Oddball, be sure to keep moving and change your paths to help confuse your enemy. | ||
*As it is always suggested that the destined winning team possesses the shotgun, a combination of a [[BR55HB battle rifle|battle rifle]] and a shotgun works well on this map. | |||
*In Infection games, stick with multiple players in a tight spot above the hole in the building and don't help players jumping on obstacles or going out alone, they will be infected easily. When the next round starts, they will simply come with you into the fortified position. | |||
*The pipes at the back near the sniper make a great place to hide with the Oddball or Bomb if you are wanting to outlast a match. | |||
*If you take the gravity lift, and go over to the side of the broken wall opposite of the overshield, you can toss it on the small pile of bricks to get on the wall. This is a decent place to snipe from in snipers, and a good spot in SWAT too. | |||
*A fairly common strategy is for teams starting at the base, they will take a Mongoose to steal the overshield at the beginning of a game, grenades, and whoever picks up the rocket launcher can usually counter, plus, whoever is going for the overshield for his team. | |||
==Forge | ==Forge== | ||
<!--This section is for Forge tips, do not put things like "Add a brute shot, its more fun" Give good reasons WHY and WHERE to add the object(s), like "Adding shield doors in the main hallway will change the flow of battle to the sides of it, allowing for more heated firefights in the side allies." Thank you for keeping Halopedia neat--> | <!--This section is for Forge tips, do not put things like "Add a brute shot, its more fun" Give good reasons WHY and WHERE to add the object(s), like "Adding shield doors in the main hallway will change the flow of battle to the sides of it, allowing for more heated firefights in the side allies." Thank you for keeping Halopedia neat--> | ||
*Using the walkway and bridges, you can create faster travel between some of the buildings, allowing the pace of the game to move faster. | *Using the walkway and bridges, you can create faster travel between some of the buildings, allowing the pace of the game to move faster. | ||
*You can access the upper area of the Atrium by placing a ramp or bridge between two support beams and then place a teleporter on top of the ramp/bridge. | *You can access the upper area of the Atrium by placing a ramp or bridge between two support beams and then place a [[teleporter]] on top of the ramp/bridge. | ||
Behind the concrete ramp in the Pump Station, there is a fenced off passageway which can be accessed by spawning a respawn inside. It is advised that you spawn a two-way teleporter node inside upon gaining access. | Behind the concrete ramp in the Pump Station, there is a fenced off passageway which can be accessed by spawning a respawn inside. It is advised that you spawn a two-way teleporter node inside upon gaining access. | ||
This method can also be used to access the ruined brick building between the Atrium and the Interior Base. | This method can also be used to access the ruined brick building between the Atrium and the Interior Base. | ||
==New Forge Objects== | ===New Forge Objects=== | ||
*Wooden ramps similar to the "bridge" object in the [[Heroic Map Pack]]. | *Wooden ramps similar to the "bridge" object in the [[Heroic Map Pack]]. | ||
*Wooden platforms attached to metal legs, effectively making a small watchtower. | *Wooden platforms attached to metal legs, effectively making a small watchtower. | ||
| Line 91: | Line 77: | ||
*Blue water containers that are spawned in groups of four with palettes on both ends. | *Blue water containers that are spawned in groups of four with palettes on both ends. | ||
*Impassable and indestructible barred walls have been added too. | *Impassable and indestructible barred walls have been added too. | ||
*A new object called FX can change the color, tint, brightness and contrast of the whole level. It appears as a blue transparent orb with a small camera inside. You can combine them and use equipment to make | *A new object called FX can change the color, tint, brightness and contrast of the whole level. It appears as a blue transparent orb with a small camera inside. You can combine them and use equipment to make lots of different and dazzling visual effects. | ||
==Trivia== | ==Trivia== | ||
<!--This is TRIVIA, not Strategies, only trivia belongs here, please put strategies below in the Strategies section--> | <!--This is TRIVIA, not Strategies, only trivia belongs here, please put strategies below in the Strategies section--> | ||
===Production notes=== | |||
* | *Development on Ghost Town started in September [[2007 (real world)|2007]], with initial blockouts created for the level. The initial massout by designer [[Steve Cotton]] was basic and used cubes to represent buildings, with players in playtests coming to know it as "that ghost town map". Although some Bungie staff wished to call the map "Mortar", the map would go through production under the guise of "OK Corral", before being renamed at the last minute to the name the map shipped with.{{Ref/Reuse|BWUGhostTown}}<ref>[http://halo.bungie.net/News/content.aspx?type=topnews&cid=13824 '''Bungie.net''': ''Bungie Weekly Update 05/23/08''] - ''“These are the final names” is what some adults told me, but Ghost Town’s name changed at the last possible moment"''</ref> Overall, the map was in production for roughly 4–5 months, in which time the layout changed little aside from the addition of new areas. The map was first teased in January 2008.{{Ref/Reuse|BWU010408}} | ||
**This map's codename of "O.K. Corral" is a reference to the ''Gunfight at the O.K. Corral''. Many thought this map would be a map similar to [[Tombstone]] because of the codename "O.K. Corral", which was a famous gunfight in Tombstone, Arizona. | |||
**Bungie staffers also jokingly called Ghost Town "that ''Counter-Strike'' map",{{Ref/Reuse|BWUGhostTown}} referencing the popular PC shooter game, and specifically referencing the map "Italy," to which Ghost Town bears more than a passing resemblance. | |||
*Some of the original artistic inspiration for Ghost Town included temples in Angkor Wat, but this shifted to a ruined facility when the Bungie team saw the models created for the [[Believe]] dioramas.{{Ref/Reuse|BWUGhostTown}} | |||
===Miscellaneous=== | |||
* | *You can hear artillery shells exploding in the background every once in a while on Ghost Town. The sound of [[Kig-Yar Sniper|Sniper Jackals]] turning on their [[Type-50 particle beam rifle|beam rifles]] can be heard occasionally. This can also be heard in Sierra 117. | ||
*Bungie staffers also jokingly called | *[[List of animals|Swallows]] can be found on this map. | ||
*You can hear artillery shells exploding in the background every once in a while on | *Ghost Town's [[Invisible Walls|invisible ceiling]] is one of the lowest in the game, both to keep people from camping on rooftops and because the rooftops were never modeled—only the edges of the level's roofs actually exist. | ||
*[[ | *The map makes a great [[race]]track due to its rectangular shape. | ||
* | *A lot of excellent hiding places, such as the slab of collapsed concrete below the large building, and the collapsed brick room between the Atrium and Interior Base, have invisible walls to stop people from camping. These walls can still be bypassed using the [[Forge turret glitch]], and most of them can be safely walked around in without dying. | ||
===Glitches=== | |||
*There is a hidden room in one corner of the map that has a fractured ceiling with rebar and concrete sticking out as well as a hole in the brick wall. The [[Forge turret glitch]] can be used to easily enter the room, and with some effort, a Two-Way Node can also be placed inside. | |||
*The map makes a great | *Under the Pump Station, beyond the concrete ramp, there is a fenced-off passageway leading to another part of the building. It seems to have been fenced off by [[Bungie]] for the final version of the map. This passageway is actually quite large, but resembles more of an abstract room. It can be accessed using the Forge turret glitch. | ||
*A lot of excellent hiding places, such as the slab of collapsed concrete below the large building, and the collapsed brick room between the Atrium and Interior Base, have invisible walls to stop people from camping. | *On occasions, if you place a door upside down in the Pump Station it will turn invisible, but still be solid. | ||
* | |||
*Under the Pump Station, beyond the concrete ramp, there is a fenced-off passageway leading to another part of the building. It seems to have been fenced off by [[Bungie]] for the final version of the map. This passageway is actually quite large, but resembles more an abstract room. It | |||
* | |||
==Gallery== | ==Gallery== | ||
{{Linkbox|gallery=yes}} | |||
<gallery> | <gallery> | ||
File:HMCC H3 Ghost Town Map.png|Ghost Town Map. | |||
File:H3_GhostTown_Layout.jpg|An overview of weapons, grenades and vehicles of ''Ghost Town''. | |||
File:H3 Ghost Town Tunnel.jpg|The Outdoor area. | |||
File:1204157836 Ghost Town II.jpg|A Base of ''Ghost Town''. | |||
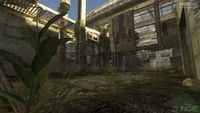
File:Ghost_Town.jpg|Face of one of the buildings. | |||
File:Halo-3-legendary-map-pack--20080408000202983.jpg| | |||
File:Halo-3-legendary-map-pack--20080408000233919.jpg| | |||
File:Halo-3-legendary-map-pack--20080408000244466.jpg| | |||
File:Halo-3-legendary-map-pack--20080408000247340.jpg|Scenery item with raised wooden platform and ramp. | |||
File:H3-GWC-WaterBarrels.png|A stack of water barrels. | |||
File:Halo-3-legendary-map-pack--20080408000253465.jpg| | |||
File:Halo-3-legendary-map-pack--20080408000256246.jpg| | |||
File:Halo-3-legendary-map-pack--20080408000258902.jpg| | |||
</gallery> | </gallery> | ||
== | ==Sources== | ||
{{Ref/Sources}} | |||
{{Levels|H3|mode=yes}} | |||
{{ | [[Category:Legendary Map Pack]] | ||
Latest revision as of 05:05, January 19, 2024
| Ghost Town | |
|---|---|

| |
| Map overview | |
|
Game: |
|
|
Map file name (?): |
|
| Lore information | |
|
Map designation (?): |
War Games Map_Set/: 673-15[1] |
|
Location: |
|
| Gameplay overview | |
|
Terrain: |
Concrete ruins, vegetation |
|
Recommended number of players: |
4-12 |
|
Recommended gametype(s): |
|
| “ | These fractured remains near Voi remind us that brave souls died here to buy our salvation. | ” |
Ghost Town is a multiplayer map featured in Halo 3 set in the same jungle near Voi as the campaign level Sierra 117.[2] It was released as part of the Legendary Map Pack alongside Avalanche and Blackout.
Setting[edit]
- Main article: Mount Kilimanjaro Water Plant
Ghost Town is set in the Mount Kilimanjaro Water Plant, just north-west of the A2 Hydroelectric Facility. The facility was a Global Water Campaign water purification facility built in the 24th century that has since fallen into ruins. Its main function was to take melted water from Mount Kilimanjaro, purify it, then pump it to the rest of Africa through the GWC Trans-African Pipelines running alongside Tsavo Highway.[2] In the early 26th century, the Mount Kilimanjaro Water Plant was decommissioned and acquired by the UNSC in order to conduct classified military training exercises for ingress/egress operations and War Games simulations.[1]
Design[edit]
Ghost Town consists of three buildings surrounded by hills and trees. The inside of one building features rubble and vegetation that has overgrown during years of the desolation. The level is a bridge between nature and failed human civilization.[3] It has many levels and open air catwalks with sights down to semi-protected alleys where you can "rain death from above". These catwalks have entrances to the main building as well.
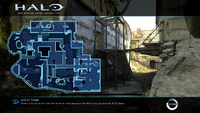
Starting from the Mongoose in the upper left corner of the image (see overview image in the image section) is one of the two bases (the other is in the bottom right of the image). The “Atrium” area (the building in the upper right corner, indicated with a 3) is a long, lean and overgrown two-story hallway with a catwalk that connects to the Pump Station, a three story building with catwalks that exit to the Interior Base (again in the lower right corner) and second level walkways to the shotgun (where the bubble shield is located). From the shotgun spawn, if players head to the right after coming from the Pump Station, they’ll be able to stay on a path that feeds down to the overshield and there’s a second level walkway overhead housing the rocket launcher and grenades. Directly to the left and under the plasma grenades that spawn near the Rocket Launcher is a tunnel that curves behind and empties almost into the area where the number 2 camera was taken.
The Pump Station’s main room is a bombed out shell of a structure with "God Rays" filtering through the ceiling - and that top floor has a walkway that leads toward the sniper in the Atrium and a walkway (where the Brute Shot spawns) that leads to the Interior base in the lower right corner. That multi-level base has a few connecting walkways that lead to an elevated and dilapidated structure that overlooks active camo, and a gravity lift spawn and is positioned above a dark hallway that funnels into the Atrium.
For the most part players have quick and dirty methods at their disposal, via quick jumps or equipment to get to the map’s second and third level catwalks and there are long sight lines from the Attackers’ base (rocket launcher side) down in front of Atrium and also down the Woods side (shotgun side).

Bases[edit]
Ghost Town consists of three main buildings. The buildings are not symmetrical, as it is an asymmetrical map. The defenders spawn in the "Interior Base", seen in the lower right corner of the overhead image, while the attackers spawn in the Tunnel. Originally the attackers spawned in the building, and the defenders in the Tunnel, but it has since changed.
The Atrium: Is a long lean hallway with a walkway that connects to the Pump Station building. The Atrium area also houses the sniper rifle. It features rubble and vegetation that has overgrown after years of desolation. Its ceiling is curved and is formed from several small windowpanes.
The Pump Station: A three-story building in the center of the map, with catwalks leading to the Interior Base. It has several entrances, and is connected to the Atrium via a wooden catwalk. On the opposite side of the building it is connected to the area where the shotgun spawns by a similar catwalk.
The Interior Base: An interior section in the corner of the map. It connects to the Pump Station via a catwalk where a Brute Shot spawns, and has an exit leading towards the shotgun spawn. This is where the Defenders spawn.
The Tunnel: This is where the Attackers respawn. The Tunnel has three entrances/exits, made up of ruined parts of pipes, similar to those running parallel to the Tsavo Highway.
Strategies[edit]
- Grab the overshield when the game begins. It may not help against the rocket launcher, but with so many brutal weapons; you can easily die on this map.
- Getting the higher walkways is key to control, since you have the high ground, you can easily have a good advantage point on that area of the map.
- Remember, there is a shotgun on this map. It is near the cut-down tree near the municipal house. Take it and use it at your disposal. This also works well with the overshield and bubble shield being nearby.
- The Atrium can be a great place to hide or camp.
- Dual Spikers and plasma rifles work great on this map.
- When you have an Oddball, be sure to keep moving and change your paths to help confuse your enemy.
- As it is always suggested that the destined winning team possesses the shotgun, a combination of a battle rifle and a shotgun works well on this map.
- In Infection games, stick with multiple players in a tight spot above the hole in the building and don't help players jumping on obstacles or going out alone, they will be infected easily. When the next round starts, they will simply come with you into the fortified position.
- The pipes at the back near the sniper make a great place to hide with the Oddball or Bomb if you are wanting to outlast a match.
- If you take the gravity lift, and go over to the side of the broken wall opposite of the overshield, you can toss it on the small pile of bricks to get on the wall. This is a decent place to snipe from in snipers, and a good spot in SWAT too.
- A fairly common strategy is for teams starting at the base, they will take a Mongoose to steal the overshield at the beginning of a game, grenades, and whoever picks up the rocket launcher can usually counter, plus, whoever is going for the overshield for his team.
Forge[edit]
- Using the walkway and bridges, you can create faster travel between some of the buildings, allowing the pace of the game to move faster.
- You can access the upper area of the Atrium by placing a ramp or bridge between two support beams and then place a teleporter on top of the ramp/bridge.
Behind the concrete ramp in the Pump Station, there is a fenced off passageway which can be accessed by spawning a respawn inside. It is advised that you spawn a two-way teleporter node inside upon gaining access. This method can also be used to access the ruined brick building between the Atrium and the Interior Base.
New Forge Objects[edit]
- Wooden ramps similar to the "bridge" object in the Heroic Map Pack.
- Wooden platforms attached to metal legs, effectively making a small watchtower.
- Curved metal walls and concrete barriers are useful for filling in ruined gaps in the level.
- Blue water containers that are spawned in groups of four with palettes on both ends.
- Impassable and indestructible barred walls have been added too.
- A new object called FX can change the color, tint, brightness and contrast of the whole level. It appears as a blue transparent orb with a small camera inside. You can combine them and use equipment to make lots of different and dazzling visual effects.
Trivia[edit]
Production notes[edit]
- Development on Ghost Town started in September 2007, with initial blockouts created for the level. The initial massout by designer Steve Cotton was basic and used cubes to represent buildings, with players in playtests coming to know it as "that ghost town map". Although some Bungie staff wished to call the map "Mortar", the map would go through production under the guise of "OK Corral", before being renamed at the last minute to the name the map shipped with.[2][4] Overall, the map was in production for roughly 4–5 months, in which time the layout changed little aside from the addition of new areas. The map was first teased in January 2008.[3]
- This map's codename of "O.K. Corral" is a reference to the Gunfight at the O.K. Corral. Many thought this map would be a map similar to Tombstone because of the codename "O.K. Corral", which was a famous gunfight in Tombstone, Arizona.
- Bungie staffers also jokingly called Ghost Town "that Counter-Strike map",[2] referencing the popular PC shooter game, and specifically referencing the map "Italy," to which Ghost Town bears more than a passing resemblance.
- Some of the original artistic inspiration for Ghost Town included temples in Angkor Wat, but this shifted to a ruined facility when the Bungie team saw the models created for the Believe dioramas.[2]
Miscellaneous[edit]
- You can hear artillery shells exploding in the background every once in a while on Ghost Town. The sound of Sniper Jackals turning on their beam rifles can be heard occasionally. This can also be heard in Sierra 117.
- Swallows can be found on this map.
- Ghost Town's invisible ceiling is one of the lowest in the game, both to keep people from camping on rooftops and because the rooftops were never modeled—only the edges of the level's roofs actually exist.
- The map makes a great racetrack due to its rectangular shape.
- A lot of excellent hiding places, such as the slab of collapsed concrete below the large building, and the collapsed brick room between the Atrium and Interior Base, have invisible walls to stop people from camping. These walls can still be bypassed using the Forge turret glitch, and most of them can be safely walked around in without dying.
Glitches[edit]
- There is a hidden room in one corner of the map that has a fractured ceiling with rebar and concrete sticking out as well as a hole in the brick wall. The Forge turret glitch can be used to easily enter the room, and with some effort, a Two-Way Node can also be placed inside.
- Under the Pump Station, beyond the concrete ramp, there is a fenced-off passageway leading to another part of the building. It seems to have been fenced off by Bungie for the final version of the map. This passageway is actually quite large, but resembles more of an abstract room. It can be accessed using the Forge turret glitch.
- On occasions, if you place a door upside down in the Pump Station it will turn invisible, but still be solid.
Gallery[edit]

|
Browse more images in this article's gallery page. |
Ghost Town Map.
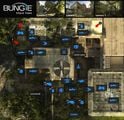
An overview of weapons, grenades and vehicles of Ghost Town.
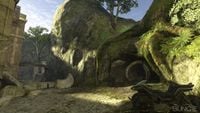
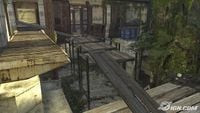
The Outdoor area.
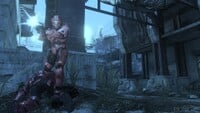
A Base of Ghost Town.
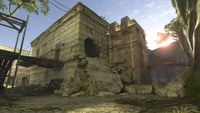
Face of one of the buildings.
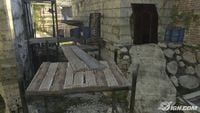
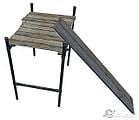
Scenery item with raised wooden platform and ramp.
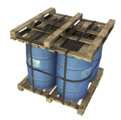
A stack of water barrels.


Sources[edit]
- ^ a b c Halo Waypoint: Earth
- ^ a b c d e Bungie.net: Ghost Town Revealed
- ^ a b Bungie.net: Bungie Weekly Update 01/04/08
- ^ Bungie.net: Bungie Weekly Update 05/23/08 - “These are the final names” is what some adults told me, but Ghost Town’s name changed at the last possible moment"
| ||||||||||||||||||||||||||||||||||||||||


