Control Room (Installation 05): Difference between revisions
From Halopedia, the Halo wiki
mNo edit summary |
m (Text replacement - "\|(right|thumb)(\|[^\]\n]+)?\|(right|thumb)" to "|thumb$2") |
||
| (18 intermediate revisions by 14 users not shown) | |||
| Line 1: | Line 1: | ||
{{ | {{Status|Canon}} | ||
{{Center|Were you looking for [[Control Room (Installation 04)|Installation 04's Control Room]], [[Control Room (Installation 03)|Installation 03's Control Room]], or the [[control room]]s in general?}} | {{Center|Were you looking for [[Control Room (Installation 04)|Installation 04's Control Room]], [[Control Room (Installation 03)|Installation 03's Control Room]], or the [[control room]]s in general?}} | ||
{{quote|Where the [[Councilor]]s were meant to watch the consecration of the [[Activation Index|Icon]]: the start of the [[Covenant religion|Great Journey]].|[[Rtas 'Vadum]]ee}} | {{quote|Where the [[Councilor]]s were meant to watch the consecration of the [[Activation Index|Icon]]: the start of the [[Covenant religion|Great Journey]].|[[Rtas 'Vadum]]ee}} | ||
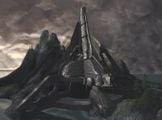
[[File:Control | [[File:H2A-Control room.png|thumb|250px|The control room's exterior.{{Ref/Reuse|newgj}}]] | ||
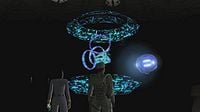
[[Installation 05]]'s '''control room''', known to the [[Covenant]] as the '''Chamber of Consecration''',<ref>''Halo: Broken Circle'', p. 245</ref> was the [[Control Room|site]] that controlled all of the installation's operations. The control room is located on an island off the coast of a larger island in the middle of a large sea. There is also a noticeable design difference from [[Installation 04]]'s control room, in there being a large, triple-tiered structure in the center of the facility. When the ring's firing sequence was initiated this structure would extend to its full height, with several floating platforms encircling it and a single beam projecting from deep within the control room in the chamber's center.<ref name="gj">''[[Halo 2]]'', campaign level, [[The Great Journey]]</ref> | |||
==History== | ==History== | ||
{{main|Battle of Installation 05}} | {{main|Battle of Installation 05}} | ||
[[File:HTMCC-H2A Councillor with Carbine.jpg|thumb|250px|A [[Sangheili High Councilor]] firing a {{Pattern|Vostu|carbine}} at [[Jiralhanae]] in the control room.<ref name="newgj">''[[Halo 2: Anniversary]]'', campaign level, [[The Great Journey]]</ref>]] | |||
After [[High Charity]]'s arrival at [[Installation 05]] and the redefinition of the [[Sangheili]]'s socio-political status following the [[Changing of the Guard]], many of the [[Sangheili Councilor]]s traveled to the control room in order to prepare it for the Halo's firing and the "Great Journey". However, the [[Jiralhanae Captain]] [[Melchus]] entered the control room with a heavily-armed [[Jiralhanae]] contingent and slaughtered the Councilors gathered there after a brief battle.<ref>''Halo: Broken Circle'', p. 245-252</ref> A small number of Councilors were taken prisoner in the nearby [[Bastion of the Brutes]].{{Ref/Reuse|gj}} | |||
Despite the Arbiter's attempt to convince Tartarus to change his mind, Tartarus forced the [[Activation Index|Index]] into the panel, activating the primary firing systems. A battle began between the Sangheili and the | Prompted by the [[Prophet of Truth]], [[Tartarus]] brought [[343 Guilty Spark]] and [[Commander]] [[Miranda Keyes]] to the control room in order to activate the ring, initiating the [[Covenant religion|Great Journey]]. Before he could force Keyes to activate the panel, however, the [[Thel 'Vadam|Arbiter]] arrived, teaming up with [[Avery Junior Johnson|Sergeant Major Johnson]] and other [[Sangheili]] troops. | ||
Despite the Arbiter's attempt to convince Tartarus to change his mind, Tartarus forced the [[Activation Index|Index]] into the panel, activating the primary firing systems. A battle began between the Sangheili and the Jiralhanae, which ended after Tartarus and his troops died and Keyes deactivated the ring.{{Ref/Reuse|gj}} | |||
==Trivia== | ==Trivia== | ||
[[Bungie]] humorously referred to the multiple-leveled structure at the center of the control room as the "Birthday cake of doom".<ref> | [[Bungie]] humorously referred to the multiple-leveled structure at the center of the control room as the "Birthday cake of doom".<ref>''[[Halo 3 Legendary Edition]]'' - Essentials, Disc Two - Halo 2 Cinematics Commentary</ref> | ||
==Gallery== | ==Gallery== | ||
===Concept art=== | |||
<gallery> | |||
File:H2A_ControlRoom_Concept.jpg|Concept art of the control room for ''[[Halo 2: Anniversary]]'' cutscenes. | |||
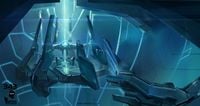
File:H2A-bogdan-marica-05-control-room.jpg|Concept art of the control room in ''Halo 2: Anniversary''. | |||
File:H2A Concept ControlRoomBeam.jpg|Concept art of the central beam and surrounding structure in the control room. | |||
File:H2A Concept ControlRoomInterior.jpg|Concept art of the door to the control room and part of the walls within its interior. | |||
File:H2A Concept ControlRoomHall.jpg|Concept art of the hallway leading to the control room. | |||
</gallery> | |||
===Screenshot=== | |||
<gallery> | <gallery> | ||
File:Control1.jpg|The | File:Control Room3.jpg|The control room's exterior in ''[[Halo 2]]''. | ||
File:H2 Phantom Dropoff.jpg|Tartarus being dropped off with Guilty Spark and Miranda at the control room. | |||
File:Control1.jpg|The control room being activated. | |||
File:MirrandaBruteMan.jpg|Tartarus attempts to force Commander Miranda Keyes into activating Halo. | File:MirrandaBruteMan.jpg|Tartarus attempts to force Commander Miranda Keyes into activating Halo. | ||
File:H2A - Arbiter and 'Vadum.png|Thel 'Vadamee and Rtas 'Vadumee stand on the grounds surrounding Halo's control room. | |||
File:H2A - Delta Halo activated.jpg|Delta Halo's control room, now fully activated as the ring prepares to fire. | |||
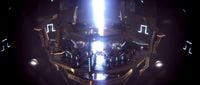
File:H2 343GS Explains Ark.jpg|Commander Keyes, Sergeant Major Johnson and 343 Guilty Spark observe a readout of the seven Halos in the control room's core in ''Halo 2''. | |||
File:H2A-SevenRings.jpg|Commander Keyes, Sergeant Major Johnson and 343 Guilty Spark observe a readout of the seven Halos in the control room's core in ''Halo 2: Anniversary''. | |||
</gallery> | </gallery> | ||
==List of appearances== | ==List of appearances== | ||
*''[[Halo 2]]'' {{1st}} | *''[[Halo 2]]'' {{1st}} | ||
*''[[Halo 2 Anniversary]]'' | *''[[Halo: Broken Circle]]'' | ||
*''[[Halo 2: Anniversary]]'' | |||
==Sources== | ==Sources== | ||
{{Ref/Sources}} | |||
{{Forerunner|array}} | {{Forerunner|array}} | ||
[[Category:Installation 05]] | |||
[[Category:Installation 05 locations]] | |||
Latest revision as of 11:27, April 12, 2023
- "Where the Councilors were meant to watch the consecration of the Icon: the start of the Great Journey."
- — Rtas 'Vadumee

Installation 05's control room, known to the Covenant as the Chamber of Consecration,[2] was the site that controlled all of the installation's operations. The control room is located on an island off the coast of a larger island in the middle of a large sea. There is also a noticeable design difference from Installation 04's control room, in there being a large, triple-tiered structure in the center of the facility. When the ring's firing sequence was initiated this structure would extend to its full height, with several floating platforms encircling it and a single beam projecting from deep within the control room in the chamber's center.[3]
History[edit]
- Main article: Battle of Installation 05

After High Charity's arrival at Installation 05 and the redefinition of the Sangheili's socio-political status following the Changing of the Guard, many of the Sangheili Councilors traveled to the control room in order to prepare it for the Halo's firing and the "Great Journey". However, the Jiralhanae Captain Melchus entered the control room with a heavily-armed Jiralhanae contingent and slaughtered the Councilors gathered there after a brief battle.[4] A small number of Councilors were taken prisoner in the nearby Bastion of the Brutes.[3]
Prompted by the Prophet of Truth, Tartarus brought 343 Guilty Spark and Commander Miranda Keyes to the control room in order to activate the ring, initiating the Great Journey. Before he could force Keyes to activate the panel, however, the Arbiter arrived, teaming up with Sergeant Major Johnson and other Sangheili troops.
Despite the Arbiter's attempt to convince Tartarus to change his mind, Tartarus forced the Index into the panel, activating the primary firing systems. A battle began between the Sangheili and the Jiralhanae, which ended after Tartarus and his troops died and Keyes deactivated the ring.[3]
Trivia[edit]
Bungie humorously referred to the multiple-leveled structure at the center of the control room as the "Birthday cake of doom".[5]
Gallery[edit]
Concept art[edit]
Concept art of the control room for Halo 2: Anniversary cutscenes.

Concept art of the control room in Halo 2: Anniversary.
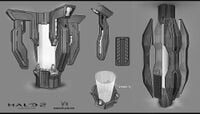
Concept art of the central beam and surrounding structure in the control room.
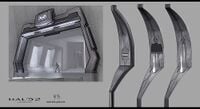
Concept art of the door to the control room and part of the walls within its interior.
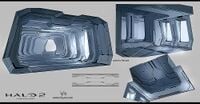
Concept art of the hallway leading to the control room.


Screenshot[edit]
The control room's exterior in Halo 2.
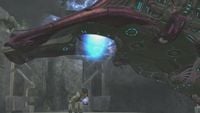
Tartarus being dropped off with Guilty Spark and Miranda at the control room.
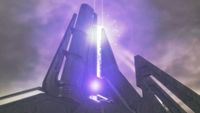
The control room being activated.

Tartarus attempts to force Commander Miranda Keyes into activating Halo.

Thel 'Vadamee and Rtas 'Vadumee stand on the grounds surrounding Halo's control room.
Delta Halo's control room, now fully activated as the ring prepares to fire.
Commander Keyes, Sergeant Major Johnson and 343 Guilty Spark observe a readout of the seven Halos in the control room's core in Halo 2.
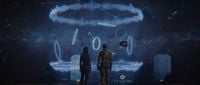
Commander Keyes, Sergeant Major Johnson and 343 Guilty Spark observe a readout of the seven Halos in the control room's core in Halo 2: Anniversary.


List of appearances[edit]
- Halo 2 (First appearance)
- Halo: Broken Circle
- Halo 2: Anniversary
Sources[edit]
- ^ a b Halo 2: Anniversary, campaign level, The Great Journey
- ^ Halo: Broken Circle, p. 245
- ^ a b c Halo 2, campaign level, The Great Journey
- ^ Halo: Broken Circle, p. 245-252
- ^ Halo 3 Legendary Edition - Essentials, Disc Two - Halo 2 Cinematics Commentary


