Second Battle of Mombasa: Difference between revisions
From Halopedia, the Halo wiki
No edit summary |
mNo edit summary |
||
| Line 70: | Line 70: | ||
As the diorama was supposedly made as part of a museum display many years after the war, it may have been an intentional distortion of what actually happened by the [[Office of Naval Intelligence#Section Two|Office of Naval Intelligence's Section Two]], perhaps in order to prevent knowledge of the [[Halo Array]] and [[the Flood]] from being gained by the general public, and/or to enforce John-117's status as a near-mythical heroic figure. This would fit with the fact that there has been no further mention of the battle. | As the diorama was supposedly made as part of a museum display many years after the war, it may have been an intentional distortion of what actually happened by the [[Office of Naval Intelligence#Section Two|Office of Naval Intelligence's Section Two]], perhaps in order to prevent knowledge of the [[Halo Array]] and [[the Flood]] from being gained by the general public, and/or to enforce John-117's status as a near-mythical heroic figure. This would fit with the fact that there has been no further mention of the battle. | ||
As seen in ''[[Halo 3: ODST]]'', the explosion caused by Regret's escape caused relatively superficial damage to the city, rather than razing it, which occurred according to the ''Believe'' campaign. On the morning of October 21st, 2552, the entire city and the surrounding area were [[Glassing|glassed]] by the Covenant in order to unearth the [[The | As seen in ''[[Halo 3: ODST]]'', the explosion caused by Regret's escape caused relatively superficial damage to the city, rather than razing it, which occurred according to the ''Believe'' campaign. On the morning of October 21st, 2552, the entire city and the surrounding area were [[Glassing|glassed]] by the Covenant in order to unearth the [[The Portal|portal structure]]. When John-117 returned to Earth on November 17, he fought in the [[Tsavo]] region and in the town of [[Voi]], though he never returned to Mombasa. | ||
John-117's capture by a [[Jiralhanae]] [[Jiralhanae Chieftain|chieftain]] and his use of a grenade to escape might have been influenced by similar events inside the [[Forerunner Dreadnought]] before it arrived at Earth, where the SPARTAN was indeed captured by a Brute and interrogated, before sticking his captor with a plasma grenade and escaping.<ref>'''Halo: Uprising''', ''[[Halo: Uprising Issue 2|Issue 2]]''</ref> | John-117's capture by a [[Jiralhanae]] [[Jiralhanae Chieftain|chieftain]] and his use of a grenade to escape might have been influenced by similar events inside the [[Forerunner Dreadnought]] before it arrived at Earth, where the SPARTAN was indeed captured by a Brute and interrogated, before sticking his captor with a plasma grenade and escaping.<ref>'''Halo: Uprising''', ''[[Halo: Uprising Issue 2|Issue 2]]''</ref> | ||
Revision as of 23:48, September 21, 2011
Template:Not Canon Template:Battle
The Second Battle of Mombasa was a bloody seven-day engagement between United Nations Space Command and Covenant forces that is depicted in the John-117 Monument in the Museum of Humanity; it took place in the weeks immediately after the Prophet of Regret's retreat to Halo Installation 05, lasting until SPARTAN John 117's return to Earth aboard the Prophet of Truth's Forerunner Dreadnought. The battle itself, or at least some of the events depicted, never actually occurred, but it serves as a summary of the final days of the Human-Covenant War and SPARTAN John-117's ultimate sacrifice.[1][note 1]
Background
On October 20, 2552, the Prophet of Regret, having suffered heavy casualties during his forces' invasion of Mombasa, entered slipspace from within the city, unleashing a powerful explosion that caused great damage to the city - heavy enough to sever the city's space tether, causing its catastrophic collapse onto the Kenyan savanna. The remaining Covenant and UNSC ground forces surged forward into the city to secure whatever tactical advantage the ruins might have held. Elements from both the 77th Marine Regiment and the 506th Tank Regiment battled furiously for the ruins, with snipers from both sides taking a heavy toll upon the enemy. After seven days of battle, the Marines were nearly beaten; however, John-117's arrival turned the tide in the UNSC's favor.
Timeline
Battle for the landing zone
The battle began on the outskirts of New Mombasa, where UNSC and Covenant forces engaged each other in a bitter fight for control of a landing zone. The UNSC never gained full control of it, always being pushed back by the Covenant whenever they seemed to secure it and vice versa.
The northern bridge falls
Despite a valiant defense by the Marines, they had no means to hold the bridge to the north. With Jiralhanae forces surging over it and hitting the Marines' vulnerable flanks, there was only one option remaining. At 14:00, the order came through to destroy the bridge, thus forcing the enemy down into the valley where UNSC trenches lay to slaughter the enemy with fire from elevated positions. However, this was not the case as the Covenant forces had already begun to surge down the trenches with the destruction of the bridge.
The hill
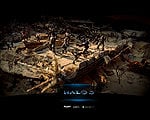
The defense of the hill was the most ferocious and bloody engagement of the battle; two thirds of the defending UNSC forces became casualties at this bottleneck. After the second bridge was destroyed, the trenches at the foot of the hill, despite a last-ditch defensive measure, came under heavy attack, garnering heavy Marine casualties.
Snipers
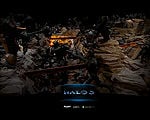
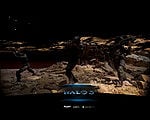
Snipers from both sides battled for control, with UNSC snipers fighting on one end of the destroyed southern bridge and Covenant Kig-yar snipers halting Marines outside the landing zone before being routed by UNSC infantry and tanks.
The 506th arrive
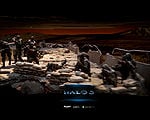
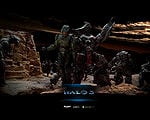
Tasked with securing a road to the southern bridge span, the 506th Tank Regiment plowed forward, taking heavy casualties. Though outnumbered, they took their objective, leaving a path for the second wave of Marine infantry to follow.
John-117's gambit
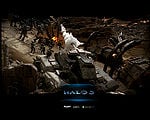
At the top of the "hill" bottleneck, SPARTAN John-117 launched a gambit to retake the hill for the UNSC forces, by allowing himself to be captured by Jiralhanae forces there. As he was being held aloft by the chieftain in command of the attacking forces, John ignited a Type-1 plasma grenade. This presumably killed the chieftain, but also led to the belief that the Spartan had been killed; decades later, Marine survivors of the battle maintained that John had been killed.
Notable UNSC combatants
The following are UNSC servicemen who are featured notably in the John-117 Monument. Some of the survivors of the battle were interviewed during the filming of the Believe documentary, which details the battle and the sacrifice of John-117.
- Pawel Czernek- Now-Major Pawel Czernek was active for thirty years in the UNSC from 2551 to 2581. By 2610, he is one of the few living survivors of the battle and Museum of Humanity]]. In the Believe documentary, he related his role in the battle, and that of John-117, while examining a diorama of the battle, part of which depicts his story.[2]
- Ian Callahan- Callahan was captured by Kig-yar during the battle. As he was about to be killed, he was rescued by fellow Marine, whose face he never saw.[2]
- James Dessen- Corporal James Dessen was posthumously awarded the UNSC Legion of Honor for his extraordinary bravery during the battle.[1]
- Thomas P. Porter- Porter served as M808B Scorpion tank driver during the battle. In the Believe documentary, he discussed the experience of driving a tank during combat.[1]
- Thomas Chang- Sergeant Chang was a veteran of numerous battles with the Covenant, including the Battle of Installation 04, and successfully completed the task of securing a forward headquarters during the battle. He was killed during a Covenant air assault.[1]
- Jackson Law- Law was the sole survivor of a Warthog patrol during the battle. He sustained serious injuries when his Warthog was destroyed by Covenant plasma bombardment, which he describe in the documentary.[1]
- Sian Wong- Wong served as a sniper during the battle. Sustained severe burn injuries from a retaliatory Banshee strike, which he discussed in the documentary.[1]
- Russel Tinnier- Tinnier was assigned to the destroy the bridge, which proved critical in the early stages of the battle. He described the experience in Believe.[1]
- Thomas C. Meyer- Meyer used his rocket launcher to destroy the bridge alongside Tinnier. He was also interviewed for the documentary.[1]
- Emmanuel "Emmet" Lomax- "Emmet" Lomax encountered SPARTAN John-117 after receiving four hours of sleep in a derelict building. He described the experience for the documentary.[1]
- Caio Zanato- Zanato was the sole survivor of his squad; He was then promoted to the rank of Private First Class, though he stated, "I got the job because I was the only one in my squad still alive." He was widely renowned for his driving ability.[1]
- Niraj Shah - Shah was a sniper during the battle on the hill. During the filming of the Believe documentary, he guided the film crew around the spot where John-117 was allegedly killed.[1]
Theories
As the diorama was supposedly made as part of a museum display many years after the war, it may have been an intentional distortion of what actually happened by the Office of Naval Intelligence's Section Two, perhaps in order to prevent knowledge of the Halo Array and the Flood from being gained by the general public, and/or to enforce John-117's status as a near-mythical heroic figure. This would fit with the fact that there has been no further mention of the battle.
As seen in Halo 3: ODST, the explosion caused by Regret's escape caused relatively superficial damage to the city, rather than razing it, which occurred according to the Believe campaign. On the morning of October 21st, 2552, the entire city and the surrounding area were glassed by the Covenant in order to unearth the portal structure. When John-117 returned to Earth on November 17, he fought in the Tsavo region and in the town of Voi, though he never returned to Mombasa.
John-117's capture by a Jiralhanae chieftain and his use of a grenade to escape might have been influenced by similar events inside the Forerunner Dreadnought before it arrived at Earth, where the SPARTAN was indeed captured by a Brute and interrogated, before sticking his captor with a plasma grenade and escaping.[3]
Note
- ^ This battle was portrayed in the Believe advertising campaign prior to Halo 3's release. The fashion in which it is portrayed is considered to be non-canonical. Microsoft was not aware of Halo 3's story during the development of the Believe campaign, and the battle is not depicted in Halo 3 or any concurrent or subsequent media, such as Halo: Uprising. The fate of New Mombasa as depicted in the diorama was later contradicted: Halo 3: ODST reveals that the city sustained relatively minor damage during Regret's escape and was glassed hours later, and that a protracted battle never occurred in the city's ruins. However, the Museum of Humanity has since been canonized in the Limited and Legendary Editions of Halo: Reach.
Gallery
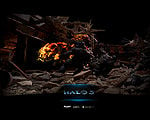
Marine fire teams defeat Covenant forces outside the landing zone.
The Covenant advance is halted by the destruction of the northern bridge.
Marines fall under the relentless advance of the Covenant.
The snipers of the 77th Marines pick off Covenant soldiers from their elevated position.
The 506th Tank Regiment arrives, relieving the beleaguered UNSC forces.
John-117 is triumphantly held aloft the Jiralhanae chieftain
The Marines of the 77th Regiment engage Jiralhanae forces.


Sources


