Coagulation: Difference between revisions
From Halopedia, the Halo wiki
No edit summary |
BaconShelf (talk | contribs) m (Reverted edits by 76.90.148.131 (talk) to last revision by BaconShelf) Tag: Rollback |
||
| (31 intermediate revisions by 17 users not shown) | |||
| Line 1: | Line 1: | ||
{{ | {{Status|Gameplay}} | ||
{{Multiplayer map infobox | |||
|image=[[File:H2 Coagulation.png|300px]] | |||
{{Multiplayer | |||
|image=[[File:Coagulation. | |||
|name=Coagulation | |name=Coagulation | ||
|game=''[[Halo 2]]'' | |game=''[[Halo 2]]'' | ||
|map=War Games Map_Set/: 701-5 | |devname=<code>coagulation</code> | ||
|map=War Games Map_Set/: 701-5{{Ref/Reuse|HU}} | |||
|location=[[Installation 05]]<ref name="HU">[https://www.halowaypoint.com/en-us/universe/locations/delta-halo '''Halo Waypoint''' - ''Universe: Delta Halo'']</ref> | |location=[[Installation 05]]<ref name="HU">[https://www.halowaypoint.com/en-us/universe/locations/delta-halo '''Halo Waypoint''' - ''Universe: Delta Halo'']</ref> | ||
|terrain= | |terrain=Valley, desert, Forerunner structures | ||
|symmetry= | |||
| | |number of players=4-16 | ||
|gametypes=*[[Slayer]] | |gametypes=*[[Slayer]] | ||
*[[Capture the Flag|CTF]] | *[[Capture the Flag|CTF]] | ||
*[[Assault]] | *[[Assault]] | ||
| | |pagegamelabel=H2 | ||
}} | }} | ||
{{Article | {{Article quote|Recent excavations have failed to shed light on the true purpose of the outposts in this bloody gulch.}} | ||
'''Coagulation''' is a multiplayer map in ''[[Halo 2]]''. A remake of the ''[[Halo: Combat Evolved]]'' multiplayer map ''[[Blood Gulch]]'', it features a large valley with identical bunkers at both ends. It is ideal for [[Capture the Flag]] games due to its wide open spaces and having one base at either end of the map. This map is best suited for matches between six and sixteen players due to its size. Coagulation was remade as [[Bloodline]] in | '''Coagulation''' is a multiplayer map in ''[[Halo 2]]''. A remake of the ''[[Halo: Combat Evolved]]'' multiplayer map ''[[Blood Gulch]]'', it features a large valley with identical bunkers at both ends. It is ideal for [[Capture the Flag]] games due to its wide open spaces and having one base at either end of the map. This map is best suited for matches between six and sixteen players due to its size. Coagulation was remade as [[Hemorrhage]] in ''[[Halo: Reach]]'' and as [[Bloodline]] in ''[[Halo 2: Anniversary]]''. | ||
==Setting== | |||
During the [[Battle of Installation 05]], the {{UNSCShip|Coral Sea}} conducted extensive scans of the [[Installation 05|ring]], recovering data about many locations including the canyon that would become known as Coagulation. The [[United Nations Space Command|UNSC]]'s current theories surrounding this canyon's twin outposts suggests they were used by young [[Forerunner]] [[Warrior-Servants]] seeking to prove their prowess in combat arenas. Although naval strength or superior weaponry resolved most Forerunner conflicts, ancient warrior principles did advocate for close-quarters combat from time-to-time.{{Ref/Reuse|HU}} | |||
==Design== | |||
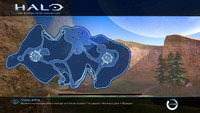
[[File:H2 Coagulation Overview.png|300px|thumb|Coagulation as viewed from above.]] | |||
===Layout=== | ===Layout=== | ||
The Red and Blue bases are both identical in layout and the weapons that they contain. Each has a single main room which contains the flag in CTF matches and bomb in assault matches respectively as well as a newly added cellar level containing a [[ | The Red and Blue bases are both identical in layout and the weapons that they contain. Each has a single main room which contains the flag in CTF matches and bomb in assault matches respectively, as well as a newly added cellar level containing a [[Oghal-pattern Banshee|Banshee]] and a [[gravity lift]] to the main room. The roof is also useful with a hole to drop into the main room, a [[teleporter]], and a [[SRS99C-S2 AM sniper rifle|sniper rifle]]. | ||
===Territories=== | ===Territories=== | ||
| Line 49: | Line 37: | ||
==Tactics== | ==Tactics== | ||
#The most popular feature of this map is the sniper alcove above the blue base, informally called the Sniper Ledge. It's reachable by a Banshee or by glitching the wall of the map with a [[ | #The most popular feature of this map is the sniper alcove above the blue base, informally called the Sniper Ledge. It's reachable by a Banshee or by glitching the wall of the map with a [[Wuzum-pattern Spectre|Spectre]], Ghost; [[Zurdo-pattern Wraith|Wraith]], or, less common, [[M808B Scorpion|Scorpion]]. Also, you can get there by a really lucky chain superjump that consists of: the Blue Base superjump, then the teleporter superjump, and then the hard one, a superjump in the middle of the way between the sniping spot and the teleporter. This is a very predictable spot for snipers to run to, though, and as such it is often avoided. | ||
#The hills (near the [[Overshield]]; the middle of the map) are another popular sniper spot, as the rocks offer a surplus of cover. | #The hills (near the [[Overshield]]; the middle of the map) are another popular sniper spot, as the rocks offer a surplus of cover. | ||
#Close range is rarely an option. There is a Shotgun that spawns, but most players avoid it as it is unnecessary in the mostly distance based game. The few close range encounters you will have usually involve preoccupied snipers, which can be assassinated or stuck. | #Close range is rarely an option. There is a Shotgun that spawns, but most players avoid it as it is unnecessary in the mostly distance based game. The few close range encounters you will have usually involve preoccupied snipers, which can be assassinated or stuck. | ||
#Good weapons to get as soon as the game starts: [[ | #Good weapons to get as soon as the game starts: [[M41 SPNKR|rocket launcher]], [[Type-25 Brute Shot|Brute Shot]], Sniper Rifle, and [[BR55 battle rifle|battle rifle]]. | ||
# Another good, and well-known sniper spot is only accessible via Banshee, Ghost or Spectre. If you are looking towards the red base, fly to the left until you hit the valley wall. Then, follow the wall until you get to a distinctive ledge. Climb out of the Banshee and there you go. In the Ghost or Spectre just go over to the corner with all the rocks and boost aiming for the darker spot in the wall. | # Another good, and well-known sniper spot is only accessible via Banshee, Ghost or Spectre. If you are looking towards the red base, fly to the left until you hit the valley wall. Then, follow the wall until you get to a distinctive ledge. Climb out of the Banshee and there you go. In the Ghost or Spectre just go over to the corner with all the rocks and boost aiming for the darker spot in the wall. | ||
=== Sniping Spots === | === Sniping Spots === | ||
The first sniping spot is a small outcrop near the blue base, informally called the Sniper Ledge. The easiest way to get there is by using a Banshee to fly up there and then drop out onto the outcrop, you can also use a Ghost's or a Spectre's speed boost to climb up the wall and on to the ledge. The ledge has a pillar on it so it is protected from the front but is open to fire from the sides. There is another sniping spot on the wall left of the Red Base that you can also reach by a Banshee, Spectre or a Ghost but this is unprotected and is on a very steep angle. You can notice it because it is on a flatter angle | The first sniping spot is a small outcrop near the blue base, informally called the Sniper Ledge. The easiest way to get there is by using a Banshee to fly up there and then drop out onto the outcrop, you can also use a Ghost's or a Spectre's speed boost to climb up the wall and on to the ledge. The ledge has a pillar on it, so it is protected from the front but is open to fire from the sides. There is another sniping spot on the wall left of the Red Base that you can also reach by a Banshee, Spectre or a Ghost, but this is unprotected and is on a very steep angle. You can notice it because it is on a flatter angle than the wall surrounding it. There are some more good sniping spots in a bunch of rocks where an [[Active camouflage]] is and around some trees where you are very well camouflaged (near the rocket's ammo). | ||
A good game winning tactic is to use the Ghost to get to the Rocket Launcher, pick it up, and then use the Ghost so that nobody can use the rocket against you. | A good game winning tactic is to use the Ghost to get to the Rocket Launcher, pick it up, and then use the Ghost so that nobody can use the rocket against you. | ||
==Trivia== | ==Trivia== | ||
*If you go into the tunnel where the Overshield | *If you go into the tunnel where the Overshield is, there is a message by the drop-off into the water that says, "Not sid was here Not". | ||
*There is | *There is the Megg "M" outside the map behind the red base. | ||
===Glitches=== | ===Glitches=== | ||
*To get out of Coagulation, you need to have a Spectre. Drive the Spectre to Blue Base where you will see a slanted wall. Boost up the side, then drive left pass two sections until you reach one tall point. Spin the Spectre around so that it is facing right. When you are ready, lodge the Spectre up against the top of the wall and get out. It is easier with an [[Sangheili|Elite]] player model. | *To get out of Coagulation, you need to have a Spectre. Drive the Spectre to Blue Base, where you will see a slanted wall. Boost up the side, then drive left, pass two sections until you reach one tall point. Spin the Spectre around so that it is facing right. When you are ready, lodge the Spectre up against the top of the wall and get out. It is easier with an [[Sangheili|Elite]] player model. | ||
*You can drive a Scorpion almost all the way up the wall next to the Blue Team base. | *You can drive a Scorpion almost all the way up the wall next to the Blue Team base. | ||
*To make a tank flip, set heavy vehicles to random and keep on restarting the match until you get a Scorpion and a | *To make a tank flip, set heavy vehicles to random and keep on restarting the match until you get a Scorpion and a Wraith. Have one person get in the Wraith and another get in the Scorpion. Then, the Wraith has to rear-end the Scorpion and boost right when they touch. If done correctly, the Scorpion will be thrown very high in the air, spinning violently with much force. The Scorpion and the driver will most likely smash into a wall with considerable force and explode. And on very rare occasions the Wraith flies into the air too. | ||
===Miscellaneous=== | ===Miscellaneous=== | ||
*''Coagulation'' has been the setting for most episodes of the popular award-winning Machinima series, [[Red vs Blue]] following the release of ''Halo 2''. | *''Coagulation'' has been the setting for most episodes of the popular award-winning Machinima series, [[Red vs Blue]], following the release of ''Halo 2''. | ||
*''Coagulation'' is a term used for the clotting of blood, obviously giving homage to ''Blood Gulch''. | *''Coagulation'' is a term used for the clotting of blood, obviously giving homage to ''Blood Gulch''. | ||
==Gallery== | ==Gallery== | ||
{{Linkbox|gallery=yes}} | |||
<gallery> | <gallery> | ||
File: | File:HMCC H2 Coagulation Map.png|Coagulation Map. | ||
File:H2 Coagulation_Panorama.jpg|A panoramic view of Coagulation. | |||
File:H2_Coagulation_RedBase.png|Back view of the red base, showing the Banshee hangar bay added in the ''Halo 2'' remake of the map. | |||
File:H2_Coagulation_BlueBase.png|Overhead view of the blue base. | |||
File:H2 Coagulation Banshee.jpg|A Banshee on Coagulation. | |||
</gallery> | </gallery> | ||
==Related | ==Related links== | ||
*''[[Blood Gulch]]'', the ''Halo: Combat Evolved'' level that inspired Coagulation | *''[[Blood Gulch]]'', the ''Halo: Combat Evolved'' level that inspired Coagulation | ||
*''[[Valhalla]]'', the ''[[Halo 3]]'' "spiritual sequel" to the box canyon line of levels | *''[[Valhalla]]'', the ''[[Halo 3]]'' "spiritual sequel" to the box canyon line of levels | ||
*''[[ | *''[[Hemorrhage]]'', the ''[[Halo: Reach]]'' version of Blood Gulch | ||
*''[[Ragnarok]]'', the ''[[Halo 4]]'' "spiritual sequel" | *''[[Ragnarok]]'', the ''[[Halo 4]]'' "spiritual sequel" | ||
*''[[Bloodline]]'', the ''[[Halo 2: Anniversary]]'' version of Blood Gulch. | *''[[Bloodline]]'', the ''[[Halo 2: Anniversary]]'' version of Blood Gulch. | ||
==Sources== | ==Sources== | ||
{{Ref/Sources}} | |||
{{Levels|H2|mode=yes}} | {{Levels|H2|mode=yes}} | ||
Latest revision as of 09:38, March 3, 2024
| Coagulation | |
|---|---|

| |
| Map overview | |
|
Game: |
|
|
Map file name (?): |
|
| Lore information | |
|
Map designation (?): |
War Games Map_Set/: 701-5[1] |
|
Location: |
|
| Gameplay overview | |
|
Terrain: |
Valley, desert, Forerunner structures |
|
Recommended gametype(s): |
|
| “ | Recent excavations have failed to shed light on the true purpose of the outposts in this bloody gulch. | ” |
Coagulation is a multiplayer map in Halo 2. A remake of the Halo: Combat Evolved multiplayer map Blood Gulch, it features a large valley with identical bunkers at both ends. It is ideal for Capture the Flag games due to its wide open spaces and having one base at either end of the map. This map is best suited for matches between six and sixteen players due to its size. Coagulation was remade as Hemorrhage in Halo: Reach and as Bloodline in Halo 2: Anniversary.
Setting[edit]
During the Battle of Installation 05, the UNSC Coral Sea conducted extensive scans of the ring, recovering data about many locations including the canyon that would become known as Coagulation. The UNSC's current theories surrounding this canyon's twin outposts suggests they were used by young Forerunner Warrior-Servants seeking to prove their prowess in combat arenas. Although naval strength or superior weaponry resolved most Forerunner conflicts, ancient warrior principles did advocate for close-quarters combat from time-to-time.[1]
Design[edit]

Layout[edit]
The Red and Blue bases are both identical in layout and the weapons that they contain. Each has a single main room which contains the flag in CTF matches and bomb in assault matches respectively, as well as a newly added cellar level containing a Banshee and a gravity lift to the main room. The roof is also useful with a hole to drop into the main room, a teleporter, and a sniper rifle.
Territories[edit]
- Hill
- Red Base
- Blue Base
- Rocky Area
- Cave
- Forest Area
Tactics[edit]
- The most popular feature of this map is the sniper alcove above the blue base, informally called the Sniper Ledge. It's reachable by a Banshee or by glitching the wall of the map with a Spectre, Ghost; Wraith, or, less common, Scorpion. Also, you can get there by a really lucky chain superjump that consists of: the Blue Base superjump, then the teleporter superjump, and then the hard one, a superjump in the middle of the way between the sniping spot and the teleporter. This is a very predictable spot for snipers to run to, though, and as such it is often avoided.
- The hills (near the Overshield; the middle of the map) are another popular sniper spot, as the rocks offer a surplus of cover.
- Close range is rarely an option. There is a Shotgun that spawns, but most players avoid it as it is unnecessary in the mostly distance based game. The few close range encounters you will have usually involve preoccupied snipers, which can be assassinated or stuck.
- Good weapons to get as soon as the game starts: rocket launcher, Brute Shot, Sniper Rifle, and battle rifle.
- Another good, and well-known sniper spot is only accessible via Banshee, Ghost or Spectre. If you are looking towards the red base, fly to the left until you hit the valley wall. Then, follow the wall until you get to a distinctive ledge. Climb out of the Banshee and there you go. In the Ghost or Spectre just go over to the corner with all the rocks and boost aiming for the darker spot in the wall.
Sniping Spots[edit]
The first sniping spot is a small outcrop near the blue base, informally called the Sniper Ledge. The easiest way to get there is by using a Banshee to fly up there and then drop out onto the outcrop, you can also use a Ghost's or a Spectre's speed boost to climb up the wall and on to the ledge. The ledge has a pillar on it, so it is protected from the front but is open to fire from the sides. There is another sniping spot on the wall left of the Red Base that you can also reach by a Banshee, Spectre or a Ghost, but this is unprotected and is on a very steep angle. You can notice it because it is on a flatter angle than the wall surrounding it. There are some more good sniping spots in a bunch of rocks where an Active camouflage is and around some trees where you are very well camouflaged (near the rocket's ammo). A good game winning tactic is to use the Ghost to get to the Rocket Launcher, pick it up, and then use the Ghost so that nobody can use the rocket against you.
Trivia[edit]
- If you go into the tunnel where the Overshield is, there is a message by the drop-off into the water that says, "Not sid was here Not".
- There is the Megg "M" outside the map behind the red base.
Glitches[edit]
- To get out of Coagulation, you need to have a Spectre. Drive the Spectre to Blue Base, where you will see a slanted wall. Boost up the side, then drive left, pass two sections until you reach one tall point. Spin the Spectre around so that it is facing right. When you are ready, lodge the Spectre up against the top of the wall and get out. It is easier with an Elite player model.
- You can drive a Scorpion almost all the way up the wall next to the Blue Team base.
- To make a tank flip, set heavy vehicles to random and keep on restarting the match until you get a Scorpion and a Wraith. Have one person get in the Wraith and another get in the Scorpion. Then, the Wraith has to rear-end the Scorpion and boost right when they touch. If done correctly, the Scorpion will be thrown very high in the air, spinning violently with much force. The Scorpion and the driver will most likely smash into a wall with considerable force and explode. And on very rare occasions the Wraith flies into the air too.
Miscellaneous[edit]
- Coagulation has been the setting for most episodes of the popular award-winning Machinima series, Red vs Blue, following the release of Halo 2.
- Coagulation is a term used for the clotting of blood, obviously giving homage to Blood Gulch.
Gallery[edit]

|
Browse more images in this article's gallery page. |
Coagulation Map.
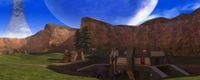
A panoramic view of Coagulation.
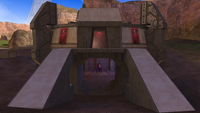
Back view of the red base, showing the Banshee hangar bay added in the Halo 2 remake of the map.
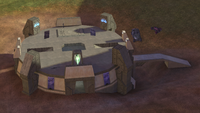
Overhead view of the blue base.
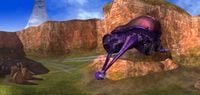
A Banshee on Coagulation.


Related links[edit]
- Blood Gulch, the Halo: Combat Evolved level that inspired Coagulation
- Valhalla, the Halo 3 "spiritual sequel" to the box canyon line of levels
- Hemorrhage, the Halo: Reach version of Blood Gulch
- Ragnarok, the Halo 4 "spiritual sequel"
- Bloodline, the Halo 2: Anniversary version of Blood Gulch.
Sources[edit]
| |||||||||||||||||||||||||||||||


