Halo 3 skulls: Difference between revisions
From Halopedia, the Halo wiki
(→Video: (Spartan781):We don't need the long version. The long version is just jumping through unecessary hoops) |
(→IWHBYD (I Would Have Been Your Daddy): Made it clear what to do with the rings on The Covenant for IWHBYD skull.) Tag: Mobile edit |
||
| Line 1: | Line 1: | ||
{{Title|''Halo 3'' skulls}} | |||
{{Status|Gameplay}} | |||
[[File:Halo3-skull-fog-floodgate.jpg|thumb|300px|An example of a skull in ''Halo 3''.]] | |||
'''Skulls''' are a series of gameplay modifiers available for use in ''[[Halo 3]]'' and ''[[Halo 3: ODST]]''. Both games feature the same roster of skulls and effects, though in ''Halo 3'' these items are hidden throughout the game's [[campaign]] as hidden easter eggs - and must be found before they can be used. In ''ODST'' and the ''[[Halo: The Master Chief Collection]]'' iterations of both games, all skulls are unlocked from the start. | |||
Once activated, a skull makes gameplay either more humorous, or more challenging. | |||
''' | ==Background== | ||
The skulls greatly resemble those in the [[Multiplayer]] game variant [[Oddball]], and can be used as weapons in much the same way. However, they lack the information text (i.e. "Press '''RB''' to pick up...") to pick them up. They are usually hidden and out of the way, so one must thoroughly search for them, or know where they are, to get them. There are thirteen skulls in ''Halo 3'', along with a fourteenth secret skull on [[Cortana (level)|Cortana.]] | |||
To unlock a skull, you must start its level from the beginning, on [[Normal]] or higher. You can stop playing at any time (provided you resume using the "Resume Solo/Co-op Game" option from the main menu), and you do not need to carry the skull all the way to the end (with the exception of the IWHBYD skull). | |||
The Mythic skull is the only skull available on [[Easy]], although you will not receive the achievement for it. Also, a ''very'' important note is that the skulls ''are'' affected by physics. This means that, with the exception of the Famine skull, skulls can be moved by grenades, explosions, and other forces. | |||
''' | Once a skull is unlocked, you can activate it from the Campaign Lobby. Simply press '''X''' while in the Campaign Lobby, and then select a skull with '''A''' to activate it. Multiple skulls can be activated at once. | ||
There are two different types of skulls: Gold skulls and silver skulls. Gold skulls will, when unlocked, grant you achievements, each worth 10 [[Gamerscore]]; when activated, they add multipliers to your [[Campaign Scoring|Campaign Meta-game score]]. The nine gold skulls affect the difficulty of game-play, making the game more challenging. Silver skulls do not unlock achievements or add multipliers to your meta-game score. They are differentiated on the selection screen by their color, but are identical in-game. There are five Silver skulls, and four of them affects the physics, dialog, and appearance of gameplay. | |||
Collecting 5, 9, and all 13 skulls of either type will unlock the [[Hayabusa Powered Assault Armor|Hayabusa]] Chest, Shoulders, and Helmet [[Armor customization (Halo 3)|Armor Permutations]], respectively, for usage in Multiplayer and Matchmaking. | |||
''' | In ''[[Halo: The Master Chief Collection]]'', the functionality of ''Halo 3'' skulls is identical, with two differences. All skulls (and Armor Permutations) are unlocked for gameplay from the start. The skulls can still be found and collected in campaign for achievements: both gold and silver skulls unlock achievements worth 5 Gamerscore each. | ||
== Campaign skulls == | |||
=== Meta game quick reference === | |||
{| class="wikitable sortable" | |||
|- | |||
!Icon | |||
!Skull Name | |||
!Multiplier | |||
!Short Description | |||
|- | |||
|[[File:Halo 3 Iron Skull.png|center|50px]] | |||
|[[#Iron|Iron]] | |||
|3× | |||
|In Solo play, dying reverts the player to the beginning of the level. In cooperative play, any player death reverts to the previous checkpoint. | |||
|- | |||
|[[File:Halo 3 Black Eye Skull.png|center|50px]] | |||
|[[#Black Eye|Black Eye]] | |||
|1.5x | |||
|No auto-shield regeneration. Only melee attacks cause shields to recharge. | |||
|- | |||
|[[File:Halo 3 Tough Luck Skull.png|center|50px]] | |||
|[[#Tough Luck|Tough Luck]] | |||
|1.5× | |||
|Grenades, Needler fire, projectiles (i.e. [[M41 Surface-to-Surface Rocket Medium Anti-Vehicle/Assault Weapon|Rocket Launcher]], [[Type-25 Grenade Launcher|Brute Shot]], and [[Class-2 Projectile cannon|Fuel Rod Cannon]]) and vehicular charges are evaded more skillfully by the AI. Brutes go Berserk more often and Grunts will turn Kamikaze more often. | |||
|- | |||
|[[File:Halo 3 Catch Skull.png|center|50px]] | |||
|[[#Catch|Catch]] | |||
|1.5× | |||
|NPCs throw many more grenades at an alarming rate. NPCs always drop two grenades when dying. | |||
|- | |||
|[[File:Halo 3 Fog Skull.png|center|50px]] | |||
|[[#Fog|Fog]] | |||
|1.5× | |||
|Motion Tracker is fully disabled. | |||
|- | |||
|[[File:Halo 3 Famine Skull.png|center|50px]] | |||
|[[#Famine|Famine]] | |||
|2× | |||
|Dropped weapons have much less ammunition/charge. | |||
|- | |||
|[[File:Halo 3 Thunderstorm Skull.png|center|50px]] | |||
|[[#Thunderstorm|Thunderstorm]] | |||
|1.5× | |||
|All enemies are promoted to higher ranks. (More experience) . | |||
|- | |||
|[[File:Halo 3 Tilt Skull.png|center|50px]] | |||
|[[#Tilt|Tilt]] | |||
|2× | |||
|Enemy defensive resistances/weaknesses are amplified. | |||
|- | |||
|[[File:Halo 3 Mythic Skull.png|center|50px]] | |||
|[[#Mythic|Mythic]] | |||
|2× | |||
|All NPC's health allocation is doubled. | |||
|- | |||
|[[File:Halo 3 Blind Skull.png|center|50px]] | |||
|[[#Blind|Blind]] | |||
|1× | |||
|Player HUD and weapon model are disabled. | |||
|- | |||
|[[File:Halo 3 Grunt Birthday Party Skull.png|center|50px]] | |||
|[[#Grunt Birthday Party|Grunt Birthday Party]] | |||
|1× | |||
|Headshots on Grunts trigger a confetti effect and sounds of children cheering. | |||
|- | |||
|[[File:Halo 3 Cowbell Skull.png|center|50px]] | |||
|[[#Cowbell|Cowbell]] | |||
|1× | |||
|Increased aceleration from explosions. | |||
|- | |||
|[[File:Halo 3 IWHBYD Skull.png|center|50px]] | |||
|[[#IWHBYD (I Would Have Been Your Daddy) skull|IWHBYD]] | |||
|1× | |||
|Rare dialogue becomes more common. | |||
|} | |||
===List of gold skulls=== | |||
==== Iron ==== | |||
[[File:H3 Iron.jpg|thumb|The Iron skull is located on the left side of the image.]] | |||
{{Article quote | |||
|Death carries a heavy price... | |||
}} | |||
'''Level''': [[Sierra 117]] | |||
'''Icon''': A skull marked with a hammer. | |||
''' | '''Effect''': If you die while playing solo, you will respawn at the very beginning of the level - The "Revert to last checkpoint" option is no longer selectable. If any player dies while playing [[Campaign#Cooperative|Co-op]], all players will respawn to the last checkpoint. This is similar to what would happen when playing Co-op on [[Legendary]] in ''Halo 2'', but it is slightly more harsh on the players. | ||
''' | '''Point Multiplier''': 3× | ||
''' | '''Directions''': | ||
# Battle through to the level normally until you arrive at the point where you must rescue [[Sergeant]] [[Avery Junior Johnson|Johnson]] and his team. | |||
# Snipe as many enemies as you can before jumping down, especially on the bridge. | |||
# Jump down and cross the bridge. | |||
# Keep to the right of the bridge until you see a blocked line with some pipes. Hop onto this block and continue. | |||
# When you reach the end of this raised block, jump up into the balcony. | |||
# Follow this balcony to the end, the skull is hidden behind a pillar jutting out from the building tucked into the corner. | |||
''' | ==== Black Eye ==== | ||
[[File:H3 Black Eye.jpeg|thumb|Skull is located on the pipe.]] | |||
{{Article quote|Bash your way to better health.}} | |||
'''Level''': [[Crow's Nest]] | |||
'''Icon''': A skull marked with a smaller skull with a bruise under one eye. | |||
'''Effect''': Your | '''Effect''': Your Energy Shield will not recharge until you perform a [[melee]] hit. The following actions will also recharge your energy shields: | ||
* The '''RT''' attacks from the [[Type-1 energy sword|Energy Sword]] and [[Gravity hammer (fiction)|Gravity Hammer]] | |||
* An enemy being in the Gravity Hammer's shockwave area of effect. | |||
* [[Boarding (gameplay mechanic)|Boarding/hijacking]] an enemy vehicle | |||
* Punching (not boarding/hijacking) an enemy vehicle, [[Rizsheda-pattern Shade|Shade Turret]], or any enemy-manned turret | |||
* Destroying a [[Deutoros-pattern Scarab|Scarab]]'s core on any level that features Scarabs | |||
* Punching the exposed Lekgolo part of the core of a Scarab. | |||
* Activating [[Invincibility]] | |||
* Deploying a [[Regenerator]] | |||
* Betraying allies and punching them | |||
'''Point Multiplier''': 1. | '''Point Multiplier''': 1.5× | ||
''' | '''Directions:''' | ||
# At the beginning of the level, walk to the door leading to the barracks, then turn around. | |||
# Walk to the green metal rack and jump on top of it. | |||
# Turn to the right, look up to the red metal beam, and jump on it. | |||
# To the direct right again, is a much larger blackish pipe. Jump on it. | |||
# Walk along the pipe, taking care not to fall off, and you will see the skull at the end. | |||
===Tough Luck=== | ==== Tough Luck ==== | ||
{{Article quote|Your foes always make every saving throw.}} | |||
'''Level''': [[ | '''Level''': [[Tsavo Highway]] | ||
''' | '''Icon''': A skull marked with a three-leafed clover. | ||
''' | '''Effect''': Enemies dodge Grenades, Needles, slow moving projectiles and vehicle assaults with a greater success rate. Non-Chieftain [[Jiralhanae]] will berserk more often and Grunts will become Suicide Grunts more often. | ||
''' | '''Point Multiplier''': 1.5× | ||
'''Effect''': | '''Directions''': | ||
# Keep battling through to the point where you must fight a group of [[Jiralhanae|Brutes]], two of which are using [[Barukaza Workshop Chopper|Choppers]]. | |||
# Kill all the enemies, destroy the shield, then continue through until you reach a long, winding bridge. At this point, a [[Covenant Empire|Covenant]] [[Ket-pattern battlecruiser|CCS-class Battlecruiser]] should fly overhead. | |||
# To your left, you will see a series of yellow ladders. Go to the very last one. If you receive a [[Regenerator]] at the top, you will know it is the correct ladder. | |||
# Jump over or around the large metal bar on the right, then turn to the left. | |||
# Look down and you will see a large, black support below you. Jump down onto it. Note that you have to walk and be standing on the part of the pipe that sticks out slightly with the bolts going through it—otherwise, you'll take too much fall damage and die. | |||
# Walk along to the end of the support, then turn to the left again. | |||
# Now you should be able to see the skull on a cliff across a gap. Jump across the gap on to the cliff, and get the skull. | |||
<center> | |||
<gallery> | |||
File:H3 Tough Luck Pipe.jpeg|The pipeline that must be traversed to the Tough Luck skull. | |||
File:H3 Tough Luck.jpg|The Tough Luck skulls in its hidden location. | |||
</gallery> | |||
</center> | |||
==== Catch ==== | |||
[[File:H3 Catch.jpg|thumb|The Catch skull is located on top of the silo.]] | |||
{{Article quote|Pull pin. Count to three. Throw.}} | |||
'''Level''': [[The Storm]] | |||
'''Icon''': A skull marked with an image of a [[Anskum-pattern plasma grenade|Plasma Grenade]]. | |||
'''Effect''': All AI-controlled units, friend or foe, throw grenades more often, where applicable. It even affects scripted grenades. For example, on the level Crow's Nest, on the part where the [[M12 Force Application Vehicle|Warthog]] is hit by a [[Anskum-pattern plasma grenade|Plasma Grenade]], it will now be hit by two, three, or even four. The Catch skull has no effect on [[The Flood|Flood]]. It should be noted that characters will throw an unlimited amount of grenades at their enemies. The skull actually does seem to increase the number of [[Unggoy#Suicide Grunts|Kamikaze Grunts]]. It has been observed that the Marines will sometimes throw grenades with reckless abandon, similar to their behavior in ''Halo: Combat Evolved''. | |||
'''Point Multiplier''': 1.5× | |||
'''Directions''': | |||
#If you have the [[Easy]] Shield in your service record, the skull will '''NOT''' spawn. You have to beat the campaign on normal or higher to make the skull spawn again.<ref>http://halo.bungie.net/Forums/posts.aspx?postID=23863683&postRepeater1-p=2#23864906</ref> | |||
# Battle through to Lakebed A -- the point where you fight an [[Ogab'd-pattern anti-aircraft Wraith|Anti-Air Wraith]], a handful of [[Type-32 Rapid Assault Vehicle|Ghosts]], and a standard [[Zurdo-pattern Wraith|Wraith]]. | |||
#You should see a silo-like building (see image). On top of this is the skull. Look for the ramp that leads over to the platform where the normal Wraith is dropped. | |||
There are multiple methods which can be used to get onto the building. | |||
#[[Drive an AA Wraith|Hijack]] the Anti-Air Wraith and maneuver it so the back (the part with the plasma mortar, or in this case, fuel rod launchers) touches the base of the silo where the ground rises slightly; then, simply get out. The only problem is that this will cause an NPC [[AV-14 Hornet|Hornet]] to fire upon the standard Wraith, and the Wraith may focus its fire on you, so you will need to work a little quickly. The Anti-Air Wraith should remain still while you jump on the back and onto the top of the silo. | |||
#[[Explosive jumping|Explosive Jump]]. | |||
#Park a Ghost below, then jump from it onto the building. Use an [[Explosive jumping|Explosive Jump]] if necessary. | |||
#Park one Ghost on the Wraith-side, then get another Ghost and park it on top. You should be able to simply jump on top of the Ghosts, then onto the silo. | |||
#Take a [[Deployable Cover]], then use it between the red wall and the building. Move out of the way and you can use the cover as a stepping stone. | |||
#On [[Campaign#Cooperative|Co-op]], one player can jump onto the other player's head, then onto the building. | |||
#Drive the [[M12 Force Application Vehicle|Warthog]] at the foot of the silo and [[crouch Jumping|crouch-jump]] onto it. Make sure that the Warthog is at the Wraith-side of the silo before attempting the crouch-jump. | |||
#Drive the Warthog between the silo and the wall so that it is turned on its side. Jump onto the red wall, then jump onto the silo. | |||
'''Note''': Do '''not''' destroy the standard Wraith, or the skull will disappear. Do '''not''' physically damage the normal Wraith (though the [[plasma turret]] operator can be sniped safely) in any way or the skull will disappear. | |||
==== Fog ==== | |||
[[File:H3 Fog.jpg|thumb|The Fog skull is in the Combat Form's right hand]] | |||
{{Article quote|You'll miss those eyes in the back of your head...}} | |||
'''Level ''': [[Floodgate]] | |||
'''Icon''': A skull marked with a swirl of fog. | |||
'''Effect''': Your [[Motion tracker]] is disabled completely. | |||
'''Point Multiplier''': 1.5× | |||
'''Directions''': | |||
#Walk into the destroyed city of Voi. As soon as you enter the city, there is a building with an SAM Launcher on the right. Move to the middle of the road that leads in and left. | |||
#Take out a weapon with a scope (preferably a [[BR55HB SR Battle Rifle|Battle Rifle]]) and look up and to the right (to the top of the right hand building). Wait for a Marine to say over the radio, ''"All squads, report."'' | |||
#You will see a [[Flood combat form|Flood Combat Form]] on the roof of the building to the right. It will jump across the street above you as a Marine replies, ''"There, over there!"''. You can either kill the Combat Form, making it drop the skull, or, you can shoot off it's right arm. You may either kill it whilst it is still on the first roof or try to shoot it while it is in midair. The skull will fall to the ground between the two buildings. | |||
==== Famine ==== | |||
[[File:H3 Famine.jpg|thumb|200px|The Famine skull on The Ark.]] | |||
{{Article quote|Trust us. Bring a magazine.}} | |||
'''Level''': [[The Ark (level)|The Ark]] | |||
'''Icon''': A skull marked with a smaller skull. The smaller skull seems to have a line between it and some dots (food). This describes the obvious traits of a famine. | |||
'''Effect''': All [[weapons]] that are dropped by enemies or are scripted to spawn on the ground (e.g., near a crashed Pelican or group of dead bodies) have halved or reduced ammunition or charge. However, weapons found in cases still have the standard amount of ammo. Jackals, the only enemies found in the Halo 3 campaign to overcharge Plasma Pistol shots, are very likely to run out of charge due to the reduced charge also affecting them. Leaving them with no charge and no way to attack the Chief. This does not work in the Halo 3: ODST campaign. | |||
'''Point Multiplier''': 2× | |||
'''Directions:''' | |||
#After obtaining the Scorpion, you will be directed into a fork in the road. Going straight will lead you into a giant bowl-like valley, and going to the right will lead you through a broad sandy road. | |||
#To the left is the bowl with two roads cut into the rock face. Go to the right and drive directly ahead until you hit the rock wall. | |||
#When you get underneath the platform structure, you will notice some climbable rocks on the right that will lead you to the platform itself. You will notice several beam-like supports alongside the platform. Go to the very last one, at the end of the platform. If you jump up you can see the skull at the end. Align yourself right up to the support. You need to get to the crevice of it, sticking out and away from the platform; the skull can be seen in it. There are several methods to obtain this skull: | |||
##'''Method A''': Stick a Plasma Grenade right where the beam-like support and incline meet (on the ''bottom'' edge of the incline). Back up, run and jump, aiming a little higher than the skull. You should be just over and a little forward of the grenade when it explodes giving you enough of a boost to reach the skull. | |||
##'''Method B''': Pick up a Deployable Cover and place it in front of the pillar with the skull and use it as a step to the ledge. It may take a few tries to place it exactly at the perfect spot, as it may slide off and fall off the ledge. | |||
##'''Method C''': Play the game in Co-Op mode. Stand on your friend's head and have them run and jump towards the skull. At the highest point of their jump, jump over to the ledge. If performed correctly, you should land on the platform. | |||
##'''Method D''': Deploy a Bubble Shield so that the edge of it is near the edge of the structure. The Bubble Shield should keep the grenade you throw inside it so right after you throw, jump, and the grenade should give you a sufficient boost. | |||
##'''Method E''': Take a Brute Shot, and aim it downward but still on the building Take a leap, and as you jump, fire downward and you will be able to launch yourself to the skull. | |||
##'''Method F''': If you saved the Rocket Launcher from the downed Pelican, you can rocket jump by positioning yourself a suitable running distance from the platform with the skull, running at it backward, jumping as you reach the slanted floor and firing a rocket. The blast should be sufficient to propel you to the platform. It may take a few tries to get it without killing yourself, and is inadvisable on any difficulty other than Normal for this reason. | |||
##'''Method G''': Find a few Ghosts, and use the boulder and a boost+A-button combo to get them onto the platform. Then stack them near the spot with the skull and you should be able to jump from on top of them to the skull. | |||
##'''Method H''': On the way back through this canyon, after getting the Scorpions from the Forward Unto Dawn, as you pass under the arch and blow up the Phantom, there is a wall to the left of the part where the canyon narrows that you can drive a tank up. If you drive one up, then wedge it in the area where the Forerunner structure comes closest to the cliff you're on, you can take a second tank up the cliff, and drive it across the bridge made from the first one, onto the Forerunner structure, then, with some careful positioning, use its turret as a platform to jump to the skull. | |||
##'''Method I''': Use Chopper to get up to the platform through the rocks and park it on a slanted platform where your jump can reach where the skull is. This may require several attempt to do it. | |||
==== Thunderstorm ==== | |||
[[File:H3 Thunderstorm.jpg|thumb|The Thunderstorm skull, and in the background, an aerial battle rages.]] | |||
{{Article quote|Field promotions for everyone.}} | |||
'''Level''': [[The Covenant (level)|The Covenant]] | |||
'''Icon''': A skull marked with a lightning bolt. | |||
'''Effect''': All enemies and allies are promoted to the highest available rank. The number of shielded Flood Elite Combat Forms and shielded Sentinels is also increased. Promotions given: | |||
* Brute Minors and Brute Majors are promoted to Brute Ultras. | |||
* Brute Captains and Brute Captain Majors (bar some) are promoted to Brute Captain Ultras. | |||
* Grunt Minors (bar some) and Grunt Majors are promoted to Grunt Ultras. | |||
* Elite Minors are promoted to Elite Majors. | |||
* Jackal Minors are promoted to Jackal Majors. | |||
'''Point Multiplier''': 1.5× | |||
'''Directions''': | |||
#After deactivating the first tower, there is a part in the level where you have to fly a Hornet to the third tower. As you hop into the Hornet, the title ''If You Want It Done Right'' will be displayed—if it isn't, then no skull will appear. | |||
#On your way to the third tower, you will see the second tower (which was disabled by the Elites). This is also the tower with the [[Terminal (Halo 3)|Terminal]]. Fly over to it. | |||
#There is a long, flat, semi-enclosed part of the tower that extends out over the ocean. There is a very tall ramp that leads up to it. At the end of the extension you will find the Thunderstorm skull. | |||
'''Note''': Restarting from Rally Point Alpha allows you to go to the skull's location, but no skull is present. Also, the "Too Close to the Sun" achievement can be unlocked from the skull location. | |||
==== Tilt ==== | |||
[[File:H3 Tilt.jpg|thumb|The Tilt skull in its hiding place.]] | |||
{{Article quote|What was once resistance is now immunity.}} | |||
'''Level''': [[Cortana (level)|Cortana]] | |||
'''Icon''': A skull marked with a smaller skull with a hole in its head. | |||
'''Effect''': All enemy and ally weaknesses and resistances double. Example: Brute armor is twice as weak to plasma weapons and twice as strong against projectile weapons. | |||
'''Point Multiplier''': 2× | |||
'''Directions''': | |||
#The skull is at the top of the large circular room where [[Cortana]] says ''"It was the coin's fault! I wanted to make you strong, keep you safe (drop in tone). I'm sorry, I can't..."'' When you enter this room you will fall out of a hole in the ceiling, next to a sitting, dead Elite. To the left of the room will be some small, somewhat fungal, growths on the walls. Near this is a rounded pillar. | |||
#Stand on the pillar and jump to the thin growth outcrops to the left. On many of them, you will hit your head on an obstruction above if you are not careful; spoiling the jump. After the first two to the left, turn around and look away from the rock wall - then left ninety degrees for another one with a longish extrusion of Flood material. | |||
#This one is difficult as your head will hit the wall with jumps from many of the obvious positions. One jump that works is at the tip of this jump, back about 2 feet from the edge, and jumping slightly left (approx one foot) of the tip of the target jump. Another jump that works is; When you get on the upper outcrop on the left, facing the other outcrop you are jumping to, move as far as you can to the left. Then, jump toward the other outcrop with the extension of flood material. Walk up the extruded Flood tentacle onto the roof of the area where you will find the skull in a small pile of blood and bones. Note that underneath the platform you usually walk on are two to three Deployable Covers near the [[Terminal (Halo 3)|Terminal]] with Cortana's message. These can be placed on the pillar and the ledge to make the jumps easier and help you avoid things that can cause your jumps to fail. | |||
==== Mythic ==== | |||
[[File:H3 Mythic.jpg|thumb|This skull is the Mythic skull]] | |||
{{Article quote|Coverage under the Covenant Health Plan.}} | |||
'''Level''': [[Halo (Halo 3 level)|Halo]] | |||
'''Icon''': A skull marked with a circle with a smaller circle in it | |||
'''Effect''': All of the Covenant you encounter have twice the amount of health and shields. This will also extend to your allies, too. | |||
'''Point Multiplier''': 2× | |||
'''Directions''': | |||
#At the beginning of the level, move forward, hugging the right wall and curving slowly left in the cave up ahead. After a short amount of time, you will see a tunnel opening to the right. Move through this, but still hug the right wall. Part way along an opening (cave) on the right will open up. | |||
#Move inside, turning your [[flashlight]] on (up on the D-pad of the controller). Soon you will reach a dead end, and the skull is on the ground, among the rocks. | |||
=== List of silver skulls === | |||
Silver skulls provide no score multipliers when turned on. | |||
==== Blind ==== | |||
[[File:H3 Blind.jpg|thumb|The Blind skull on the rock.]] | |||
{{Article quote|Shoot from the hip.}} | |||
'''Level''': [[Sierra 117]] | |||
'''Icon''': An eye with the pupil crossed out. | |||
'''Effect''': Your entire Heads-Up Display is disabled. You can't see your weapon, shield meter, motion tracker, equipment, or ammo/grenades. Your shield will not make any noise unless it is recharging. You do not get notifications for checkpoints or loading nor are you able to visibly see prompts. You are able to see what gun you're holding by the subtle sound it makes, looking down, and getting out of first person view. You are also able to know what type of grenade you have equipped yourself with by the subtle sounds they make. | |||
'''Directions''': | |||
# Go to the area where you first encounter the Covenant. There should be a Brute Captain Major and a few Grunts. | |||
# Face the large body of water and look for the protruding rock. | |||
# Jump onto this rock. There should be another rock. Jump on this. Walk to the end of this rock and pick up the skull. | |||
==== Grunt Birthday Party ==== | |||
[[File:BirthdayGruntCloseUp.jpg|thumb|The effect of the Grunt Birthday Party skull.]] | |||
{{Article quote|Light a match...}} | |||
'''Level''': [[Crow's Nest]] | |||
'''Icon''': A skull marked with a candle. | |||
'''Effect''': If a Grunt is shot in the head with any headshot-capable weapon (such as the [[BR55HB SR Battle Rifle|Battle Rifle]], [[Type-50 particle beam rifle|Beam Rifle]], [[Carbine]], [[Sniper rifle|Sniper Rifle]] or [[M6 Series|Magnum]]), a popping sound is heard, colorful confetti explodes out of it which causes minor damage to nearby enemies, detonates grenades on the ground, and a sound clip of children cheering from the game ''Hurray''!"can be heard in the background. When the Grunt's head explodes, their mask will usually fall off. | |||
'''Directions''': | |||
#Method A: On your way to the barracks, you will come across a section in the level where you are required to drop down into a shaft, and at the bottom, are several pipe entrances, where Drones fly in and out of. Reaching the bottom will initiate a Cortana Moment. | |||
#If you walk to the end of the corridor, there is another large drop (purple pipe with a rotating fan), but do not jump down. Instead, look down around the drop and you will notice a small ledge protruding out a little bit with a green arrow just visible in the middle of it. If you approach the edge very slowly and walk backwards very quickly as soon as you fall, you will land on the ledge. The skull will be located at the end of the passage. | |||
#Method B: After the battle with the Chieftain and Brutes, grab a grav lift. Continue on until you are in the shaft with the drones. Walk down the corridor and go down the large drop. Turn around and throw the grav lift. Go through it and then you'll enter the passage with the skull at the end of it. | |||
'''Note''': Try to lay the lift as near to the pipe as possible; laying it in the middle won't always work. | |||
==== Cowbell ==== | |||
[[File:H3 Cowbell.jpg|thumb|The Cowbell skull above the stairs.]] | |||
{{Article quote|More bang for your buck.}} | |||
'''Level''': [[The Ark (level)|The Ark]] | |||
'''Icon''': A skull marked with a cowbell. | |||
''' | '''Effect''': Physics impulses are increased. Explosions and melee attacks launch characters and objects farther, but the damage is not affected. Allies and enemies alike do not flinch when you melee them bar [[Jiralhanae]] with very weak shields. | ||
'''Directions''': | |||
#You must start this level from the beginning; starting from any other point will cause the skull to not appear. After defeating the [[Deutoros-pattern Scarab|Scarab]], take a Gravity Lift from the small structure in the center (to the right of the entrance up the large slope), then continue on until you pass the room with a lot of explosive [[Plasma battery|Plasma Batteries]]. In the hallway after this room, there is a tall section with openings above the turning point of the hall, and the skull is in the top one of the highest of these. There are several methods to obtain this skull: | |||
##'''Method A''': Use the Grav Lift to get there. The ideal place to deploy it is about three fourths of the way down the ramp, and a little to the left of the center, while facing up-ramp (facing up-ramp will ensure the Grav Lift doesn't slip farther down). Run down the ramp and jump, such that you reach the peak of your jump while directly over the Grav Lift. You should also be running towards the tall section, aiming towards the middle of the top shelf on the section. If your Grav Lift expires or is destroyed, you can always revert to last save since the room containing the skull is a checkpoint. If you have difficulty getting there, crouch while being Grav-Lifted. This may take a few tries. | |||
##'''Method B''': If you are having too much trouble placing the Grav Lift, it is possible to drive a Brute Chopper into the building. You can then drive the Chopper to the bottom of the ramp, jump onto it, and deploy the Grav Lift, which will go through the vehicle. You should be elevated to the opening with the skull. | |||
##'''Method C''': If you are playing on Co-Op, have two of the players grab a Grav Lift. One (''Person A'') should drop their Grav Lift before the platforms, use it to go up to the fourth level (one below the skull), and wait for their partner (''Person B'') to join them. ''Person B'' should stand right on the edge of that platform and deploy their Grav Lift while facing straight down. If ''Person A'' placed the first one right, then the two Grav Lifts should line up, with one hovering above the other. ''Person A'' should then walk backwards off the edge and onto the Grav Lift(s). ''A'' will end up being suspended above the platform with the skull, at which point they should just keep holding the left thumbstick forward until they move onto the platform. If they ''can't'' move forward, they should keep pushing forward anyway, because when the lower Grav Lift breaks, they will drop onto the platform. | |||
##'''Method D''': If you managed to pass through the previous room without setting off any of the plasma batteries, push one down to the edge of the openings, detonate it with a plasma grenade or a brute shot, and explosive jump to the top opening. | |||
==== IWHBYD (I Would Have Been Your Daddy)==== | |||
[[File:H3 IWHBYD.jpg|thumb|The IWHBYD skull in front of the light bridge.]] | |||
{{Main|IWHBYD skull (Halo 3)}} | |||
{{Article quote|But a dog beat me over the fence!}} | |||
''' | '''Level''': [[The Covenant (level)|The Covenant]] | ||
''' | '''Icon''': A skull marked with a double helix. | ||
''' | '''Effect''': Rare dialog is more common, and vice versa. | ||
''' | '''Directions''': Near the end of the level, after you and the Arbiter fight through the Covenant to stop Truth from firing the Halo rings, the Flood will turn against you. Fight your way back to the elevator, but '''DO NOT''' drop through the vent at the end. Instead, turn around, facing the 7 holographic rings. From here, the closest ring is 1, the farthest away is 7. '''''FOLLOW THIS SEQUENCE BY JUMPING THROUGH THE RINGS IN THIS ORDER''''': 4 6 5 4 5 3 4 (If you listen closely, the humming noise of each holographic ring corresponds to one of 7 notes on a musical scale, and the sequence of notes produced by the rings in the sequence follows the tune of the last [[seven]] notes of the Gregorian Chant from the famous [[Halo Theme]]). Afterward, head all the way back to the control console and the skull should be on the floor just in front of the light-bridge. | ||
==== Unknown (Second Blind/Assassin) ==== | |||
{{Main|Halo 3 skulls#Assassin skull|l1=Assassin skull}} | |||
''' | '''Level''': [[Cortana (level)|Cortana]] | ||
''' | '''Effects''': Nothing. [[Halo 3 skulls#Glitches|There is a glitch]] that enables a player carrying either this skull or the [[Halo 3 skulls#Tilt|Tilt]] skull through to the end of the level to start the next level with a [[M6 Grindell/Galilean Nonlinear Rifle|Spartan Laser]] and their current secondary weapon. | ||
''' | '''Directions''': | ||
#This skull can be found in the reactor room. First, kill all of the Flood forces in the room. Once the room is free of Flood, search the room for some stacked up Deployable Covers. Make sure you have some grenades (not Spike Grenades or Firebombs) with you. | |||
#Grab one of the Deployable Covers and climb one of the pillars that extend from the upper floor. Deploy the cover and climb it. Then, jump to the upper floor. If you can't do it with the Deployable Cover, throw a grenade on the end of the pillar and grenade jump—if you got the [[Halo 2 skulls#Famine|Famine skull]] by grenade jumping, you should be able to reach the upper floor in 2-3 tries. | |||
#When you're up, search around the surface and look down. At some point, you should find the skull among some bones. It's above the main door. | |||
'''Note''': In ''Halo: The Master Chief Collection'', the skull will sometimes fall off its perch when it spawns, falling into the pit and becoming unobtainable. | |||
'''Level''': [[ | == Mythic skulls == | ||
These skulls can be found in the [[Mythic Map Pack]] levels that can give you [[achievement]]s. These skulls only appear when in [[Forge]]. | |||
=== Orbital === | |||
[[File:H3 Orbital Skull.png|thumb|200px|The Orbital skull's location.]] | |||
'''Level''': [[Orbital]] | |||
''' | '''Icon''': A skull marked with the emblem of the [[Quito Space Tether]]. | ||
''' | '''Direction''': Above the pit between the two pathways, go up until you see the skull on the ledge. You must exit Edit Mode on the ledge beside it, crouch and get it. | ||
''' | ===Assembly=== | ||
[[File:H3 Assembly Skull.png|thumb|200px|The Assembly skull's location.]] | |||
'''Level''': [[Assembly]] | |||
''' | '''Icon''': A skull marked with [[Lekgolo]] worms. | ||
''' | '''Direction''': Near the middle. Between the two pipes connecting the middle to the building. Use Edit Mode in Forge to fly up there. | ||
=== | ===Sandbox=== | ||
[[File:H3 Sandbox Skull.png|thumb|200px|The Sandbox skull's location.]] | |||
'''Level''': [[Sandbox]] | |||
''' | '''Icon''': A skull marked with a [[Monitor]]. | ||
''' | '''Direction''': | ||
The skull is located between two of the [[The Guardians|Guardian]] towers, at the right of the sun - locating the skull in [[Theater]] first helps. The towers fire upon the player on sight, and are one-hit kills, so to reach the skull, a player has to use scenery items to protect themselves. An easy way to obtain the skull is through the following steps: | |||
''' | '''Method 1:''' | ||
#In [[Forge]], [[Overload glitch (Halo 3)|overload]] the map. | |||
#Locate the skull and construct a Tube Y-Intersection surrounding the skull. This will serve as your protection against the towers' deadly beam. | |||
#Place two two-way teleporter nodes; one inside the tube and the other within the map's safe zone. | |||
#Start a new round and simply walk into the teleporter and obtain the skull. | |||
'''Method 2:''' | |||
#Locate the skull in Theater mode. | |||
#Place a corner piece of movable corridor with one opening facing in the direction of the skull and the other opening facing the sky. | |||
#Position yourself within the piece of corridor looking out towards the skull. | |||
#'Pick up' the corridor and move towards the skull, the corridor should move around you, absorbing the fire from the Guardian Towers. | |||
#When you reach the skull simply turn back into a Spartan, crouch down and pick it up. | |||
'''Method 3:''' | |||
#Before starting, edit both the editor and player traits to give both maximum overshields. (This allows both modes to withstand a single blast from a tower.) | |||
#Locate the skull. | |||
#Create a [[Bubble Shield|bubble shield]] in edit mode and pick it up in player mode. | |||
#Fly to the skull in edit mode. | |||
#Enter player mode and quickly drop the bubble shield over the skull, giving you time to retrieve it. | |||
''' | ===Heretic=== | ||
[[File:H3 Heretic Skull.png|thumb|200px|The Heretic skull's location.]] | |||
'''Level''': [[Heretic]] | |||
''' | '''Icon''': A skull marked with the [[Mark of Shame]]. | ||
'''Direction''': Standing on the sword platform face the windows and the skull is 90 degrees to the right of the sword under the vents. | |||
'''Level''': [[ | ===Longshore=== | ||
[[File:H3 Longshore Skull.png|thumb|200px|The Longshore skull's location.]] | |||
'''Level''': [[Longshore]] | |||
''' | '''Icon''': A skull marked with a harpooned fish. | ||
''' | '''Direction''': On the top of a large ventilation shaft beside a "Fronk's" sign. Head for the aircraft carrier & then turn right. Only accessible via Forge. | ||
''' | ===Citadel=== | ||
[[File:H3 Citadel Skull.png|thumb|200px|The Citadel skull's location.]] | |||
'''Level''': [[Citadel]] | |||
''' | '''Icon''': A skull marked with the symbol of the [[Covenant citadel|Citadel]]. | ||
''' | '''Direction''': Find the overshield on the blue side. Then look for the wall with the blue triangular shapes on it. There should be a pillar in-between the shapes. At the top of this pillar, to the right in an alcove is the skull. Only accessible via Forge. | ||
=== | ==Special / Exclusive Skull== | ||
=== Assassin=== | |||
Hackers searched the Halo 3 files and found evidence of an "Assassin Skull" in the <code>mainmenu.map</code> file. The same file also had hints of every skulls' locations, and the Assassin skull's hint was "Interred where heroes fall". Interestingly enough, the Sierra 117 Blind skull's hint was "Interred deep within her tomb". That description doesn't match with Sierra 117, but the Assassin skull's description does (the Chief fell from the [[Forerunner Dreadnought|Dreadnought]] at that level). The "unknown skull" on Cortana matches the Blind skull's description, considering that Cortana was trapped in ''[[High Charity]]''. | |||
Apparently the unknown skull in Cortana was going to be the Blind skull, and Sierra 117 would have the Assassin skull, but the latter was replaced by the former. However Bungie technically did not remove the "old" Blind skull from the game, nor updated the mainmenu.map file; the Assassin skull and its info were not removed, and the hint for the Blind skull was not corrected. It has commonly been claimed that if a player retrieves the unknown skull before they retrieve the Blind skull, that they will unlock the Blind skull in the Campaign options screen, but this has been disproven.{{Ref/Site|Id=BlindSkull2|URL=https://www.youtube.com/watch?v=VEOFxQrKArI|Site=YouTube|Page=Halo 3 - Is The Secret Skull On Cortana Really A 2nd Blind Skull?|D=03|M=10|Y=2017}} | |||
===Acrophobia=== | |||
The Acrophobia skull is an exclusive skull, featured only in [[Halo: The Master Chief Collection]]. The skull was released for the Xbox and PC version in commemoration of Halo 3‘s release on PC on 14 July 2020. | |||
''' | '''Unlock criteria''': Kill 343 enemy air units (Banshee, Drones, Sentinels, and Phantoms). | ||
''' | '''Effects''': Hold jump to activate the skull, and hold crouch during the flight to stop mid-air. | ||
''' | '''Note''': Direct impact into almost anything at high speed while in flight can cause the player to die upon impact. | ||
===Anger=== | |||
This skull was made available in Halo: The Master Chief Collection in the April 2022 update. | |||
===Bandanna=== | |||
This skull was made available in Halo: The Master Chief Collection in the April 2022 update. | |||
===Bonded Pair=== | |||
This skull was made available in Halo: The Master Chief Collection in the April 2022 update. | |||
===Boom=== | |||
This skull was made available in Halo: The Master Chief Collection in the April 2022 update. | |||
== | ===Eye Patch=== | ||
This skull was made available in Halo: The Master Chief Collection in the April 2022 update. | |||
===Foreign=== | |||
This skull was made available in Halo: The Master Chief Collection in the April 2022 update. | |||
===Ghost=== | |||
This skull was made available in Halo: The Master Chief Collection in the April 2022 update. | |||
===Jacked=== | |||
This skull was made available in Halo: The Master Chief Collection in the April 2022 update. | |||
=== | ===Malfunction=== | ||
This skull was made available in Halo: The Master Chief Collection in the April 2022 update. | |||
===Master Blaster=== | |||
This skull was made available in Halo: The Master Chief Collection in the April 2022 update. | |||
===Pinata=== | |||
This skull was made available in Halo: The Master Chief Collection in the April 2022 update. | |||
=== | ===Recession=== | ||
This skull was made available in Halo: The Master Chief Collection in the April 2022 update. | |||
===So…Angry…=== | |||
This skull was made available in Halo: The Master Chief Collection in the April 2022 update. | |||
===Swarm=== | |||
This skull was made available in Halo: The Master Chief Collection in the April 2022 update. | |||
=== | ===That’s Just… Wrong=== | ||
This skull was made available in Halo: The Master Chief Collection in the April 2022 update. | |||
===They Come Back=== | |||
This skull was made available in Halo: The Master Chief Collection in the April 2022 update. | |||
==Cut Hints== | |||
''Halo 3''{{'}}s mainmenu.map file contains unused lines that would have hinted at the locations of the skulls. | |||
{| class="wikitable" | |||
|- | |||
! Skull !! Hint | |||
|- | |||
| Iron || Interred along [[Sierra 117|the slopes of Mt. Killimanjaro]].. | |||
|- | |||
| Black Eye || Interred within [[Crow's Nest|the hidden human base]].. | |||
|- | |||
| Tough Luck|| Interred in a ditch at the side of [[Tsavo Highway|the road]].. | |||
|- | |||
| Catch || Interred at [[The Storm|the crater's edge]].. | |||
|- | |||
| Fog || Interred [[Floodgate|where the dead walk again]].. | |||
|- | |||
| Famine || Interred within [[The Ark (level)|the wastelands of the Ark]].. | |||
|- | |||
| Thunderstorm || Interred near [[The Covenant (level)|the peaks at the Ark's core]].. | |||
|- | |||
| Tilt || Interred deep within [[Cortana (level)|the Flood hive]].. | |||
|- | |||
| Mythic || Interred on [[Halo (Halo 3 level)|Installation 04v2]].. | |||
|- | |||
| Assassin {{C|cut}} || Interred [[Sierra 117|where heroes fall]]..<br>(Describes where the blind skull is found in the final game) | |||
|- | |||
| Blind || Interred within [[Cortana (level)|her tomb]]..<br>(Describes where the unused skull in Cortana is found) | |||
|- | |||
| Cowbell || Interred along [[The Ark (level)|the rim]].. | |||
|- | |||
| Grunt Birthday Party || Interred where [[Crow's Nest|the crows roost]].. | |||
|- | |||
| IWHBYD || Interred at [[The Covenant (level)|the Foundry's edge]].. | |||
|} | |||
' | == Trivia == | ||
===Glitches=== | |||
The [[Spartan Laser]] the player receives on the mission [[Halo (Halo 3 Level)|Halo]] upon completing [[Cortana (Level)|Cortana]] with a skull equipped is likely an unintended quirk caused by the way the game reallocates player weapons after completing certain missions. Between these missions, the game will go through a series of checks comparing the player's weapons to the weapons in the next mission to determine whether they are present. Ordinarily, if they are, the player will retain them. If the game cannot find an appropriate match for the weapon, or the player has a projectile weapon with an empty magazine and no ammunition remaining, it will instead give the player the default loadout for the mission. | |||
'' | Skulls, however, are unintentionally able to pass the checks for retaining non-melee energy weapons as the game doesn't check an energy weapon's ammunition count, contrary to projectile weapons which are checked. This means that holding: | ||
*the [[Halo 3 skulls#Tough Luck|Tough Luck]] skull from [[Tsavo Highway (level)|Tsavo Highway]] into [[The Storm (level)|The Storm]]; or | |||
*the [[Halo 3 skulls#Tilt|Tilt]] or [[Halo 3 skulls#Unknown (Second Blind/Assassin)|Unknown]] skull from Cortana into Halo, | |||
''' | will give the player the first energy weapon in the weapon index of these levels. In The Storm, this gives the player a [[Plasma Pistol]], and in Halo it gives them a Spartan Laser. If the player finishes any other mission with a skull, the game will replace it with a default weapon instead. This is because these missions check either projectile weapons or melee weapons first in the weapon index, which are both checks the skulls will immediately fail.<ref>[https://www.youtube.com/watch?v=4hD8PoqLLTc '''General Heed on YouTube''' ''- The Truth About The Secret Skull On Cortana Revealed'']</ref> | ||
Bungie. | ===Miscellaneous=== | ||
*The Mythic skull has gold teeth. | |||
*A skull's melee power is the same as a regular melee, rather than an instant kill with the Oddball. | |||
*''Halo 3'' skulls also have [[command neural interface|neural interfaces]] in the back of them, like those used by [[John-117]], [[Jacob Keyes|Captain Keyes]] and [[Terrence Hood|Lord Hood]] and etc. | |||
*The "I Would Have Been Your Daddy" skull references to the first chapter of [[Assault on the Control Room]], in ''[[Halo: Combat Evolved]]'' which shares the same name. The skull name is the same quote from the beginning of the level. | |||
*It is possible to "dribble" the skull at the beginning of ''Crows Nest'', just pick up the skull when unarmed and start rapidly pressing right trigger. | |||
*On any level with the Arbiter, if you kill the Arbiter in a safe spot, and drop the skull very close to him, he might jump up and grab it and use it as a weapon, going into the fight hitting enemies with the skull as he goes. | |||
*The "Grunt Birthday Party" skull is the only skull that appears in all seven of the Halo games that feature skulls: ''[[Halo 2]]'', ''[[Halo 3]]'', ''[[Halo 3: ODST]]'', ''[[Halo Wars]]'', ''[[Halo: Reach]]'', ''[[Halo 4]]'', and ''[[Halo 5: Guardians]]''. | |||
*''Halo 3'' skulls are generally easier to get than in ''Halo 2''. They can be found on the Normal difficulty, and are often hidden in simple places which require far less skill and time to reach; examples being the Tough Luck, Mythic and Thunderstorm skulls, which only require taking a simple detour rather than a complicated jump challenge. | |||
*In Co-op, if any of the players do not have the skull of that corresponding level and someone picks it up, the skull will be unlocked in both the menu and as an Achievement for the players which did not already have it. | |||
*The term "[[Mythic (difficulty)|Mythic]] Difficulty", or more commonly "LASO", simply refers to a person playing on Legendary difficulty with every skull active. | |||
*The sound that results from the Grunt Birthday Party skull being used was originally from [[wikipedia:Viva Piñata|Viva Piñata]].<ref>[https://twitter.com/franklez/status/1131661432787853312]</ref> | |||
*The particle effect for the Grunt Birthday Party skull was created by Bungie VFX artist [[Steve Scott]] for amusement during a period of intense [https://en.wikipedia.org/wiki/Video_game_developer#Crunch_time crunch] during the development of ''Halo 3''.<ref>[https://twitter.com/stepscot/status/1152667859983589376 '''Steve Scott on Twitter''' - ''Someone cosplayed as a particle effect I made to amuse myself during a brutal crunch over a decade ago. This gives me a type of joy I have never experienced before. #gamedev #halo3'']</ref> | |||
== | ==Gallery== | ||
<gallery> | <gallery> | ||
File:Main menu map.jpg|The code containing hints to skull locations and descriptions. | |||
File:HxD - Assassin Skull.jpg|The Assassin skull listed within Halo 3's game code. | |||
File:H3 Icon Skull-Gold.png|A gold skull as depicted on Bungie.net. | |||
File:H3 Icon Skull-Silver.png|A silver skull as depicted on Bungie.net. | |||
</gallery> | </gallery> | ||
== | ==Sources== | ||
{{Ref/Sources}} | |||
{{ | |||
==External links== | |||
*[http://halo.bungie.net/News/content.aspx?type=topnews&cid=12828 Bungie.net - Get the most out of skulls] | |||
*[http://www.gamerhelp.com/article_viewer.cfm?article_id=129280 Location of all the skulls] | |||
[[Category:Halo 3]] | [[Category:Halo 3]] | ||
[[Category:Skulls]] | |||
Latest revision as of 07:03, April 18, 2024

Skulls are a series of gameplay modifiers available for use in Halo 3 and Halo 3: ODST. Both games feature the same roster of skulls and effects, though in Halo 3 these items are hidden throughout the game's campaign as hidden easter eggs - and must be found before they can be used. In ODST and the Halo: The Master Chief Collection iterations of both games, all skulls are unlocked from the start.
Once activated, a skull makes gameplay either more humorous, or more challenging.
Background[edit]
The skulls greatly resemble those in the Multiplayer game variant Oddball, and can be used as weapons in much the same way. However, they lack the information text (i.e. "Press RB to pick up...") to pick them up. They are usually hidden and out of the way, so one must thoroughly search for them, or know where they are, to get them. There are thirteen skulls in Halo 3, along with a fourteenth secret skull on Cortana.
To unlock a skull, you must start its level from the beginning, on Normal or higher. You can stop playing at any time (provided you resume using the "Resume Solo/Co-op Game" option from the main menu), and you do not need to carry the skull all the way to the end (with the exception of the IWHBYD skull).
The Mythic skull is the only skull available on Easy, although you will not receive the achievement for it. Also, a very important note is that the skulls are affected by physics. This means that, with the exception of the Famine skull, skulls can be moved by grenades, explosions, and other forces.
Once a skull is unlocked, you can activate it from the Campaign Lobby. Simply press X while in the Campaign Lobby, and then select a skull with A to activate it. Multiple skulls can be activated at once.
There are two different types of skulls: Gold skulls and silver skulls. Gold skulls will, when unlocked, grant you achievements, each worth 10 Gamerscore; when activated, they add multipliers to your Campaign Meta-game score. The nine gold skulls affect the difficulty of game-play, making the game more challenging. Silver skulls do not unlock achievements or add multipliers to your meta-game score. They are differentiated on the selection screen by their color, but are identical in-game. There are five Silver skulls, and four of them affects the physics, dialog, and appearance of gameplay.
Collecting 5, 9, and all 13 skulls of either type will unlock the Hayabusa Chest, Shoulders, and Helmet Armor Permutations, respectively, for usage in Multiplayer and Matchmaking.
In Halo: The Master Chief Collection, the functionality of Halo 3 skulls is identical, with two differences. All skulls (and Armor Permutations) are unlocked for gameplay from the start. The skulls can still be found and collected in campaign for achievements: both gold and silver skulls unlock achievements worth 5 Gamerscore each.
Campaign skulls[edit]
Meta game quick reference[edit]
| Icon | Skull Name | Multiplier | Short Description |
|---|---|---|---|
 |
Iron | 3× | In Solo play, dying reverts the player to the beginning of the level. In cooperative play, any player death reverts to the previous checkpoint. |
 |
Black Eye | 1.5x | No auto-shield regeneration. Only melee attacks cause shields to recharge. |
 |
Tough Luck | 1.5× | Grenades, Needler fire, projectiles (i.e. Rocket Launcher, Brute Shot, and Fuel Rod Cannon) and vehicular charges are evaded more skillfully by the AI. Brutes go Berserk more often and Grunts will turn Kamikaze more often. |
 |
Catch | 1.5× | NPCs throw many more grenades at an alarming rate. NPCs always drop two grenades when dying. |
 |
Fog | 1.5× | Motion Tracker is fully disabled. |
 |
Famine | 2× | Dropped weapons have much less ammunition/charge. |
 |
Thunderstorm | 1.5× | All enemies are promoted to higher ranks. (More experience) . |
 |
Tilt | 2× | Enemy defensive resistances/weaknesses are amplified. |
 |
Mythic | 2× | All NPC's health allocation is doubled. |
 |
Blind | 1× | Player HUD and weapon model are disabled. |
 |
Grunt Birthday Party | 1× | Headshots on Grunts trigger a confetti effect and sounds of children cheering. |
 |
Cowbell | 1× | Increased aceleration from explosions. |
 |
IWHBYD | 1× | Rare dialogue becomes more common. |
List of gold skulls[edit]
Iron[edit]

| “ | Death carries a heavy price... | ” |
Level: Sierra 117 Icon: A skull marked with a hammer.
Effect: If you die while playing solo, you will respawn at the very beginning of the level - The "Revert to last checkpoint" option is no longer selectable. If any player dies while playing Co-op, all players will respawn to the last checkpoint. This is similar to what would happen when playing Co-op on Legendary in Halo 2, but it is slightly more harsh on the players.
Point Multiplier: 3×
Directions:
- Battle through to the level normally until you arrive at the point where you must rescue Sergeant Johnson and his team.
- Snipe as many enemies as you can before jumping down, especially on the bridge.
- Jump down and cross the bridge.
- Keep to the right of the bridge until you see a blocked line with some pipes. Hop onto this block and continue.
- When you reach the end of this raised block, jump up into the balcony.
- Follow this balcony to the end, the skull is hidden behind a pillar jutting out from the building tucked into the corner.
Black Eye[edit]

| “ | Bash your way to better health. | ” |
Level: Crow's Nest Icon: A skull marked with a smaller skull with a bruise under one eye.
Effect: Your Energy Shield will not recharge until you perform a melee hit. The following actions will also recharge your energy shields:
- The RT attacks from the Energy Sword and Gravity Hammer
- An enemy being in the Gravity Hammer's shockwave area of effect.
- Boarding/hijacking an enemy vehicle
- Punching (not boarding/hijacking) an enemy vehicle, Shade Turret, or any enemy-manned turret
- Destroying a Scarab's core on any level that features Scarabs
- Punching the exposed Lekgolo part of the core of a Scarab.
- Activating Invincibility
- Deploying a Regenerator
- Betraying allies and punching them
Point Multiplier: 1.5×
Directions:
- At the beginning of the level, walk to the door leading to the barracks, then turn around.
- Walk to the green metal rack and jump on top of it.
- Turn to the right, look up to the red metal beam, and jump on it.
- To the direct right again, is a much larger blackish pipe. Jump on it.
- Walk along the pipe, taking care not to fall off, and you will see the skull at the end.
Tough Luck[edit]
| “ | Your foes always make every saving throw. | ” |
Level: Tsavo Highway
Icon: A skull marked with a three-leafed clover.
Effect: Enemies dodge Grenades, Needles, slow moving projectiles and vehicle assaults with a greater success rate. Non-Chieftain Jiralhanae will berserk more often and Grunts will become Suicide Grunts more often.
Point Multiplier: 1.5×
Directions:
- Keep battling through to the point where you must fight a group of Brutes, two of which are using Choppers.
- Kill all the enemies, destroy the shield, then continue through until you reach a long, winding bridge. At this point, a Covenant CCS-class Battlecruiser should fly overhead.
- To your left, you will see a series of yellow ladders. Go to the very last one. If you receive a Regenerator at the top, you will know it is the correct ladder.
- Jump over or around the large metal bar on the right, then turn to the left.
- Look down and you will see a large, black support below you. Jump down onto it. Note that you have to walk and be standing on the part of the pipe that sticks out slightly with the bolts going through it—otherwise, you'll take too much fall damage and die.
- Walk along to the end of the support, then turn to the left again.
- Now you should be able to see the skull on a cliff across a gap. Jump across the gap on to the cliff, and get the skull.
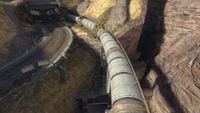
The pipeline that must be traversed to the Tough Luck skull.
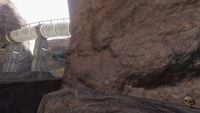
The Tough Luck skulls in its hidden location.


Catch[edit]

| “ | Pull pin. Count to three. Throw. | ” |
Level: The Storm
Icon: A skull marked with an image of a Plasma Grenade.
Effect: All AI-controlled units, friend or foe, throw grenades more often, where applicable. It even affects scripted grenades. For example, on the level Crow's Nest, on the part where the Warthog is hit by a Plasma Grenade, it will now be hit by two, three, or even four. The Catch skull has no effect on Flood. It should be noted that characters will throw an unlimited amount of grenades at their enemies. The skull actually does seem to increase the number of Kamikaze Grunts. It has been observed that the Marines will sometimes throw grenades with reckless abandon, similar to their behavior in Halo: Combat Evolved.
Point Multiplier: 1.5×
Directions:
- If you have the Easy Shield in your service record, the skull will NOT spawn. You have to beat the campaign on normal or higher to make the skull spawn again.[1]
- Battle through to Lakebed A -- the point where you fight an Anti-Air Wraith, a handful of Ghosts, and a standard Wraith.
- You should see a silo-like building (see image). On top of this is the skull. Look for the ramp that leads over to the platform where the normal Wraith is dropped.
There are multiple methods which can be used to get onto the building.
- Hijack the Anti-Air Wraith and maneuver it so the back (the part with the plasma mortar, or in this case, fuel rod launchers) touches the base of the silo where the ground rises slightly; then, simply get out. The only problem is that this will cause an NPC Hornet to fire upon the standard Wraith, and the Wraith may focus its fire on you, so you will need to work a little quickly. The Anti-Air Wraith should remain still while you jump on the back and onto the top of the silo.
- Explosive Jump.
- Park a Ghost below, then jump from it onto the building. Use an Explosive Jump if necessary.
- Park one Ghost on the Wraith-side, then get another Ghost and park it on top. You should be able to simply jump on top of the Ghosts, then onto the silo.
- Take a Deployable Cover, then use it between the red wall and the building. Move out of the way and you can use the cover as a stepping stone.
- On Co-op, one player can jump onto the other player's head, then onto the building.
- Drive the Warthog at the foot of the silo and crouch-jump onto it. Make sure that the Warthog is at the Wraith-side of the silo before attempting the crouch-jump.
- Drive the Warthog between the silo and the wall so that it is turned on its side. Jump onto the red wall, then jump onto the silo.
Note: Do not destroy the standard Wraith, or the skull will disappear. Do not physically damage the normal Wraith (though the plasma turret operator can be sniped safely) in any way or the skull will disappear.
Fog[edit]

| “ | You'll miss those eyes in the back of your head... | ” |
Level : Floodgate
Icon: A skull marked with a swirl of fog.
Effect: Your Motion tracker is disabled completely.
Point Multiplier: 1.5×
Directions:
- Walk into the destroyed city of Voi. As soon as you enter the city, there is a building with an SAM Launcher on the right. Move to the middle of the road that leads in and left.
- Take out a weapon with a scope (preferably a Battle Rifle) and look up and to the right (to the top of the right hand building). Wait for a Marine to say over the radio, "All squads, report."
- You will see a Flood Combat Form on the roof of the building to the right. It will jump across the street above you as a Marine replies, "There, over there!". You can either kill the Combat Form, making it drop the skull, or, you can shoot off it's right arm. You may either kill it whilst it is still on the first roof or try to shoot it while it is in midair. The skull will fall to the ground between the two buildings.
Famine[edit]

| “ | Trust us. Bring a magazine. | ” |
Level: The Ark
Icon: A skull marked with a smaller skull. The smaller skull seems to have a line between it and some dots (food). This describes the obvious traits of a famine.
Effect: All weapons that are dropped by enemies or are scripted to spawn on the ground (e.g., near a crashed Pelican or group of dead bodies) have halved or reduced ammunition or charge. However, weapons found in cases still have the standard amount of ammo. Jackals, the only enemies found in the Halo 3 campaign to overcharge Plasma Pistol shots, are very likely to run out of charge due to the reduced charge also affecting them. Leaving them with no charge and no way to attack the Chief. This does not work in the Halo 3: ODST campaign.
Point Multiplier: 2×
Directions:
- After obtaining the Scorpion, you will be directed into a fork in the road. Going straight will lead you into a giant bowl-like valley, and going to the right will lead you through a broad sandy road.
- To the left is the bowl with two roads cut into the rock face. Go to the right and drive directly ahead until you hit the rock wall.
- When you get underneath the platform structure, you will notice some climbable rocks on the right that will lead you to the platform itself. You will notice several beam-like supports alongside the platform. Go to the very last one, at the end of the platform. If you jump up you can see the skull at the end. Align yourself right up to the support. You need to get to the crevice of it, sticking out and away from the platform; the skull can be seen in it. There are several methods to obtain this skull:
- Method A: Stick a Plasma Grenade right where the beam-like support and incline meet (on the bottom edge of the incline). Back up, run and jump, aiming a little higher than the skull. You should be just over and a little forward of the grenade when it explodes giving you enough of a boost to reach the skull.
- Method B: Pick up a Deployable Cover and place it in front of the pillar with the skull and use it as a step to the ledge. It may take a few tries to place it exactly at the perfect spot, as it may slide off and fall off the ledge.
- Method C: Play the game in Co-Op mode. Stand on your friend's head and have them run and jump towards the skull. At the highest point of their jump, jump over to the ledge. If performed correctly, you should land on the platform.
- Method D: Deploy a Bubble Shield so that the edge of it is near the edge of the structure. The Bubble Shield should keep the grenade you throw inside it so right after you throw, jump, and the grenade should give you a sufficient boost.
- Method E: Take a Brute Shot, and aim it downward but still on the building Take a leap, and as you jump, fire downward and you will be able to launch yourself to the skull.
- Method F: If you saved the Rocket Launcher from the downed Pelican, you can rocket jump by positioning yourself a suitable running distance from the platform with the skull, running at it backward, jumping as you reach the slanted floor and firing a rocket. The blast should be sufficient to propel you to the platform. It may take a few tries to get it without killing yourself, and is inadvisable on any difficulty other than Normal for this reason.
- Method G: Find a few Ghosts, and use the boulder and a boost+A-button combo to get them onto the platform. Then stack them near the spot with the skull and you should be able to jump from on top of them to the skull.
- Method H: On the way back through this canyon, after getting the Scorpions from the Forward Unto Dawn, as you pass under the arch and blow up the Phantom, there is a wall to the left of the part where the canyon narrows that you can drive a tank up. If you drive one up, then wedge it in the area where the Forerunner structure comes closest to the cliff you're on, you can take a second tank up the cliff, and drive it across the bridge made from the first one, onto the Forerunner structure, then, with some careful positioning, use its turret as a platform to jump to the skull.
- Method I: Use Chopper to get up to the platform through the rocks and park it on a slanted platform where your jump can reach where the skull is. This may require several attempt to do it.
Thunderstorm[edit]

| “ | Field promotions for everyone. | ” |
Level: The Covenant
Icon: A skull marked with a lightning bolt.
Effect: All enemies and allies are promoted to the highest available rank. The number of shielded Flood Elite Combat Forms and shielded Sentinels is also increased. Promotions given:
- Brute Minors and Brute Majors are promoted to Brute Ultras.
- Brute Captains and Brute Captain Majors (bar some) are promoted to Brute Captain Ultras.
- Grunt Minors (bar some) and Grunt Majors are promoted to Grunt Ultras.
- Elite Minors are promoted to Elite Majors.
- Jackal Minors are promoted to Jackal Majors.
Point Multiplier: 1.5×
Directions:
- After deactivating the first tower, there is a part in the level where you have to fly a Hornet to the third tower. As you hop into the Hornet, the title If You Want It Done Right will be displayed—if it isn't, then no skull will appear.
- On your way to the third tower, you will see the second tower (which was disabled by the Elites). This is also the tower with the Terminal. Fly over to it.
- There is a long, flat, semi-enclosed part of the tower that extends out over the ocean. There is a very tall ramp that leads up to it. At the end of the extension you will find the Thunderstorm skull.
Note: Restarting from Rally Point Alpha allows you to go to the skull's location, but no skull is present. Also, the "Too Close to the Sun" achievement can be unlocked from the skull location.
Tilt[edit]

| “ | What was once resistance is now immunity. | ” |
Level: Cortana
Icon: A skull marked with a smaller skull with a hole in its head.
Effect: All enemy and ally weaknesses and resistances double. Example: Brute armor is twice as weak to plasma weapons and twice as strong against projectile weapons.
Point Multiplier: 2×
Directions:
- The skull is at the top of the large circular room where Cortana says "It was the coin's fault! I wanted to make you strong, keep you safe (drop in tone). I'm sorry, I can't..." When you enter this room you will fall out of a hole in the ceiling, next to a sitting, dead Elite. To the left of the room will be some small, somewhat fungal, growths on the walls. Near this is a rounded pillar.
- Stand on the pillar and jump to the thin growth outcrops to the left. On many of them, you will hit your head on an obstruction above if you are not careful; spoiling the jump. After the first two to the left, turn around and look away from the rock wall - then left ninety degrees for another one with a longish extrusion of Flood material.
- This one is difficult as your head will hit the wall with jumps from many of the obvious positions. One jump that works is at the tip of this jump, back about 2 feet from the edge, and jumping slightly left (approx one foot) of the tip of the target jump. Another jump that works is; When you get on the upper outcrop on the left, facing the other outcrop you are jumping to, move as far as you can to the left. Then, jump toward the other outcrop with the extension of flood material. Walk up the extruded Flood tentacle onto the roof of the area where you will find the skull in a small pile of blood and bones. Note that underneath the platform you usually walk on are two to three Deployable Covers near the Terminal with Cortana's message. These can be placed on the pillar and the ledge to make the jumps easier and help you avoid things that can cause your jumps to fail.
Mythic[edit]

| “ | Coverage under the Covenant Health Plan. | ” |
Level: Halo
Icon: A skull marked with a circle with a smaller circle in it
Effect: All of the Covenant you encounter have twice the amount of health and shields. This will also extend to your allies, too.
Point Multiplier: 2×
Directions:
- At the beginning of the level, move forward, hugging the right wall and curving slowly left in the cave up ahead. After a short amount of time, you will see a tunnel opening to the right. Move through this, but still hug the right wall. Part way along an opening (cave) on the right will open up.
- Move inside, turning your flashlight on (up on the D-pad of the controller). Soon you will reach a dead end, and the skull is on the ground, among the rocks.
List of silver skulls[edit]
Silver skulls provide no score multipliers when turned on.
Blind[edit]

| “ | Shoot from the hip. | ” |
Level: Sierra 117
Icon: An eye with the pupil crossed out.
Effect: Your entire Heads-Up Display is disabled. You can't see your weapon, shield meter, motion tracker, equipment, or ammo/grenades. Your shield will not make any noise unless it is recharging. You do not get notifications for checkpoints or loading nor are you able to visibly see prompts. You are able to see what gun you're holding by the subtle sound it makes, looking down, and getting out of first person view. You are also able to know what type of grenade you have equipped yourself with by the subtle sounds they make.
Directions:
- Go to the area where you first encounter the Covenant. There should be a Brute Captain Major and a few Grunts.
- Face the large body of water and look for the protruding rock.
- Jump onto this rock. There should be another rock. Jump on this. Walk to the end of this rock and pick up the skull.
Grunt Birthday Party[edit]

| “ | Light a match... | ” |
Level: Crow's Nest
Icon: A skull marked with a candle.
Effect: If a Grunt is shot in the head with any headshot-capable weapon (such as the Battle Rifle, Beam Rifle, Carbine, Sniper Rifle or Magnum), a popping sound is heard, colorful confetti explodes out of it which causes minor damage to nearby enemies, detonates grenades on the ground, and a sound clip of children cheering from the game Hurray!"can be heard in the background. When the Grunt's head explodes, their mask will usually fall off.
Directions:
- Method A: On your way to the barracks, you will come across a section in the level where you are required to drop down into a shaft, and at the bottom, are several pipe entrances, where Drones fly in and out of. Reaching the bottom will initiate a Cortana Moment.
- If you walk to the end of the corridor, there is another large drop (purple pipe with a rotating fan), but do not jump down. Instead, look down around the drop and you will notice a small ledge protruding out a little bit with a green arrow just visible in the middle of it. If you approach the edge very slowly and walk backwards very quickly as soon as you fall, you will land on the ledge. The skull will be located at the end of the passage.
- Method B: After the battle with the Chieftain and Brutes, grab a grav lift. Continue on until you are in the shaft with the drones. Walk down the corridor and go down the large drop. Turn around and throw the grav lift. Go through it and then you'll enter the passage with the skull at the end of it.
Note: Try to lay the lift as near to the pipe as possible; laying it in the middle won't always work.
Cowbell[edit]

| “ | More bang for your buck. | ” |
Level: The Ark
Icon: A skull marked with a cowbell.
Effect: Physics impulses are increased. Explosions and melee attacks launch characters and objects farther, but the damage is not affected. Allies and enemies alike do not flinch when you melee them bar Jiralhanae with very weak shields.
Directions:
- You must start this level from the beginning; starting from any other point will cause the skull to not appear. After defeating the Scarab, take a Gravity Lift from the small structure in the center (to the right of the entrance up the large slope), then continue on until you pass the room with a lot of explosive Plasma Batteries. In the hallway after this room, there is a tall section with openings above the turning point of the hall, and the skull is in the top one of the highest of these. There are several methods to obtain this skull:
- Method A: Use the Grav Lift to get there. The ideal place to deploy it is about three fourths of the way down the ramp, and a little to the left of the center, while facing up-ramp (facing up-ramp will ensure the Grav Lift doesn't slip farther down). Run down the ramp and jump, such that you reach the peak of your jump while directly over the Grav Lift. You should also be running towards the tall section, aiming towards the middle of the top shelf on the section. If your Grav Lift expires or is destroyed, you can always revert to last save since the room containing the skull is a checkpoint. If you have difficulty getting there, crouch while being Grav-Lifted. This may take a few tries.
- Method B: If you are having too much trouble placing the Grav Lift, it is possible to drive a Brute Chopper into the building. You can then drive the Chopper to the bottom of the ramp, jump onto it, and deploy the Grav Lift, which will go through the vehicle. You should be elevated to the opening with the skull.
- Method C: If you are playing on Co-Op, have two of the players grab a Grav Lift. One (Person A) should drop their Grav Lift before the platforms, use it to go up to the fourth level (one below the skull), and wait for their partner (Person B) to join them. Person B should stand right on the edge of that platform and deploy their Grav Lift while facing straight down. If Person A placed the first one right, then the two Grav Lifts should line up, with one hovering above the other. Person A should then walk backwards off the edge and onto the Grav Lift(s). A will end up being suspended above the platform with the skull, at which point they should just keep holding the left thumbstick forward until they move onto the platform. If they can't move forward, they should keep pushing forward anyway, because when the lower Grav Lift breaks, they will drop onto the platform.
- Method D: If you managed to pass through the previous room without setting off any of the plasma batteries, push one down to the edge of the openings, detonate it with a plasma grenade or a brute shot, and explosive jump to the top opening.
IWHBYD (I Would Have Been Your Daddy)[edit]

- Main article: IWHBYD skull (Halo 3)
| “ | But a dog beat me over the fence! | ” |
Level: The Covenant
Icon: A skull marked with a double helix.
Effect: Rare dialog is more common, and vice versa.
Directions: Near the end of the level, after you and the Arbiter fight through the Covenant to stop Truth from firing the Halo rings, the Flood will turn against you. Fight your way back to the elevator, but DO NOT drop through the vent at the end. Instead, turn around, facing the 7 holographic rings. From here, the closest ring is 1, the farthest away is 7. FOLLOW THIS SEQUENCE BY JUMPING THROUGH THE RINGS IN THIS ORDER: 4 6 5 4 5 3 4 (If you listen closely, the humming noise of each holographic ring corresponds to one of 7 notes on a musical scale, and the sequence of notes produced by the rings in the sequence follows the tune of the last seven notes of the Gregorian Chant from the famous Halo Theme). Afterward, head all the way back to the control console and the skull should be on the floor just in front of the light-bridge.
Unknown (Second Blind/Assassin)[edit]
- Main article: Assassin skull
Level: Cortana
Effects: Nothing. There is a glitch that enables a player carrying either this skull or the Tilt skull through to the end of the level to start the next level with a Spartan Laser and their current secondary weapon.
Directions:
- This skull can be found in the reactor room. First, kill all of the Flood forces in the room. Once the room is free of Flood, search the room for some stacked up Deployable Covers. Make sure you have some grenades (not Spike Grenades or Firebombs) with you.
- Grab one of the Deployable Covers and climb one of the pillars that extend from the upper floor. Deploy the cover and climb it. Then, jump to the upper floor. If you can't do it with the Deployable Cover, throw a grenade on the end of the pillar and grenade jump—if you got the Famine skull by grenade jumping, you should be able to reach the upper floor in 2-3 tries.
- When you're up, search around the surface and look down. At some point, you should find the skull among some bones. It's above the main door.
Note: In Halo: The Master Chief Collection, the skull will sometimes fall off its perch when it spawns, falling into the pit and becoming unobtainable.
Mythic skulls[edit]
These skulls can be found in the Mythic Map Pack levels that can give you achievements. These skulls only appear when in Forge.
Orbital[edit]

Level: Orbital
Icon: A skull marked with the emblem of the Quito Space Tether.
Direction: Above the pit between the two pathways, go up until you see the skull on the ledge. You must exit Edit Mode on the ledge beside it, crouch and get it.
Assembly[edit]

Level: Assembly
Icon: A skull marked with Lekgolo worms.
Direction: Near the middle. Between the two pipes connecting the middle to the building. Use Edit Mode in Forge to fly up there.
Sandbox[edit]

Level: Sandbox
Icon: A skull marked with a Monitor.
Direction:
The skull is located between two of the Guardian towers, at the right of the sun - locating the skull in Theater first helps. The towers fire upon the player on sight, and are one-hit kills, so to reach the skull, a player has to use scenery items to protect themselves. An easy way to obtain the skull is through the following steps:
Method 1:
- In Forge, overload the map.
- Locate the skull and construct a Tube Y-Intersection surrounding the skull. This will serve as your protection against the towers' deadly beam.
- Place two two-way teleporter nodes; one inside the tube and the other within the map's safe zone.
- Start a new round and simply walk into the teleporter and obtain the skull.
Method 2:
- Locate the skull in Theater mode.
- Place a corner piece of movable corridor with one opening facing in the direction of the skull and the other opening facing the sky.
- Position yourself within the piece of corridor looking out towards the skull.
- 'Pick up' the corridor and move towards the skull, the corridor should move around you, absorbing the fire from the Guardian Towers.
- When you reach the skull simply turn back into a Spartan, crouch down and pick it up.
Method 3:
- Before starting, edit both the editor and player traits to give both maximum overshields. (This allows both modes to withstand a single blast from a tower.)
- Locate the skull.
- Create a bubble shield in edit mode and pick it up in player mode.
- Fly to the skull in edit mode.
- Enter player mode and quickly drop the bubble shield over the skull, giving you time to retrieve it.
Heretic[edit]

Level: Heretic
Icon: A skull marked with the Mark of Shame.
Direction: Standing on the sword platform face the windows and the skull is 90 degrees to the right of the sword under the vents.
Longshore[edit]

Level: Longshore
Icon: A skull marked with a harpooned fish.
Direction: On the top of a large ventilation shaft beside a "Fronk's" sign. Head for the aircraft carrier & then turn right. Only accessible via Forge.
Citadel[edit]

Level: Citadel
Icon: A skull marked with the symbol of the Citadel.
Direction: Find the overshield on the blue side. Then look for the wall with the blue triangular shapes on it. There should be a pillar in-between the shapes. At the top of this pillar, to the right in an alcove is the skull. Only accessible via Forge.
Special / Exclusive Skull[edit]
Assassin[edit]
Hackers searched the Halo 3 files and found evidence of an "Assassin Skull" in the mainmenu.map file. The same file also had hints of every skulls' locations, and the Assassin skull's hint was "Interred where heroes fall". Interestingly enough, the Sierra 117 Blind skull's hint was "Interred deep within her tomb". That description doesn't match with Sierra 117, but the Assassin skull's description does (the Chief fell from the Dreadnought at that level). The "unknown skull" on Cortana matches the Blind skull's description, considering that Cortana was trapped in High Charity.
Apparently the unknown skull in Cortana was going to be the Blind skull, and Sierra 117 would have the Assassin skull, but the latter was replaced by the former. However Bungie technically did not remove the "old" Blind skull from the game, nor updated the mainmenu.map file; the Assassin skull and its info were not removed, and the hint for the Blind skull was not corrected. It has commonly been claimed that if a player retrieves the unknown skull before they retrieve the Blind skull, that they will unlock the Blind skull in the Campaign options screen, but this has been disproven.[2]
Acrophobia[edit]
The Acrophobia skull is an exclusive skull, featured only in Halo: The Master Chief Collection. The skull was released for the Xbox and PC version in commemoration of Halo 3‘s release on PC on 14 July 2020.
Unlock criteria: Kill 343 enemy air units (Banshee, Drones, Sentinels, and Phantoms).
Effects: Hold jump to activate the skull, and hold crouch during the flight to stop mid-air.
Note: Direct impact into almost anything at high speed while in flight can cause the player to die upon impact.
Anger[edit]
This skull was made available in Halo: The Master Chief Collection in the April 2022 update.
Bandanna[edit]
This skull was made available in Halo: The Master Chief Collection in the April 2022 update.
Bonded Pair[edit]
This skull was made available in Halo: The Master Chief Collection in the April 2022 update.
Boom[edit]
This skull was made available in Halo: The Master Chief Collection in the April 2022 update.
Eye Patch[edit]
This skull was made available in Halo: The Master Chief Collection in the April 2022 update.
Foreign[edit]
This skull was made available in Halo: The Master Chief Collection in the April 2022 update.
Ghost[edit]
This skull was made available in Halo: The Master Chief Collection in the April 2022 update.
Jacked[edit]
This skull was made available in Halo: The Master Chief Collection in the April 2022 update.
Malfunction[edit]
This skull was made available in Halo: The Master Chief Collection in the April 2022 update.
Master Blaster[edit]
This skull was made available in Halo: The Master Chief Collection in the April 2022 update.
Pinata[edit]
This skull was made available in Halo: The Master Chief Collection in the April 2022 update.
Recession[edit]
This skull was made available in Halo: The Master Chief Collection in the April 2022 update.
So…Angry…[edit]
This skull was made available in Halo: The Master Chief Collection in the April 2022 update.
Swarm[edit]
This skull was made available in Halo: The Master Chief Collection in the April 2022 update.
That’s Just… Wrong[edit]
This skull was made available in Halo: The Master Chief Collection in the April 2022 update.
They Come Back[edit]
This skull was made available in Halo: The Master Chief Collection in the April 2022 update.
Cut Hints[edit]
Halo 3's mainmenu.map file contains unused lines that would have hinted at the locations of the skulls.
| Skull | Hint |
|---|---|
| Iron | Interred along the slopes of Mt. Killimanjaro.. |
| Black Eye | Interred within the hidden human base.. |
| Tough Luck | Interred in a ditch at the side of the road.. |
| Catch | Interred at the crater's edge.. |
| Fog | Interred where the dead walk again.. |
| Famine | Interred within the wastelands of the Ark.. |
| Thunderstorm | Interred near the peaks at the Ark's core.. |
| Tilt | Interred deep within the Flood hive.. |
| Mythic | Interred on Installation 04v2.. |
| Assassin (cut) | Interred where heroes fall.. (Describes where the blind skull is found in the final game) |
| Blind | Interred within her tomb.. (Describes where the unused skull in Cortana is found) |
| Cowbell | Interred along the rim.. |
| Grunt Birthday Party | Interred where the crows roost.. |
| IWHBYD | Interred at the Foundry's edge.. |
Trivia[edit]
Glitches[edit]
The Spartan Laser the player receives on the mission Halo upon completing Cortana with a skull equipped is likely an unintended quirk caused by the way the game reallocates player weapons after completing certain missions. Between these missions, the game will go through a series of checks comparing the player's weapons to the weapons in the next mission to determine whether they are present. Ordinarily, if they are, the player will retain them. If the game cannot find an appropriate match for the weapon, or the player has a projectile weapon with an empty magazine and no ammunition remaining, it will instead give the player the default loadout for the mission.
Skulls, however, are unintentionally able to pass the checks for retaining non-melee energy weapons as the game doesn't check an energy weapon's ammunition count, contrary to projectile weapons which are checked. This means that holding:
- the Tough Luck skull from Tsavo Highway into The Storm; or
- the Tilt or Unknown skull from Cortana into Halo,
will give the player the first energy weapon in the weapon index of these levels. In The Storm, this gives the player a Plasma Pistol, and in Halo it gives them a Spartan Laser. If the player finishes any other mission with a skull, the game will replace it with a default weapon instead. This is because these missions check either projectile weapons or melee weapons first in the weapon index, which are both checks the skulls will immediately fail.[3]
Miscellaneous[edit]
- The Mythic skull has gold teeth.
- A skull's melee power is the same as a regular melee, rather than an instant kill with the Oddball.
- Halo 3 skulls also have neural interfaces in the back of them, like those used by John-117, Captain Keyes and Lord Hood and etc.
- The "I Would Have Been Your Daddy" skull references to the first chapter of Assault on the Control Room, in Halo: Combat Evolved which shares the same name. The skull name is the same quote from the beginning of the level.
- It is possible to "dribble" the skull at the beginning of Crows Nest, just pick up the skull when unarmed and start rapidly pressing right trigger.
- On any level with the Arbiter, if you kill the Arbiter in a safe spot, and drop the skull very close to him, he might jump up and grab it and use it as a weapon, going into the fight hitting enemies with the skull as he goes.
- The "Grunt Birthday Party" skull is the only skull that appears in all seven of the Halo games that feature skulls: Halo 2, Halo 3, Halo 3: ODST, Halo Wars, Halo: Reach, Halo 4, and Halo 5: Guardians.
- Halo 3 skulls are generally easier to get than in Halo 2. They can be found on the Normal difficulty, and are often hidden in simple places which require far less skill and time to reach; examples being the Tough Luck, Mythic and Thunderstorm skulls, which only require taking a simple detour rather than a complicated jump challenge.
- In Co-op, if any of the players do not have the skull of that corresponding level and someone picks it up, the skull will be unlocked in both the menu and as an Achievement for the players which did not already have it.
- The term "Mythic Difficulty", or more commonly "LASO", simply refers to a person playing on Legendary difficulty with every skull active.
- The sound that results from the Grunt Birthday Party skull being used was originally from Viva Piñata.[4]
- The particle effect for the Grunt Birthday Party skull was created by Bungie VFX artist Steve Scott for amusement during a period of intense crunch during the development of Halo 3.[5]
Gallery[edit]

The code containing hints to skull locations and descriptions.

The Assassin skull listed within Halo 3's game code.

A gold skull as depicted on Bungie.net.

A silver skull as depicted on Bungie.net.


Sources[edit]
- ^ http://halo.bungie.net/Forums/posts.aspx?postID=23863683&postRepeater1-p=2#23864906
- ^ YouTube, Halo 3 - Is The Secret Skull On Cortana Really A 2nd Blind Skull? (Retrieved on Oct 3, 2017) [archive]
- ^ General Heed on YouTube - The Truth About The Secret Skull On Cortana Revealed
- ^ [1]
- ^ Steve Scott on Twitter - Someone cosplayed as a particle effect I made to amuse myself during a brutal crunch over a decade ago. This gives me a type of joy I have never experienced before. #gamedev #halo3


