Death Island: Difference between revisions
From Halopedia, the Halo wiki
mNo edit summary |
mNo edit summary |
||
| (119 intermediate revisions by 79 users not shown) | |||
| Line 1: | Line 1: | ||
{{ | {{Status|Gameplay}} | ||
{{Multiplayer map infobox | |||
{{Multiplayer | |||
|name=Death Island | |name=Death Island | ||
|image=[[ | |image=[[File:HaloCE - Death Island.jpg|265px]] | ||
|game=''[[Halo PC|Halo: Combat Evolved]]'' | |game=''[[Halo: Combat Evolved (PC port)|Halo: Combat Evolved for PC]]'' | ||
|map= | |||
|location=[[Installation 04]] | |location=[[Installation 04]] | ||
|terrain=Island, | |terrain=Island, beach | ||
| | |symmetry=Asymmetrical | ||
|playernumber= | |||
*4-16 | |||
| | |||
* | |||
|gametypes= | |gametypes= | ||
*[[Team Slayer]] | *[[Team Slayer]] | ||
*[[Race]] | *[[Race|Team Race]] | ||
*[[ | *[[Capture the Flag]] | ||
| | |pagegamelabel=CE | ||
}} | }} | ||
{{Article quote|Sand, Surf, and Spent Shells.}} | |||
' | '''Death Island''' is a [[multiplayer]] map, originally exclusive to ''[[Halo: Combat Evolved (PC port)|''Halo: Combat Evolved'' for PC]]'' and ''Halo Mac''. It is included in [[Halo: The Master Chief Collection|''The Master Chief Collection'']]. The map itself is very similar to the ''[[Halo: Combat Evolved]]'' [[campaign]] level [[The Silent Cartographer]]. The map is fairly large, with a recommended number of eight players for an ideal match for any gametype. | ||
Death Island is a | |||
==Overview== | |||
Death Island features two [[base]]s, one for Red team and the other for Blue team, which are on opposite sides of the island. These bases each contain two [[teleporter]]s, which lead either to a [[Mamua'uda-pattern Shade|Shade]] gunner's outcrop or a platform on top of the base, where players can find two [[Type-26 Banshee|Banshee]]s, a [[Karo'etba-pattern Ghost|Ghost]], and a [[SRS99C-S2 AM sniper rifle|sniper rifle]]. The map supports vehicle gameplay, such as the [[M12 Warthog|Warthogs]] and [[M808B Scorpion|Scorpions]] that spawn near the bases. | |||
In the center of the map is a large, permanently closed hatch, similar to the one that the [[D77-TC Pelican|Pelican]] [[Echo 419]] enters at the end of The Silent Cartographer. On it lies an [[overshield]], along with a [[M41 SPNKR|rocket launcher]], a [[M90 shotgun|shotgun]], a [[Unidentified fuel rod gun|Fuel Rod Gun]], [[grenade]]s, and a [[health pack]]. | |||
== | == Strategies == | ||
*Many games of [[Capture the Flag|CTF]] played on Death Island will have little [[flag]] involvement. The most likely place to spawn is inside the base, so everyone runs straight for the Banshee teleporter to the top of the island. Most players charge at the other team's Banshee roof, but this does not get to the flag. Paths down to the bases from up there are too far, and trying to jump from the roof into its interior will always result in death without an overshield, or land on a slope. | |||
*If you are experienced with [[fall damage reduction]], it's possible to jump off the roof and land on the slope above the entrance to each base, although the Red team's base is much harder as the wall partially blocks you. If successful, on CTF matches, you can score very quick captures by doing this and having teammates to cover you. | |||
*The trees near each base are solid, so landing on them can provide a quick way down to each team's base. Once there, you can easily nab the flag and go through the teleport, or if no one is looking, snatch a Warthog and drive away. | |||
*Players should value their vehicles because they are vital to this map and should be used whenever possible. Controlling the Scorpions and Banshees are often the key to winning, mostly due to the map's large size. A good tactic on CTF is to get at least four Scorpion tanks, drive them out into the ocean, and bombard the enemy base. Then, you can sneak troops up to the base while they are distracted and steal the enemy flag. Also, a group of Banshees working together are a force to be reckoned with and can even take down groups of Scorpion tanks. | |||
*Another good tactic on [[Team Slayer]] or Capture the Flag is to drive Scorpions up to the top of the map and bombard; placing them over their teleporters can also greatly help an offensive attack, so long as you watch out for [[Anskum-pattern plasma grenade|Plasma Grenades]]. | |||
*You can also use the Shade turret as an option if needed, although it is less practical for offensive purposes. It is able to take out Banshees and Ghosts, especially in Team Games where they are likely to be in dogfights. Also, it can give cover fire to a teammate fleeing an enemy, although since the Sniper Rifle spawns next to the teleporter, the Shade is of dubious value. | |||
*During Free-For-All [[Slayer]], a good tactic is to go through the Banshee teleport, grab the Sniper Rifle, and [[Camping|camp]] near the Fuel Rod Gun's spawning point. It is a good vantage point and makes picking off enemies relatively simple. If a vehicle shows up, you have the Fuel Rod Gun to counter it, and you can drop into the cave and behind the rock for cover. | |||
*This map is an experienced Banshee pilot's dream. Unlike [[Blood Gulch]] and [[Sidewinder]], the level's [[Invisible wall|invisible ceiling]] is incredibly high, providing ample room to maneuver. With the proper tactics (i.e., falling shots, curling, and peeling), the top pilots can take on two Scorpions at once and win. If they continuously neutralize all threats (other Banshees, Scorpions, Shades, etc.), the pilot can allow a team to dominate a match. | |||
*Often, Scorpion drivers will back into the ocean to prevent being blindsided. But this makes the vehicles very hard to access for teammates if the driver is lost. Another problem is that these drivers will often stay still, making their pilots easy targets for a sniper. | |||
*A useful trick for modes with four Ghosts spawning per team is to take the enemy Ghost that spawns behind the Banshees and drive it off the cliff. If you successfully land, it is then a fairly simple matter to drive into the base, splattering anyone getting in the way, and take the flag. The Ghost's high speed also makes it the perfect flag transporter. | |||
*In both bases, there is a ledge high above that has an Overshield on it. Although not accessible without [[Modding|mods]], it makes for a great camping spot, especially if one has the Fuel Rod Gun. In CTF games, this can wreak havoc and allow a teammate to grab the flag while the enemy is confused. | |||
*Each base can spawn up to four Scorpion tanks. Try to get teammates to use them with you. Controlling a number of Scorpions at a time is a good way to win a Slayer of CTF game. | |||
*Each base has one shotgun. A good tactic in a CTF game is to [[Camping|camp]] in the base with the shotgun and take out any opponents that try to steal your flag. | |||
*Another good tactic is to sneak under the enemy's base where the tanks are located. Hop into one of the tanks and edge forward so that the tank is visible from above. Due to the game's mechanics, any enemy who jumps onto your tanks instantly dies. Also, you can shoot any enemy that jumps down near your tank. | |||
*When looking into a base from outside the island, there is a tree on the left-hand side of the map. A good tactic is to grab a Sniper rifle and jump onto the tree. It is extremely difficult to be spotted at that location, as the cliff's shadow conceals the player well. | |||
== | ==Trivia== | ||
* | === Glitches === | ||
*Getting outside the invisible walls on the map is possible. Simply stand in front of the barrier and have a teammate ram into you with the Warthog, which should send you through the wall. Just make sure "Friendly Fire" is set to "off". You can also do it by yourself with a ghost. The Ghost method described above is also useful. | |||
**Players that attempt to throw grenades from outside the map will find that while their player model does perform the animation, but the grenade is not visible. | |||
*It is possible to hide inside the large rocks at the top of the island. Simply position a Warthog so that exiting a passenger or driver seat will result in the player moving through the rock. Once inside, a player may simply walk out of the rock. Players inside a rock are able to shoot at enemies that are outside, but outside players are not able to retaliate unless they use explosives or other area-of-effect weapons. | |||
<!--The "wall-hacking glitch", as some may call it, is exclusive to Danger Canyon in that it specifically requires a player to travel from one base to the other by passing through a wall. The act of getting inside a wall is referred to as bumping, and the act of climbing up polygons in the wall is referred to as ledging.--> | |||
{{ | ==Gallery== | ||
{{Linkbox|gallery=yes}} | |||
<gallery> | |||
File:HMCC HCE Death Island Map.png|Death Island Map. | |||
</gallery> | |||
{{Levels|H1|mode=yes}} | |||
Latest revision as of 01:06, February 25, 2024
| Death Island | |
|---|---|

| |
| Map overview | |
|
Game: |
|
| Lore information | |
|
Location: |
|
| Gameplay overview | |
|
Terrain: |
Island, beach |
|
Map layout: |
Asymmetrical |
|
Recommended number of players: |
|
|
Recommended gametype(s): |
|
| “ | Sand, Surf, and Spent Shells. | ” |
Death Island is a multiplayer map, originally exclusive to Halo: Combat Evolved for PC and Halo Mac. It is included in The Master Chief Collection. The map itself is very similar to the Halo: Combat Evolved campaign level The Silent Cartographer. The map is fairly large, with a recommended number of eight players for an ideal match for any gametype.
Overview[edit]
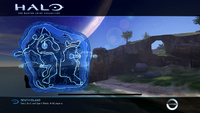
Death Island features two bases, one for Red team and the other for Blue team, which are on opposite sides of the island. These bases each contain two teleporters, which lead either to a Shade gunner's outcrop or a platform on top of the base, where players can find two Banshees, a Ghost, and a sniper rifle. The map supports vehicle gameplay, such as the Warthogs and Scorpions that spawn near the bases.
In the center of the map is a large, permanently closed hatch, similar to the one that the Pelican Echo 419 enters at the end of The Silent Cartographer. On it lies an overshield, along with a rocket launcher, a shotgun, a Fuel Rod Gun, grenades, and a health pack.
Strategies[edit]
- Many games of CTF played on Death Island will have little flag involvement. The most likely place to spawn is inside the base, so everyone runs straight for the Banshee teleporter to the top of the island. Most players charge at the other team's Banshee roof, but this does not get to the flag. Paths down to the bases from up there are too far, and trying to jump from the roof into its interior will always result in death without an overshield, or land on a slope.
- If you are experienced with fall damage reduction, it's possible to jump off the roof and land on the slope above the entrance to each base, although the Red team's base is much harder as the wall partially blocks you. If successful, on CTF matches, you can score very quick captures by doing this and having teammates to cover you.
- The trees near each base are solid, so landing on them can provide a quick way down to each team's base. Once there, you can easily nab the flag and go through the teleport, or if no one is looking, snatch a Warthog and drive away.
- Players should value their vehicles because they are vital to this map and should be used whenever possible. Controlling the Scorpions and Banshees are often the key to winning, mostly due to the map's large size. A good tactic on CTF is to get at least four Scorpion tanks, drive them out into the ocean, and bombard the enemy base. Then, you can sneak troops up to the base while they are distracted and steal the enemy flag. Also, a group of Banshees working together are a force to be reckoned with and can even take down groups of Scorpion tanks.
- Another good tactic on Team Slayer or Capture the Flag is to drive Scorpions up to the top of the map and bombard; placing them over their teleporters can also greatly help an offensive attack, so long as you watch out for Plasma Grenades.
- You can also use the Shade turret as an option if needed, although it is less practical for offensive purposes. It is able to take out Banshees and Ghosts, especially in Team Games where they are likely to be in dogfights. Also, it can give cover fire to a teammate fleeing an enemy, although since the Sniper Rifle spawns next to the teleporter, the Shade is of dubious value.
- During Free-For-All Slayer, a good tactic is to go through the Banshee teleport, grab the Sniper Rifle, and camp near the Fuel Rod Gun's spawning point. It is a good vantage point and makes picking off enemies relatively simple. If a vehicle shows up, you have the Fuel Rod Gun to counter it, and you can drop into the cave and behind the rock for cover.
- This map is an experienced Banshee pilot's dream. Unlike Blood Gulch and Sidewinder, the level's invisible ceiling is incredibly high, providing ample room to maneuver. With the proper tactics (i.e., falling shots, curling, and peeling), the top pilots can take on two Scorpions at once and win. If they continuously neutralize all threats (other Banshees, Scorpions, Shades, etc.), the pilot can allow a team to dominate a match.
- Often, Scorpion drivers will back into the ocean to prevent being blindsided. But this makes the vehicles very hard to access for teammates if the driver is lost. Another problem is that these drivers will often stay still, making their pilots easy targets for a sniper.
- A useful trick for modes with four Ghosts spawning per team is to take the enemy Ghost that spawns behind the Banshees and drive it off the cliff. If you successfully land, it is then a fairly simple matter to drive into the base, splattering anyone getting in the way, and take the flag. The Ghost's high speed also makes it the perfect flag transporter.
- In both bases, there is a ledge high above that has an Overshield on it. Although not accessible without mods, it makes for a great camping spot, especially if one has the Fuel Rod Gun. In CTF games, this can wreak havoc and allow a teammate to grab the flag while the enemy is confused.
- Each base can spawn up to four Scorpion tanks. Try to get teammates to use them with you. Controlling a number of Scorpions at a time is a good way to win a Slayer of CTF game.
- Each base has one shotgun. A good tactic in a CTF game is to camp in the base with the shotgun and take out any opponents that try to steal your flag.
- Another good tactic is to sneak under the enemy's base where the tanks are located. Hop into one of the tanks and edge forward so that the tank is visible from above. Due to the game's mechanics, any enemy who jumps onto your tanks instantly dies. Also, you can shoot any enemy that jumps down near your tank.
- When looking into a base from outside the island, there is a tree on the left-hand side of the map. A good tactic is to grab a Sniper rifle and jump onto the tree. It is extremely difficult to be spotted at that location, as the cliff's shadow conceals the player well.
Trivia[edit]
Glitches[edit]
- Getting outside the invisible walls on the map is possible. Simply stand in front of the barrier and have a teammate ram into you with the Warthog, which should send you through the wall. Just make sure "Friendly Fire" is set to "off". You can also do it by yourself with a ghost. The Ghost method described above is also useful.
- Players that attempt to throw grenades from outside the map will find that while their player model does perform the animation, but the grenade is not visible.
- It is possible to hide inside the large rocks at the top of the island. Simply position a Warthog so that exiting a passenger or driver seat will result in the player moving through the rock. Once inside, a player may simply walk out of the rock. Players inside a rock are able to shoot at enemies that are outside, but outside players are not able to retaliate unless they use explosives or other area-of-effect weapons.
Gallery[edit]

|
Browse more images in this article's gallery page. |
Death Island Map.

| |||||||||||||||||||||||


