MCC:Control schemes
From Halopedia, the Halo wiki

The following control schemes are available for use in Halo: The Master Chief Collection. The game features new input actions, new control settings and on PC supports keyboard & mouse for all six games.
The game supports new input actions such as "SELECT PREVIOUS GRENADES" for Halo 3 and Halo 3: ODST, "ZOOM OUT" for keyboard & mouse, and more. The collection also features modded input actions (the text that is highlighted are an exclusive modded map).
Controller[edit]
Thumbstick Layout[edit]
Not inverted[edit]
Default

Southpaw

Legacy
Legacy Southpaw


Inverted[edit]
Default

Southpaw
Legacy

Legacy Southpaw


Button Layout[edit]
MCC has rebindable button maps for the controller. The following represents the default controls, which are viewed below:
| Input Action | Controller Button | Bindable |
|---|---|---|
| Game Menu | No | |
| Push to Talk |

| Input Action | Controller Button | Description | Bindable | |
|---|---|---|---|---|
| Movement | Jump | Set button to JUMP.[Note 1] Use the equipped Series 8 jetpack or Tlaipoz-pattern harness variant while airborne if "JUMPER JUMPER" is enabled. |
Yes | |
| Crouch | Set button to CROUCH. Hold Crouch or Toggle Crouch, depending on the "CROUCH BEHAVIOR" setting. | |||
| Actions | Fire | Set button to FIRE your primary weapon. Also known as "Use Right Weapon."[Note 2] | ||
| Zoom | Set button to cycle between magnification levels for weapon scopes. Can be held or toggled. Use binoculars if a weapon lacks scope. | |||
| Melee | Set button to MELEE. | |||
| Reload | Set button to RELOAD. | |||
| Throw Grenade | Set button to THROW GRENADE. | |||
| Action | Set button for primary ACTIONS like interacting, picking up weapons, and entering vehicles. | |||
| Change Weapon | Set button to CHANGE WEAPON. | |||
| Switch Grenades | Set button to SWITCH GRENADES. | |||
| Select Next Grenades | Set button to SELECT NEXT GRENADES. | |||
| Select Previous Grenades | Set button to SELECT PREVIOUS GRENADES. | |||
| Use Armor Ability | Set button to USE ARMOR ABILITY. | |||
| Toggle Night Vision | Set button to TOGGLE NIGHT VISION. | |||
| Vehicle Controls | Vehicle Function 1 | Set button to use vehicle functions like secondary fire, drifting, boosting, and ascending. | ||
| Vehicle Function 2 | Set button to use vehicle functions like braking and hovering. | |||
| Vehicle Function 3 | Set button to use vehicle functions like aerial maneuvers and descending. | |||
| Ascend | Set button to ASCEND while piloting air vehicles. | |||
| Descend | Set button to DESCEND while piloting air vehicles. | |||
| UI Controls | Toggle Scoreboard | Set button to TOGGLE MULTIPLAYER SCOREBOARD. | ||
| Open Loadouts Menu | Set button to open the LOADOUTS MENU. | |||
| Forge | Ascend | Set button to ASCEND while in Editor mode. While piloting a Pelican or Phantom, hold "ASCEND" to fly up. | ||
| Descend | Set button to DESCEND while in Editor mode. While piloting a Pelican or Phantom, hold "DESCEND" to fly down. | |||
| Grab/Release Object | Set button to GRAB and RELEASE objects while in Editor mode. | |||
| Boost | Set button to BOOST movement speed while in Editor mode. | |||
| Precision Edit | Set button to enter PRECISION EDIT mode while in Editor mode. | |||
| Delete Object | Set button to DELETE OBJECTS while in Editor mode. | |||
| Create Object/Object Properties | Set button to create objects and access their properties while in Editor mode. | |||
| Tools | Set button to access TOOLS menu while in Editor mode. | |||
| Duplicate | Set button to DUPLICATE objects while in Editor mode. | |||
| Reset | Set button to RESET object orientation while in Editor mode. | |||
| Switch Player Mode | Set button to switch between Player and Editor mode. | |||
| Zoom | Set button to ZOOM the camera while in Editor mode. | |||
| Rotation Mode | Set button to enter Object ROTATION MODE while in Editor mode. | |||
| Toggle Rotation Axes | Set button to switch between global/local rotation axes. | |||
| Theater | Toggle Panel | Set button to toggle visibility of the Theater control panel. | ||
| Toggle Interface | Set button to toggle visibility of the player HUD and Theater interface. | |||
| Toggle First/Third Person | Set button to toggle between first and third person view. | |||
| Camera Reset | Set button to reset the camera position while in orbit cam. | |||
| Jump Forward | Set button to JUMP FORWARD to the next available rewind point. | |||
| Jump Back | Set button to JUMP BACK to the previous rewind point. | |||
| Pause/Resume Playback | Set button to pause and resume playback. | |||
| Fast Forward | Set button to increase playback speed. | |||
| Toggle Freecam | Set button to switch the camera between anchored and freecam modes. | |||
| Boost | Set button to BOOST the camera movement speed. | |||
| Theater Panning | Set button to enable panning in Theater mode. | |||
| Ascend | Set button to ASCEND the fly cam while in Theater mode. | |||
| Descend | Set button to DESCEND the fly cam while in Theater mode. | |||
| Zoom | Set button to ZOOM the fly camera while in Theater mode. | |||
| Alert Carry | "RELOAD" + "ZOOM" + B + ↓ D-Pad |
Press and hold them until the weapon is lower; it should take 3 seconds.[Note 3] | No | |
| Enable/Disable Coordinates | "RELOAD" + "ZOOM" + B + ↑ D-Pad |
Press and hold them until the coordinates is enable and displayed on the screen; it should take 3 seconds.[Note 3] | ||
| Enable/Disable Panoramic Camera Mode | "ZOOM" + "← D-Pad" |
This is after the coordinates is enable. | ||
| Hide/Show Coordinates | "ZOOM" + "→ D-Pad" | |||
| Increase Observer Movement Speed | This is only usable as an observer (flying mode) while having Panoramic Camera Mode enabled, but enabling coordinates only works on foot; therefore:
| |||
| Decrease Observer Movement Speed | ||||

| Input Action | Controller Button | Description | Bindable | |
|---|---|---|---|---|
| Movement | Jump | Set button to JUMP. | Yes | |
| Crouch | Set button to CROUCH. Hold Crouch or Toggle Crouch, depending on the "CROUCH BEHAVIOR" setting. | |||
| Actions | Fire | Set button to FIRE your primary weapon. Also known as "Use Right Weapon."[Note 2] | ||
| Zoom | Set button to cycle between magnification levels for weapon scopes. Can be held or toggled. | |||
| Melee | Set button to MELEE. | |||
| Reload | Set button to RELOAD. | |||
| Throw Grenade | Set button to THROW GRENADE. | |||
| Action | Set button for primary ACTIONS like interacting, picking up weapons, and entering vehicles. | |||
| Change Weapon | Set button to CHANGE WEAPON. | |||
| Switch Grenades | Set button to SWITCH GRENADES. | |||
| Select Next Grenades | Set button to SELECT NEXT GRENADES. | |||
| Select Previous Grenades | Set button to SELECT PREVIOUS GRENADES. | |||
| Toggle Flashlight | Set button to TOGGLE FLASHLIGHT. Activate a Sniper Rifle's night-vision while zooming. | |||
| Toggle Flashlight Alt | Set button to TOGGLE FLASHLIGHT. Activate a Sniper Rifle's night-vision while zooming. | |||
| Move Forward | Set button to Move Forward. | |||
| Move Backward | Set button to Move Backward. | |||
| Move Left | Set button to Move Left. | |||
| Move Right | Set button to Move Right. | |||
| Vehicle Controls | Vehicle Function 1 | Set button to use vehicle functions like secondary fire, drifting, boosting, and ascending. | ||
| Vehicle Function 2 | Set button to use vehicle functions like braking and hovering. | |||
| Vehicle Function 3 | Set button to use vehicle functions like aerial maneuvers and descending. | |||
| UI Controls | Toggle Visuals/Scoreboard | Set button to TOGGLE VISUALS / MULTIPLAYER SCOREBOARD. | ||

| Input Action | Controller Button | Description | Bindable | |
|---|---|---|---|---|
| Movement | Jump | Set button to JUMP. | Yes | |
| Crouch | Set button to CROUCH. Hold Crouch or Toggle Crouch, depending on the "CROUCH BEHAVIOR" setting. | |||
| Actions | Fire | Set button to FIRE your primary weapon. Also known as "Use Right Weapon."[Note 2] | ||
| Fire Secondary | Set button to FIRE your secondary weapon while dual-wielding. Also known as "Use Left Weapon."[Note 2] | |||
| Zoom | Set button to cycle between magnification levels for weapon scopes. Can be held or toggled. Use binoculars if a weapon lacks scope. | |||
| Melee | Set button to MELEE. | |||
| Reload | Set button to RELOAD. Reload right and left weapons while dual-wielding, unlike Halo 3. | |||
| Throw Grenade | Set button to THROW GRENADE. | |||
| Action | Set button for primary ACTIONS like interacting, picking up weapons, and entering vehicles. | |||
| Change Weapon | Set button to CHANGE WEAPON. | |||
| Switch Grenades | Set button to SWITCH GRENADES. | |||
| Select Next Grenades | Set button to SELECT NEXT GRENADES. | |||
| Select Previous Grenades | Set button to SELECT PREVIOUS GRENADES. | |||
| Toggle Flashlight | Set button to TOGGLE FLASHLIGHT. As the Arbiter, instead of a flashlight, it's active camo. | |||
| Toggle Flashlight Alt | Set button to TOGGLE FLASHLIGHT. As the Arbiter, instead of a flashlight, it's active camo. | |||
| Dual-Wield | Set button to pick up a secondary weapon to DUAL-WIELD. Also known as "Swap Left Weapon."[Note 2] | |||
| Vehicle Controls | Vehicle Function 1 | Set button to use vehicle functions like secondary fire, drifting, boosting, and ascending. | ||
| Vehicle Function 2 | Set button to use vehicle functions like braking and hovering. | |||
| Vehicle Function 3 | Set button to use vehicle functions like aerial maneuvers and descending. | |||
| Banshee Bomb | Set button to use BANSHEE BOMB. | |||
| Ascend | Set button to ASCEND while piloting air vehicles. | |||
| Descend | Set button to DESCEND while piloting air vehicles. | |||
| UI Controls | Toggle Visuals/Scoreboard | Set button to TOGGLE VISUALS / MULTIPLAYER SCOREBOARD. | ||
| Open Loadouts Menu | Set button to open the LOADOUTS MENU. | |||
| Forge | Ascend | Set button to ASCEND while in Editor mode. | ||
| Descend | Set button to DESCEND while in Editor mode. | |||
| Grab/Release Object | Set button to GRAB and RELEASE objects while in Editor mode. | |||
| Boost | Set button to BOOST movement speed while in Editor mode. | |||
| Precision Edit | Set button to enter PRECISION EDIT mode while in Editor mode. | |||
| Delete Object | Set button to DELETE OBJECTS while in Editor mode. | |||
| Create Object/Object Properties | Set button to create objects and access their properties while in Editor mode. | |||
| Tools | Set button to access TOOLS menu while in Editor mode. | |||
| Duplicate | Set button to DUPLICATE objects while in Editor mode. | |||
| Lock | Set button to LOCK objects while in Editor mode. | |||
| Reset | Set button to RESET object orientation while in Editor mode. | |||
| Switch Player Mode | Set button to switch between Player and Editor mode. | |||
| Zoom | Set button to ZOOM the camera while in Editor mode. | |||
| Rotation Mode | Set button to enter Object ROTATION MODE while in Editor mode. | |||
| Toggle Rotation Axes | Set button to switch between global/local rotation axes. | |||
| Theater | Toggle Panel | Set button to toggle visibility of the Theater control panel. | ||
| Toggle Interface | Set button to toggle visibility of the player HUD and Theater interface. | |||
| Toggle First/Third Person | Set button to toggle between first and third person view. | |||
| Camera Reset | Set button to reset the camera position while in orbit cam. | |||
| Jump Forward | Set button to JUMP FORWARD to the next available rewind point. | |||
| Jump Back | Set button to JUMP BACK to the previous rewind point. | |||
| Pause/Resume Playback | Set button to pause and resume playback. | |||
| Fast Forward | Set button to increase playback speed. | |||
| Toggle Freecam | Set button to switch the camera between anchored and freecam modes. | |||
| Boost | Set button to BOOST the camera movement speed. | |||
| Theater Panning | Set button to enable panning in Theater mode. | |||
| Ascend | Set button to ASCEND the fly cam while in Theater mode. | |||
| Descend | Set button to DESCEND the fly cam while in Theater mode. | |||
| Zoom | Set button to ZOOM the fly camera while in Theater mode. | |||
| Alert Carry | Note: In Halo 2 (classic) it's a single press, but in Halo 2: Anniversary multiplayer, it's a combination of "ZOOM" + "ACTION" + "JUMP" + ↓ D-Pad; Press and hold them until the weapon is lower; it should take 3 seconds.[Note 3] | No | ||
| Enable/Disable Coordinates | "ACTION" + "JUMP" + ↓ D-Pad |
For Halo 2: Anniversary multiplayer only, Press and hold them until the coordinates is enable and displayed on the screen; it should take 3 seconds.[Note 3] | ||
| Enable/Disable Panoramic Camera Mode | "ZOOM" + "← D-Pad" |
This is after the coordinates is enable. | ||
| Hide/Show Coordinates | "ZOOM" + "→ D-Pad" | |||

| Input Action | Controller Button | Description | Bindable | |
|---|---|---|---|---|
| Movement | Jump | Set button to JUMP. | Yes | |
| Crouch | Set button to CROUCH. Hold Crouch or Toggle Crouch, depending on the "CROUCH BEHAVIOR" setting. | |||
| Actions | Fire | Set button to FIRE your primary weapon. Also known as "Use Right Weapon."[Note 2] | ||
| Fire Secondary | Set button to FIRE your secondary weapon while dual-wielding. Also known as "Use Left Weapon."[Note 2] | |||
| Zoom | Set button to cycle between magnification levels for weapon scopes. Can be held or toggled. Use binoculars if a weapon lacks scope. | |||
| Melee | Set button to MELEE. | |||
| Reload | Set button to RELOAD. | |||
| Reload Secondary Weapon | Set button to RELOAD SECONDARY WEAPON while dual-wielding. Also known as "Reload Left Weapon."[Note 2] | |||
| Throw Grenade | Set button to THROW GRENADE. | |||
| Action | Set button for primary ACTIONS like interacting, picking up weapons, and entering vehicles. | |||
| Change Weapon | Set button to CHANGE WEAPON. | |||
| Switch Grenades | Set button to SWITCH GRENADES. | |||
| Select Next Grenades | Set button to SELECT NEXT GRENADES. | |||
| Select Previous Grenades | Set button to SELECT PREVIOUS GRENADES. | |||
| Use Equipment | Set button to USE EQUIPMENT. | |||
| Toggle Flashlight | Set button to TOGGLE FLASHLIGHT. | |||
| Dual-Wield | Set button to pick up a secondary weapon to DUAL-WIELD. Also known as "Swap Left Weapon."[Note 2] | |||
| Vehicle Controls | Vehicle Function 1 | Set button to use vehicle functions like secondary fire, drifting, boosting, and ascending. | ||
| Vehicle Function 2 | Set button to use vehicle functions like braking and hovering. | |||
| Vehicle Function 3 | Set button to use vehicle functions like aerial maneuvers and descending. | |||
| Banshee Bomb | Set button to use BANSHEE BOMB. | |||
| Ascend | Set button to ASCEND while piloting air vehicles. | |||
| Descend | Set button to DESCEND while piloting air vehicles. | |||
| UI Controls | Toggle Scoreboard | Set button to TOGGLE MULTIPLAYER SCOREBOARD. | ||
| Forge | Ascend | Set button to ASCEND while in Editor mode. | ||
| Descend | Set button to DESCEND while in Editor mode. | |||
| Grab/Release Object | Set button to GRAB and RELEASE objects while in Editor mode. | |||
| Boost | Set button to BOOST movement speed while in Editor mode. | |||
| Precision Edit | Set button to enter PRECISION EDIT mode while in Editor mode. | |||
| Delete Object | Set button to DELETE OBJECTS while in Editor mode. | |||
| Create Object/Object Properties | Set button to create objects and access their properties while in Editor mode. | |||
| Tools | Set button to access TOOLS menu while in Editor mode. | |||
| Switch Player Mode | Set button to switch between Player and Editor mode. | |||
| Zoom | Set button to ZOOM the camera while in Editor mode. | |||
| Rotation Mode | Set button to enter Object ROTATION MODE while in Editor mode. | |||
| Toggle Rotation Axes | Set button to switch between global/local rotation axes. | |||
| Theater | Toggle Panel | Set button to toggle visibility of the Theater control panel. | ||
| Toggle Interface | Set button to toggle visibility of the player HUD and Theater interface. | |||
| Toggle First/Third Person | Set button to toggle between first and third person view. | |||
| Camera Reset | Set button to reset the camera position while in orbit cam. | |||
| Jump Forward | Set button to JUMP FORWARD to the next available rewind point. | |||
| Jump Back | Set button to JUMP BACK to the previous rewind point. | |||
| Pause/Resume Playback | Set button to pause and resume playback. | |||
| Fast Forward | Set button to increase playback speed. | |||
| Toggle Freecam | Set button to switch the camera between anchored and freecam modes. | |||
| Boost | Set button to BOOST the camera movement speed. | |||
| Theater Panning | Set button to enable panning in Theater mode. | |||
| Ascend | Set button to ASCEND the fly cam while in Theater mode. | |||
| Descend | Set button to DESCEND the fly cam while in Theater mode. | |||
| Zoom | Set button to ZOOM the fly camera while in Theater mode. | |||
| Alert Carry | "CROUCH" + "ACTION" + "RELOAD" + "RELOAD LEFT WEAPON" + "↓ D-Pad" |
Press and hold them until the weapon is lower; it should take 3 seconds.[Note 3] | No | |
| Enable/Disable Coordinates | "CROUCH" + "ACTION" + "RELOAD" + "RELOAD LEFT WEAPON" + ↑ D-Pad |
Press and hold them until the coordinates is enable and displayed on the screen; it should take 3 seconds.[Note 3] | ||
| Enable/Disable Panoramic Camera Mode | "ZOOM" + "← D-Pad" |
This is after the coordinates is enable. | ||
| Hide/Show Coordinates | "ZOOM" + "→ D-Pad" | |||
| Increase Observer Movement Speed | This is only usable as an observer (flying mode) while having Panoramic Camera Mode enabled, but enabling coordinates only works on foot; therefore:
| |||
| Decrease Observer Movement Speed | ||||

| Input Action | Controller Button | Description | Bindable | |
|---|---|---|---|---|
| Movement | Jump | Set button to JUMP. | Yes | |
| Crouch | Set button to CROUCH. Hold Crouch or Toggle Crouch, depending on the "CROUCH BEHAVIOR" setting. | |||
| Actions | Fire | Set button to FIRE your primary weapon. Also known as "Use Right Weapon."[Note 2] | ||
| Fire Secondary | Set button to FIRE your secondary weapon while dual-wielding. | |||
| Zoom | Set button to cycle between magnification levels for weapon scopes. Can be held or toggled. Use binoculars if a weapon lacks scope. | |||
| Melee | Set button to MELEE. | |||
| Reload | Set button to RELOAD. | |||
| Reload Secondary Weapon | Set button to RELOAD SECONDARY WEAPON while dual-wielding. | |||
| Throw Grenade | Set button to THROW GRENADE. | |||
| Action | Set button for primary ACTIONS like interacting, picking up weapons, and entering vehicles. | |||
| Change Weapon | Set button to CHANGE WEAPON. | |||
| Switch Grenades | Set button to SWITCH GRENADES. | |||
| Select Next Grenades | Set button to SELECT NEXT GRENADES. | |||
| Select Previous Grenades | Set button to SELECT PREVIOUS GRENADES. | |||
| Use Equipment | Set button to USE EQUIPMENT. | |||
| Toggle Night Vision | Set button to TOGGLE NIGHT VISION. | |||
| Dual-Wield | Set button to pick up a secondary weapon to DUAL-WIELD. | |||
| Vehicle Controls | Vehicle Function 1 | Set button to use vehicle functions like secondary fire, drifting, boosting, and ascending. | ||
| Vehicle Function 2 | Set button to use vehicle functions like braking and hovering. | |||
| Vehicle Function 3 | Set button to use vehicle functions like aerial maneuvers and descending. | |||
| Banshee Bomb | Set button to use BANSHEE BOMB. | |||
| Ascend | Set button to ASCEND while piloting air vehicles. | |||
| Descend | Set button to DESCEND while piloting air vehicles. | |||
| UI Controls | Toggle VISR Database | Set button to TOGGLE VISR DATABASE. | ||
| Toggle Display Waypoint Markers | Set button to TOGGLE WAYPOINT MARKERS. | |||
| Toggle Display Waypoint Markers Alt | Alternative button to TOGGLE WAYPOINT MARKERS. | |||
| Theater | Toggle Panel | Set button to toggle visibility of the Theater control panel. | ||
| Toggle Interface | Set button to toggle visibility of the player HUD and Theater interface. | |||
| Toggle First/Third Person | Set button to toggle between first and third person view. | |||
| Camera Reset | Set button to reset the camera position while in orbit cam. | |||
| Pause/Resume Playback | Set button to pause and resume playback. | |||
| Fast Forward | Set button to increase playback speed. | |||
| Toggle Freecam | Set button to switch the camera between anchored and freecam modes. | |||
| Boost | Set button to BOOST the camera movement speed. | |||
| Theater Panning | Set button to enable panning in Theater mode. | |||
| Ascend | Set button to ASCEND the fly cam while in Theater mode. | |||
| Descend | Set button to DESCEND the fly cam while in Theater mode. | |||
| Zoom | Set button to ZOOM the fly camera while in Theater mode. | |||
| Alert Carry | "CROUCH" + "ACTION" + "RELOAD" + "RELOAD LEFT WEAPON" + "↓ D-Pad" |
Press and hold them until the weapon is lower; it should take 3 seconds.[Note 3] | No | |
| Enable/Disable Coordinates | "CROUCH" + "ACTION" + "RELOAD" + "RELOAD LEFT WEAPON" + ↑ D-Pad |
Press and hold them until the coordinates is enable and displayed on the screen; it should take 3 seconds.[Note 3] | ||
| Enable/Disable Panoramic Camera Mode | "ZOOM" + "← D-Pad" |
This is after the coordinates is enable. | ||
| Hide/Show Coordinates | "ZOOM" + "→ D-Pad" | |||
| Increase Observer Movement Speed | This is only usable as an observer (flying mode) while having Panoramic Camera Mode enabled, but enabling coordinates only works on foot; therefore:
| |||
| Decrease Observer Movement Speed | ||||

| Input Action | Controller Button | Description | Bindable | |
|---|---|---|---|---|
| Movement | Jump | Set button to JUMP. Use the equipped Series 12 jetpack while airborne if "JUMPER JUMPER" is enabled. |
Yes | |
| Crouch | Set button to CROUCH. Hold Crouch or Toggle Crouch, depending on the "CROUCH BEHAVIOR" setting. | |||
| Sprint | Set button to SPRINT. | |||
| Actions | Fire | Set button to FIRE your primary weapon. Also known as "Use Right Weapon."[Note 2] | ||
| Zoom | Set button to cycle between magnification levels for weapon scopes. Can be held or toggled. Use binoculars if a weapon lacks scope. | |||
| Melee | Set button to MELEE. | |||
| Reload | Set button to RELOAD. | |||
| Throw Grenade | Set button to THROW GRENADE. | |||
| Action | Set button for primary ACTIONS like interacting, picking up weapons, and entering vehicles. | |||
| Change Weapon | Set button to CHANGE WEAPON. | |||
| Select Next Grenades | Set button to SELECT NEXT GRENADES. | |||
| Select Previous Grenades | Set button to SELECT PREVIOUS GRENADES. | |||
| Use Armor Ability | Set button to USE ARMOR ABILITY. | |||
| Special Action | Set button to use the Target Designator in Campaign. | |||
| Vehicle Controls | Vehicle Function 1 | Set button to use vehicle functions like secondary fire, drifting, boosting, and ascending. | ||
| Vehicle Function 2 | Set button to use vehicle functions like braking and hovering. | |||
| Vehicle Function 3 | Set button to use vehicle functions like aerial maneuvers and descending. | |||
| Ascend | Set button to ASCEND while piloting air vehicles. | |||
| Descend | Set button to DESCEND while piloting air vehicles. | |||
| UI Controls | Toggle Scoreboard | Set button to TOGGLE MULTIPLAYER SCOREBOARD. | ||
| Open Loadouts Menu | Set button to open the LOADOUTS MENU. | |||
| Forge | Ascend | Set button to ASCEND while in Editor mode. | ||
| Descend | Set button to DESCEND while in Editor mode. | |||
| Grab/Release Object | Set button to GRAB and RELEASE objects while in Editor mode. | |||
| Boost | Set button to BOOST movement speed while in Editor mode. | |||
| Precision Edit | Set button to enter PRECISION EDIT mode while in Editor mode. | |||
| Delete Object | Set button to DELETE OBJECTS while in Editor mode. | |||
| Create Object/Object Properties | Set button to create objects and access their properties while in Editor mode. | |||
| Tools | Set button to access TOOLS menu while in Editor mode. | |||
| Duplicate | Set button to DUPLICATE objects while in Editor mode. | |||
| Lock | Set button to LOCK objects while in Editor mode. | |||
| Reset | Set button to RESET object orientation while in Editor mode. | |||
| Switch Player Mode | Set button to switch between Player and Editor mode. | |||
| Zoom | Set button to ZOOM the camera while in Editor mode. | |||
| Rotation Mode | Set button to enter Object ROTATION MODE while in Editor mode. | |||
| Toggle Rotation Axes | Set button to switch between global/local rotation axes. | |||
| Theater | Toggle Panel | Set button to toggle visibility of the Theater control panel. | ||
| Toggle Interface | Set button to toggle visibility of the player HUD and Theater interface. | |||
| Toggle First/Third Person | Set button to toggle between first and third person view. | |||
| Camera Reset | Set button to reset the camera position while in orbit cam. | |||
| Jump Forward | Set button to JUMP FORWARD to the next available rewind point. | |||
| Jump Back | Set button to JUMP BACK to the previous rewind point. | |||
| Pause/Resume Playback | Set button to pause and resume playback. | |||
| Fast Forward | Set button to increase playback speed. | |||
| Toggle Freecam | Set button to switch the camera between anchored and freecam modes. | |||
| Boost | Set button to BOOST the camera movement speed. | |||
| Theater Panning | Set button to enable panning in Theater mode. | |||
| Ascend | Set button to ASCEND the fly cam while in Theater mode. | |||
| Descend | Set button to DESCEND the fly cam while in Theater mode. | |||
| Zoom | Set button to ZOOM the fly camera while in Theater mode. | |||
| Toggle Flashlight | No | |||
| Sent Ordnance Pod Option #1 | Sent an Ordnance pod when available in Multiplayer. | |||
| Sent Ordnance Pod Option #2 | ||||
| Sent Ordnance Pod Option #3 | ||||
| Alert Carry | “ACTION” + "JUMP" + ↓ D-Pad |
Press and hold them until the weapon is lower; it should take 3 seconds.[Note 3] | ||
| Enable/Disable Coordinates | “ACTION” + "JUMP" + ↑ D-Pad |
Press and hold them until the coordinates is enable and displayed on the screen; it should take 3 seconds.[Note 3] | ||
| Enable/Disable Panoramic Camera Mode | "ZOOM" + ← D-Pad |
This is after the coordinates is enable. | ||
| Hide/Show Coordinates | "ZOOM" + → D-Pad | |||
| Increase Observer Movement Speed | This is only usable as an observer (flying mode) while having Panoramic Camera Mode enabled, but enabling coordinates only works on foot; therefore:
| |||
| Decrease Observer Movement Speed | ||||
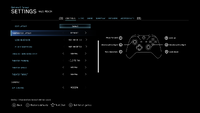
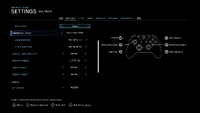
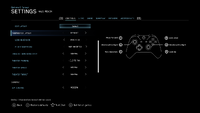
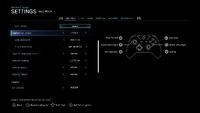
Other Control Settings[edit]

| Setting | Options | Official Info | |
|---|---|---|---|
| Gamepad Controls | |||
| Crouch Behavior | Hold | Default | Crouching for a period of time will require a button hold. |
| Toggle | Crouching for a period of time will require a button press to toggle the effect. | ||
| Button Layout | Universal Default (Recon) | Default | Change gamepad layout to a specific controller preset. |
| Universal Reclaimer | |||
| Universal Zoom & Shoot | |||
| Universal Bump & Jump | |||
| Universal Green Thumbs | |||
| Universal Infinite | |||
| Default | |||
| Boxer | |||
| Green Thumbs | |||
| Bumper Jumper | |||
| Recon | |||
| Custom | |||
|
Default | D-pad & buttons will be normal. | |
| Swapped | D-pad & buttons will be swapped. | ||
| Inverted | D-pad & buttons will be swapped, and also inverted. | ||
|
Default | Bumpers & triggers will be normal. | |
| Swapped | Bumpers & triggers will be swapped. | ||
|
Not Inverted | Default | Look axis will not be inverted when flying. |
| Inverted | Look axis will be inverted when flying. | ||
| Theater Turn Sensitivity | Slow | Set the turn sensitivity of the camera in Theater mode. | |
| Normal | Default | ||
| Fast | |||
| Very Fast | |||
| Theater Panning | Hold to Pan | Default | Set the panning behavior of the camera in Theater mode. |
| Toggle | |||
| Theater Speed | Slow | Set the speed of the camera in Theater mode. | |
| Normal | Default | ||
| Fast | |||
| Very Fast | |||
| Theater Thrust | Slow | Set the thrust speed of the camera in Theater mode. | |
| Normal | Default | ||
| Fast | |||
| Gamepad | |||
| Aim Control | Classic | Aiming will feel like the original Halo game. | |
| Modern | Default | Aiming will feel consistent with other modern shooters. | |
| Auto Look Centering | Disabled | Default | Automatically center the vertical look axis as the player moves. |
| Enabled | The vertical look axis will move towards the center when moving. | ||
| Vibration | Enabled | Default | The gamepad will vibrate during gameplay and cutscenes. |
| Disabled | The gamepad will not vibrate during gameplay and cutscenes. | ||
| Horizontal Look Sensitivity | 1 | Minimum | Change how sensitive the horizontal aiming feels. |
| 3 | Default | ||
| 10 | Maximum | ||
| Vertical Look Sensitivity | 1 | Minimum | Change how sensitive the vertical aiming feels. |
| 3 | Default | ||
| 10 | Maximum | ||
| Look Acceleration | 1 | Minimum | Change your look acceleration, controlling how quickly the maximum turn speed is reached. |
| 5 | Default | ||
| 10 | Maximum | ||
|
0% | Minimum | Change the amount of input required to exit the dead zone. Used to adjust 'drift'. |
| 12% | Default | ||
| 20% | Maximum | ||
|
0% | Minimum | Change the amount of input required to exit the dead zone based on radius. Used to adjust 'drift'. |
| 12% | Default | ||
| 20% | Maximum | ||

| Setting | Options | Official Info | |
|---|---|---|---|
| Gamepad Controls | |||
| Crouch Behavior | Hold | Default | Crouching for a period of time will require a button hold. |
| Toggle | Crouching for a period of time will require a button press to toggle the effect. | ||
| Button Layout | Universal Default (Recon) | Default | Change gamepad layout to a specific controller preset. |
| Universal Reclaimer | |||
| Universal Zoom & Shoot | |||
| Universal Bump & Jump | |||
| Universal Green Thumbs | |||
| Universal Infinite | |||
| Default | |||
| Jumpy | |||
| Bumper Jumper | |||
| Boxer | |||
| Green Thumbs | |||
| The Duke | |||
| Hero | |||
| Recon | |||
| Custom | |||
|
Default | D-pad & buttons will be normal. | |
| Swapped | D-pad & buttons will be swapped. | ||
| Inverted | D-pad & buttons will be swapped, and also inverted. | ||
|
Default | Bumpers & triggers will be normal. | |
| Swapped | Bumpers & triggers will be swapped. | ||
|
Not Inverted | Default | Look axis will not be inverted when flying. |
| Inverted | Look axis will be inverted when flying. | ||
| Gamepad | |||
| Aim Control | Classic | Aiming will feel like the original Halo game. | |
| Modern | Default | Aiming will feel consistent with other modern shooters. | |
| Auto Look Centering | Disabled | Default | Automatically center the vertical look axis as the player moves. |
| Enabled | The vertical look axis will move towards the center when moving. | ||
| Vibration | Enabled | Default | The gamepad will vibrate during gameplay and cutscenes. |
| Disabled | The gamepad will not vibrate during gameplay and cutscenes. | ||
| Horizontal Look Sensitivity | 1 | Minimum | Change how sensitive the horizontal aiming feels. |
| 3 | Default | ||
| 10 | Maximum | ||
| Vertical Look Sensitivity | 1 | Minimum | Change how sensitive the vertical aiming feels. |
| 3 | Default | ||
| 10 | Maximum | ||
| Look Acceleration | 1 | Minimum | Change your look acceleration, controlling how quickly the maximum turn speed is reached. |
| 5 | Default | ||
| 10 | Maximum | ||
|
0% | Minimum | Change the amount of input required to exit the dead zone. Used to adjust 'drift'. |
| 12% | Default | ||
| 20% | Maximum | ||
|
0% | Minimum | Change the amount of input required to exit the dead zone based on radius. Used to adjust 'drift'. |
| 12% | Default | ||
| 20% | Maximum | ||

| Setting | Options | Official Info | |
|---|---|---|---|
| Gamepad Controls | |||
| Crouch Behavior | Hold | Default | Crouching for a period of time will require a button hold. |
| Toggle | Crouching for a period of time will require a button press to toggle the effect. | ||
| Button Layout | Universal Default (Recon) | Default | Change gamepad layout to a specific controller preset. |
| Universal Reclaimer | |||
| Universal Zoom & Shoot | |||
| Universal Bump & Jump | |||
| Universal Green Thumbs | |||
| Universal Infinite | |||
| Default | |||
| Boxer | |||
| Green Thumbs | |||
| Custom | |||
|
Default | D-pad & buttons will be normal. | |
| Swapped | D-pad & buttons will be swapped. | ||
| Inverted | D-pad & buttons will be swapped, and also inverted. | ||
|
Default | Bumpers & triggers will be normal. | |
| Swapped | Bumpers & triggers will be swapped. | ||
|
Not Inverted | Default | Your Fire button will fire your right-hand weapon and your Fire Secondary button will fire your left-hand weapon while dual-wielding. |
| Inverted | Your Fire button will fire your left-hand weapon and your Fire Secondary button will fire your right-hand weapon while dual-wielding. | ||
|
Not Inverted | Default | Look axis will not be inverted when flying. |
| Inverted | Look axis will be inverted when flying. | ||
| Theater Turn Sensitivity | Slow | Set the turn sensitivity of the camera in Theater mode. | |
| Normal | Default | ||
| Fast | |||
| Very Fast | |||
| Theater Panning | Hold to Pan | Default | Set the panning behavior of the camera in Theater mode. |
| Toggle | |||
| Theater Speed | Slow | Set the speed of the camera in Theater mode. | |
| Normal | Default | ||
| Fast | |||
| Very Fast | |||
| Theater Thrust | Slow | Set the thrust speed of the camera in Theater mode. | |
| Normal | Default | ||
| Fast | |||
| Gamepad | |||
| Aim Control | Classic | Aiming will feel like the original Halo game. | |
| Modern | Default | Aiming will feel consistent with other modern shooters. | |
| Auto Look Centering | Disabled | Default | Automatically center the vertical look axis as the player moves. |
| Enabled | The vertical look axis will move towards the center when moving. | ||
| Vibration | Enabled | Default | The gamepad will vibrate during gameplay and cutscenes. |
| Disabled | The gamepad will not vibrate during gameplay and cutscenes. | ||
| Horizontal Look Sensitivity | 1 | Minimum | Change how sensitive the horizontal aiming feels. |
| 3 | Default | ||
| 10 | Maximum | ||
| Vertical Look Sensitivity | 1 | Minimum | Change how sensitive the vertical aiming feels. |
| 3 | Default | ||
| 10 | Maximum | ||
| Look Acceleration | 1 | Minimum | Change your look acceleration, controlling how quickly the maximum turn speed is reached. |
| 5 | Default | ||
| 10 | Maximum | ||
|
0% | Minimum | Change the amount of input required to exit the dead zone. Used to adjust 'drift'. |
| 12% | Default | ||
| 20% | Maximum | ||
|
0% | Minimum | Change the amount of input required to exit the dead zone based on radius. Used to adjust 'drift'. |
| 12% | Default | ||
| 20% | Maximum | ||

| Setting | Options | Official Info | |
|---|---|---|---|
| Gamepad Controls | |||
| Crouch Behavior | Hold | Default | Crouching for a period of time will require a button hold. |
| Toggle | Crouching for a period of time will require a button press to toggle the effect. | ||
| Button Layout | Universal Default (Recon) | Default | Change gamepad layout to a specific controller preset. |
| Universal Reclaimer | |||
| Universal Zoom & Shoot | |||
| Universal Bump & Jump | |||
| Universal Green Thumbs | |||
| Universal Infinite | |||
| Default | |||
| Boxer | |||
| Green Thumbs | |||
| Bumper Jumper | |||
| Custom | |||
|
Default | D-pad & buttons will be normal. | |
| Swapped | D-pad & buttons will be swapped. | ||
| Inverted | D-pad & buttons will be swapped, and also inverted. | ||
|
Default | Bumpers & triggers will be normal. | |
| Swapped | Bumpers & triggers will be swapped. | ||
|
Not Inverted | Default | Your Fire button will fire your right-hand weapon and your Fire Secondary button will fire your left-hand weapon while dual-wielding. |
| Inverted | Your Fire button will fire your left-hand weapon and your Fire Secondary button will fire your right-hand weapon while dual-wielding. | ||
|
Button | Default | Control the altitude using the buttons assigned in the Layout. |
| Thumbstick | Control the altitude using the thumbstick. | ||
|
Not Inverted | Default | Look axis will not be inverted when flying. |
| Inverted | Look axis will be inverted when flying. | ||
| Theater Turn Sensitivity | Slow | Set the turn sensitivity of the camera in Theater mode. | |
| Normal | Default | ||
| Fast | |||
| Very Fast | |||
| Theater Panning | Hold to Pan | Default | Set the panning behavior of the camera in Theater mode. |
| Toggle | |||
| Theater Speed | Slow | Set the speed of the camera in Theater mode. | |
| Normal | Default | ||
| Fast | |||
| Very Fast | |||
| Theater Thrust | Slow | Set the thrust speed of the camera in Theater mode. | |
| Normal | Default | ||
| Fast | |||
| Gamepad | |||
| Aim Control | Classic | Aiming will feel like the original Halo game. | |
| Modern | Default | Aiming will feel consistent with other modern shooters. | |
| Auto Look Centering | Disabled | Default | Automatically center the vertical look axis as the player moves. |
| Enabled | The vertical look axis will move towards the center when moving. | ||
| Vibration | Enabled | Default | The gamepad will vibrate during gameplay and cutscenes. |
| Disabled | The gamepad will not vibrate during gameplay and cutscenes. | ||
| Horizontal Look Sensitivity | 1 | Minimum | Change how sensitive the horizontal aiming feels. |
| 3 | Default | ||
| 10 | Maximum | ||
| Vertical Look Sensitivity | 1 | Minimum | Change how sensitive the vertical aiming feels. |
| 3 | Default | ||
| 10 | Maximum | ||
| Look Acceleration | 1 | Minimum | Change your look acceleration, controlling how quickly the maximum turn speed is reached. |
| 5 | Default | ||
| 10 | Maximum | ||
|
0% | Minimum | Change the amount of input required to exit the dead zone. Used to adjust 'drift'. |
| 12% | Default | ||
| 20% | Maximum | ||
|
0% | Minimum | Change the amount of input required to exit the dead zone based on radius. Used to adjust 'drift'. |
| 12% | Default | ||
| 20% | Maximum | ||

| Setting | Options | Official Info | |
|---|---|---|---|
| Gamepad Controls | |||
| Crouch Behavior | Hold | Default | Crouching for a period of time will require a button hold. |
| Toggle | Crouching for a period of time will require a button press to toggle the effect. | ||
| Button Layout | Universal Default (Recon) | Default | Change gamepad layout to a specific controller preset. |
| Universal Reclaimer | |||
| Universal Zoom & Shoot | |||
| Universal Bump & Jump | |||
| Universal Green Thumbs | |||
| Universal Infinite | |||
| Default | |||
| Boxer | |||
| Green Thumbs | |||
| Bumper Jumper | |||
| Recon | |||
| Fishstick | |||
| Custom | |||
|
Default | D-pad & buttons will be normal. | |
| Swapped | D-pad & buttons will be swapped. | ||
| Inverted | D-pad & buttons will be swapped, and also inverted. | ||
|
Default | Bumpers & triggers will be normal. | |
| Swapped | Bumpers & triggers will be swapped. | ||
|
Not Inverted | Default | Buttons for the Banshee's brake and trick actions remain in their classic layout. |
| Inverted | Buttons for the Banshee's brake and trick actions are inverted | ||
|
Not Inverted | Default | Look axis will not be inverted when flying. |
| Inverted | Look axis will be inverted when flying. | ||
| Theater Turn Sensitivity | Slow | Set the turn sensitivity of the camera in Theater mode. | |
| Normal | Default | ||
| Fast | |||
| Very Fast | |||
| Theater Panning | Hold to Pan | Default | Set the panning behavior of the camera in Theater mode. |
| Toggle | |||
| Theater Speed | Slow | Set the speed of the camera in Theater mode. | |
| Normal | Default | ||
| Fast | |||
| Very Fast | |||
| Theater Thrust | Slow | Set the thrust speed of the camera in Theater mode. | |
| Normal | Default | ||
| Fast | |||
| Gamepad | |||
| Aim Control | Classic | Aiming will feel like the original Halo game. | |
| Modern | Default | Aiming will feel consistent with other modern shooters. | |
| Auto Look Centering | Disabled | Default | Automatically center the vertical look axis as the player moves. |
| Enabled | The vertical look axis will move towards the center when moving. | ||
| Vibration | Enabled | Default | The gamepad will vibrate during gameplay and cutscenes. |
| Disabled | The gamepad will not vibrate during gameplay and cutscenes. | ||
| Horizontal Look Sensitivity | 1 | Minimum | Change how sensitive the horizontal aiming feels. |
| 3 | Default | ||
| 10 | Maximum | ||
| Vertical Look Sensitivity | 1 | Minimum | Change how sensitive the vertical aiming feels. |
| 3 | Default | ||
| 10 | Maximum | ||
| Look Acceleration | 1 | Minimum | Change your look acceleration, controlling how quickly the maximum turn speed is reached. |
| 5 | Default | ||
| 10 | Maximum | ||
|
0% | Minimum | Change the amount of input required to exit the dead zone. Used to adjust 'drift'. |
| 12% | Default | ||
| 20% | Maximum | ||
|
0% | Minimum | Change the amount of input required to exit the dead zone based on radius. Used to adjust 'drift'. |
| 12% | Default | ||
| 20% | Maximum | ||
Keyboard and Mouse[edit]
Configure Bindings[edit]
Default keyboard and mouse controls for all six games; this also included the key binding information of the configuration file.
The configuration file information.
The file name is GameUserSettings.ini and the file is located:
| Microsoft Store | C:\Users\%USERPROFILE%\AppData\LocalLow\MCC\
|
| Steam | C:\Users\%USERPROFILE%\AppData\LocalLow\MCC\Saved\Config\WindowsNoEditor\
|
In the file, the main keyboard and mouse bindings for six games are…
| Game | Line |
|---|---|
| Halo: Reach | CustomKeyboardMouseMappingV2[5]=(GameKeyboardMouseMappings[0]=(AbstractButton=0,VirtualKeyCodes[0]=…
|
| Halo: Combat Evolved | CustomKeyboardMouseMappingV2[0]=(GameKeyboardMouseMappings[0]=(AbstractButton=0,VirtualKeyCodes[0]=…
|
| Halo 2 (Classic) | CustomKeyboardMouseMappingV2[1]=(GameKeyboardMouseMappings[0]=(AbstractButton=0,VirtualKeyCodes[0]=…
|
| Halo 2: Anniversary multiplayer | |
| Halo 3 | CustomKeyboardMouseMappingV2[3]=(GameKeyboardMouseMappings[0]=(AbstractButton=0,VirtualKeyCodes[0]=…
|
| Halo 3: ODST | CustomKeyboardMouseMappingV2[4]=(GameKeyboardMouseMappings[0]=(AbstractButton=0,VirtualKeyCodes[0]=…
|
| Halo 4 | CustomKeyboardMouseMappingV2[6]=(GameKeyboardMouseMappings[0]=(AbstractButton=0,VirtualKeyCodes[0]=…
|
Understanding the Texts
…]=(GameKeyboardMouseMappings[0]=(AbstractButton=0,VirtualKeyCodes[0]=32,VirtualKeyCodes[1]=0,VirtualKeyCodes[2]=0,VirtualKeyCodes[3]=0,VirtualKeyCodes[4]=0),GameKeyboardMouseMappings[1]=(A…
|
In the Halo Reach (MCC) settings menu, there are 51 input actions; apparently, in the configuration file, there are 66. All six games have 66 in the file. Below, the Xs mean they aren't in-game settings; almost all of the Xs don't do anything in any built-in map. Not to be confused with 0 counting as 1.
| Category | Input Action | Configuration File | |||||
|---|---|---|---|---|---|---|---|
| Halo: Reach | Halo: Combat Evolved | Halo 2 | Halo 3 | Halo 3: ODST | Halo 4 | ||
| MOVEMENT | JUMP | 0
| |||||
| ACTIONS | SWITCH GRENADES | SELECT NEXT GRENADES | 1
| ||||
| ACTIONS | ACTION | 2
| |||||
| ACTIONS | RELOAD | 3
| |||||
| ACTIONS | CHANGE WEAPON | 4
| |||||
| ACTIONS | MELEE | 5
| |||||
| ACTIONS | TOGGLE NIGHT VISION | TOGGLE FLASHLIGHT | TOGGLE NIGHT VISION | ✗ | 6
| ||
| ACTIONS | THROW GRENADE | 7
| |||||
| ACTIONS | FIRE | 8
| |||||
| MOVEMENT | CROUCH | 9
| |||||
| ACTIONS | ZOOM | 10
| |||||
| ACTIONS | ZOOM IN | 11
| |||||
| ACTIONS | ZOOM OUT | 12
| |||||
| ACTIONS | ✗ | DUAL-WIELD | ✗ | 13
| |||
| MOVEMENT | ✗ | SPRINT | 14
| ||||
| VEHICLE CONTROLS | ✗ | BANSHEE BOMB | ✗ | 15
| |||
| MOVEMENT | MOVE FORWARD | 16
| |||||
| MOVEMENT | MOVE BACKWARD | 17
| |||||
| MOVEMENT | MOVE LEFT | 18
| |||||
| MOVEMENT | MOVE RIGHT | 19
| |||||
| UI CONTROLS | TOGGLE SCOREBOARD | TOGGLE VISUALS/SCOREBOARD | TOGGLE SCOREBOARD | TOGGLE VISR DATABASE | TOGGLE SCOREBOARD | 20
| |
| VEHICLE CONTROLS | VEHICLE FUNCTION 2 | 21
| |||||
| VEHICLE CONTROLS | VEHICLE FUNCTION 3 | 22
| |||||
| ACTIONS | USE ARMOR ABILITY | ✗ | USE EQUIPMENT | USE ARMOR ABILITY | 23
| ||
| VEHICLE CONTROLS | VEHICLE FUNCTION 1 | 24
| |||||
| FORGE | ASCEND | ✗ | ASCEND | ✗ | ASCEND | 25
| |
| FORGE | DESCEND | ✗ | DESCEND | ✗ | DESCEND | 26
| |
| FORGE | GRAB / RELEASE OBJECT | ✗ | GRAB / RELEASE OBJECT | ✗ | GRAB / RELEASE OBJECT | 27
| |
| FORGE | BOOST | ✗ | BOOST | ✗ | BOOST | 28
| |
| FORGE | PRECISION EDIT | ✗ | PRECISION EDIT | ✗ | PRECISION EDIT | 29
| |
| FORGE | DELETE OBJECT | ✗ | DELETE OBJECT | ✗ | DELETE OBJECT | 30
| |
| FORGE | CREATE OBJECT / OBJECT PROPERTIES | ✗ | CREATE OBJECT / OBJECT PROPERTIES | ✗ | CREATE OBJECT / OBJECT PROPERTIES | 31
| |
| FORGE | TOOLS | ✗ | TOOLS | ✗ | TOOLS | 32
| |
| FORGE | SWITCH PLAYER MODE | ✗ | SWITCH PLAYER MODE | ✗ | SWITCH PLAYER MODE | 33
| |
| FORGE | ZOOM | ✗ | ZOOM | ✗ | ZOOM | 34
| |
| FORGE | ROTATION MODE | ✗ | ROTATION MODE | ✗ | ROTATION MODE | 35
| |
| THEATER | TOGGLE PANEL | ✗ | TOGGLE PANEL | 36
| |||
| THEATER | TOGGLE INTERFACE | ✗ | TOGGLE INTERFACE | 37
| |||
| THEATER | TOGGLE FIRST / THIRD PERSON | ✗ | TOGGLE FIRST / THIRD PERSON | 38
| |||
| THEATER | CAMERA RESET | ✗ | CAMERA RESET | 39
| |||
| THEATER | JUMP FORWARD | ✗ | JUMP FORWARD | ✗ | JUMP FORWARD | 40
| |
| THEATER | JUMP BACK | ✗ | JUMP BACK | ✗ | JUMP BACK | 41
| |
| THEATER | PAUSE / RESUME PLAYBACK | ✗ | PAUSE / RESUME PLAYBACK | 42
| |||
| THEATER | FAST FORWARD | ✗ | FAST FORWARD | 43
| |||
| THEATER | TOGGLE FREECAM | ✗ | TOGGLE FREECAM | 44
| |||
| THEATER | BOOST | ✗ | BOOST | 45
| |||
| THEATER | THEATER PANNING | ✗ | THEATER PANNING | 46
| |||
| THEATER | ASCEND | ✗ | ASCEND | 47
| |||
| THEATER | DESCEND | ✗ | DESCEND | 48
| |||
| ACTIONS | ✗ | FIRE SECONDARY | ✗ | 49
| |||
| THEATER | ZOOM | ✗ | ZOOM | 50
| |||
| FORGE | TOGGLE ROTATION AXES | ✗ | TOGGLE ROTATION AXES | ✗ | TOGGLE ROTATION AXES | 51
| |
| FORGE | DUPLICATE | ✗ | DUPLICATE | ✗ | DUPLICATE | 52
| |
| FORGE | ✗ | LOCK | ✗ | LOCK | 53
| ||
| FORGE | RESET | ✗ | RESET | ✗ | RESET | 54
| |
| ACTIONS | ✗ | RELOAD SECONDARY WEAPON | ✗ | 55
| |||
| ACTIONS | ✗ | SELECT PREVIOUS GRENADES | 56
| ||||
| ACTIONS | ✗ | SPECIAL ACTION | 57
| ||||
| UI CONTROLS | OPEN LOADOUTS MENU | ✗ | OPEN LOADOUTS MENU | ✗ | OPEN LOADOUTS MENU | 58
| |
| UI CONTROLS | ✗ | TOGGLE DISPLAY WAYPOINT MARKERS | ✗ | 59
| |||
| UI CONTROLS | ✗ | TOGGLE DISPLAY WAYPOINT MARKERS ALT | ✗ | 60
| |||
| ✗ | 61
| ||||||
| ✗ | 62
| ||||||
| ✗ | 63
| ||||||
| ✗ | 64
| ||||||
| ✗ | 65
| ||||||
These green numbers are the only things that can be edited in the file; they are "decimal values", which are key and mouse button codes instead of their names; here is the list of key and mouse button number code details.
Editing the configuration file is an alternate way to change bindings in-game settings, but the configuration file isn't user-friendly; it can still be edited with a text editor application.
Just make sure you don't save while MCC is running.
In the settings menu, MCC only supports secondary key binding; apparently, in the configuration file, there are more than two key bindings (Five Key Bindings). However, these extra key bindings are lacking for the reason shown below:
| Game | Primary Key BindingVirtualKeyCodes[0]= |
Secondary Key BindingVirtualKeyCodes[1]= |
Tertiary Key BindingVirtualKeyCodes[2]= |
Quaternary Key BindingVirtualKeyCodes[3]= |
Quinary Key BindingVirtualKeyCodes[4]=
|
|---|---|---|---|---|---|
| Halo: Reach | Yes | No | |||
| Halo: Combat Evolved | Yes | Secondary, tertiary, quaternary, or quinary key bindings—therefore, it's like the game supports secondary key binding. | |||
| Halo 2 (Classic) | Yes | ||||
| Halo 2: Anniversary multiplayer | Yes | No | |||
| Halo 3 | Yes | No | |||
| Halo 3: ODST | Yes | No | |||
| Halo 4 | Yes | No | |||
| Input Action | Key or Mouse Button | Description | Bindable | |
|---|---|---|---|---|
| Game Menu | No | |||
| Communication | Open Text Chat | Set key for TEXT CHAT.[Note 1] | Yes | |
| Push to Talk | Set key for PUSH TO TALK. | |||

| Input Action | Key or Mouse Button | Description | Configuration File Input Action |
Bindable | |
|---|---|---|---|---|---|
| Movement | Move Forward | Set key to Move Forward.[Note 1] | 16 |
Yes | |
| Move Backward | Set key to Move Backward. | 17 | |||
| Move Left | Set key to Move Left. | 18 | |||
| Move Right | Set key to Move Right. | 19 | |||
| Jump | Set key to JUMP. Use the equipped Series 8 jetpack or Tlaipoz-pattern harness variant while airborne if "JUMPER JUMPER" is enabled. |
0 | |||
| Crouch | Set key to CROUCH. Hold Crouch or Toggle Crouch, depending on the "CROUCH BEHAVIOR" setting. |
9 | |||
| Actions | Fire | Set key to FIRE your primary weapon. | 8 | ||
| Zoom | Set key to cycle between magnification levels for weapon scopes. Can be held or toggled. Use binoculars if a weapon lacks scope. |
10 | |||
| Zoom In | Set key to cycle up to the next magnification level. Use binoculars if a weapon lacks scope. |
11 | |||
| Zoom Out | Set key to cycle down to the previous magnification level. | 12 | |||
| Melee | Set key to MELEE. | 5 | |||
| Reload | Set key to RELOAD. | 3 | |||
| Throw Grenade | Set key to THROW GRENADE. | 7 | |||
| Action | Set key for primary ACTIONS like interacting, picking up weapons, and entering vehicles. | 2 | |||
| Change Weapon | Set key to CHANGE WEAPON. | 4 | |||
| Switch Grenades | Set key to SWITCH GRENADES. | 1 | |||
| Use Armor Ability | Set key to USE ARMOR ABILITY. | 23 | |||
| Toggle Night Vision | Set key to TOGGLE NIGHT VISION. | 6 | |||
| Vehicle Controls | Vehicle Function 1 | Set key to use vehicle functions like secondary fire, drifting, boosting, and ascending. | 24 | ||
| Vehicle Function 2 | Set key to use vehicle functions like braking and hovering. | 21 | |||
| Vehicle Function 3 | Set key to use vehicle functions like aerial maneuvers and descending. | 22 | |||
| UI Controls | Toggle Scoreboard | Set key to TOGGLE MULTIPLAYER SCOREBOARD. | 20 | ||
| Open Loadouts Menu | Set key to open the LOADOUTS MENU. | 58 | |||
| Forge | Ascend | Set key to ASCEND while in Editor mode. While piloting a Pelican or Phantom, hold "ASCEND" to fly up. |
25 | ||
| Descend | Set key to DESCEND while in Editor mode. While piloting a Pelican or Phantom, hold "DESCEND" to fly down. |
26 | |||
| Grab/Release Object | Set key to GRAB and RELEASE objects while in Editor mode. | 27 | |||
| Boost | Set key to BOOST movement speed while in Editor mode. | 28 | |||
| Precision Edit | Set key to enter PRECISION EDIT mode while in Editor mode. | 29 | |||
| Delete Object | Set key to DELETE OBJECTS while in Editor mode. | 30 | |||
| Create Object/Object Properties | Set key to create objects and access their properties while in Editor mode. | 31 | |||
| Tools | Set key to access TOOLS menu while in Editor mode. | 32 | |||
| Duplicate | Set key to DUPLICATE objects while in Editor mode. | 52 | |||
| Reset | Set key to RESET object orientation while in Editor mode. | 54 | |||
| Switch Player Mode | Set key to switch between Player and Editor mode. | 33 | |||
| Zoom | Set key to ZOOM the camera while in Editor mode. | 34 | |||
| Rotation Mode | Set key to enter Object ROTATION MODE while in Editor mode. | 35 | |||
| Toggle Rotation Axes | Set key to switch between global/local rotation axes. | 51 | |||
| Theater | Toggle Panel | Set key to toggle visibility of the Theater control panel. | 36 | ||
| Toggle Interface | Set key to toggle visibility of the player HUD and Theater interface. | 37 | |||
| Toggle First/Third Person | Set key to toggle between first and third person view. | 38 | |||
| Camera Reset | Set key to reset the camera position while in orbit cam. | 39 | |||
| Jump Forward | Set key to JUMP FORWARD to the next available rewind point. | 40 | |||
| Jump Back | Set key to JUMP BACK to the previous rewind point. | 41 | |||
| Pause/Resume Playback | Set key to pause and resume playback. | 42 | |||
| Fast Forward | Set key to increase playback speed. | 43 | |||
| Toggle Freecam | Set key to switch the camera between anchored and freecam modes. | 44 | |||
| Boost | Set key to BOOST the camera movement speed. | 45 | |||
| Theater Panning | Set key to enable panning in Theater mode. | 46 | |||
| Ascend | Set key to ASCEND the fly cam while in Theater mode. | 47 | |||
| Descend | Set key to DESCEND the fly cam while in Theater mode. | 48 | |||
| Zoom | Set key to ZOOM the fly camera while in Theater mode. | 50 | |||
| Select Previous Grenades | 56 |
Yes & No Only in the configuration file GameUserSettings.ini. | |||
| Switch Grenades Alt | 65 |
Yes & No Only in the configuration file GameUserSettings.ini. | |||

| Input Action | Key or Mouse Button | Description | Configuration File Input Action |
Bindable | |
|---|---|---|---|---|---|
| Movement | Move Forward | Set key to Move Forward. | 16 |
Yes | |
| Move Backward | Set key to Move Backward. | 17 | |||
| Move Left | Set key to Move Left. | 18 | |||
| Move Right | Set key to Move Right. | 19 | |||
| Jump | Set key to JUMP. | 0 | |||
| Crouch | Set key to CROUCH. Hold Crouch or Toggle Crouch, depending on the "CROUCH BEHAVIOR" setting. |
9 | |||
| Actions | Fire | Set key to FIRE your primary weapon. | 8 | ||
| Zoom | Set key to cycle between magnification levels for weapon scopes. Can be held or toggled. | 10 | |||
| Zoom In | Set key to cycle up to the next magnification level. | 11 | |||
| Zoom Out | Set key to cycle down to the previous magnification level. | 12 | |||
| Melee | Set key to MELEE. | 5 | |||
| Reload | Set key to RELOAD. | 3 | |||
| Throw Grenade | Set key to THROW GRENADE. | 7 | |||
| Action | Set key for primary ACTIONS like interacting, picking up weapons, and entering vehicles. | 2 | |||
| Change Weapon | Set key to CHANGE WEAPON. | 4 | |||
| Switch Grenades | Set key to SWITCH GRENADES. | 1 | |||
| Toggle Flashlight | Set key to TOGGLE FLASHLIGHT. Activate a Sniper Rifle's night-vision while zooming. |
6 | |||
| Vehicle Controls | Vehicle Function 1 | Set key to use vehicle functions like secondary fire, drifting, boosting, and ascending. | 24 | ||
| Vehicle Function 2 | Set key to use vehicle functions like braking and hovering. | 21 | |||
| Vehicle Function 3 | Set key to use vehicle functions like aerial maneuvers and descending. | 22 | |||
| UI Controls | Toggle Visuals/Scoreboard | Set key to TOGGLE VISUALS / MULTIPLAYER SCOREBOARD. | 20 | ||
| Select Previous Grenades | 56 |
Yes & No Only in the configuration file GameUserSettings.ini. | |||
| Toggle Flashlight Alt | Activate a Sniper Rifle's night-vision while zooming. | 64 |
Yes & No Only in the configuration file GameUserSettings.ini. | ||
| Switch Grenades Alt | 65 |
Yes & No Only in the configuration file GameUserSettings.ini. | |||

| Input Action | Key or Mouse Button | Description | Configuration File Input Action |
Bindable | |
|---|---|---|---|---|---|
| Movement | Move Forward | Set key to Move Forward. | 16 |
Yes | |
| Move Backward | Set key to Move Backward. | 17 | |||
| Move Left | Set key to Move Left. | 18 | |||
| Move Right | Set key to Move Right. | 19 | |||
| Jump | Set key to JUMP. | 0 | |||
| Crouch | Set key to CROUCH. Hold Crouch or Toggle Crouch, depending on the "CROUCH BEHAVIOR" setting. |
9 | |||
| Actions | Fire | Set key to FIRE your primary weapon. | 8 | ||
| Fire Secondary | Set key to FIRE your secondary weapon while dual-wielding. | 49 | |||
| Zoom | Set key to cycle between magnification levels for weapon scopes. Can be held or toggled. Use binoculars if a weapon lacks scope. |
10 | |||
| Zoom In | Set key to cycle up to the next magnification level. Use binoculars if a weapon lacks scope. |
11 | |||
| Zoom Out | Set key to cycle down to the previous magnification level. | 12 | |||
| Melee | Set key to MELEE. | 5 | |||
| Reload | Set key to RELOAD. Reload right and left weapons while dual-wielding, unlike Halo 3. |
3 | |||
| Throw Grenade | Set key to THROW GRENADE. | 7 | |||
| Action | Set key for primary ACTIONS like interacting, picking up weapons, and entering vehicles. | 2 | |||
| Change Weapon | Set key to CHANGE WEAPON. | 4 | |||
| Switch Grenades | Set key to SWITCH GRENADES. | 1 | |||
| Toggle Flashlight | Set key to TOGGLE FLASHLIGHT. As the Arbiter, instead of a flashlight, it's active camo. |
6 | |||
| Dual-Wield | Set key to pick up a secondary weapon to DUAL-WIELD. | 13 | |||
| Vehicle Controls | Vehicle Function 1 | Set key to use vehicle functions like secondary fire, drifting, boosting, and ascending. | 24 | ||
| Vehicle Function 2 | Set key to use vehicle functions like braking and hovering. | 21 | |||
| Vehicle Function 3 | Set key to use vehicle functions like aerial maneuvers and descending. | 22 | |||
| Banshee Bomb | Set key to use BANSHEE BOMB. | 15 | |||
| UI Controls | Toggle Visuals/Scoreboard | Set key to TOGGLE VISUALS / MULTIPLAYER SCOREBOARD. | 20 | ||
| Open Loadouts Menu | Set key to open the LOADOUTS MENU. | 58 | |||
| Forge | Ascend | Set key to ASCEND while in Editor mode. | 25 | ||
| Descend | Set key to DESCEND while in Editor mode. | 26 | |||
| Grab/Release Object | Set key to GRAB and RELEASE objects while in Editor mode. | 27 | |||
| Boost | Set key to BOOST movement speed while in Editor mode. | 28 | |||
| Precision Edit | Set key to enter PRECISION EDIT mode while in Editor mode. | 29 | |||
| Delete Object | Set key to DELETE OBJECTS while in Editor mode. | 30 | |||
| Create Object/Object Properties | Set key to create objects and access their properties while in Editor mode. | 31 | |||
| Tools | Set key to access TOOLS menu while in Editor mode. | 32 | |||
| Duplicate | Set key to DUPLICATE objects while in Editor mode. | 52 | |||
| Lock | Set key to LOCK objects while in Editor mode. | 53 | |||
| Reset | Set key to RESET object orientation while in Editor mode. | 54 | |||
| Switch Player Mode | Set key to switch between Player and Editor mode. | 33 | |||
| Zoom | Set key to ZOOM the camera while in Editor mode. | 34 | |||
| Rotation Mode | Set key to enter Object ROTATION MODE while in Editor mode. | 35 | |||
| Toggle Rotation Axes | Set key to switch between global/local rotation axes. | 51 | |||
| Theater | Toggle Panel | Set key to toggle visibility of the Theater control panel. | 36 | ||
| Toggle Interface | Set key to toggle visibility of the player HUD and Theater interface. | 37 | |||
| Toggle First/Third Person | Set key to toggle between first and third person view. | 38 | |||
| Camera Reset | Set key to reset the camera position while in orbit cam. | 39 | |||
| Jump Forward | Set key to JUMP FORWARD to the next available rewind point. | 40 | |||
| Jump Back | Set key to JUMP BACK to the previous rewind point. | 41 | |||
| Pause/Resume Playback | Set key to pause and resume playback. | 42 | |||
| Fast Forward | Set key to increase playback speed. | 43 | |||
| Toggle Freecam | Set key to switch the camera between anchored and freecam modes. | 44 | |||
| Boost | Set key to BOOST the camera movement speed. | 45 | |||
| Theater Panning | Set key to enable panning in Theater mode. | 46 | |||
| Ascend | Set key to ASCEND the fly cam while in Theater mode. | 47 | |||
| Descend | Set key to DESCEND the fly cam while in Theater mode. | 48 | |||
| Zoom | Set key to ZOOM the fly camera while in Theater mode. | 50 | |||
| Toggle Flashlight Alt | As the Arbiter, instead of a flashlight, it's active camo. | 64 |
Yes & No Only in the configuration file GameUserSettings.ini. | ||
| Setting | Options | Official Info | |
|---|---|---|---|
| Dual-Wield Inversion | Inverted | Default | Your Fire key will fire your left-hand weapon and your Fire Secondary key will fire your right-hand weapon while dual-wielding. |
| Not Inverted | Your Fire key will fire your right-hand weapon and your Fire Secondary key will fire your left-hand weapon while dual-wielding. | ||

| Input Action | Key or Mouse Button | Description | Configuration File Input Action |
Bindable | |
|---|---|---|---|---|---|
| Movement | Move Forward | Set key to Move Forward. | 16 |
Yes | |
| Move Backward | Set key to Move Backward. | 17 | |||
| Move Left | Set key to Move Left. | 18 | |||
| Move Right | Set key to Move Right. | 19 | |||
| Jump | Set key to JUMP. | 0 | |||
| Crouch | Set key to CROUCH. Hold Crouch or Toggle Crouch, depending on the "CROUCH BEHAVIOR" setting. |
9 | |||
| Actions | Fire | Set key to FIRE your primary weapon. | 8 | ||
| Fire Secondary | Set key to FIRE your secondary weapon while dual-wielding. | 49 | |||
| Zoom | Set key to cycle between magnification levels for weapon scopes. Can be held or toggled. Use binoculars if a weapon lacks scope. |
10 | |||
| Zoom In | Set key to cycle up to the next magnification level. Use binoculars if a weapon lacks scope. |
11 | |||
| Zoom Out | Set key to cycle down to the previous magnification level. | 12 | |||
| Melee | Set key to MELEE. | 5 | |||
| Reload | Set key to RELOAD. | 3 | |||
| Reload Secondary Weapon | Set key to RELOAD SECONDARY WEAPON while dual-wielding. | 55 | |||
| Throw Grenade | Set key to THROW GRENADE. | 7 | |||
| Action | Set key for primary ACTIONS like interacting, picking up weapons, and entering vehicles. | 2 | |||
| Change Weapon | Set key to CHANGE WEAPON. | 4 | |||
| Select Next Grenades | Set key to SELECT NEXT GRENADES. | 1 | |||
| Select Previous Grenades | Set key to SELECT PREVIOUS GRENADES. | 56 | |||
| Use Equipment | Set key to USE EQUIPMENT. | 23 | |||
| Toggle Flashlight | Set key to TOGGLE FLASHLIGHT. | 6 | |||
| Dual-Wield | Set key to pick up a secondary weapon to DUAL-WIELD. | 13 | |||
| Vehicle Controls | Vehicle Function 1 | Set key to use vehicle functions like secondary fire, drifting, boosting, and ascending. | 24 | ||
| Vehicle Function 2 | Set key to use vehicle functions like braking and hovering. | 21 | |||
| Vehicle Function 3 | Set key to use vehicle functions like aerial maneuvers and descending. | 22 | |||
| Banshee Bomb | Set key to use BANSHEE BOMB. | 15 | |||
| UI Controls | Toggle Scoreboard | Set key to TOGGLE MULTIPLAYER SCOREBOARD. | 20 | ||
| Forge | Ascend | Set key to ASCEND while in Editor mode. | 25 | ||
| Descend | Set key to DESCEND while in Editor mode. | 26 | |||
| Grab/Release Object | Set key to GRAB and RELEASE objects while in Editor mode. | 27 | |||
| Boost | Set key to BOOST movement speed while in Editor mode. | 28 | |||
| Precision Edit | Set key to enter PRECISION EDIT mode while in Editor mode. | 29 | |||
| Delete Object | Set key to DELETE OBJECTS while in Editor mode. | 30 | |||
| Create Object/Object Properties | Set key to create objects and access their properties while in Editor mode. | 31 | |||
| Tools | Set key to access TOOLS menu while in Editor mode. | 32 | |||
| Switch Player Mode | Set key to switch between Player and Editor mode. | 33 | |||
| Zoom | Set key to ZOOM the camera while in Editor mode. | 34 | |||
| Rotation Mode | Set key to enter Object ROTATION MODE while in Editor mode. | 35 | |||
| Toggle Rotation Axes | Set key to switch between global/local rotation axes. | 51 | |||
| Theater | Toggle Panel | Set key to toggle visibility of the Theater control panel. | 36 | ||
| Toggle Interface | Set key to toggle visibility of the player HUD and Theater interface. | 37 | |||
| Toggle First/Third Person | Set key to toggle between first and third person view. | 38 | |||
| Camera Reset | Set key to reset the camera position while in orbit cam. | 39 | |||
| Jump Forward | Set key to JUMP FORWARD to the next available rewind point. | 40 | |||
| Jump Back | Set key to JUMP BACK to the previous rewind point. | 41 | |||
| Pause/Resume Playback | Set key to pause and resume playback. | 42 | |||
| Fast Forward | Set key to increase playback speed. | 43 | |||
| Toggle Freecam | Set key to switch the camera between anchored and freecam modes. | 44 | |||
| Boost | Set key to BOOST the camera movement speed. | 45 | |||
| Theater Panning | Set key to enable panning in Theater mode. | 46 | |||
| Ascend | Set key to ASCEND the fly cam while in Theater mode. | 47 | |||
| Descend | Set key to DESCEND the fly cam while in Theater mode. | 48 | |||
| Zoom | Set key to ZOOM the fly camera while in Theater mode. | 50 | |||
| Select Next Grenades Alt | 65 |
Yes & No Only in the configuration file GameUserSettings.ini. | |||
| Setting | Options | Official Info | |
|---|---|---|---|
| Dual-Wield Inversion | Inverted | Default | Your Fire key will fire your left-hand weapon and your Fire Secondary key will fire your right-hand weapon while dual-wielding. |
| Not Inverted | Your Fire key will fire your right-hand weapon and your Fire Secondary key will fire your left-hand weapon while dual-wielding. | ||

| Input Action | Key or Mouse Button | Description | Configuration File Input Action |
Bindable | |
|---|---|---|---|---|---|
| Movement | Move Forward | Set key to Move Forward. | 16 |
Yes | |
| Move Backward | Set key to Move Backward. | 17 | |||
| Move Left | Set key to Move Left. | 18 | |||
| Move Right | Set key to Move Right. | 19 | |||
| Jump | Set key to JUMP. | 0 | |||
| Crouch | Set key to CROUCH. Hold Crouch or Toggle Crouch, depending on the "CROUCH BEHAVIOR" setting. |
9 | |||
| Actions | Fire | Set key to FIRE your primary weapon. | 8 | ||
| Fire Secondary | Set key to FIRE your secondary weapon while dual-wielding. | 49 | |||
| Zoom | Set key to cycle between magnification levels for weapon scopes. Can be held or toggled. Use binoculars if a weapon lacks scope. |
10 | |||
| Zoom In | Set key to cycle up to the next magnification level. Use binoculars if a weapon lacks scope. |
11 | |||
| Zoom Out | Set key to cycle down to the previous magnification level. | 12 | |||
| Melee | Set key to MELEE. | 5 | |||
| Reload | Set key to RELOAD. | 3 | |||
| Reload Secondary Weapon | Set key to RELOAD SECONDARY WEAPON while dual-wielding. | 55 | |||
| Throw Grenade | Set key to THROW GRENADE. | 7
| |||
| Action | Set key for primary ACTIONS like interacting, picking up weapons, and entering vehicles. | 2 | |||
| Change Weapon | Set key to CHANGE WEAPON. | 4 | |||
| Select Next Grenades | Set key to SELECT NEXT GRENADES. | 1 | |||
| Select Previous Grenades | Set key to SELECT PREVIOUS GRENADES. | 56 | |||
| Use Equipment | Set key to USE EQUIPMENT. | 23 | |||
| Toggle Night Vision | Set key to TOGGLE NIGHT VISION. | 6 | |||
| Dual-Wield | Set key to pick up a secondary weapon to DUAL-WIELD. | 13 | |||
| Vehicle Controls | Vehicle Function 1 | Set key to use vehicle functions like secondary fire, drifting, boosting, and ascending. | 24 | ||
| Vehicle Function 2 | Set key to use vehicle functions like braking and hovering. | 21 | |||
| Vehicle Function 3 | Set key to use vehicle functions like aerial maneuvers and descending. | 22 | |||
| Banshee Bomb | Set key to use BANSHEE BOMB. | 15 | |||
| UI Controls | Toggle VISR Database | Set key to TOGGLE VISR DATABASE. | 20 | ||
| Toggle Display Waypoint Markers | Set key to TOGGLE WAYPOINT MARKERS. | 59 | |||
| Toggle Display Waypoint Markers Alt | Alternative key to TOGGLE WAYPOINT MARKERS. | 60 | |||
| Theater | Toggle Panel | Set key to toggle visibility of the Theater control panel. | 36 | ||
| Toggle Interface | Set key to toggle visibility of the player HUD and Theater interface. | 37 | |||
| Toggle First/Third Person | Set key to toggle between first and third person view. | 38 | |||
| Camera Reset | Set key to reset the camera position while in orbit cam. | 39 | |||
| Pause/Resume Playback | Set key to pause and resume playback. | 42 | |||
| Fast Forward | Set key to increase playback speed. | 43 | |||
| Toggle Freecam | Set key to switch the camera between anchored and freecam modes. | 44 | |||
| Boost | Set key to BOOST the camera movement speed. | 45 | |||
| Theater Panning | Set key to enable panning in Theater mode. | 46 | |||
| Ascend | Set key to ASCEND the fly cam while in Theater mode. | 47 | |||
| Descend | Set key to DESCEND the fly cam while in Theater mode. | 48 | |||
| Zoom | Set key to ZOOM the fly camera while in Theater mode. | 50 | |||
| Select Next Grenades Alt | 65 |
Yes & No Only in the configuration file GameUserSettings.ini. | |||
| Setting | Options | Official Info | |
|---|---|---|---|
| Dual-Wield Inversion | Inverted | Default | Your Fire key will fire your left-hand weapon and your Fire Secondary key will fire your right-hand weapon while dual-wielding. |
| Not Inverted | Your Fire key will fire your right-hand weapon and your Fire Secondary key will fire your left-hand weapon while dual-wielding. | ||

| Input Action | Key or Mouse Button | Description | Configuration File Input Action |
Bindable | |
|---|---|---|---|---|---|
| Movement | Move Forward | Set key to Move Forward. | 16 |
Yes | |
| Move Backward | Set key to Move Backward. | 17 | |||
| Move Left | Set key to Move Left. | 18 | |||
| Move Right | Set key to Move Right. | 19 | |||
| Jump | Set key to JUMP. Use the equipped Series 12 jetpack while airborne if "JUMPER JUMPER" is enabled. |
0 | |||
| Crouch | Set key to CROUCH. Hold Crouch or Toggle Crouch, depending on the "CROUCH BEHAVIOR" setting. |
9 | |||
| Sprint | Set key to SPRINT. | 14 | |||
| Actions | Fire | Set key to FIRE your primary weapon. | 8 | ||
| Zoom | Set key to cycle between magnification levels for weapon scopes. Can be held or toggled. Use binoculars if a weapon lacks scope. |
10 | |||
| Zoom In | Set key to cycle up to the next magnification level. Use binoculars if a weapon lacks scope. |
11 | |||
| Zoom Out | Set key to cycle down to the previous magnification level. | 12 | |||
| Melee | Set key to MELEE. | 5 | |||
| Reload | Set key to RELOAD. | 3 | |||
| Throw Grenade | Set key to THROW GRENADE. | 7 | |||
| Action | Set key for primary ACTIONS like interacting, picking up weapons, and entering vehicles. | 2 | |||
| Change Weapon | Set key to CHANGE WEAPON. | 4 | |||
| Select Next Grenades | Set key to SELECT NEXT GRENADES. | 1 | |||
| Select Previous Grenades | Set key to SELECT PREVIOUS GRENADES. | 56 | |||
| Use Armor Ability | Set key to USE ARMOR ABILITY. | 23 | |||
| Special Action | Set key to use the Target Designator in Campaign. | 57 | |||
| Vehicle Controls | Vehicle Function 1 | Set key to use vehicle functions like secondary fire, drifting, boosting, and ascending. | 24 | ||
| Vehicle Function 2 | Set key to use vehicle functions like braking and hovering. | 21 | |||
| Vehicle Function 3 | Set key to use vehicle functions like aerial maneuvers and descending. | 22 | |||
| UI Controls | Toggle Scoreboard | Set key to TOGGLE MULTIPLAYER SCOREBOARD. | 20 | ||
| Open Loadouts Menu | Set key to open the LOADOUTS MENU. | 58 | |||
| Forge | Ascend | Set key to ASCEND while in Editor mode. | 25 | ||
| Descend | Set key to DESCEND while in Editor mode. | 26 | |||
| Grab/Release Object | Set key to GRAB and RELEASE objects while in Editor mode. | 27 | |||
| Boost | Set key to BOOST movement speed while in Editor mode. | 28 | |||
| Precision Edit | Set key to enter PRECISION EDIT mode while in Editor mode. | 29 | |||
| Delete Object | Set key to DELETE OBJECTS while in Editor mode. | 30 | |||
| Create Object/Object Properties | Set key to create objects and access their properties while in Editor mode. | 31 | |||
| Tools | Set key to access TOOLS menu while in Editor mode. | 32 | |||
| Duplicate | Set key to DUPLICATE objects while in Editor mode. | 52 | |||
| Lock | Set key to LOCK objects while in Editor mode. | 53 | |||
| Reset | Set key to RESET object orientation while in Editor mode. | 54 | |||
| Switch Player Mode | Set key to switch between Player and Editor mode. | 33 | |||
| Zoom | Set key to ZOOM the camera while in Editor mode. | 34 | |||
| Rotation Mode | Set key to enter Object ROTATION MODE while in Editor mode. | 35 | |||
| Toggle Rotation Axes | Set key to switch between global/local rotation axes. | 51 | |||
| Theater | Toggle Panel | Set key to toggle visibility of the Theater control panel. | 36 | ||
| Toggle Interface | Set key to toggle visibility of the player HUD and Theater interface. | 37 | |||
| Toggle First/Third Person | Set key to toggle between first and third person view. | 38 | |||
| Camera Reset | Set key to reset the camera position while in orbit cam. | 39 | |||
| Jump Forward | Set key to JUMP FORWARD to the next available rewind point. | 40 | |||
| Jump Back | Set key to JUMP BACK to the previous rewind point. | 41 | |||
| Pause/Resume Playback | Set key to pause and resume playback. | 42 | |||
| Fast Forward | Set key to increase playback speed. | 43 | |||
| Toggle Freecam | Set key to switch the camera between anchored and freecam modes. | 44 | |||
| Boost | Set key to BOOST the camera movement speed. | 45 | |||
| Theater Panning | Set key to enable panning in Theater mode. | 46 | |||
| Ascend | Set key to ASCEND the fly cam while in Theater mode. | 47 | |||
| Descend | Set key to DESCEND the fly cam while in Theater mode. | 48 | |||
| Zoom | Set key to ZOOM the fly camera while in Theater mode. | 50 | |||
| Toggle Flashlight | 6 |
Yes & No Only in the configuration file GameUserSettings.ini. | |||
| Sent Ordnance Pod Option #1 | Sent an Ordnance pod when available in Multiplayer. | No | |||
| Sent Ordnance Pod Option #2 | |||||
| Sent Ordnance Pod Option #3 | |||||
| Alert Carry | “ACTION” + "JUMP" + Down Arrow |
Press and hold them until the weapon is lower; it should take 3 seconds.[Note 3] | |||
| Enable/Disable Coordinates | “ACTION” + "JUMP" + Up Arrow |
Press and hold them until the coordinates is enable and displayed on the screen; it should take 3 seconds.[Note 3] | |||
| Enable/Disable Panoramic Camera Mode | "ZOOM" + Left Arrow |
This is after the coordinates is enable. | |||
| Hide/Show Coordinates | "ZOOM" + Right Arrow | ||||
Other Control Settings[edit]

| Setting | Options | Official Info | |
|---|---|---|---|
| Mouse & Keyboard Controls | |||
| Look Inversion | Not Inverted | Default | Look axis will not be inverted. |
| Inverted | Look axis will be inverted. | ||
| Flight Inversion | Not Inverted | Default | Look axis will not be inverted when flying. |
| Inverted | Look axis will be inverted when flying. | ||
| Crouch Behavior | Hold | Default | Crouching for a period of time will require a button hold. |
| Toggle | Crouching for a period of time will require a button press to toggle the effect. | ||
| Theater Turn Sensitivity | Slow | Set the turn sensitivity of the camera in Theater mode. | |
| Normal | Default | ||
| Fast | |||
| Very Fast | |||
| Theater Panning | Hold to Pan | Default | Set the panning behavior of the camera in Theater mode. |
| Toggle | |||
| Theater Speed | Slow | Set the speed of the camera in Theater mode. | |
| Normal | Default | ||
| Fast | |||
| Very Fast | |||
| Theater Thrust | Slow | Set the thrust speed of the camera in Theater mode. | |
| Normal | Default | ||
| Fast | |||
| Mouse | |||
| Mouse Sensitivity | 0.1 | Minimum | Control the amount of mouse movement needed to move a direction in the look axis. |
| 1.6 | Default | ||
| 10 | Maximum | ||
|
0.1 | Minimum | Adjust the mouse sensitivity when using weapon zoom. |
| 1 | Default | ||
| 2 | Maximum | ||
|
0.1 | Minimum | Adjust the mouse sensitivity when driving vehicles. |
| 1 | Default | ||
| 2 | Maximum | ||
| Mouse Acceleration | Off | Default | Look axis movement is not increased when mouse travel is fast. |
| On | Look axis movement is increased when mouse travel is fast. | ||
|
0 | Minimum | If mouse acceleration is enabled, set the lower threshold at which acceleration starts. |
| 0 | Default | ||
| 100 | Maximum | ||
|
1 | Minimum | If mouse acceleration is enabled, set the upper limit at which acceleration ends. |
| 100 | Default | ||
| 800 | Maximum | ||
|
0 | Minimum | If mouse acceleration is enabled, set the acceleration scaling curve. |
| 0 | Default | ||
| 100 | Maximum | ||
|
0 | Minimum | If mouse acceleration is enabled, set the intensity of the scaling curve. |
| 1 | Default | ||
| 100 | Maximum | ||
| Mouse Smoothing | Off | Default | Mouse movements will not be smoothed out. |
| On | Mouse movements will be smoothed out. | ||
Controller and Mouse & Keyboard Control Settings[edit]

| Setting | Options | Official Info |
|---|---|---|
| Preferred Input Device | Mouse & Keyboard | Select your preferred input device. You will be locked to this device for the duration of a match in some matchmaking playlists. |
| Gamepad |
| Setting | Options | Official Info | |
|---|---|---|---|
| Jumper Jumper | Disabled | Default | Enable to activate Jetpack equipment by holding the 'Jump' button while airbourne. Recommended for 'Bumper Jumper' button layouts. |
| Enabled | Disable to activate Jetpack equipment only by holding the 'Use Equipment' button. | ||
Removed[edit]
Input Action[edit]
In an older version of MCC, when the keyboard & mouse were a feature for the collection, the C key used to be used for picking up weapons in Halo: Combat Evolved but without having to hold it for a short second, unlike "ACTION," because Halo: Combat Evolved (PC port) featured an input action called "EXCHANGE WEAPON," and the anniversary version was based on the PC port, not the Xbox version. In the latest version of MCC, GameKeyboardMouseMappings[13]=(AbstractButton=13, which is bound by the C key by default; it's not "EXCHANGE WEAPON" anymore.[1]
Control Setting[edit]
| Setting | Options | Official Info |
|---|---|---|
| Zoom Mode[2] | Hold | Zooming for a period of time will require a button hold. |
| Toggle | Zooming for a period of time will require a button press to toggle the effect. |
Notes[edit]
- ^ a b c The "Set button to _.", "Set key for _.", and "Set key to _." descriptions are from the Halo: The Master Chief Collection (PC) settings menu.
- ^ a b c d e f g h i j k The controller layout displayed on the Halo: The Master Chief Collection controller setting menu
- ^ a b c d e f g h i j k l Not every button layout option will work for the button combination for various reasons.
Sources[edit]
| |||||||||||

