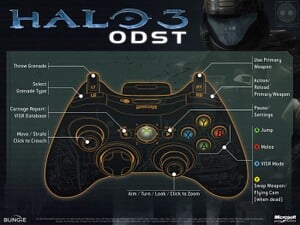
An official image of the
Halo 3: ODST control scheme on
Xbox 360.
The following control schemes are available in Halo 3: ODST. The controls in Halo 3: ODST are largely the same as in Halo 3, except the ↑/↓ D-Pad views waypoints, VISR Mode instead of a flashlight, VISR database instead of Halo 3's scoreboard menu, equipments aren't usable, and dual-wielding is not possible.
Halo 3: ODST (Xbox 360)[edit]
Stick Layout[edit]
Default
| “
|
This is the default stick configuration recommended by Bungie.[1]
|
”
|
Southpaw
| “
|
This setting is similar to the default, but the functions of the left and right sticks have been switched. A special option for lefties.[2]
|
”
|
Legacy
| “
|
This setting hearkens back to the controls of the console first-person shooters of yesteryear.[3]
|
”
|
Legacy Southpaw
| “
|
This setting swaps left and right sticks from the Legacy setting. An option for ancient lefties.[4]
|
”
|
Button Layout[edit]
Default[edit]
| “
|
This is the default button configuration recommended by Bungie.[5]
|
”
|
| Button |
Input Action
|
| A |
Jump
|
| B |
Melee Attack
|
| X |
VISR Mode
|
| Y |
Swap Weapons
|
| Left Analog Click |
Crouch
|
| Right Analog Click |
Zoom View
|
| Right Trigger |
Use Weapon
|
| Left Trigger |
Throw Grenade
|
| Right Bumper |
Action/Reload Weapon
|
| Left Bumper |
Switch Grenades
|
| "Start" Button |
Game Menu
|
| "Back" Button |
VISR database
|
| ↑ D-Pad |
Display Waypoint Markers
|
| ↓ D-Pad
|
Southpaw[edit]
| “
|
This setting is similar to the default except the left and right controls are flipped.[6]
|
”
|
| Button |
Input Action
|
| A |
Jump
|
| B |
Melee Attack
|
| X |
VISR Mode
|
| Y |
Swap Weapons
|
| Left Analog Click |
Crouch
|
| Right Analog Click |
Zoom View
|
| Right Trigger |
Throw Grenade
|
| Left Trigger |
Use Weapon
|
| Right Bumper |
Action/Reload Weapon
|
| Left Bumper |
Switch Grenades
|
| "Start" Button |
Game Menu
|
| "Back" Button |
VISR database
|
| ↑ D-Pad |
Display Waypoint Markers
|
| ↓ D-Pad
|
| “
|
If you're tired of hitting the wrong button in the heat of a melee fight, this setting is for you. Instead, you will pull the left trigger to melee attack.[7]
|
”
|
| Button |
Input Action
|
| A |
Jump
|
| B |
Throw Grenade
|
| X |
VISR Mode
|
| Y |
Swap Weapons
|
| Left Analog Click |
Crouch
|
| Right Analog Click |
Zoom View
|
| Right Trigger |
Use Weapon
|
| Left Trigger |
Melee Attack
|
| Right Bumper |
Action/Reload Weapon
|
| Left Bumper |
Switch Grenades
|
| "Start" Button |
Game Menu
|
| "Back" Button |
VISR database
|
| ↑ D-Pad |
Display Waypoint Markers
|
| ↓ D-Pad
|
Green Thumb[edit]
| “
|
This setting allows you to melee attack by pressing the right stick.[8]
|
”
|
| Button |
Input Action
|
| A |
Jump
|
| B |
Zoom View
|
| X |
VISR Mode
|
| Y |
Swap Weapons
|
| Left Analog Click |
Crouch
|
| Right Analog Click |
Melee Attack
|
| Right Trigger |
Use Weapon
|
| Left Trigger |
Throw Grenade
|
| Right Bumper |
Action/Reload Weapon
|
| Left Bumper |
Switch Grenades
|
| "Start" Button |
Game Menu
|
| "Back" Button |
VISR database
|
| ↑ D-Pad |
Display Waypoint Markers
|
| ↓ D-Pad
|
Bumper Jumper[edit]
| “
|
This setting allows you to melee attack by pressing the right bumper, and to jump by pressing the left bumper.[9]
|
”
|
| Button |
Input Action
|
| A |
Switch Grenades
|
| B |
Action/Reload Weapon
|
| X |
VISR Mode
|
| Y |
Swap Weapons
|
| Left Analog Click |
Crouch
|
| Right Analog Click |
Zoom View
|
| Right Trigger |
Use Weapon
|
| Left Trigger |
Throw Grenade
|
| Right Bumper |
Melee Attack
|
| Left Bumper |
Jump
|
| "Start" Button |
Game Menu
|
| "Back" Button |
VISR database
|
| ↑ D-Pad |
Display Waypoint Markers
|
| ↓ D-Pad
|
Walkie Talkie[edit]
| “
|
This setting puts VISR Mode on the left bumper.[10]
|
”
|
| Button |
Input Action
|
| A |
Jump
|
| B |
Action/Reload Weapon
|
| X |
Switch Grenades
|
| Y |
Swap Weapons
|
| Left Analog Click |
Crouch
|
| Right Analog Click |
Zoom View
|
| Right Trigger |
Use Weapon
|
| Left Trigger |
Throw Grenade
|
| Right Bumper |
Melee Attack
|
| Left Bumper |
VISR Mode
|
| "Start" Button |
Game Menu
|
| "Back" Button |
VISR database
|
| ↑ D-Pad |
Display Waypoint Markers
|
| ↓ D-Pad
|
Hidden Input Actions[edit]
 This section is a stub. You can help Halopedia by expanding it. Reason: The theater instructions aren't included, unlike this section.
| Input Action |
Combination |
Note
|
| Alert Carry |
Hold "Jump" + "Crouch" + "Switch Grenades" + "Action/Reload Weapon" + "↓ D-pad" for 3 Seconds |
Only works in "Local" or "System Link".
|
| Enable/Disable Coordinates |
Hold "Jump" + "Crouch" + "Switch Grenades" + "Action/Reload Weapon" + "↑ D-pad" for 3 Seconds
|
| Enable/Disable Panoramic Camera Mode |
Press "Crouch" + "Zoom" + "← D-pad" |
This is after the coordinates is enable.
|
| Hide/Show Coordinates |
Press "Crouch" + "Zoom" + "→ D-pad"
|
| Increase Observer Movement Speed |
↑ D-Pad |
This is only usable as an observer (flying mode) (with Panoramic Camera Mode enabled), but enabling coordinates only works on foot; therefore:
- In Firefight, after the coordinates is enable, die, then activate flying mode (Enabling Panoramic Camera Mode can be done while being alive or dead).
|
| Decrease Observer Movement Speed |
↓ D-Pad
|
Theater[edit]
Controls for use in Halo 3: ODST's Theater mode.
| Button |
Input Action
|
| A |
Play/Pause
|
| B |
Hide/Show HUD
|
| X |
Hide/Show Control Pad
|
| Y |
Flying Cam/Player Cam
|
| Left Analog Click |
Pan
|
| Right Trigger |
Slow Motion/Fast Forward
|
| Left Trigger |
Thrust
|
| Directional Pad |
Switch Player
|
| Right Bumper |
Move Up
|
| Left Bumper |
Move Down
|
Other Control Settings[edit]
| Setting |
Options |
Official Info
|
| Look Inversion |
Not Inverted (Default) |
If inverted, moving the look stick up causes the player to look down.
|
| Inverted
|
| Look Sensitivity |
1 (Low) |
Select the speed at which you look around. Keep in mind that a higher look speed is not necessarily better.
|
| 2
|
| 3 (Default)
|
| 4
|
| 5 (Medium)
|
| 6
|
| 7 (High)
|
| 8
|
| 9
|
| 10 (Insane)
|
| Auto Look Centering |
Disabled (Default) |
When enabled, this setting causes your view to automatically recenter as you move forward. This is a great setting for newer players not used to manually controlling their view.
|
| Enabled
|
| Crouch Behavior |
Hold to Crouch (Default) |
This setting determines how you stay crouched in the game by pressing the left stick. When set to Toggle, one press will cause your player to stay crouched until you press again.
|
| Toggle Crouch
|
Flying Camera[edit]
| Panning |
Hold to Pan (Default) |
This setting determines how you lock the camera to a fixed height when moving the camera around.
HOLD TO PAN: Clicking and holding the left stick locks the camera's elevation.
TOGGLE: Clicking the left stick toggles locking the camera's elevation.
|
| Toggle
|
| Speed |
Slow |
This controls how fast the flying camera moves normally.
|
| Normal (Default)
|
| Fast
|
| Very Fast
|
| Thrust |
Slow |
This controls how fast the flying camera moves when you press the left trigger to thrust.
|
| Normal (Default)
|
| Fast
|
Gallery[edit]
Halo 3: ODST manual's control scheme information on page 27.
Sources[edit]

![Southpaw “ This setting is similar to the default, but the functions of the left and right sticks have been switched. A special option for lefties.[2] ”](https://halo.wiki.gallery/images/thumb/d/d5/H3ODST_%E2%80%94_StickLayout_Southpaw.png/200px-H3ODST_%E2%80%94_StickLayout_Southpaw.png)
![Legacy “ This setting hearkens back to the controls of the console first-person shooters of yesteryear.[3] ”](https://halo.wiki.gallery/images/thumb/3/31/H3ODST_%E2%80%94_StickLayout_Legacy.png/200px-H3ODST_%E2%80%94_StickLayout_Legacy.png)
![Legacy Southpaw “ This setting swaps left and right sticks from the Legacy setting. An option for ancient lefties.[4] ”](https://halo.wiki.gallery/images/thumb/7/7c/H3ODST_%E2%80%94_StickLayout_LegacySouthpaw.png/200px-H3ODST_%E2%80%94_StickLayout_LegacySouthpaw.png)
![Default “ This is the default stick configuration recommended by Bungie.[1] ”](/File:H3ODST_%E2%80%94_StickLayout_Default.png)
![Southpaw “ This setting is similar to the default, but the functions of the left and right sticks have been switched. A special option for lefties.[2] ”](/File:H3ODST_%E2%80%94_StickLayout_Southpaw.png)
![Legacy “ This setting hearkens back to the controls of the console first-person shooters of yesteryear.[3] ”](/File:H3ODST_%E2%80%94_StickLayout_Legacy.png)
![Legacy Southpaw “ This setting swaps left and right sticks from the Legacy setting. An option for ancient lefties.[4] ”](/File:H3ODST_%E2%80%94_StickLayout_LegacySouthpaw.png)


