Reach:Control schemes
From Halopedia, the Halo wiki
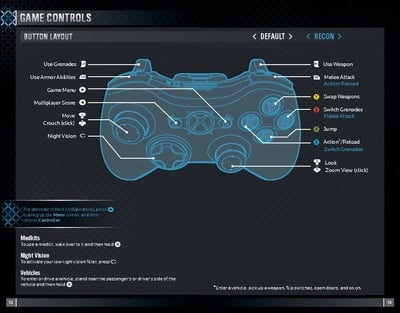
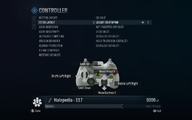
The Halo: Reach control scheme in the Halo: Reach manual.
The following control schemes are available for Halo: Reach.
Halo: Reach (Xbox 360)[edit]
Stick Layout[edit]
Default
Southpaw
Legacy
Legacy Southpaw


Button Layout[edit]
Default[edit]

| Button | Input Action |
|---|---|
| Jump | |
| Switch Grenades | |
| Action/Reload | |
| Swap Weapons | |
| Crouch | |
| Zoom View | |
| Use Weapon | |
| Use Grenades | |
| Melee Attack | |
| Use Equipment | |
| Game Menu | |
| Multiplayer Score | |
| Team Chat | |
| Open Mic/Regroup | |
| Night Vision |
Southpaw[edit]

| Button | Input Action |
|---|---|
| Jump | |
| Switch Grenades | |
| Action/Reload | |
| Swap Weapons | |
| Crouch | |
| Zoom View | |
| Use Grenades | |
| Use Weapon | |
| Use Equipment | |
| Melee Attack | |
| Game Menu | |
| Multiplayer Score | |
| Team Chat | |
| Open Mic/Regroup | |
| Night Vision |
Boxer[edit]

| Button | Input Action |
|---|---|
| Jump | |
| Switch Grenades | |
| Action/Reload | |
| Swap Weapons | |
| Crouch | |
| Zoom View | |
| Use Weapon | |
| Melee Attack | |
| Use Grenades | |
| Use Equipment | |
| Game Menu | |
| Multiplayer Score | |
| Team Chat | |
| Open Mic/Regroup | |
| Night Vision |
Green Thumb[edit]

| Button | Input Action |
|---|---|
| Jump | |
| Switch Grenades | |
| Action/Reload | |
| Swap Weapons | |
| Crouch | |
| Melee Attack | |
| Use Weapon | |
| Use Grenades | |
| Zoom View | |
| Use Equipment | |
| Game Menu | |
| Multiplayer Score | |
| Team Chat | |
| Open Mic/Regroup | |
| Night Vision |
Bumper Jumper[edit]

| Button | Input Action |
|---|---|
| Switch Grenades | |
| Action/Reload | |
| Use Equipment | |
| Swap Weapons | |
| Crouch | |
| Zoom View | |
| Use Weapon | |
| Use Grenades | |
| Melee Attack | |
| Jump | |
| Game Menu | |
| Multiplayer Score | |
| Team Chat | |
| Open Mic/Regroup | |
| Night Vision |
Recon[edit]
The Recon control scheme was designed to emulate the default controls of Halo 3 and Halo 3: ODST, primarily the use of Right Bumper for interacting with the game world. It is named after the Recon helmet, which was an iconic armor piece in both titles.

| Button | Input Action |
|---|---|
| Jump | |
| Melee Attack | |
| Switch Grenades | |
| Swap Weapons | |
| Crouch | |
| Zoom View | |
| Use Weapon | |
| Use Grenades | |
| Action/Reload | |
| Use Equipment | |
| Game Menu | |
| Multiplayer Score | |
| Team Chat | |
| Open Mic/Regroup | |
| Night Vision |
Hidden Input Actions[edit]
| Input Action | Combination | Note |
|---|---|---|
| Alert Carry | Hold "Action/Reload" + "Zoom" + "Switch Grenades" + "↓ D-Pad" for 3 Seconds | Only works in "Local" or "System Link". |
| Enable/Disable Coordinates | Hold "Action/Reload" + "Zoom" + "Switch Grenades" + "↑ D-Pad" for 3 Seconds | |
| Enable/Disable Panoramic Camera Mode | Press "Crouch" + "Zoom" + "← D-Pad" | This is after the coordinates is enable. |
| Hide/Show Coordinates | Press "Crouch" + "Zoom" + "→ D-Pad" | |
| Increase Observer Movement Speed | ↑ D-Pad | This is only usable in Theater and as an observer (flying mode) (with Panoramic Camera Mode enabled), but enabling coordinates only works on foot; therefore:
|
| Decrease Observer Movement Speed | ↓ D-Pad |
Forge[edit]

The following controls are for use in Halo: Reach's Forge mode.
| Input Action | Stick Layout | |||||
|---|---|---|---|---|---|---|
| Movement | Depends on the "STICK LAYOUT" setting. | |||||
| Pivot | Depends on the "STICK LAYOUT" and "LOOK INVERSION" settings. | |||||
| Button Layout | ||||||
Default |
Southpaw |
Boxer |
Green Thumb |
Bumper Jumper |
Recon
| |
| Pick up/Drop Item | A | |||||
| Tools | B | |||||
| Object Options | X | |||||
| Delete | Y | |||||
| Fly Down | Left Bumper | |||||
| Fly Up | Right Bumper | |||||
| Zoom View | Right Analog Click | Right Bumper | Right Analog Click | |||
| Thrust | Left Trigger | Right Trigger | Left Trigger | |||
| Manipulate Object | Right Trigger | Left Trigger | Right Trigger | |||
| Play/Edit Mode | ↑ D-Pad | |||||
| Combination | ||||||
| Push Monitor Forward | Manipulate Object + Move Forward | |||||
| Push Monitor Backward | Manipulate Object + Move Backward | |||||
| Rotate Item | Manipulate Object + (Move Left or Right) (Look Left, Up, Right, or Down) | |||||
Theater[edit]

 This section is a stub. You can help Halopedia by expanding it. Reason: Needed to be cleaned up.
The following controls can be used in Halo: Reach's Theater mode.
| Button | Input Action |
|---|---|
| Play/Pause | |
| Toggle HUD | |
| Invoke Controls | |
| Change Camera Type | |
| Change Follow View | |
| Camera View | |
| Adjust Playback Speed | |
| Camera Boost | |
| Fly Up | |
| Fly Down | |
| Change Player | |
| Skip Forward | |
| Skip Back |
Other Control Options[edit]

| Setting | Options | Official Info |
|---|---|---|
| Look Inversion | Not Inversion (Default) | If inverted, moving the look stick forward makes your in-game character look down. |
| Inversion | ||
| Look Sensitivity | 1 (Low) | Select the speed at which you look around. Keep in mind that higher look speed is not necessarily better. |
| 2 | ||
| 3 (Default) | ||
| 4 | ||
| 5 (Medium) | ||
| 6 | ||
| 7 (High) | ||
| 8 | ||
| 9 | ||
| 10 (Insane) | ||
| Autolook Centering | Disabled (Default) | When enabled, this setting makes your view automatically center as you move forward. |
| Enabled | ||
| Crouch Behavior | Hold to Crouch (Default) | Stay crouched in the game by clicking the left stick. When set to toggle, one click will make your in-game character stay crouched until you click again. |
| Toggle Crouch | ||
| Clench Protection | Disabled (Default) | If enabled, Clench Protection will help against accidental stick clicks. |
| Enabled |
Flying Controls[edit]


| Flight Inversion | Not Inversion (Default) | If inverted, moving the look stick forward makes you dive. |
| Inversion |
| Turn Sensitivity | Slow | Select the speed at which you look around. |
| Normal (Default) | ||
| Fast | ||
| Very Fast | ||
| Panning | Hold to Pan (Default) | This setting determines how you lock the camera to a fixed height when moving the camera around. If set to toggle, one press of the left stick will lock the camera for panning until you press again. |
| Toggle | ||
| Speed | Slow | This controls how fast the flying camera moves normally. |
| Normal (Default) | ||
| Fast | ||
| Very Fast | ||
| Thrust | Slow | This controls how fast the flying camera moves when you press the left trigger to thrust. |
| Normal (Default) | ||
| Fast |
| |||||||||||


