Panoramic camera mode
From Halopedia, the Halo wiki
Panoramic camera mode, commonly shortened to Pan Cam, is a feature that Bungie and 343 Industries added to Halo 3, Halo 3: ODST, Halo: Reach, Halo 4, Halo: The Master Chief Collection, Halo 5: Guardians, Halo Infinite, and Halo: Campaign Evolved. It is used by many players as a way to force the camera out of any map while in the Theater (in Halo 5: Guardians and subsequent FPS games, however, they featured Freecam for some Game modes), and its use is permitted for screenshots, Film Clips, and other files.
Show coordinates/camera mode[edit]
The Show Coordinates mode displays the exact location of the camera, its rotation (in degrees), its speed, and the current camera mode. Pan Cam itself cannot be enabled until coordinates are displayed.
Instructions[edit]
- For Xbox 360 only, set your network mode to “System Link” or “My Xbox 360.”
- Start a custom game, Campaign, or Firefight session.
- Press and hold the proper button combination for your game to show camera coordinates on-screen.
| Version | Input Device | Combination |
|---|---|---|
| Xbox 360 | Controller | Hold "Jump" + "Crouch" + "Reload/Swap Left Weapon" + "Action/Reload Right Weapon" + "↑ D-Pad" for 3 Seconds |
| Halo MCC PC | Controller (Xinput) | Hold "Jump" + "Crouch" + "Action" + "Reload" + "Reload Left Weapon" + "↑ D-Pad" for 3 Seconds |
| Mouse and Keyboard | It's not possible to show coordinates with M&K. |
Depending on your button layout, your layout might be:

| Button | Input Actions |
|---|---|
| A Button | Jump |
| Left Bumper | Reload/Swap Left Weapon |
| Right Bumper | Action/Reload Right Weapon |
| Left Analog Click | Crouch |
| ↑ D-Pad |

| Button | Input Actions |
|---|---|
| A Button | Jump |
| Left Bumper | Reload/Swap Left Weapon |
| Right Bumper | Action/Reload Right Weapon |
| Left Analog Click | Crouch |
| ↑ D-Pad |

| Button | Input Actions |
|---|---|
| A Button | Jump |
| Left Bumper | Reload/Swap Left Weapon |
| Right Bumper | Action/Reload Right Weapon |
| Left Analog Click | Crouch |
| ↑ D-Pad |

| Button | Input Actions |
|---|---|
| A Button | Jump |
| Left Bumper | Reload/Swap Left Weapon |
| Right Bumper | Action/Reload Right Weapon |
| Left Analog Click | Crouch |
| ↑ D-Pad |

| Button | Input Actions |
|---|---|
| A Buttom | Reload/Swap Left Weapon |
| B Buttom | Action/Reload Right Weapon |
| Left Bumper | Jump |
| Left Analog Click | Crouch |
| ↑ D-Pad |

| Button | Input Actions |
|---|---|
| A Buttom | Jump |
| B Buttom | Action/Reload Right Weapon |
| X Buttom | Reload/Swap Left Weapon |
| Left Analog Click | Crouch |
| ↑ D-Pad |
D-pad & Buttons: Default
Bumpers & Triggers: Default


| Button | Input Actions | ||
|---|---|---|---|
| A Button | Jump | ||
| Left Bumper | Reload Left Weapon | Switch Grenades | Swap Left Weapon |
| Right Bumper | Action | Reload | |
| Left Analog Click | Crouch | ||
| ↑ D-Pad | Push to Talk | ||
D-pad & Buttons: Default
Bumpers & Triggers: Default

| Button | Input Actions | ||||
|---|---|---|---|---|---|
| A Button | Jump | ||||
| Left Bumper | Reload Left Weapon | Switch Grenades | Next Grenade | Previous Grenade | Swap Left Weapon |
| Right Bumper | Action | Reload | |||
| Left Analog Click | Crouch | ||||
| ↑ D-Pad | Push to Talk | ||||
| Version | Input Device | Combination |
|---|---|---|
| Xbox 360 | Controller | Hold "Jump" + "Crouch" + "Switch Grenades" + "Action/Reload Weapon" + "↑ D-Pad" for 3 Seconds |
| Halo MCC PC | Controller (Xinput) | Hold "Jump" + "Crouch" + "Action" + "Reload" + "Reload Left Weapon" + "↑ D-Pad" for 3 Seconds |
| Mouse and Keyboard | It's not possible to show coordinates with M&K. |
Depending on your button layout, your layout might be:

| Button | Input Actions |
|---|---|
| A Button | Jump |
| Left Bumper | Switch Grenades |
| Right Bumper | Action/Reload Weapon |
| Left Analog Click | Crouch |
| ↑ D-Pad |

| Button | Input Actions |
|---|---|
| A Button | Jump |
| Left Bumper | Switch Grenades |
| Right Bumper | Action/Reload Weapon |
| Left Analog Click | Crouch |
| ↑ D-Pad |

| Button | Input Actions |
|---|---|
| A Button | Jump |
| Left Bumper | Switch Grenades |
| Right Bumper | Action/Reload Weapon |
| Left Analog Click | Crouch |
| ↑ D-Pad |

| Button | Input Actions |
|---|---|
| A Button | Jump |
| Left Bumper | Switch Grenades |
| Right Bumper | Action/Reload Weapon |
| Left Analog Click | Crouch |
| ↑ D-Pad |

| Button | Input Actions |
|---|---|
| A Buttom | Switch Grenades |
| B Buttom | Action/Reload Weapon |
| Left Bumper | Jump |
| Left Analog Click | Crouch |
| ↑ D-Pad |

| Button | Input Actions |
|---|---|
| A Buttom | Jump |
| B Buttom | Action/Reload Weapon |
| X Buttom | Switch Grenades |
| Left Analog Click | Crouch |
| ↑ D-Pad |
D-pad & Buttons: Default
Bumpers & Triggers: Default


| Button | Input Actions | ||
|---|---|---|---|
| A Button | Jump | ||
| Left Bumper | Switch Grenades | ||
| Right Bumper | Action | Reload | |
| Left Analog Click | Crouch | ||
| ↑ D-Pad | Push to Talk | ||
D-pad & Buttons: Default
Bumpers & Triggers: Default

| Button | Input Actions | ||||
|---|---|---|---|---|---|
| A Button | Jump | ||||
| Left Bumper | Switch Grenades | Next Grenade | Previous Grenade | ||
| Right Bumper | Action | Reload | |||
| Left Analog Click | Crouch | ||||
| ↑ D-Pad | Push to Talk | ||||
| Version | Input Device | Combination |
|---|---|---|
| Xbox 360 | Controller | Hold "Action/Reload" + "Zoom" + "Switch Grenades" + "↑ D-Pad" for 3 Seconds |
| Halo MCC PC | Controller (Xinput) | Hold "Action" + "Reload" + "Zoom" + "B Button" + "↑ D-Pad" for 3 Seconds |
| Mouse and Keyboard | It's not possible to show coordinates with M&K. |
Depending on your button layout, your layout might be:

| Button | Input Actions |
|---|---|
| B Button | Switch Grenades |
| X Button | Action/Reload |
| Right Analog Click | Zoom View |
| ↑ D-Pad | Open Mic/Regroup |

| Button | Input Actions |
|---|---|
| B Button | Switch Grenades |
| X Button | Action/Reload |
| Right Analog Click | Zoom View |
| ↑ D-Pad | Open Mic/Regroup |

| Button | Input Actions |
|---|---|
| B Button | Switch Grenades |
| X Button | Action/Reload |
| Right Analog Click | Zoom View |
| ↑ D-Pad | Open Mic/Regroup |

| Button | Input Actions |
|---|---|
| B Button | Switch Grenades |
| X Button | Action/Reload |
| Right Bumper | Zoom View |
| ↑ D-Pad | Open Mic/Regroup |

| Button | Input Actions |
|---|---|
| A Button | Switch Grenades |
| B Button | Action/Reload |
| Right Analog Click | Zoom View |
| ↑ D-Pad | Open Mic/Regroup |

| Button | Input Actions |
|---|---|
| X Button | Switch Grenades |
| Right Bumper | Action/Reload |
| Right Analog Click | Zoom View |
| ↑ D-Pad | Open Mic/Regroup |
D-pad & Buttons: Default
Bumpers & Triggers: Default


| Button | Input Actions | ||
|---|---|---|---|
| B Button | Melee | ||
| Right Bumper | Action | Reload | |
| Right Analog Click | Zoom | ||
| ↑ D-Pad | Push to Talk | ||
D-pad & Buttons: Default
Bumpers & Triggers: Default

| Button | Input Actions | ||
|---|---|---|---|
| B Button | Switch Grenades | Next Grenade | Previous Grenade |
| X Button | Action | Reload | |
| Right Analog Click | Zoom | ||
| ↑ D-Pad | Push to Talk | ||
| Button | Input Actions | ||
|---|---|---|---|
| B Button | Action | ||
| Right Bumper | Zoom | ||
| ↑ D-Pad | Reload | Push to Talk | |
This is the editor's custom layout, by the way; you can customize it however you want in MCC, unlike the Xbox 360 version.
| Version | Input Device | Combination |
|---|---|---|
| Xbox 360 | Controller | Hold "B Button" + "Action/Reload" + "Jump" + “↑ D-Pad" for 3 Seconds |
| Halo MCC PC | Controller (Xinput) | Hold “Zoom” + “Action” + "Jump" + “↑ D-Pad" for 3 Seconds |
| Mouse and Keyboard | Hold “Zoom” + “Action” + "Jump" + “↑ Arrow Key" for 3 Seconds |
Depending on your button layout, your layout might be:

| Button | Input Actions |
|---|---|
| A Button | Jump |
| B Button | Crouch |
| X Button | Action/Reload |
| ↑ D-Pad |

| Button | Input Actions |
|---|---|
| A Button | Jump |
| B Button | Crouch |
| X Button | Action/Reload |
| ↑ D-Pad |

| Button | Input Actions |
|---|---|
| A Button | Jump |
| B Button | Sprint |
| X Button | Action/Reload |
| ↑ D-Pad |

| Button | Input Actions |
|---|---|
| A Button | Jump |
| B Button | Crouch |
| X Button | Action/Reload |
| ↑ D-Pad |

| Button | Input Actions |
|---|---|
| B Buttom | Action/Reload |
| Left Bumper | Jump |
| ↑ D-Pad |

| Button | Input Actions |
|---|---|
| A Button | Jump |
| B Button | Melee |
| Right Bumper | Action/Reload |
| ↑ D-Pad |

| Button | Input Actions |
|---|---|
| A Button | Jump |
| B Button | Crouch |
| X Button | Action/Reload |
| ↑ D-Pad |
D-pad & Buttons: Default
Bumpers & Triggers: Default


| Button | Input Actions | |
|---|---|---|
| A Button | Jump | |
| Right Bumper | Action | Reload |
| Right Analog Click | Zoom | |
| ↑ D-Pad | Push to Talk | |
D-pad & Buttons: Default
Bumpers & Triggers: Default

| Button | Input Actions | |
|---|---|---|
| A Button | Jump | |
| X Button | Action | Reload |
| Right Analog Click | Zoom | |
| ↑ D-Pad | Push to Talk | |

| Key and Mouse Button | Input Action |
|---|---|
| Right Mouse Button | Zoom |
| Space Bar | Jump |
| ↑ Arrow Key | |
| E Key | Action |
| Version | Input Device | Combination |
|---|---|---|
| PC | Controller (Xinput) | Hold “Zoom” + “Action” + "Jump" + “↑ D-Pad" for 3 Seconds |
| Mouse and Keyboard | It's not possible to show coordinates with M&K. |
Depending on your button layout, your layout might be:
D-pad & Buttons: Default
Bumpers & Triggers: Default


| Button | Input Actions | |
|---|---|---|
| A Button | Jump | |
| Right Bumper | Action | Reload |
| Right Analog Click | Zoom | |
| ↑ D-Pad | Push to Talk | |
D-pad & Buttons: Default
Bumpers & Triggers: Default

| Button | Input Actions | |
|---|---|---|
| A Button | Jump | |
| X Button | Action | Reload |
| Right Analog Click | Zoom | |
| ↑ D-Pad | Push to Talk | |

| Version | Input Device | Combination |
|---|---|---|
| Halo 5: Forge (PC) | Controller (Xinput) | Press "Action/Reload" + “→ D-Pad" |
| Mouse and Keyboard | Press "Machinima: Display Position" |
Depending on your button layout, your layout might be:

| Button | Input Actions |
|---|---|
| X Button | Action/Reload |
| → D-Pad |

| Button | Input Actions |
|---|---|
| X Button | Action/Reload |
| → D-Pad |

| Button | Input Actions |
|---|---|
| X Button | Action/Reload |
| → D-Pad |

| Button | Input Actions |
|---|---|
| X Button | Action/Reload |
| → D-Pad |

| Button | Input Actions |
|---|---|
| B Button | Action/Reload |
| → D-Pad |

| Button | Input Actions |
|---|---|
| Right Bumper | Action/Reload |
| → D-Pad |

| Button | Input Actions |
|---|---|
| X Button | Action/Reload |
| → D-Pad |

| Button | Input Actions |
|---|---|
| X Button | Action/Reload |
| → D-Pad |

| Button | Input Actions |
|---|---|
| X Button | Action/Reload |
| → D-Pad |

| Button | Input Actions |
|---|---|
| B Button | Action/Reload |
| → D-Pad |


| Key | Input Action |
|---|---|
| I Key | Machinima: Display Position |

| Input Device | Combination |
|---|---|
| Controller (Xinput) | Press "X Button" + “→ D-Pad" |
| Mouse and Keyboard | It's not possible to show coordinates with M&K. |
 This section is a stub. You can help Halopedia by expanding it. Reason: Machinima mode is returning to the game.[1]
Reading the coordinates[edit]
Coordinates are displayed in white, sans-serif font, aligned to in the upper-left corner of the screen. The coordinates consist of three space-separated numbers, followed by a slash, followed by two more space-separated numbers, another slash, another number, and then either "[normal]" or "[pan-cam]". Here is an example of coordinates that may be shown:
- 212.377 159.564 137.233 / 91 -1.74 / 1.000 [normal]
The first three numbers are coordinates showing the camera's exact position in the map, relative to the map's centerpoint. The first two coordinates are the camera's lateral position; the third coordinate is the vertical position. You can never go farther than ±50000.000 world units from any map's center, though no map's playable area ever comes close to that size.
The next two numbers show the camera's angle of rotation in degrees. The first value shows your lateral orientation—if it's 0, you're looking east; if it's 90, you're looking north. The second value is your vertical orientation—if it's 0 or 180, the camera is level; if it's 90, the camera is looking straight up; and if it's -90 or 270, the camera is looking straight down.
The third number is the camera's speed, which can only be adjusted while in Pan Cam mode. Following that is the current camera mode.
Uses for coordinates[edit]
Coordinates can be useful when taking aerial photos of a map, to identify which way is north. They can be used to measure distances, as one world unit equals to ten feet. By taking note of the coordinates of an area in a Campaign level's cutscenes, it is also possible to "break into" the areas in the cutscenes when using the Pan Cam to glitch the camera outside the level boundaries (as described below). All cutscenes are rendered in real time, so all areas shown in cutscenes have to be hidden somewhere in a level. As an example, the coordinates above are where you can find the Ark as seen from space in the opening cutscene of the level of the same name -- it's hidden beneath the level boundaries. Near the start of that same level, you can also find the Shadow of Intent's bridge, hidden behind a cliff face.
Pan Cam and Hide Coordinates[edit]
After displaying coordinates, two button combinations are available: Pan Cam and Hide Coordinates.
Pan Cam[edit]
Pan Cam is little more than a set of alternate controls. These alternate controls, however, provide a previously-hidden function—the ability to change the camera's movement speed—that can be used to force the camera outside a level's boundaries.
To activate Pan Cam, first turn on Coordinates as described above. Then, press and hold depending on the Halo game you're playing and your button layout:
| Version | Input Device | Combination |
|---|---|---|
| Xbox 360 | Controller | Press "Crouch" + "Zoom" + "← D-Pad" |
| Halo MCC PC | Controller (Xinput) | |
| Mouse and Keyboard | It's not possible to enable Pan Cam with M&K. |
Depending on your button layout, your layout might be:
| Button | Input Action |
|---|---|
| Left Analog Click | Crouch |
| Right Analog Click | Zoom |
| ← D-Pad |
| Button | Input Action |
|---|---|
| Left Analog Click | Crouch |
| Right Analog Click | Zoom |
| ← D-Pad |
| Button | Input Action |
|---|---|
| Left Analog Click | Crouch |
| Right Analog Click | Zoom |
| ← D-Pad |
| Button | Input Action |
|---|---|
| B Button | Zoom |
| Left Analog Click | Crouch |
| ← D-Pad |
| Button | Input Action |
|---|---|
| Left Analog Click | Crouch |
| Right Analog Click | Zoom |
| ← D-Pad |
| Button | Input Action |
|---|---|
| Left Analog Click | Crouch |
| Right Analog Click | Zoom |
| ← D-Pad |
D-pad & Buttons: Default
Bumpers & Triggers: Default
| Button | Input Action |
|---|---|
| Left Analog Click | Crouch |
| Right Analog Click | Zoom |
| ← D-Pad |
D-pad & Buttons: Default
Bumpers & Triggers: Default
| Button | Input Action |
|---|---|
| Left Analog Click | Crouch |
| Right Analog Click | Zoom |
| ← D-Pad |
| Version | Input Device | Combination |
|---|---|---|
| Xbox 360 | Controller | Press "Crouch" + "Zoom" + "← D-Pad" |
| Halo MCC PC | Controller (Xinput) | |
| Mouse and Keyboard | It's not possible to enable Pan Cam with M&K. |
Depending on your button layout, your layout might be:
| Button | Input Action |
|---|---|
| Left Analog Click | Crouch |
| Right Analog Click | Zoom |
| ← D-Pad |
| Button | Input Action |
|---|---|
| Left Analog Click | Crouch |
| Right Analog Click | Zoom |
| ← D-Pad |
| Button | Input Action |
|---|---|
| Left Analog Click | Crouch |
| Right Analog Click | Zoom |
| ← D-Pad |
| Button | Input Action |
|---|---|
| Right Bumper | Zoom |
| Left Analog Click | Crouch |
| ← D-Pad |
| Button | Input Action |
|---|---|
| Left Analog Click | Crouch |
| Right Analog Click | Zoom |
| ← D-Pad |
| Button | Input Action |
|---|---|
| Left Analog Click | Crouch |
| Right Analog Click | Zoom |
| ← D-Pad |
D-pad & Buttons: Default
Bumpers & Triggers: Default
| Button | Input Action |
|---|---|
| Left Analog Click | Crouch |
| Right Analog Click | Zoom |
| ← D-Pad |
D-pad & Buttons: Default
Bumpers & Triggers: Default
| Button | Input Action |
|---|---|
| Left Analog Click | Crouch |
| Right Analog Click | Zoom |
| ← D-Pad |
| Version | Input Device | Combination |
|---|---|---|
| Xbox 360 | Controller | Press "Crouch" + "Zoom" + "← D-Pad" |
| Halo MCC PC | Controller (Xinput) | |
| Mouse and Keyboard | Press "Crouch" + "Zoom" + "← Arrow Key" |
Depending on your button layout, your layout might be:
| Button | Input Action |
|---|---|
| B Button | Crouch |
| Right Analog Click | Zoom |
| ← D-Pad |
| Button | Input Action |
|---|---|
| B Button | Crouch |
| Right Analog Click | Zoom |
| ← D-Pad |
| Button | Input Action |
|---|---|
| Left Analog Click | Crouch |
| Right Analog Click | Zoom |
| ← D-Pad |
| Button | Input Action |
|---|---|
| B Button | Crouch |
| Right Bumper | Zoom |
| ← D-Pad |
| Button | Input Action |
|---|---|
| Left Analog Click | Crouch |
| Right Analog Click | Zoom |
| ← D-Pad |
| Button | Input Action |
|---|---|
| Left Analog Click | Crouch |
| Right Analog Click | Zoom |
| ← D-Pad |
1. Left Trigger (Zoom)
2. B Button (Crouch)
3. ← D-Pad
| Button | Input Action |
|---|---|
| B Button | Crouch |
| Left Trigger | Zoom |
| ← D-Pad |
D-pad & Buttons: Default
Bumpers & Triggers: Default
| Button | Input Action |
|---|---|
| Left Analog Click | Crouch |
| Right Analog Click | Zoom |
| ← D-Pad |
D-pad & Buttons: Default
Bumpers & Triggers: Default
1. B Button (Crouch)
2. Right Analog Click (Zoom)
3. ← D-Pad
| Key & Mouse Button | Input Action |
|---|---|
| Left Ctrl | Crouch |
| Right Mouse Button | Zoom |
| ← Arrow Key |
| Version | Input Device | Combination |
|---|---|---|
| Halo MCC PC | Controller (Xinput) | Press "Crouch" + "Zoom" + "← D-Pad" |
| Mouse and Keyboard | It's not possible to enable Pan Cam with M&K. |
Depending on your button layout, your layout might be:
D-pad & Buttons: Default
Bumpers & Triggers: Default
| Button | Input Action |
|---|---|
| Left Analog Click | Crouch |
| Right Analog Click | Zoom |
| ← D-Pad |
D-pad & Buttons: Default
Bumpers & Triggers: Default
| Button | Input Action |
|---|---|
| Left Analog Click | Crouch |
| Right Analog Click | Zoom |
| ← D-Pad |
It isn't enableable for on-foot players; it's only for players who had their camera detached from their Spartan during gameplay.
| Version | Input Device | Combination |
|---|---|---|
| Halo 5: Forge (PC) | Controller (Xinput) | Press "Action/Reload" + “← D-Pad" |
| Mouse and Keyboard | Press "Machinima: Toggle Pan" |
It isn't enableable for on-foot players; it's only for players who had their camera detached from their Spartan during gameplay.
| Version | Input Device | Combination |
|---|---|---|
| Halo Infinite (PC) | Controller (Xinput) | Press "X Button" + “← D-Pad" |
- This section is a stub. You can help Halopedia by expanding it. Reason: Machinima mode is returning to the game.[1]
The "[normal]" at the end of the coordinates should change to read, "[pan-cam]". You can also enable Pan Cam by simply viewing any Film Clip that was saved while in Pan Cam. Pan Cam will remain enabled either until you disable it or until your session ends (you exit or turn off the game).
The controls in Pan Cam are somewhat altered. The bumpers on the controller are now useless; Left Trigger is used to descend and Right Trigger is used to ascend. The left stick still controls your movement, but it cannot be used to move vertically, even if you are looking upward or downward. ↑ D-Pad and ↓ D-Pad will increase and decrease your speed. Pausing is still Available using the A Button.
Hide Coordinates[edit]
Well, the coordinates can be disabled by following the instructions again; it's not recommended thanks to this button combination.
| Version | Input Device | Combination |
|---|---|---|
| Xbox 360 | Controller | Press "Crouch" + "Zoom" + "→ D-Pad" |
| Halo MCC PC | Controller (Xinput) | |
| Mouse and Keyboard | It's not possible to hide coordinates with M&K. |
Depending on your button layout, your layout might be:
| Button | Input Action |
|---|---|
| Left Analog Click | Crouch |
| Right Analog Click | Zoom |
| → D-Pad |
| Button | Input Action |
|---|---|
| Left Analog Click | Crouch |
| Right Analog Click | Zoom |
| → D-Pad |
| Button | Input Action |
|---|---|
| Left Analog Click | Crouch |
| Right Analog Click | Zoom |
| → D-Pad |
| Button | Input Action |
|---|---|
| B Button | Zoom |
| Left Analog Click | Crouch |
| → D-Pad |
| Button | Input Action |
|---|---|
| Left Analog Click | Crouch |
| Right Analog Click | Zoom |
| → D-Pad |
| Button | Input Action |
|---|---|
| Left Analog Click | Crouch |
| Right Analog Click | Zoom |
| → D-Pad |
D-pad & Buttons: Default
Bumpers & Triggers: Default
| Button | Input Action |
|---|---|
| Left Analog Click | Crouch |
| Right Analog Click | Zoom |
| → D-Pad |
D-pad & Buttons: Default
Bumpers & Triggers: Default
| Button | Input Action |
|---|---|
| Left Analog Click | Crouch |
| Right Analog Click | Zoom |
| → D-Pad |
| Version | Input Device | Combination |
|---|---|---|
| Xbox 360 | Controller | Press "Crouch" + "Zoom" + "→ D-Pad" |
| Halo MCC PC | Controller (Xinput) | |
| Mouse and Keyboard | It's not possible to hide coordinates with M&K. |
Depending on your button layout, your layout might be:
| Button | Input Action |
|---|---|
| Left Analog Click | Crouch |
| Right Analog Click | Zoom |
| → D-Pad |
| Button | Input Action |
|---|---|
| Left Analog Click | Crouch |
| Right Analog Click | Zoom |
| → D-Pad |
| Button | Input Action |
|---|---|
| Left Analog Click | Crouch |
| Right Analog Click | Zoom |
| → D-Pad |
| Button | Input Action |
|---|---|
| Right Bumper | Zoom |
| Left Analog Click | Crouch |
| → D-Pad |
| Button | Input Action |
|---|---|
| Left Analog Click | Crouch |
| Right Analog Click | Zoom |
| → D-Pad |
| Button | Input Action |
|---|---|
| Left Analog Click | Crouch |
| Right Analog Click | Zoom |
| → D-Pad |
D-pad & Buttons: Default
Bumpers & Triggers: Default
| Button | Input Action |
|---|---|
| Left Analog Click | Crouch |
| Right Analog Click | Zoom |
| → D-Pad |
D-pad & Buttons: Default
Bumpers & Triggers: Default
| Button | Input Action |
|---|---|
| Left Analog Click | Crouch |
| Right Analog Click | Zoom |
| → D-Pad |
| Version | Input Device | Combination |
|---|---|---|
| Xbox 360 | Controller | Press "Crouch" + "Zoom" + "→ D-Pad" |
| Halo MCC PC | Controller (Xinput) | |
| Mouse and Keyboard | Press "Crouch" + "Zoom" + "→ Arrow Key" |
Depending on your button layout, your layout might be:
| Button | Input Action |
|---|---|
| B Button | Crouch |
| Right Analog Click | Zoom |
| → D-Pad |
| Button | Input Action |
|---|---|
| B Button | Crouch |
| Right Analog Click | Zoom |
| → D-Pad |
| Button | Input Action |
|---|---|
| Left Analog Click | Crouch |
| Right Analog Click | Zoom |
| → D-Pad |
| Button | Input Action |
|---|---|
| B Button | Crouch |
| Right Bumper | Zoom |
| → D-Pad |
| Button | Input Action |
|---|---|
| Left Analog Click | Crouch |
| Right Analog Click | Zoom |
| → D-Pad |
| Button | Input Action |
|---|---|
| Left Analog Click | Crouch |
| Right Analog Click | Zoom |
| → D-Pad |
| Button | Input Action |
|---|---|
| B Button | Crouch |
| Left Trigger | Zoom |
| → D-Pad |
D-pad & Buttons: Default
Bumpers & Triggers: Default
| Button | Input Action |
|---|---|
| Left Analog Click | Crouch |
| Right Analog Click | Zoom |
| → D-Pad |
D-pad & Buttons: Default
Bumpers & Triggers: Default
| Button | Input Action |
|---|---|
| B Button | Crouch |
| Right Analog Click | Zoom |
| → D-Pad |
| Key & Mouse Button | Input Action |
|---|---|
| Left Ctrl | Crouch |
| Right Mouse Button | Zoom |
| → Arrow Key |
| Version | Input Device | Combination |
|---|---|---|
| Halo MCC PC | Controller (Xinput) | Press "Crouch" + "Zoom" + "→ D-Pad" |
| Mouse and Keyboard | It's not possible to hide coordinates with M&K. |
Depending on your button layout, your layout might be:
D-pad & Buttons: Default
Bumpers & Triggers: Default
| Button | Input Action |
|---|---|
| Left Analog Click | Crouch |
| Right Analog Click | Zoom |
| → D-Pad |
D-pad & Buttons: Default
Bumpers & Triggers: Default
| Button | Input Action |
|---|---|
| Left Analog Click | Crouch |
| Right Analog Click | Zoom |
| → D-Pad |
The instruction is exactly the same as the Show Coordinates.
The instruction is exactly the same as the Show Coordinates.
- This section is a stub. You can help Halopedia by expanding it. Reason: Machinima mode is returning to the game.[1]
Toggle Freecam and Toggle Control[edit]
Toggling Freecam and Toggle Control first appeared in Halo 5: Guardians and made it return in Halo Infinite and Halo: Campaign Evolved.
Toggle Freecam[edit]
Freecam stands for Free Camera. In Halo 5: Forge's settings menu, it is referred to as "MACHINIMA: DETACH CAMERA"; it allows players' cameras to fly around the map like in Theater but during gameplay and only with movement features.
| Version | Input Device | Combination |
|---|---|---|
| Halo 5: Forge | Controller (Xinput) | Hold “Action/Reload” + “↑ D-Pad" for 3 Seconds |
| Mouse and Keyboard | Press "Machinima: Toggle Control" |
| Version | Input Device | Combination |
|---|---|---|
| Halo Infinite (PC) | Controller (Xinput) | Hold “X Button” + “↑ D-Pad" for 5 Seconds |
- This section is a stub. You can help Halopedia by expanding it. Reason: Machinima mode is returning to the game.[1][2]
Toggle Control[edit]
After Freecam is enabled, players can also control their Spartans while Freecam is still enabled; this means their cameras are locked until they toggle again.
| Version | Input Device | Combination |
|---|---|---|
| Halo 5: Forge | Controller (Xinput) | Press "Back Button" |
| Mouse and Keyboard | Press "Machinima: Detach Camera" |
| Version | Input Device | Combination |
|---|---|---|
| Halo Infinite (PC) | Controller (Xinput) | Press "Back Button" |
- This section is a stub. You can help Halopedia by expanding it. Reason: Machinima mode is returning to the game.[1]
Glitching the Pan Cam outside a level's boundaries[edit]
Pan Cam's main use is its is primarily used to force the camera out of a level's boundaries.
To do this, you must watch a Film in which a player either falls to their death or dies while in Edit Mode. Focus the camera on that player, and then pause the Film and detach the camera when the player dies. Then, approach, but not touch, the "target" boundary. Raise the camera's speed to a very high value (something around 50,000.000 will work), and either quickly flick the left stick towards the boundary (if it's a wall) or quickly press the appropriate trigger (if it's an invisible floor or ceiling). The result will be that you clip through the wall and over to the other side.
(If the camera is following a living player, then it will snap back to that player after any attempt to exit the level's boundaries.)
To ensure that you've paused at the right time, "detach" the camera from the player by pressing Y, move the camera away a small distance, and then press Y again; if the HUD appears, but the camera does not move, then you are now free to force the camera outside the map. Note, though, that sometimes, Y will return the camera to your character, but the camera can still be forced out of the map.
Make sure you reduce your speed after exiting the map, to make it easier to explore outside the map!
Things to note[edit]
There are a number of caveats and issues when working outside the level boundaries.
- Saving a Film Clip while outside the level boundaries can be problematic. In particular, the entire camera will become almost irreversibly glitched if you touch the boundaries from the outside.
- In rarer cases, this can happen when approaching the edge of a skybox—for example, the rather massive one surrounding Epitaph. It can be reversed by quickly backing away from the skybox before you move too far.
- If, while trying to clip past a boundary, you set the speed to too high of a value, you may become lost outside the level, unable to even see it. The on-screen coordinates can be used to navigate back to the level.
- Draw distance limits can render some or all of the level invisible when flying far outside the boundaries.
- The "hall of mirrors effect" can be disorienting. In some 3D engines, when part of a screen is "empty" -- when nothing, not even a skybox, is rendered on part of a screen—the contents of the previous frame show through on that screen, creating a "hall of mirrors" or "afterimage" effect. In Halo 3, random red and blue patterns can also appear in such spaces. When taking a screenshot, a solid color (usually sky blue) fills such spaces.
- In Halo 3: ODST, the maximum speed is limited to 10000.00, but it is enough to break all the way out of the level if you struggle enough. In Halo 4, the maximum speed is 100.00, but some boundaries can be bypassed even at that low speed.
Basic instructions for multiplayer maps[edit]

- Enable Coordinates, and then Pan Cam.
- Next, go to Forge on local play, and select any map. Find a simple way to kill yourself. One quick and easy way is to lower Editing Players' damage resistance to 10% and disable their shields. Then, in-game, just toss a grenade without even bothering to place Fusion Coils, and then enter Edit Mode right before it detonates.
- End the game, and go straight to Theater. Watch your character until it dies. As soon as your Monitor explodes, pause the Film. Then press Y to "detach" the camera from them. Now, you're free!
Instructions for campaign maps[edit]
- Enable Coordinates and Pan Cam.
- Find an easy way to kill yourself that will get your body near a level boundary and to a kill barrier; falling off a cliff works well.
- Head to Theater. Watch the Film, and wait until your body dies or leaves the map, e.g. falls through or hits the ground falls off or out of the map.
- Pause, and press Y to detach the camera from your character.
- Enjoy exploring the levels!
Note: Not all levels can be used for Pan Cam.[citation needed]
Trivia[edit]
- Pan Cam can be used as a way to find certain Easter eggs and oddities that Bungie placed around the Multiplayer maps, such as those seen in Sandtrap and Sandbox.
- If you watch a Film Clip that has the Pan Camera enabled, then the Pan Cam will automatically enable itself for the remainder of the session.
Gallery[edit]
Screenshots[edit]
During gameplay[edit]
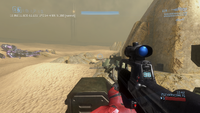
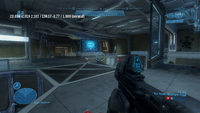
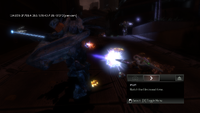
Coordinates are displayed in Halo 3.
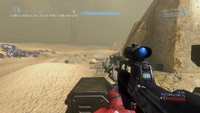
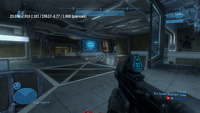
Coordinates are displayed and Pan Cam is enabled in Halo 3.
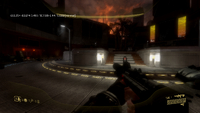
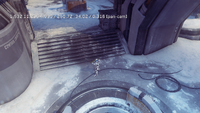
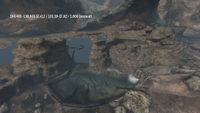
Coordinates are displayed in Halo 3: ODST.

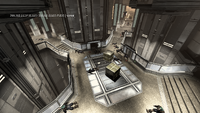
Coordinates are displayed and Pan Cam is enabled in Halo 3: ODST.
A player can adjust the camera speed while flying in Firefight of Halo 3: ODST.
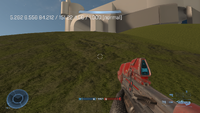
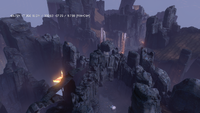
Coordinates are displayed in Halo: Reach.
Coordinates are displayed and Pan Cam is enabled in Halo: Reach.
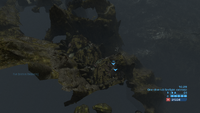
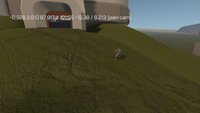
A player can freely fly out of the Firefight map in Halo: Reach.
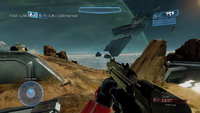
Coordinates are displayed in Halo 4.
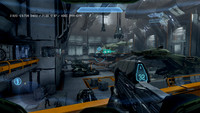
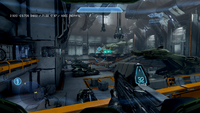
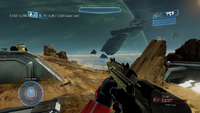
Coordinates are displayed and Pan Cam is enabled in Halo 4.
Coordinates are displayed in Halo 2: Anniversary.
Coordinates are displayed and Pan Cam is enabled in Halo 2: Anniversary.
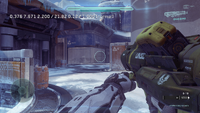
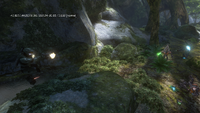
Coordinates are displayed in Halo 5: Guardians.
Coordinates are displayed, Pan Cam is enabled, and the player's camera is detached during the custom game in Halo 5: Guardians.
Coordinates are displayed in Halo Infinite.
Coordinates are displayed, Pan Cam is enabled, and the player's camera is detached during the custom game in Halo Infinite.


Theater Mode[edit]
Coordinates is enabled in Halo 3.
Coordinates is enabled in Halo 3: ODST.
Coordinates is enabled in Halo: Reach.
Coordinates is enabled in Halo 4.


[edit]
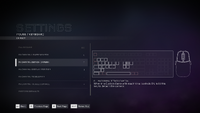
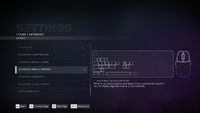
"MACHINIMA: DETACH CAMERA" map in settings menu.
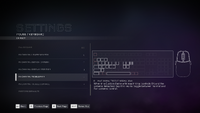
"MACHINIMA: DISPLAY POSITION" (Show/Hide Coordinates) map in settings menu.
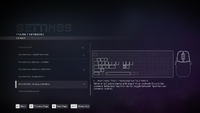
"MACHINIMA: TOGGLE PAN" map in settings menu.
"MACHINIMA: TOGGLE CONTROL" map in settings menu.


Sources[edit]
- ^ a b c d e Halo Waypoint, July Community Q&A | Halo: Campaign Evolved (Retrieved on Jul 3, 2026) [archive]
- ^ YouTube - HALO, Let's talk MACHINIMA MODE
See also[edit]
- Alert carry – A button combination that allows players to lower their weapons for machinima purposes.


