Ascension
From Halopedia, the Halo wiki
| Ascension | |
|---|---|

| |
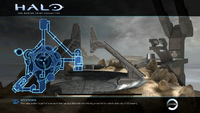
| Map overview | |
|
Game: |
|
|
Map file name (?): |
|
| Lore information | |
|
Map designation (?): |
War Games Map_Set/: 118-3[2] |
|
Location: |
|
| Gameplay overview | |
|
Terrain: |
Plateau, Forerunner structure |
|
Map layout: |
Asymmetrical |
|
Recommended number of players: |
2-12 |
|
Recommended gametype(s): |
|
| “ | This relay station is part of a network that has kept Delta Halo functioning smoothly for untold centuries. | ” |
Ascension is a multiplayer map in Halo 2. It was remade as Pinnacle in Halo: Reach and as Zenith[3] in Halo 2: Anniversary.
Setting
When the High Prophet of Regret fled Earth, he was pursued by a number of UNSC vessels, including the corvette UNSC Coral Sea. To avoid discovery by the Covenant, the Coral Sea hid close to Delta Halo's surface and devoted most of its time to scanning the ringworld. The crew discovered several relay stations across the installation's surface. They acquired information that is now used to reconstruct Delta Halo locations for research and War Games.[2] These kinds of relay stations have kept Delta Halo running for centuries.
Though the skies of Ascension are exceptionally obscure and hazy, it is possible to see a Halo ring in the atmosphere. There are also giant rock formations in the background.
Design

Ascension takes the form of platforms and walkways built on and around a central rocky pillar, interconnecting and weaving throughout. There are three primary platforms extending off the main area, with two containing sniper/ watchtowers and another containing a landing pad with a Oghal-pattern Banshee. The centre of the map has a large dish inset into the ground, with a rotating structure capable of temporarily blocking sightlines across the map.
Territories
- Dish/Middle
- Command Center/Big Tower
- Leap of Faith/Rocket Spawn
- Sniper Roost/Little Tower
- Landing Pad/Banshee Spawn
Strategies
Sniping Tips

Though this map is somewhat small, it is excellent for sniping. There are two sniper rifles, one on the walkway near the left side of the big sniper tower and one on the platform near the left side of the small sniper tower. Though these sniping towers are great places to get a quick kill, a sniper should not stay there, as he will be extremely exposed. There are two, much better sniping spots on this island.
To get to the first sniping spot, one has to get hold of a rocket launcher, a sniper rifle and a Banshee. Fly up above the small sniper tower using the Banshee, to where it looks like two fork prongs. Get out of the Banshee and onto the large platform at the base of the prongs. One has a choice to walk up either of the two prongs or stand on the very edge of the platform, both choices enabling one to see the entire map. This spot offers good protection from any enemy fire down below. The Rocket Launcher in the players possession is to help neutralize any Banshees that attempt to get up.
To get to the second sniping spot, one should have a rocket launcher, a sniper rifle, and a Banshee. Just fly up to the big sniper tower and you should see a large opening in the sides. Fly right in and jump out of the Banshee. Note: Try to make the Banshee fall out. Now you can see out of a large hole in the front. Snipe away, but be careful. If someone sees you and starts shooting at you, you can just back up and you will be safe. You will even be safe from rockets, though you may be slightly damaged. This is why you don't want the Banshee in there. If it were to get hit by a rocket, you might die.
If they throw grenades in there, back up more so that you start going up another incline. You will still get damaged but they should run out of grenades before you die. Another way to completely avoid damage from grenades or rockets is to go up to the sniping opening. Turn around and you should see a ramp on the left side of the wall. Go all the way up this and the only thing you have to worry about is your more open position. People will be able to see you but only from the Banshee platform, needler platform, and the Overshield bridge, so keep your eye out for unlucky enemies. Again, if a banshee comes around, blow 'em out of the sky.
In some games, the Banshee is removed, or it is banned by honor rules. The best countermeasure is to snipe from the large tower and change position after every shot.
Hiding Spots
Where the Banshee spawns turn left and head down a small ledge just bellow there is a small platform with a rocket launcher on it. It's called the "Leap of Faith". Try maneuvering behind the teleporter. This is a great place to hide with the oddball and it is easily escapable because there is a gravity lift and a teleporter so if someone finds you, you can teleport or fly off the platform. If you don't use the banshee and jump down while someone is following you, you can grab the rocket launcher and go through the teleport. Chances are they will follow you through the teleport and you'll be ready on the other side with A rocket pointed at the teleport.
Another hiding spot is by taking the banshee and going to the big tower, and you should be able to see that the tower is open from the middle, land there and people have a less chance firing at you since there is a wall in front.
More helpful of a hiding spot is if you get a Banshee and fly down to the things that hold up a structure like under the platform with the man cannon. AKA: "Leap of Faith".
Glitches
There are three ways to get out of this map. The first only requires one person. To do this you will need a rocket launcher, an Overshield, and a Banshee. Place the Banshee wherever you need and flip it over and knock one of the wings to the ground. The lower wing should be pointing where you want to go, which is anywhere there is not a tower. Get on the lower wing and shoot at the high wing with the Rockets and it will send you flying out of the level. If you go far enough, the invisible floor will be above the death barrier so you can walk very far out of the level, but you will eventually hit a barrier.
The Second way requires two people. One person needs an Overshield and the other needs a Banshee. Position one Person on the Right side of the Tall Tower, where there is a long pathway with a corner. The person with the Overshield should stand at the corner. The player in the Banshee should boost at the other player, launching out of the map.
It is possible to Banshee launch onto the rocks around the level. However, the Guardians will kill the player after a few seconds if they go far out enough.
The third method of breaking out of the map is with skulls on the Master Chief Collection's port of Halo 2. Using Sputnik, Feather, Overshields, and/or decreased gravity, the player can use a grenade (or any other explosive method) to get launched out of the map, skipping all of the kill barriers and landing outside of the map, letting one reach the walls of the whole map. This is relatively simple, and does not require many steps to complete, although stepping/boucing too close to the map will get you killed by the Guardians.
Super Bounce
Go to the large tower. There should be a cut in half or split path, one going into the tower and the other going down to the dirt caves and sniper rifle. You should see a small area sticking out of the walls of the path going up to the tower. Crouch and go up to it and stay there for a few seconds. Then turn and go to the center. Turn left and don't hit any rocks. Look off to the side of the path so you can see where the pavement and dirt thin and jump on the line. If you do it right you will fly up, if you do it wrong you will fall into the map and get killed by the The Guardians.
Another jump to the top of the tower is much easier, but has a chance of falling to your death. Go inside the base of the large tower. From the front entrance, go to the left. Walk down the spiral ramp and you will see a small wall coming out of the larger wall on your left side, forming a corner. Crouch into this corner walking forward until your screen starts to vibrate. When this happens turn around and run up the ramp. When you get near the top turn to face the bridge and look down. On the small walkway you see (not the bridge) there should be some lights. At the light all the way to the left stop and jump onto the railing in line with it, it should be right where the railing ramps up more sharply than the rest. Look at the railing on the bridge. You should see the first archway from the entrance to the base. Jump towards the center of the rail closest to you, between the entrance and the first archway.
When you land, jump again and you will hit the rail and got the jump perfectly. Instead of trying to time the jump perfectly, tap A while you fall and it should work with moderate success. Sometimes when this happens you can get a full jump on the rebound. Fourth, you hit the rail and got a full jump... but you flew way off to the Banshee platform. Just try again and you should do fine.
Despite common speculation (which says that if you get to the top of the tower that you are invulnerable to enemy fire), you are not invulnerable to anything while open to the rest of the course. However, you cannot be shot by anything if you go to the very back on the top of the tower, as Banshees are incapable of reaching the spot and there aren't any open spaces for enemy fire.
To do another Super jump (easiest and very helpful) you go to the bottom of the forked tower (usually want to grab a sniper first for when you get up there). Stand behind the ramp that goes up to the little spot to snipe from. Don't go up the ramp just stand behind it looking right up the ramp. Then walk up to the right railing, jump and walk up to the top, staying on the ramp, don't jump. Then crouch down and walk forward, you should be able to let go of crouch and you should still be crouching because you are under the ledge. Now, very slowly keep walking forward for a few sec. Then let go of forward, press jump (you should still land on the railing after you jump) then turn to your right, look down and jump at an arc and land on the pillar down by the sniper.
You have to land right in the center of the pillar at the right arc. (Hint: after you jump after being crouched you should turn right and look down and jump to the pillar fairly quickly, you don't have to be super quick but don't waste time.) If you hit it right you should fly through the air upwards and land on the fork tower, if the banshee is turned off get ready for a crap load of snipes.
Trivia

Production notes
- Some elements of Ascension were incorporated into the Halo 3 map, Guardian, which included one of the main towers of the map.
- An Ascension remake, Pinnacle, appears in Halo: Reach as a built-in variant of Forge World.
- Ascension was nearly cut from Halo 2 in its early stages. The map was considered broken as all player traffic was concentrated to the center dish; this was solved by adding more paths to the sides of the map.[4]
Miscellaneous
- Medium-long range fights, always with Battle Rifles and Sniper Rifles which have two spawn points on this map, populate Ascension.
- Faces can be seen throughout the hazy clouds and rocks.
- If one destroys the machine gun turret on this map they can still operate the stub as if it were a fully functioning turret.
Gallery

|
Browse more images in this article's gallery page. |
Ascension Map.
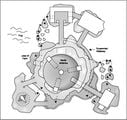
The second revision of the paper design for Ascension.
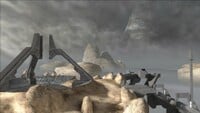
A view of the center and a walkway.
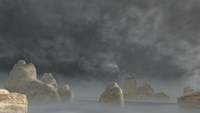
The view of Installation 05 from Ascension.
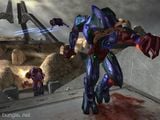
Sangheili on Ascension.


Sources
- ^ Halo 2 Editing Kit, game file
H2EK\tags\scenarios\multi\ascension\ascension.scenario - ^ a b Halo Waypoint, Delta Halo (Retrieved on Oct 27, 2015) [archive]
- ^ Halo Waypoint, Halo: The Master Chief Collection (Retrieved on Nov 10, 2015) [archive]
- ^ YouTube - Halo, Halo: The Master Chief Collection Panel - RTX 2014 (Retrieved on Nov 10, 2014)
| |||||||||||||||||||||||||||||||


