Sidewinder: Difference between revisions
From Halopedia, the Halo wiki
mNo edit summary |
|||
| (147 intermediate revisions by 87 users not shown) | |||
| Line 1: | Line 1: | ||
{{ | {{Status|Gameplay}} | ||
{{Multiplayer map infobox | |||
{{Multiplayer | |||
|name=Sidewinder | |name=Sidewinder | ||
|image=[[ | |image=[[File:Sidewinder.JPG|250px]] | ||
|game=''[[Halo: Combat Evolved]]'' | |game=''[[Halo: Combat Evolved]]'' | ||
|map= | |||
|location=[[Installation 04]] | |location=[[Installation 04]] | ||
|terrain=Cliffs, | |terrain=Cliffs, snowy valley | ||
| | |symmetry=Semi-symmetrical | ||
|playernumber=4-16 | |||
| | |||
|gametypes= | |gametypes= | ||
*[[Slayer]] | *[[Slayer]] | ||
*[[Oddball]] | *[[Oddball]] | ||
*[[CTF]] | *[[CTF]] | ||
| | |pagegamelabel=CE | ||
}} | }} | ||
{{Article quote | |||
|Red Blood, White Snow | |||
}} | |||
'''Sidewinder''' is a horseshoe [[multiplayer]] map in ''[[Halo: Combat Evolved]]''. It was remade into the ''[[Halo 3]]'' map, [[Avalanche (Level)|Avalanche]], which was released on April 15, 2008 in the [[Legendary Map Pack]].<ref>http://www.bungie.net/News/content.aspx?type=topnews&cid=13382</ref> | |||
==Summary== | |||
[[File:Sidewinder.jpg|200px|A bird's eye view of Sidewinder.|thumb|left]] | |||
The main feature of this map is the ice patches on the front of the horseshoe in between the [[base]]s that can cause any ground vehicle without treads or hover abilities to slide, making it hard to control the vehicle, but makes a fun way to splatter enemies. On the outer edge of the map are two large cliffs that are connected to each base with [[teleporters]]. These areas are popular sniping spots, as they provide a large view and a quick route to an easily defensible area. On the inner edge, there is a network of tunnels which lead to the opposing [[bases]]. Four power-ups can be found in the lower section of the tunnel. There is a [[SRS99C-S2 AM sniper rifle|sniper rifle]], two [[M90 shotgun|shotguns]], [[health pack]], [[Type-25 plasma pistol|plasma pistol]], [[M6D magnum|pistol]] and an [[MA5B assault rifle|assault rifle]] inside each base. | |||
== | ==Strategies== | ||
*A good defensive technique in | *During [[Capture the Flag]] games, players will utilize three different paths. Some will come in vehicles down the middle, others will go on foot through the teleporters, while a third group will move through the tunnels found in the middle of the map. Control of the teleporters is important for success. Taking control of the teleporters gives a constant supply of heavy weapons, such as the [[Unidentified fuel rod gun|fuel rod gun]] and [[M41 SPNKR|rocket launchers]] which spawn near them. A place for snipers to control, is the middle ground and other areas that your enemies would use to go from base to base. A good defensive technique in CTF is to park a rocket warthog inside your base behind the flag. The player then goes into the gunner seat picking off any enemies that enter. Or you can use a warthog to block the door. But be careful, both tactics have the potential to give the enemy a free ride. | ||
*Players on foot will almost always take the ledges around and snipe at the enemy base. They will also pick up heavy weapons along the way and use these to assault the enemy base. | *Players on foot will almost always take the ledges around and snipe at the enemy base. They will also pick up heavy weapons along the way and use these to assault the enemy base or to defend themselves from the enemy. | ||
*When on offense in CTF, teams should use a few vehicles to pin down the enemy and then use a fast and maneuverable vehicle to steal the flag. | *When on offense in CTF, teams should use a few vehicles to pin down the enemy and then use a fast and maneuverable vehicle to steal the flag. | ||
*The map is a favorite for Team [[King of the Hill | *The map is a favorite for Team [[King of the Hill]] with a moving hill. This gametype pleases people with all preferences. Snipers can pick off and slow the attack of the enemy. People who like close range can charge in with a shotgun and assault rifle. | ||
* | *An effective CTF offensive is to have someone drive your team's [[M808B Scorpion|Scorpion]] around the bend to a good view point of your enemy's upper base. Also drive your team's [[M12 Warthog|Warthog]] up to the bend, but not around it, in front of the Scorpion. Once in position, have the person in the Scorpion start firing at their upper base to distract their sniper. The 2 people at your base then travel through the center to the enemy's side of the center area, and stop. Also have another person use the [[Karo'etba-pattern Ghost|Ghost]] and charge the enemy's base. When they come out to attack the Ghost, have your teams sniper and pick them off. Now the 2 people waiting can go grab the enemy's flag. Here's the part where you need the Warthog. Drive up to pick them up while the sniper, Ghost, Warthog, and Scorpion provide cover. Though elaborate, this maneuver can prove to be quite effective. | ||
*As a warthog driver, avoid driving on the frozen ponds at all costs. The Warthog will lose traction, be very difficult to control, and a sitting duck for other vehicles or opponents armed with heavy weapons. Even a skilled sniper can be devastating, first picking off the slow moving driver, then easily shooting the gunner and/or passenger. | |||
*The | *A good strategy during a game where sniping weapons such as the sniper rifle and the pistol are only allowed is have 2 team members in a Ghost and a standard or Rocket Warthog and to have 2 to 4 members of your team at the ledge which is facing the enemy's base . The Ghosts and the Warthog will provide suppressive fire at the two front doors and the snipers on the ledge can stop any enemies from climbing to the top of the base and using the portal on the roof. Right now your enemy should be distracted by your allies, during this time use the portal on the ledge to get into the enemy base along with your sniper allies to establish control of the roof. Now you can easy bombard the enemy with grenades from the roof and easily steal the flag as the enemy should be in panic. This will only work if sniping weapons are available and Warthogs and Ghosts are available. If there are any heavy weapons available than this strategy will be upset. | ||
* | |||
== | ==Trivia== | ||
===Miscellaneous=== | |||
*Sidewinder bears a salient resemblance to the map [[Ice Fields]], as well as the ''[[Halo: Combat Evolved]]'' campaign mission [[Assault on the Control Room]]. | |||
*The 10th episode of [[Red vs Blue]] shows a short scene on Sidewinder. | |||
==Glitches== | |||
*[[ | *Grab an [[Overshield]] and drive a Warthog into the short tunnel connecting the two base areas, and park it perpendicular to the wall, as far back as it'll go. Now jump onto the barrel of the turret, and throw two or three plasma grenades just over the hood of the car, so they land just in front. When they go off, you will be propelled through the ceiling, landing on the "roof" of the snow hills. From here you may throw grenades and shoot your enemies. Be careful though, they can shoot you if you're standing on the rim or "edge" of the cliffs, though it is less vital to your health than normal. | ||
'''WARNING: If you attempt this glitch without an Overshield, you'll be "killed by a vehicle".''' | |||
* Another alternative, and possibly easier way is to perform the following tasks; First this MUST be done with at least one other person. Grab a Scorpion and head up the hill toward where the exit of one end of your base opens to the top of a hill, close to the clifftops. Whoever else is interested should grab a Ghost, but DO NOT get in the Scorpion driver's way. Back the Scorpion as far as you can, and ram it up against the cliff at roughly a 45-degree angle. Spinning the turret backwards may or may not help. The Scorpion's pilot must stay in the vehicle until everyone is on top, as the tank tends to slip off when no one is hitting the gas continuously. Now the Ghost pilots can use the Scorpion as a ramp to gain access to the clifftops. | |||
* The clifftops pose some strategic value, due to their excellent sniping potential. It can also be amusing to drop grenades through the so-called "sunroof" installed in the bases, as well as harassing other players with fire from your Ghost. Keep in mind, however, that you will become easy prey for a competent Scorpion gunner, as well as players with Rocket Launchers. | |||
*Do not attempt to move too close to the background scenery while on the clifftops, or you will hit the death barrier, and it will count as a suicide. | |||
Suicides can also occur by falling through the holes on the roof of the bases, which can be difficult to see while on a Ghost. | |||
* When hit by a rocket or a round from a Scorpion's main cannon, your corpse will fly quite far, due to the height of your perch. | |||
*With Ghosts and players on foot on the clifftops, and a Scorpion on the ground, the potential for multi-level, two pronged assaults arises. | |||
*On the Xbox version it is possible to re-enter the level after vacating it, but due to the addition of the [[Type-26 Banshee|Banshee]] to the PC edition a forcefield is added so it is impossible to exit. | |||
=== | ==Gallery== | ||
{{Linkbox|gallery=yes}} | |||
<gallery> | |||
File:Sidewinder loading screen.png|Loading screen of this map in the Master Chief Collection. | |||
File:HTMCC HCE Sidewinder CTF.jpg|A game of Capture the Flag on Sidewinder. | |||
</gallery> | |||
{{ | ==Sources== | ||
{{Ref/Sources}} | |||
{{Levels|H1|mode=yes}} | |||
Latest revision as of 00:47, February 25, 2024
| Sidewinder | |
|---|---|

| |
| Map overview | |
|
Game: |
|
| Lore information | |
|
Location: |
|
| Gameplay overview | |
|
Terrain: |
Cliffs, snowy valley |
|
Map layout: |
Semi-symmetrical |
|
Recommended number of players: |
4-16 |
|
Recommended gametype(s): |
|
| “ | Red Blood, White Snow | ” |
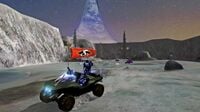
Sidewinder is a horseshoe multiplayer map in Halo: Combat Evolved. It was remade into the Halo 3 map, Avalanche, which was released on April 15, 2008 in the Legendary Map Pack.[1]
Summary[edit]

The main feature of this map is the ice patches on the front of the horseshoe in between the bases that can cause any ground vehicle without treads or hover abilities to slide, making it hard to control the vehicle, but makes a fun way to splatter enemies. On the outer edge of the map are two large cliffs that are connected to each base with teleporters. These areas are popular sniping spots, as they provide a large view and a quick route to an easily defensible area. On the inner edge, there is a network of tunnels which lead to the opposing bases. Four power-ups can be found in the lower section of the tunnel. There is a sniper rifle, two shotguns, health pack, plasma pistol, pistol and an assault rifle inside each base.
Strategies[edit]
- During Capture the Flag games, players will utilize three different paths. Some will come in vehicles down the middle, others will go on foot through the teleporters, while a third group will move through the tunnels found in the middle of the map. Control of the teleporters is important for success. Taking control of the teleporters gives a constant supply of heavy weapons, such as the fuel rod gun and rocket launchers which spawn near them. A place for snipers to control, is the middle ground and other areas that your enemies would use to go from base to base. A good defensive technique in CTF is to park a rocket warthog inside your base behind the flag. The player then goes into the gunner seat picking off any enemies that enter. Or you can use a warthog to block the door. But be careful, both tactics have the potential to give the enemy a free ride.
- Players on foot will almost always take the ledges around and snipe at the enemy base. They will also pick up heavy weapons along the way and use these to assault the enemy base or to defend themselves from the enemy.
- When on offense in CTF, teams should use a few vehicles to pin down the enemy and then use a fast and maneuverable vehicle to steal the flag.
- The map is a favorite for Team King of the Hill with a moving hill. This gametype pleases people with all preferences. Snipers can pick off and slow the attack of the enemy. People who like close range can charge in with a shotgun and assault rifle.
- An effective CTF offensive is to have someone drive your team's Scorpion around the bend to a good view point of your enemy's upper base. Also drive your team's Warthog up to the bend, but not around it, in front of the Scorpion. Once in position, have the person in the Scorpion start firing at their upper base to distract their sniper. The 2 people at your base then travel through the center to the enemy's side of the center area, and stop. Also have another person use the Ghost and charge the enemy's base. When they come out to attack the Ghost, have your teams sniper and pick them off. Now the 2 people waiting can go grab the enemy's flag. Here's the part where you need the Warthog. Drive up to pick them up while the sniper, Ghost, Warthog, and Scorpion provide cover. Though elaborate, this maneuver can prove to be quite effective.
- As a warthog driver, avoid driving on the frozen ponds at all costs. The Warthog will lose traction, be very difficult to control, and a sitting duck for other vehicles or opponents armed with heavy weapons. Even a skilled sniper can be devastating, first picking off the slow moving driver, then easily shooting the gunner and/or passenger.
- A good strategy during a game where sniping weapons such as the sniper rifle and the pistol are only allowed is have 2 team members in a Ghost and a standard or Rocket Warthog and to have 2 to 4 members of your team at the ledge which is facing the enemy's base . The Ghosts and the Warthog will provide suppressive fire at the two front doors and the snipers on the ledge can stop any enemies from climbing to the top of the base and using the portal on the roof. Right now your enemy should be distracted by your allies, during this time use the portal on the ledge to get into the enemy base along with your sniper allies to establish control of the roof. Now you can easy bombard the enemy with grenades from the roof and easily steal the flag as the enemy should be in panic. This will only work if sniping weapons are available and Warthogs and Ghosts are available. If there are any heavy weapons available than this strategy will be upset.
Trivia[edit]
Miscellaneous[edit]
- Sidewinder bears a salient resemblance to the map Ice Fields, as well as the Halo: Combat Evolved campaign mission Assault on the Control Room.
- The 10th episode of Red vs Blue shows a short scene on Sidewinder.
Glitches[edit]
- Grab an Overshield and drive a Warthog into the short tunnel connecting the two base areas, and park it perpendicular to the wall, as far back as it'll go. Now jump onto the barrel of the turret, and throw two or three plasma grenades just over the hood of the car, so they land just in front. When they go off, you will be propelled through the ceiling, landing on the "roof" of the snow hills. From here you may throw grenades and shoot your enemies. Be careful though, they can shoot you if you're standing on the rim or "edge" of the cliffs, though it is less vital to your health than normal.
WARNING: If you attempt this glitch without an Overshield, you'll be "killed by a vehicle".
- Another alternative, and possibly easier way is to perform the following tasks; First this MUST be done with at least one other person. Grab a Scorpion and head up the hill toward where the exit of one end of your base opens to the top of a hill, close to the clifftops. Whoever else is interested should grab a Ghost, but DO NOT get in the Scorpion driver's way. Back the Scorpion as far as you can, and ram it up against the cliff at roughly a 45-degree angle. Spinning the turret backwards may or may not help. The Scorpion's pilot must stay in the vehicle until everyone is on top, as the tank tends to slip off when no one is hitting the gas continuously. Now the Ghost pilots can use the Scorpion as a ramp to gain access to the clifftops.
- The clifftops pose some strategic value, due to their excellent sniping potential. It can also be amusing to drop grenades through the so-called "sunroof" installed in the bases, as well as harassing other players with fire from your Ghost. Keep in mind, however, that you will become easy prey for a competent Scorpion gunner, as well as players with Rocket Launchers.
- Do not attempt to move too close to the background scenery while on the clifftops, or you will hit the death barrier, and it will count as a suicide.
Suicides can also occur by falling through the holes on the roof of the bases, which can be difficult to see while on a Ghost.
- When hit by a rocket or a round from a Scorpion's main cannon, your corpse will fly quite far, due to the height of your perch.
- With Ghosts and players on foot on the clifftops, and a Scorpion on the ground, the potential for multi-level, two pronged assaults arises.
- On the Xbox version it is possible to re-enter the level after vacating it, but due to the addition of the Banshee to the PC edition a forcefield is added so it is impossible to exit.
Gallery[edit]

|
Browse more images in this article's gallery page. |

Loading screen of this map in the Master Chief Collection.
A game of Capture the Flag on Sidewinder.


Sources[edit]
| |||||||||||||||||||||||


