Operation: TALON: Difference between revisions
From Halopedia, the Halo wiki
Sith Venator (talk | contribs) (Woot first edit of 2013! lol) |
mNo edit summary |
||
| Line 30: | Line 30: | ||
==Prelude== | ==Prelude== | ||
After being forced out of [[Eridanus II]] during [[Operation: TREBUCHET]], [[Insurrectionist]] forces went into hiding in the system's asteroid belt. Any attempt to flush the rebels out was met by either no success or attack by superior force. Having discovered that [[Colonel]] [[Robert Watts]], the leader of the rebels, thought to have been killed in Operation: TREBUCHET, was in fact alive, the [[Office of Naval Intelligence]] resolved to capture Watts and track down the mole in [[UNSC High Command|HIGHCOM]]. | After being forced out of [[Eridanus II]] during [[Operation: TREBUCHET]], [[Insurrectionist]] forces went into hiding in the system's [[asteroid]] belt. Any attempt to flush the rebels out was met by either no success or attack by superior force. Having discovered that [[Colonel]] [[Robert Watts]], the leader of the rebels, thought to have been killed in Operation: TREBUCHET, was in fact alive, the [[Office of Naval Intelligence]] resolved to capture Watts and track down the mole in [[UNSC High Command|HIGHCOM]]. | ||
==The raid== | ==The raid== | ||
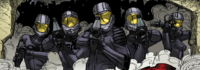
Disguised in the clothing of the crew of the freighter ''[[Laden]]'', the [[Blue Team|team]] of Spartan- | Disguised in the clothing of the crew of the freighter ''[[Laden]]'', the [[Blue Team|team]] of Spartan-IIs, consisting of John, Kelly, Fred, Linda, and Sam, went to the upper girder and hid in the reservoir storage tank, which John deemed "the perfect hiding place". In addition, Sam rigged the fill sensor so that it would not let more water flow. Then, having ten hours to spare, they took rotating sleep patterns. When they had almost approached the base in the asteroid field, the Spartans tagged a crate containing [[Sweet William cigar]]s with a [[NAV marker transmitter]].<ref>'''Halo: The Fall of Reach''', ''page 85''</ref> Then, remaining calm, they slid out of ''Laden'' along with the rebels and decided to group at the public showers, which would be their fallback point if something went wrong. | ||
Following the track point, they arrived at a barracks, where Kelly and John quickly and silently eliminated the guards. Then, using the [[elevator]] cables, they climbed up to Watts' apartment. Using their [[ | Following the track point, they arrived at a barracks, where Kelly and John quickly and silently eliminated the guards. Then, using the [[elevator]] cables, they climbed up to Watts' apartment. Using their [[MA2B assault rifle]]s (as well as Linda's [[SRS99C-S2 AM sniper rifle]]), the Spartans proficiently eliminated the five guards around the door leading to Watts. However, after slaughtering the next three guards, who had an easier target, as the Spartans had to take care not to kill their target, John was shot three times in the side, one bullet penetrating his [[black body suit|body suit]], bouncing off a few ribs, and causing a tremendous amount of internal bleeding, keeping the bullet lodged in his abdomen, during the ensuing firefight. Though Watts brandished an [[M6D Personal Defense Weapon System|M6D pistol]] at them, Kelly and Fred fired, causing him to duck. Spartan-117 then leaped to his quarry, snapped his finger, and choked him to unconsciousness.<ref>'''[[Halo: The Flood]]''', ''page 91''</ref> | ||
Kelly proceeded to inject Watts with enough [[polypseudomorphine]] to keep him out for a day and the Spartans forced the Colonel into a sealed cargo crate. On his part, John received a dose of [[biofoam]] in order to stop the internal bleeding. Sam then read that there were six incoming vehicles and rebel infantry, to which he responded by placing the mines that they brought. The Spartans then rappelled down the side of the building and, hefting Watts in the airtight crate, made their way back to the docking bay. John activated the panic button while Sam went on to place C-12 explosives on the main bay doors. As the doors blew and the hangar bay decompressed, John and the rest of his team successfully escaped in a [[D77-TC Pelican|Pelican]] dropship (stolen from the UNSC by the rebels). | Kelly proceeded to inject Watts with enough [[polypseudomorphine]] to keep him out for a day and the Spartans forced the Colonel into a sealed cargo crate. On his part, John received a dose of [[biofoam]] in order to stop the internal bleeding. Sam then read that there were six incoming vehicles and rebel infantry, to which he responded by placing the mines that they brought. The Spartans then rappelled down the side of the building and, hefting Watts in the airtight crate, made their way back to the docking bay. John activated the panic button while Sam went on to place C-12 explosives on the main bay doors. As the doors blew and the hangar bay decompressed, John and the rest of his team successfully escaped in a [[D77-TC Pelican|Pelican]] dropship (stolen from the UNSC by the rebels). | ||
| Line 45: | Line 45: | ||
==Aftermath== | ==Aftermath== | ||
Despite UNSC plans to return later and destroy the base, it never happened despite it being marked by the Spartans. Presumably the greater conflict with the Covenant prevented this. | Despite UNSC plans to return later and destroy the base, it never happened despite it being marked by the Spartans. Presumably [[Human-Covenant War|the greater conflict]] with the Covenant prevented this. The base survived for another 25 years, even after Eridanus II was destroyed by the [[Covenant]]. In [[2552]], all but one of the Spartans who attacked the base returned with the ''[[Ascendant Justice]]-[[UNSC Gettysburg|Gettysburg]]'' for repairs. They were able to find the base thanks to information from this attack and convinced the rebels to help them. The group even defended the base from attack by a [[Covenant cruiser]], but were forced to abandon the rebels to the Covenant when over 30 ships showed up, leading to the [[Massacre at Eridanus Secundus]] in which the rebel base was presumably destroyed by the Covenant. | ||
==Gallery== | ==Gallery== | ||
Revision as of 14:32, May 18, 2014
Template:Battle The Assault on Eridanus Secundus was the first combat mission by the SPARTAN-IIs.
Prelude
After being forced out of Eridanus II during Operation: TREBUCHET, Insurrectionist forces went into hiding in the system's asteroid belt. Any attempt to flush the rebels out was met by either no success or attack by superior force. Having discovered that Colonel Robert Watts, the leader of the rebels, thought to have been killed in Operation: TREBUCHET, was in fact alive, the Office of Naval Intelligence resolved to capture Watts and track down the mole in HIGHCOM.
The raid
Disguised in the clothing of the crew of the freighter Laden, the team of Spartan-IIs, consisting of John, Kelly, Fred, Linda, and Sam, went to the upper girder and hid in the reservoir storage tank, which John deemed "the perfect hiding place". In addition, Sam rigged the fill sensor so that it would not let more water flow. Then, having ten hours to spare, they took rotating sleep patterns. When they had almost approached the base in the asteroid field, the Spartans tagged a crate containing Sweet William cigars with a NAV marker transmitter.[1] Then, remaining calm, they slid out of Laden along with the rebels and decided to group at the public showers, which would be their fallback point if something went wrong.
Following the track point, they arrived at a barracks, where Kelly and John quickly and silently eliminated the guards. Then, using the elevator cables, they climbed up to Watts' apartment. Using their MA2B assault rifles (as well as Linda's SRS99C-S2 AM sniper rifle), the Spartans proficiently eliminated the five guards around the door leading to Watts. However, after slaughtering the next three guards, who had an easier target, as the Spartans had to take care not to kill their target, John was shot three times in the side, one bullet penetrating his body suit, bouncing off a few ribs, and causing a tremendous amount of internal bleeding, keeping the bullet lodged in his abdomen, during the ensuing firefight. Though Watts brandished an M6D pistol at them, Kelly and Fred fired, causing him to duck. Spartan-117 then leaped to his quarry, snapped his finger, and choked him to unconsciousness.[2]
Kelly proceeded to inject Watts with enough polypseudomorphine to keep him out for a day and the Spartans forced the Colonel into a sealed cargo crate. On his part, John received a dose of biofoam in order to stop the internal bleeding. Sam then read that there were six incoming vehicles and rebel infantry, to which he responded by placing the mines that they brought. The Spartans then rappelled down the side of the building and, hefting Watts in the airtight crate, made their way back to the docking bay. John activated the panic button while Sam went on to place C-12 explosives on the main bay doors. As the doors blew and the hangar bay decompressed, John and the rest of his team successfully escaped in a Pelican dropship (stolen from the UNSC by the rebels).
Outcome
The Spartans successfully located Watts' base of operations, infiltrated the base and captured him. However, they were unable to make a stealthy exfiltration, and as a result some of the surviving rebels witnessed their superhuman abilities. Despite this, the rebels never found the locator beacon that the Spartans left behind.
Despite the mission's success, John-117 reported having a feeling of unease as they left the station, possibly due to the fact that it was the first time he'd had to deliberately use deadly force against human beings.[3]
Aftermath
Despite UNSC plans to return later and destroy the base, it never happened despite it being marked by the Spartans. Presumably the greater conflict with the Covenant prevented this. The base survived for another 25 years, even after Eridanus II was destroyed by the Covenant. In 2552, all but one of the Spartans who attacked the base returned with the Ascendant Justice-Gettysburg for repairs. They were able to find the base thanks to information from this attack and convinced the rebels to help them. The group even defended the base from attack by a Covenant cruiser, but were forced to abandon the rebels to the Covenant when over 30 ships showed up, leading to the Massacre at Eridanus Secundus in which the rebel base was presumably destroyed by the Covenant.
Gallery

Blue Team in the lobby of Watts' hideout.
Blue Team storming Watts' apartment.


List of appearances
- Halo: The Fall of Reach (First appearance)
- Halo: First Strike (Mentioned only)
- Halo: Fall of Reach
Sources
- ^ Halo: The Fall of Reach, page 85
- ^ Halo: The Flood, page 91
- ^ Halo: The Fall of Reach, page 93


