Waterworks: Difference between revisions
From Halopedia, the Halo wiki
m (Text replacement - "{{Multiplayer Map Infobox" to "{{Multiplayer map infobox") |
BaconShelf (talk | contribs) m (Reverted edits by 76.90.148.131 (talk) to last revision by BaconShelf) Tag: Rollback |
||
| (15 intermediate revisions by 7 users not shown) | |||
| Line 1: | Line 1: | ||
{{ | {{Status|Gameplay}} | ||
{{Multiplayer map infobox | {{Multiplayer map infobox | ||
|name=Waterworks | |name=Waterworks | ||
|image=[[File:H2 Waterworks Banshees.jpg|300px]] | |image=[[File:H2 Waterworks Banshees.jpg|300px]] | ||
|game=''[[Halo 2]]'' | |game=''[[Halo 2]]'' | ||
|devname=<code>waterworks</code> | |||
|map= | |map= | ||
|location= Unknown | |location= Unknown{{Ref/Generic|[[#Production notes|See production notes]]}} | ||
|terrain=Underground cavern, Forerunner | |terrain=Underground cavern, Forerunner | ||
|symmetry= | |symmetry= | ||
| Line 20: | Line 21: | ||
==Description== | ==Description== | ||
This huge map was found mostly in the [[Big Team Battle]] playlist, and is a symmetrical area with bases on either side. This map is built mainly for games of 8 versus 8 [[Assault]] and [[Capture the Flag]]. There are several stalactites hanging from the ceiling which can be brought down by shooting them repeatedly. However, if they are shot with an explosive it will fragment and not be able to damage anything. If they hit an opposing vehicle or enemy, it is an instant kill. It is similar in many ways to the cavern parts of the [[campaign]] level, [[Uprising (Level)|Uprising]]. If you are killed by the large piston in the center, you will be killed by | This huge map was found mostly in the [[Big Team Battle]] playlist, and is a symmetrical area with bases on either side. This map is built mainly for games of 8 versus 8 [[Assault]] and [[Capture the Flag]]. There are several stalactites hanging from the ceiling which can be brought down by shooting them repeatedly. However, if they are shot with an explosive, it will fragment and not be able to damage anything. If they hit an opposing vehicle or enemy, it is an instant kill. It is similar in many ways to the cavern parts of the [[campaign]] level, [[Uprising (Level)|Uprising]]. If you are killed by the large piston in the center, you will be killed by [[The Guardians]], although, on some occasions, the game says that you committed suicide. | ||
===Layout=== | ===Layout=== | ||
Waterworks is arguably the biggest multiplayer map in ''[[Halo 2]]'', only rivaled by [[Containment (Level)|Containment]]. | Waterworks is arguably the biggest multiplayer map in ''[[Halo 2]]'', only rivaled by [[Containment (Level)|Containment]]. | ||
The bases have a total of three floors. The first floor has a window, some crates, and a [[BR55 battle rifle|Battle Rifle]], [[Type-25 plasma pistol|plasma pistol]], [[M7 SMG|SMG]], and a [[M6C magnum|magnum]]. The second floor is unprotected but with more ammo, with a [[Type-33 needler|needler]], [[SRS99C-S2 AM sniper rifle|sniper rifle]], [[M9 fragmentation grenade|frag grenades]], SMG, battle rifle, and a [[M247 machine gun|machine gun]] in a little protective alcove that is good for suppressing enemies. A ramp leads to the "hangar bay" that has a [[Type-26 Banshee|Banshee]], a battle rifle, and a one way [[teleporter]]. In the front, there is a small parking lot that has a [[M12 Warthog|Warthog]], [[ | The bases have a total of three floors. The first floor has a window, some crates, and a [[BR55 battle rifle|Battle Rifle]], [[Type-25 plasma pistol|plasma pistol]], [[M7 SMG|SMG]], and a [[M6C magnum|magnum]]. The second floor is unprotected but with more ammo, with a [[Type-33 needler|needler]], [[SRS99C-S2 AM sniper rifle|sniper rifle]], [[M9 fragmentation grenade|frag grenades]], SMG, battle rifle, and a [[M247 machine gun|machine gun]] in a little protective alcove that is good for suppressing enemies. A ramp leads to the "hangar bay" that has a [[Type-26 Banshee|Banshee]], a battle rifle, and a one way [[teleporter]]. In the front, there is a small parking lot that has a [[M12 Warthog|Warthog]], [[Karo'etba-pattern Ghost|Ghost]], and (usually) a tank of some sort. This is the same for both bases. | ||
The teleporters lead to a personal bridge for each team, that has a [[M41 SPNKR|rocket launcher]], an SMG, and a plasma pistol with a [[ | The teleporters lead to a personal bridge for each team, that has a [[M41 SPNKR|rocket launcher]], an SMG, and a plasma pistol with a [[Vostu-pattern carbine|carbine]]. Both these bridges lead to the same place, but they are all pretty vulnerable to snipers and gunners. | ||
Both these bridges end up in the same place-the bases and the piston. This place has the [[Type-1 energy sword|energy sword]], a sniper rifle, a [[Type-25 Brute Shot|Brute Shot]], a battle rifle, rocket launcher, and more. This piston also has the central bridge that connects the bases to one another. | Both these bridges end up in the same place-the bases and the piston. This place has the [[Type-1 energy sword|energy sword]], a sniper rifle, a [[Type-25 Brute Shot|Brute Shot]], a battle rifle, rocket launcher, and more. This piston also has the central bridge that connects the bases to one another. | ||
| Line 41: | Line 42: | ||
*Watch out for snipers, gunners on stationed turrets, and vehicles (If you're on foot). They'll end your livelihood very quickly. | *Watch out for snipers, gunners on stationed turrets, and vehicles (If you're on foot). They'll end your livelihood very quickly. | ||
*Always keep a flexible arsenal (i.e. battle rifle; shotgun; carbine; sniper rifle) | *Always keep a flexible arsenal (i.e. battle rifle; shotgun; carbine; sniper rifle) | ||
*The pounder has a lot of catwalks that are perfect places to snipe, provided you can reach them (via Banshee). Once there the person should have a rocket launcher and sniper and, if they are a good sniper, would be able to command that position for the duration of the match. | *The pounder has a lot of catwalks that are perfect places to snipe, provided you can reach them (via Banshee). Once there, the person should have a rocket launcher and sniper and, if they are a good sniper, would be able to command that position for the duration of the match. | ||
*Try to make the enemy team fall off the cliff. | *Try to make the enemy team fall off the cliff. | ||
*Each base has its own fleet of vehicles. Put people in the [[M808B Scorpion|Scorpion]], Warthog, Ghost and Banshee. In [[Capture the Flag]], send the smaller vehicles out for offense, while station the Scorpion along with a turret man for cover. | *Each base has its own fleet of vehicles. Put people in the [[M808B Scorpion|Scorpion]], Warthog, Ghost and Banshee. In [[Capture the Flag]], send the smaller vehicles out for offense, while station the Scorpion along with a turret man for cover. | ||
*It is easy to get lost on this level. Try to stay near the bases if you're new to the map. | *It is easy to get lost on this level. Try to stay near the bases if you're new to the map. | ||
*There are stalactites on the ceiling that if shot at enough they will fall. If anyone happens to be standing under these stalactites when this happens, they will die. | *There are stalactites on the ceiling that if shot at enough, they will fall. If anyone happens to be standing under these stalactites when this happens, they will die. | ||
*If you happen to be caught without a vehicle, head for the giant area in the middle. You'll last a lot longer. | *If you happen to be caught without a vehicle, head for the giant area in the middle. You'll last a lot longer. | ||
==Production notes== | |||
According to the original Halo 2 design document for the map, Waterworks was set in a "Forerunner drainage system inside a large natural cavern on Delta Halo with sewer bunkers and natural stream runoff to a reservoir". It was also said to utilize tunnels and long sloping pipes for its environment.{{Ref/Generic|[[:File:H2 Waterworks DesignDoc.jpg|Waterworks design document]]}} | |||
== Trivia == | == Trivia == | ||
| Line 54: | Line 58: | ||
*The moon is visible to see on this map by looking out the hole in the ceiling. | *The moon is visible to see on this map by looking out the hole in the ceiling. | ||
*If you get hit by with the stalactites, sometimes the kill will go to [[the Guardians]]. | *If you get hit by with the stalactites, sometimes the kill will go to [[the Guardians]]. | ||
*If you touch the water under the bridge or lower you will die. | *If you touch the water under the bridge or lower, you will die. | ||
*If you take a Banshee onto the piston and position yourself where the piston hits, you will be killed by the Guardians. | *If you take a Banshee onto the piston and position yourself where the piston hits, you will be killed by the Guardians. | ||
*Sometimes, when on the ground, an odd rumbling can be heard. | *Sometimes, when on the ground, an odd rumbling can be heard. | ||
*If you throw a [[ | *If you throw a [[Anskum-pattern plasma grenade|plasma grenade]] at a turret, the turret will be destroyed, but it will allow you to use it and fire it, even though there is no gun. This occurs on other maps that spawn turrets by default, such as Headlong. | ||
*Another good sniping position is on top of the base. Simply take the Banshee on top of the base and keep it there so you may easily refresh your ammo. That provides an advantage over the other sniping area near the piston. Nevertheless, they must both be reached via Banshee. | *Another good sniping position is on top of the base. Simply take the Banshee on top of the base and keep it there, so you may easily refresh your ammo. That provides an advantage over the other sniping area near the piston. Nevertheless, they must both be reached via Banshee. | ||
==Gallery== | ==Gallery== | ||
{{Linkbox|gallery=yes}} | |||
<gallery> | <gallery> | ||
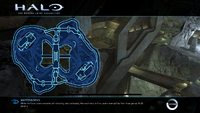
File:HMCC H2 Waterworks Map.png|Waterworks Map. | File:HMCC H2 Waterworks Map.png|Waterworks Map. | ||
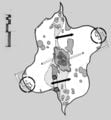
File:H2 Waterworks DesignDoc.jpg|Original design document for Waterworks. | File:H2 Waterworks DesignDoc.jpg|Original design document for Waterworks. | ||
File:H2 Waterworks Layout Concept.jpg|Concept art of one of the map's layout | File:H2 Waterworks Layout Concept.jpg|Concept art of one of the map's layout. | ||
File:H2 Waterworks Base Concept.jpg|Concept art of one of the bases on Waterworks. | File:H2 Waterworks Base Concept.jpg|Concept art of one of the bases on Waterworks. | ||
File:H2_Waterworks_RedBase.png|Red Base. | File:H2_Waterworks_RedBase.png|Red Base. | ||
Latest revision as of 09:38, March 3, 2024
| Waterworks | |
|---|---|

| |
| Map overview | |
|
Game: |
|
|
Map file name (?): |
|
| Lore information | |
|
Location: |
Unknown[1] |
| Gameplay overview | |
|
Terrain: |
Underground cavern, Forerunner |
|
Recommended number of players: |
6-16 |
|
Recommended gametype(s): |
|
| “ | While the Forerunners excelled at mimicking natural beauty, the machinery in this cavern exemplifies their true genius. | ” |
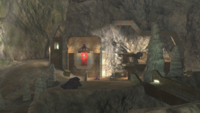
Waterworks is a Halo 2 multiplayer map.
Description[edit]
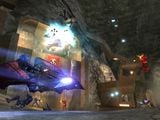
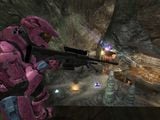
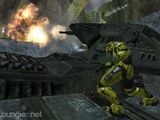
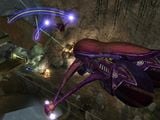
This huge map was found mostly in the Big Team Battle playlist, and is a symmetrical area with bases on either side. This map is built mainly for games of 8 versus 8 Assault and Capture the Flag. There are several stalactites hanging from the ceiling which can be brought down by shooting them repeatedly. However, if they are shot with an explosive, it will fragment and not be able to damage anything. If they hit an opposing vehicle or enemy, it is an instant kill. It is similar in many ways to the cavern parts of the campaign level, Uprising. If you are killed by the large piston in the center, you will be killed by The Guardians, although, on some occasions, the game says that you committed suicide.
Layout[edit]
Waterworks is arguably the biggest multiplayer map in Halo 2, only rivaled by Containment.
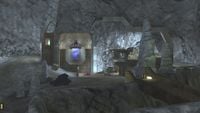
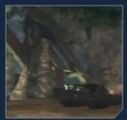
The bases have a total of three floors. The first floor has a window, some crates, and a Battle Rifle, plasma pistol, SMG, and a magnum. The second floor is unprotected but with more ammo, with a needler, sniper rifle, frag grenades, SMG, battle rifle, and a machine gun in a little protective alcove that is good for suppressing enemies. A ramp leads to the "hangar bay" that has a Banshee, a battle rifle, and a one way teleporter. In the front, there is a small parking lot that has a Warthog, Ghost, and (usually) a tank of some sort. This is the same for both bases.
The teleporters lead to a personal bridge for each team, that has a rocket launcher, an SMG, and a plasma pistol with a carbine. Both these bridges lead to the same place, but they are all pretty vulnerable to snipers and gunners.
Both these bridges end up in the same place-the bases and the piston. This place has the energy sword, a sniper rifle, a Brute Shot, a battle rifle, rocket launcher, and more. This piston also has the central bridge that connects the bases to one another.
Territories[edit]
- Center Bridge
- Red Base
- Blue Base
- Blue Bridge
- Red Bridge
Tactics[edit]
- Watch out for snipers, gunners on stationed turrets, and vehicles (If you're on foot). They'll end your livelihood very quickly.
- Always keep a flexible arsenal (i.e. battle rifle; shotgun; carbine; sniper rifle)
- The pounder has a lot of catwalks that are perfect places to snipe, provided you can reach them (via Banshee). Once there, the person should have a rocket launcher and sniper and, if they are a good sniper, would be able to command that position for the duration of the match.
- Try to make the enemy team fall off the cliff.
- Each base has its own fleet of vehicles. Put people in the Scorpion, Warthog, Ghost and Banshee. In Capture the Flag, send the smaller vehicles out for offense, while station the Scorpion along with a turret man for cover.
- It is easy to get lost on this level. Try to stay near the bases if you're new to the map.
- There are stalactites on the ceiling that if shot at enough, they will fall. If anyone happens to be standing under these stalactites when this happens, they will die.
- If you happen to be caught without a vehicle, head for the giant area in the middle. You'll last a lot longer.
Production notes[edit]
According to the original Halo 2 design document for the map, Waterworks was set in a "Forerunner drainage system inside a large natural cavern on Delta Halo with sewer bunkers and natural stream runoff to a reservoir". It was also said to utilize tunnels and long sloping pipes for its environment.[2]
Trivia[edit]
- Waterworks, along with Headlong, are the only maps in Halo 2 multiplayer that feature a ladder.
- You can shoot down the stalactites on the ceiling of the level. They will kill a player beneath them, but you must have excellent timing.
- Like on the Halo 3 map The Pit, maniacal laughing can sometimes be heard.
- The moon is visible to see on this map by looking out the hole in the ceiling.
- If you get hit by with the stalactites, sometimes the kill will go to the Guardians.
- If you touch the water under the bridge or lower, you will die.
- If you take a Banshee onto the piston and position yourself where the piston hits, you will be killed by the Guardians.
- Sometimes, when on the ground, an odd rumbling can be heard.
- If you throw a plasma grenade at a turret, the turret will be destroyed, but it will allow you to use it and fire it, even though there is no gun. This occurs on other maps that spawn turrets by default, such as Headlong.
- Another good sniping position is on top of the base. Simply take the Banshee on top of the base and keep it there, so you may easily refresh your ammo. That provides an advantage over the other sniping area near the piston. Nevertheless, they must both be reached via Banshee.
Gallery[edit]

|
Browse more images in this article's gallery page. |
Waterworks Map.
Original design document for Waterworks.
Concept art of one of the map's layout.
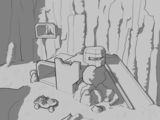
Concept art of one of the bases on Waterworks.
Red Base.
Blue Base.

Two players on Waterworks.
Original loadout picture of Waterworks in the Halo 2 Beta.
A battle on Waterworks.
A sniper on Waterworks.
A Spartan hijacking a Scorpion tank on Waterworks.
A Banshee battle on Waterworks.


| |||||||||||||||||||||||||||||||


