|
|
| (426 intermediate revisions by more than 100 users not shown) |
| Line 1: |
Line 1: |
| ==Summary ==
| | {{Status|Gameplay}} |
| {{era|H3|RVB|}} | | '''Equipment''' is a type of special gameplay item introduced in ''[[Halo 3]]'', featured in ''[[Halo 3: ODST]]'' as an enemy-only sandbox item, and again as a player-usable feature in ''[[Halo Infinite]]''. |
| {{ratings}}
| |
| [[Image:H3_Equipment.jpg|right|300px|Some examples of equipment.]]
| |
| In ''[[Halo 3]]'', [[Spartans]], [[Elites]] and [[Brutes]] can carry one item of '''equipment''' (deployed using the “X” button on the default setting of the [[Halo 3#Controls|Xbox 360 controller]]). The type of equipment varies dramatically in its purpose, functionality, and appearance. All can be used with deadly or strategic force. There may be more to find, and their availability is subject in [[Matchmaking]] rules.
| |
|
| |
|
| ==Overview== | | == Overview == |
| The philosophy of equipment is simple: to add a variety to the combat in ''[[Halo 3]]'' without unbalancing the game. The simple fact is that equipment items, once deployed, can be used by both attackers and defenders. Someone on your team might accidentally activate a [[Trip Mine]] (an explosive), and a [[Bubble Shield]], which is a geometric spherical shield – while they can’t shoot in, you can’t shoot out either. Suffice to say that equipment can turn the tide of battle if used correctly. It can be useful in [[multiplayer]] and [[campaign]].
| | While prior ''Halo'' games featured [[power-up]]s in the form of [[overshield]] and [[active camouflage]], these on-map pickups were activated immediately upon acquisition. ''Halo 3'' introduced equipment as a new addition to the "golden triangle" of ''Halo'' gameplay alongside weapons, grenades and melee. Equipment can be found in campaign and multiplayer as pickups in the game world - once picked up, they can be activated at any time with a single button press. |
|
| |
|
| To make it more balanced, it takes longer to deploy equipment than in the [[Halo 3 Beta]], but you can throw it further.{{fact}} It is not entirely clear which faction, [[Human]] or [[Covenant]], manufactures each piece of equipment, but only [[Covenant]] are seen utilizing it in the [[Halo 3 Campaign|Campaign]]. [[Covenant]] also use the human manufactured Bubble Shield.
| | == Appearances == |
| | === ''Halo 3'' === |
| | In ''Halo 3'', equipment can be found in campaign and multiplayer modes. Equipment in ''Halo 3'' are single-use pickups, and only one such item can be carried at a time. In the [[campaign]], equipment can be employed by the player and by [[Jiralhanae|Brute]] AI enemies, with several equipment pieces reserved for the campaign not available in [[multiplayer]]. Most equipment can be found in multiplayer, placed on the map like any other [[power weapon]]. The mainstay list of equipment found in multiplayer includes the [[TR/9 trip mine|trip mine]], [[Z-4190 bubble shield|bubble shield]], [[deployable cover]], [[flare]], [[Portable gravity lift|gravity lift]], [[power drain]], [[regenerator]] and [[radar jammer]]. The campaign features all the prior-listed equipment with the addition of the [[Invincibility]], [[Cloaking]] and [[Forerunner automated turret|Auto-Turret]]. Later, in [[Halo: Reach]], [[Halo 4]], [[Halo: Spartan Assault]], and [[Halo: Spartan Strike]], equipment was remade into [[Armor abilities]] |
|
| |
|
| Most theories say that the [[Forerunner]] made some of the equipment, which is true in the case of the Auto turret, but no one knows for sure. By looking at some technology of the equipment, it seems that it is not human made, so it might be very clear it is Covenant made. Equipment can be made by a human or Covenant. Equipment is very useful in tricky situations.
| | The Invincibility equipment can only be found by killing [[Jiralhanae Chieftain|Brute Chieftains]], while the Cloaking can be found on the bodies of [[Jiralhanae Stalker|Stalkers]] and on the map in some areas. The Auto-Turret is exclusively found in a handful of levels and can only be used by the player. The Auto-Turret has since seen its addition to multiplayer with the release of ''Halo 3'' on PC as part of ''[[Halo: The Master Chief Collection]]'', and can now be spawned in [[Forge/Halo 3|Forge]] mode. |
|
| |
|
| == Equipment ==
| | In ''Halo 3'' Forge, equipment can be used to [[Overload glitch (Halo 3)|overload]] a map, allowing the player to escape the map's confines. |
| ===List of Equipment===
| |
| *[[Bubble Shield]]
| |
| *[[Power Drain]]
| |
| *[[Radar Jammer]] (Not in Matchmaking)
| |
| *[[Portable_Gravity_Lift|Gravity Lift]]
| |
| *[[Trip Mine]]
| |
| *[[Flare]] (Not in Matchmaking)
| |
| *[[Regenerator]]
| |
| *[[Deployable Cover]] (Never usable in Matchmaking)
| |
| *[[Automated Turret]] (Campaign Only)
| |
| *[[Cloaking]] (Campaign Only)
| |
| *[[Invincibility (Equipment)|Invincibility]] (Campaign Only)
| |
| *[[Active Camouflage]] (Multiplayer Only)
| |
| *[[Overshield]] (Multiplayer Only)
| |
| *[[Custom Powerup]] (Multiplayer Only)
| |
|
| |
|
| ==Equipment Abilities== | | === ''Halo 3: ODST'' === |
| *[[Bubble Shield]] - The Bubble Shield releases a spherical shield around a center generator, for a limited time. No bullets, grenades, or any type of explosion can pass through the shield from inside or out way, but [[vehicles]] and players (ally AND enemy) can pass through. The Bubble Shield's generator is also very weak after it is deployed, and can be destroyed with a melee attack or a few rounds from any given weapon. Skilled players can also exploit the bubble shield from deflecting their own shots by walking just close enough to the edge of the shield that the barrel of their gun id outside of the shield and fire at enemies that way. However this meathod has a flaw, it is true the player will be safe from enemy guns, the explosive yeild of a granade is more than enough to cut this technique.
| | Almost all equipment - except for the gravity lift, auto-turret, regenerator and radar jammer - can be found again in ''Halo 3: ODST''. Unlike ''Halo 3'', equipment cannot be used by the player, and only exists within the game to be used by Brute enemies against the player. |
|
| |
|
| * [[Power Drain]] - When deployed, the Power Drain produces a blue energy field that will generally drain everyone's shields within range and if thrown near a vehicle in motion an EMP (Electromagnetic Pulse) effect occurs (similar to the EMP effect of a charged [[Plasma Pistol]] shot) which causes the vehicle to stop and, again drains the energy shields of any kind. The vehicles weapons systems are still functional. However, if you stay too close to the power source, it will eventually explode, and the explosion can kill you if you are unlucky. If you know how to use it, you can use it to disable vehicles and you can board them. It is also very useful in Close - Quarters Combat, as a good toss will result in an easy kill.
| | ===''Halo Infinite''=== |
| | [[File:HINF-Equipmentupgrademenu.png|thumb|Equipment upgrades in ''Halo Infinite''{{'}}s campaign.|250px]] |
| | ''Halo Infinite'' features the return of equipment pick-ups, with several abilities new to the series. The game's equipment includes the [[Grappleshot]], [[Drop wall]], [[Thruster (Halo Infinite)|Thruster]], [[Repair Field]], [[Repulsor]], [[Threat Sensor]], [[Threat Seeker]], and [[Shroud Screen]]. In addition to these, overshield and active camouflage have also been melded into the equipment system, now called "power equipment." Like other equipment, both the overshield and active camouflage can be picked up and held, with the player being able to activate them on demand after a short animation. On top of the overshield and active camouflage, a third power equipment called the [[Quantum Translocator]] was also added. Unlike ''Halo 3'', equipment use differs greatly between campaign and multiplayer. Four pieces of equipment in ''Halo Infinite'' can be equipped at once in campaign and recharge similar to armor abilities. This equipment can also be upgraded with Spartan cores.{{Ref/Site|Id=IIFeb2021|D=01|M=6|Y=2020|URL=https://www.halowaypoint.com/en-us/news/inside-infinite-february-2021|Site=Halo Waypoint|Page=Inside Infinite - February 2021}} In multiplayer matchmaking, only one piece of equipment can be used at a time, like in ''Halo 3'', but retains multiple uses per pickup varying on game mode.{{Ref/YouTube|https://www.youtube.com/watch?v=BgrbXe-CMaE|Channel=HALO|VideoName=#Ask343 Halo Infinite - Zeta Halo}} |
|
| |
|
| *[[Radar Jammer]] - When deployed, ghost contacts will appear on the motion sensors of anyone within the area of it, causing confusion. When moving away from the Radar Jammer, the contacts will begin to slowly disappear and eventually completely disappear. Best used in conjunction with active camo, as you can confuse opponents, and sneak up on them. It is very useful to use in close - quarters. | | ==Trivia== |
| | {{linkbox|gallery=yes|gallerypage=Images of equipment}} |
| | *In the January 2008 issue of EGM, in an interview with [[Brian Jarrard]] and [[Tyson Green]], it was revealed that there was a piece of equipment cut from the final release of ''Halo 3'' known as The Vortex. It was said to be deployed the same as a Power Drain, but would instead create a mini black hole that would "suck" in any object within range, and diverting its course into the black hole, and away from your face. It was even able to affect nearby objects such as the [[Fusion coil|Fusion Coil]] and even other players. The design was cut due to the fact that it was too "expensive" from a networking and performance standpoint.{{citation needed}} |
| | **In ''[[Halo 5: Guardians]]'', there's a [[Type-54 plasma pistol]] variant named "[[Void's Tear]]" that works similarly to this cut piece of Equipment. |
|
| |
|
| *[[Flare]] - Similar to the Radar Jammer, but instead of making your radar useless, it makes your sight useless. This creates a blinding light, resulting in all players within range losing their sight for a matter of seconds. Turning away from the power source or blocking it out in some way lessens the effect. The flare also makes you to not be able to see the radar. It isn't recommended to use it on Campaign, because enemies can still see you when you deploy it. It was used in online matchmaking, but after an update, it was removed due to causing [[lag]].
| | ==Gallery== |
| | <gallery> |
| | File:HINF Concept VisorAnimation.gif|Concept animation showing a placeholder "targeting visor" equipment for ''Halo Infinite''. |
| | File:HINF Concept VISRAnimation.gif|Concept animation visualizing how the "targeting visor" equipment could work if implemented. |
| | File:HINF Concept RocketAnimation.gif|Concept animation showing a placeholder "rocket pod" equipment. |
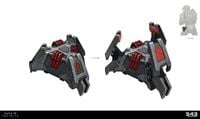
| | File:HINF Concept ShieldAnimation.gif|Concept animation showing a placeholder "shield module" equipment. |
| | File:HINF Concept ActiveCloak.jpg|Concept showing a placeholder "active cloak" equipment. |
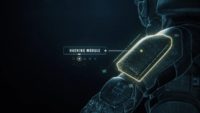
| | File:HINF Concept HackingModule.png|Concept showing a placeholder "hacking module" equipment. |
| | File:HINF Concept BanishedEquipment.jpg|Concept art of what appears to be an example of [[Banished]] equipment for ''Halo Infinite''. |
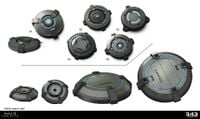
| | File:HINF Concept EquipmentPad.jpg|Concept art of the pad used to hold equipment in ''Halo Infinite''. |
| | </gallery> |
|
| |
|
| *[[Deployable Cover]] - Once deployed, this creates a relatively large energy shield, which can temporarily protect those hiding behind it. In [[Custom Games]] and [[Forge]], where as in [[Campaign]], it can last infinitely, although it can be easily destroyed by shooting the base unit. Hitting the shield itself three or so times will work too, but then you have to hit the vulnerable base to completely destroy the whole shield. The only thing that you might be vulnerable to is a [[gravity hammer]] blast or an [[energy sword]] slash because those are one hit kills and the shield is not designed to withstand such forces. It can also be used to reach higher places when jumping on it. Human projectile weapons can shoot through the back side of it, and can get safe kills from behind it. It also is a good idea that you place two together to make a shell-like shield base.
| | ==Sources== |
| | {{Ref/Sources}} |
|
| |
|
| *[[Regenerator]] - This creates a small green energy field, that is similar to the power drain's, but instead of draining your shield, it regenerates the shields of anyone within its radius, very quickly. It is wise to note that everyone within range will benefit from it, not just the person who deployed it. It differentiates from the Bubble Shield as it just creates a field of energy, instead of protecting you like the Bubble Shield does. Its effect can be described as the exact opposite of the Power Drain; however, if a Power Drain is placed next to a Regenerator, the Power Drain will overpower it. Please note that the Regenerator does NOT protect against anything that can kill in one or two hits. A sniper headshot or point blank shotgun shot, for instance, will kill you, even if you are in a Regenerator. Two melees performed immediately will also take you out, as your shields will not regenerate fast enough. So, use them wisely when in dire situations, when enemies are charging, and you need a quick shield regenerate.
| | {{Navbox/Pickups/Gameplay}} |
| | | [[Category:Equipment| ]] |
| *[[Invincibility (Equipment) | Invincibility]] - This changes your armor to have lots of white lines forming pentagons all over you much like an overshield charged 4X but instead of a dull yellowish color, invincibility is bright, vivid blue and it makes you have unlowerable shields. You can only find it in [[campaign]]. If you activated a cloaking before/after you activated the Invincibility, you will be seen. If you are against an Invincible Brute Chieftain, you can still kill it in one way, assassination hit it in the back and it will be instantly killed. You can still die using invincibility by jumping off a cliff, or getting assassinated. The Arbiter and other invulnerable characters can still kill you instantly if you kill them enough times to make them your enemy. You can get these from killing a Brute Chieftain but only if he hasn't already deployed it and it is most commonly found on the chieftain armed with grav-hammers.
| |
|
| |
| *[[Portable_Gravity_Lift|Gravity Lift]] - Once deployed, the grav-lift projects a bluish-purple anti-gravity beam which can propel players or light vehicles into the air, much like The Covenant's [[Ghost]], [[Banshee]] and [[Wraith]] lifts, as well as the Sniper platforms, but on a much smaller scale. Useful for getting to higher places you would otherwise not be able to reach. It dissipates after about 45 seconds. The Scorpion and Wraith cannot be lifted. It is excellent when trying to reach a high vantage point, and can be deployed in front of an oncoming vehicle for gut-busting results.
| |
| | |
| *[[Trip Mine]] - Once deployed, as said in its name, it is an explosive charge which reacts and explodes to movement near itself or if it is shot, effectively taking out your shields. Luckily, when deployed, it lets out a beeping warning signal and an orange light to let you know if you are near one of these, and the signal gets louder as you get closer. The trip mine in the Halo 3 beta, however, is much more powerful and sticks on to vehicles. You can try to deploy the mine upside down so the light will be dimmer and it will be darker and invisible to enemies. A safe way to walk over Trip Mines is to crouch-walk, so that the radar cannot detect you in any way unless you make a sudden movement; at this speed, the Trip Mine will not detonate, but you will be doomed if an enemy spots you trying this. A trip mine can also be used to get the Achievement [[We're in for some Chop]]. A Trip Mine is perfect on Rat's Nest, as many vehicles swerve around corners. Also, a great way to use the Mine is to place it under the wheel of a parked vehicle, as an unsuspecting group of enemies gets in, BOOM!!! Finally a Trip Mine is prone to friendly fire, so warn teammates of unexploded mines. It will instantly kill some vehicles as well as players if you are close to it.
| |
| | |
| *[[Active Camouflage]] - Like Cloaking, the Active Camouflage or Active Camo will give its user virtual invisibility for a short time. Like the Cloaking, weapons fire or radial damage will lessen the effect of the camo making the user more visible. The only difference is that it is activated instantly. Invisible players are still visible on the motion tracker. But notice that if you have an Overshield / invincibility activated at the same time, the shield will be visible.
| |
| | |
| *[[Overshield]] - The Overshield gives the user an extra layer(s) of shielding which will slowly weaken when exposed to any form of damage. When activated, the shield will slowly begin to deteriorate until the player has normal shields. When the overshield is picked up and until it is fully charged the player is completely invincible from anything short or assassinations or the guardians.
| |
| | |
| *[[Custom Powerup]] - A Custom Power up cannot be found in any maps by default, and must be placed in the map on Forge. It affects the user in various ways: good (faster speed, lower gravity, one-shot kills, invisibility, invincibility, etc...) or even bad (reduction in health, slower speed, lower damage resistance, higher gravity, instant death, lower damage done, bad weapon respawn, etc.). These settings can be activated or deactivated in the custom power up settings area in the game variant settings area. This also can be used for the long rumored agility power up, such as ninja capabilities.
| |
| | |
| == Tips ==
| |
| *Place a Bubble Shield and position a [[Sniper Rifle]] so only the end protrudes, therefore being able to snipe people without getting hurt. Another clever method is to drop a bubble shield at an approaching enemy in possession of a [[missile pod]], [[Rocket Launcher]] or [[Spartan laser]], possibly resulting in the enemy committing suicide. An extremely good tactic during a Free for All game is to get the [[Energy Sword]] or [[Shotgun]] and the Bubble Shield and deploy the Shield right in the middle of the map, and those foolish enough to attempt to kill you will soon be respawning. Bullets can't go in or out. Vehicles can still try to splatter you. The Bubble Shield blocks explosions as well. Also, you can deploy a bubble shield, wait for someone to enter, and stick them and jump out for an almost guaranteed kill.
| |
| | |
| *Don't activate Power Drains against Grunts, Drones or Hunters, as they don't have energy shields therefore the Power Drain is a waste of time on them. The only thing that would make a Power Drain useful against Grunts is that you can try to stop them in their Ghosts.
| |
| *If you use the two [[Auto Turret]'s while defending the door on the new [[Installation 04]] in ''[[Halo 3]]'', this makes fighting the [[Flood]] far easier on [[Normal]] or [[Easy]]. However, you need to destroy them before continuing because after you kill [[343 Guilty Spark]], they will try to kill you along with the [[Sentinels]]. They are especially lethal on legendary, with the beam only needing a few second to kill.
| |
| *You should deploy a Trip Mine in a close quarters area, or near or under explosive items like vehicles, for these both increase the chance of seriously hurting multiple players. Be sure to warn your team when and where you have deployed a Trip Mine to prevent a possible needless betrayal. Also deploy the Trip Mine in an area that is hard to see as it has lights on it making it easy to avoid. Trip mines also make a ticking noise the closer you are to them. Placing Trip Mines and throwing a grenade can cause massive damage to an enemy just outside of the trip range.
| |
| *You can use a [[Deployable Cover]] to help you get to higher places by using it as kind of a step stool, like for getting [[skulls]] in Campaign. If you deploy one while jumping and looking down, then in mid-air back up a bit, you can catapult yourself around the map. This is very hard to do though.
| |
| *Use Invincibility in packed areas such as a group of Brutes to keep you from dying and getting through more easily.
| |
| *On multiplayer maps with a central lift such as [[Blackout]] and [[Guardian]], place a [[Bubble Shield]] at the top of the lift. Then, throw a [[Plasma Grenade]] up the bottom of the lift. This will trap the plasma until someone uses the lift or the bubble shield dies. Anyone going up the lift will be stuck.
| |
| *Use Cloaking to be stealthy and maybe try to get a few assassinations on some enemy troops. Don't needlessly shoot someone, you are invisible remember!
| |
| *Use the [[Flare]] to blind people to easily get from one place to another.
| |
| *If you deploy a Grav Lift just before a speeding vehicle is about to hit you, the vehicle will "jump" over you, or simply splatter your head in some cases. Try making them go off a cliff.
| |
| *If you have been seen by an enemy, run to some cover and throw a [[Flare]] to blind the enemy and you can either run or fight them while they are not looking at your direction.
| |
| *Use a [[Bubble Shield]] if you have been shot or you are getting shot to take cover and recharge your shields, but be warned that they can still enter it and finish the job.
| |
| *If you deploy a [[Trip Mine]] at the indent of an enemy [[AIE-486H_Heavy_Machine_Gun|machine gun turret]], enemies might step on it as they go through, thus depleting their shields. The enemy is now vulnerable to a quick Magnum shot or Battle Rifle burst to finish him/her off. Note: If playing a team based game, be sure to alert your allies of the trap set intended for your enemies.
| |
| *Use [[Regenerator]]s if your shields are depleted and you need recharge your shields very quickly.
| |
| *If an opponent has a [[M41_SSR_MAV/AW Rocket Launcher|Rocket Launcher]], a [[Spartan Laser]] or a [[Fuel Rod Cannon]], and they are at close range and are about to fire at you, deploy a [[Bubble Shield]], if done correctly the enemy will hit the shield while very close and end up committing suicide.
| |
| *Throw a [[Power Drain]] at an enemy who has deployed a Regenerator, and it will overpower the Regenerator and instead, drain their energy bar. Shoot at them then to kill them with ease.
| |
| *Don't use the Flare on enemies in Campaign because it doesn't blind them.
| |
| *Deploy a [[Trip Mine]] at a rapidly approaching vehicle to destroy it, but try to avoid the blast and get away from the [[Trip Mine]] since it could drop your shields and result in vulnerability to enemy fire.
| |
| *If you can tell that a grenade is coming your way, then deploy a Bubble Shield. Odds are that the grenade will bounce off of the shield and back to the owner of the grenade, damaging/ killing / sticking him/her, and leaving them with weak shielding, allowing you to take them out very quickly.
| |
| *A little known fact about the Trip Mine is that it is very similar to a real player using radar. If you crouch or move slowly, as long as your dot does not show up, the Trip Mine will not recognize you. Use this tip to pass tight areas where one was deployed, or if you happen to be in the wrong place at the wrong time.
| |
| *The power drain can kill the enemy if it explodes very close to them.
| |
| *You can throw a Trip Mine at someone and it will be like a grenade and blow up the enemy. Only do this when you are desperate and you are about to die, this procedure drains your shields but damages all enemies within a 5.5 meter radius.
| |
| *While fighting against the Flood, deploy a cover in a hallway and the Flood will not pass through and you can run or pick them off.
| |
| *On [[Crow's Nest (Level)|Crow's Nest]], there is a room that contains lots of goodies such as SMGs, Magnums, Assault Rifles, etc. in the part where you have to clear the hangar for the Pelican to launch, go up all of the stairs and the room is blue with a lot of laptops. The equipment that can be found there includes Regenerators, cloaking devices, Bubble Shields, Trip Mines, Deployable Covers, Power Drains, and Flares.
| |
| *Power Drains have the ability to pass through Bubble Shields.
| |
| *A good tactic with the Trip Mine is to go to the other team's base and throw it under their vehicles. Try to communicate this to your team if you do.
| |
| *If an enemy has deployed a [[Bubble Shield]], they can still be killed safely. Throw a [[Spike Grenade]] at the very base of the dome, getting it as close as possible. If done correctly, sometimes the spikes will penetrate the shield upon detonation, killing whomever is inside.
| |
| | |
| =Trivia=
| |
| *The Bubble Shield is in effect before the deploying animation finishes.
| |
| *The overshield also makes you invincible for three seconds, though the player can still be assassinated during this state.
| |
| *Though many of these are available in [[Multiplayer]], the [[Automated Turret]], [[Cloaking]], and [[Invincibility]] are exclusive to the Campaign for balancing reasons.
| |
| *In the January 2008 issue of [[EGM]], in an interview with Brian Jarrard and Tyson Green, it was revealed that there was a piece of equipment cut from the final game known as The Vortex.{{fact}} It was said to be deployed the same as a Power Drain, but would instead create a mini black hole that would "suck" in any object within range, and diverting its course into the black hole, and away from your face. It was even able to affect nearby objects such as the [[Fusion Coil]] and even other players. The design was cut due to the fact that it was too "expensive" from a networking and performance standpoint.
| |
| *When you try to drop a Grav Lift on a vehicle or an object (like a crate on [[Forge]]), the equipment will go through the object and end up underneath it.
| |
| *Although covered by the Active Camouflage, an Auto Turret can still detect you.
| |
| *While using Active Camouflage and mounted on a [[Warthog]] turret, you can shoot and your Camouflage is not disturbed at all, unlike firing normal weapons in Campaign and Multiplayer.
| |
| *There are pieces of equipment that appear before they are said to first appear in the ''Halo 3 Official Guide'', such as the two Cloakings in [[Crow's Nest (Level)|Crow's Nest]].
| |
| *A [[Grav Lift]] can be spawned in Forge as deployable or as deployed.
| |
| *You can jump on top of the barrier emitted by the Deployable Cover. It also works to make a single or double box float if spawned inside one.
| |
| *After you have deployed a [[Trip Mine]], it is activated after 1.2 seconds and any motion near its vicinity will set it off, be it from you, your team members, or your foe.
| |
| *Shooting anything [[Plasma]]-related through a Deployable Cover will drain the cover's energy.
| |
| *Projectile weapons can be fired through Deployable Covers if you are standing behind it, but energy or plasma weapons will cause the shield to take damage.
| |
| *[[Radar Jammer]]s and [[Flare]]s are no longer usable in Matchmaking, due to glitches.
| |
| *The [[Regenerator]]'s generator can take heavy punishment, withstanding even a spike grenade.
| |
| *Shooting a Trip Mine, Radar Jammer, Power Drain, or Bubble Shield will cause it to explode.
| |
| *When you throw a Bubble Shield, it is invisible for few milliseconds, but the generator isn't and the shield still works even though invisible.
| |
| *There is a glitch in campaign where you get in the back of a Pelican and walk to the door to the cockpit, and if you throw a Deployable Cover, the Pelican will crash.
| |
| *If you deploy an auto turret in the level Halo, it turns against you after you kill [[343 Guilty Spark (Monitor)|343 Guilty Spark]].
| |
| *If you have a Radar Jammer (Power Drains and Flares also work), you can look straight down, hit X, and then A an instant later, if you do it right, then you will jump off the equipment, making it useful for getting to high places.
| |
| * In the Forge, you can manipulate the game so that you can spawn equipment continuously. Press the X button (default configuration) on the item, pressing X again and changing the Run-Time Minimum to the same number as the Number on Map while cause the item to spawn immediately after being picked up.
| |
| [[Category:Equipment]] | |