Uplift Reserve: Difference between revisions
From Halopedia, the Halo wiki
m (clean up, replaced: [[Type-26 Assault Gun Carriage → [[Type-26 Wraith (2)) |
m (→Transcript: image category and link replacements, replaced: deployable lookout tower → Covenant watchtower) |
||
| (44 intermediate revisions by 13 users not shown) | |||
| Line 1: | Line 1: | ||
{{ | {{Status|Gameplay}} | ||
{{disambig header|the campaign level|other uses|Uplift (disambiguation)}} | {{disambig header|the campaign level|other uses|Uplift (disambiguation)}} | ||
{{Level infobox | {{Level infobox | ||
|image= [[File: | |pagegamelabel=ODST | ||
|prev=''[[ | |image= [[File:H3ODST UpliftReserve Loadscreen.png|300px]] | ||
|next=''[[ | |prev=''[[Tayari Plaza]]'' | ||
|next=''[[Kizingo Boulevard]]'' | |||
|game=''[[Halo 3: ODST]]'' | |game=''[[Halo 3: ODST]]'' | ||
|devname=<code>sc110</code> | |||
|name='''''Uplift Reserve''''' | |name='''''Uplift Reserve''''' | ||
|player= [[Taylor H. Miles|Dutch]]<ref name="vidoc">'''[[Halo 3: ODST]]''' [[ViDoc]]: ''[[Halo 3: ODST ViDoc: Terra Incognita|Terra Incognita]]''</ref> | |player= [[Taylor H. Miles|Dutch]]<ref name="vidoc">'''[[Halo 3: ODST]]''' [[ViDoc]]: ''[[Halo 3: ODST ViDoc: Terra Incognita|Terra Incognita]]''</ref> | ||
|date=[[2552#October|October 20]], [[2552]], 1636 hours | |date=[[2552#October|October 20]], [[2552]], 1636 hours | ||
|place=[[Uplift Nature Reserve]], [[New Mombasa]], [[Earth]] | |place=[[Uplift Nature Reserve]], [[New Mombasa]], [[Earth]] | ||
|objective=Lead a [[M12 | |objective=Lead a [[M12 Warthog|Warthog]] charge and clear hostiles from the park. | ||
| | |partime=00:04:00 {{C|''Master Chief Collection''}} | ||
|parscore=14,000 {{C|''Master Chief Collection''}}<br/>60,000 {{C|''Halo 3: ODST''}} | |||
}} | }} | ||
{{Article | {{Article quote|Lead a Warthog charge, clear hostiles from the park.}} | ||
'''Uplift Reserve''' is the second flashback level in the ''[[Halo 3: ODST]]'' [[campaign]]. Played from [[Taylor H. Miles|Dutch]]'s point of view, it takes place in the [[Uplift Nature Reserve]] in [[New Mombasa]], as Dutch regroups with [[UNSC Marine Corps|UNSC Marine]] forces and assists them in defending the park. | '''Uplift Reserve''' is the second flashback level in the ''[[Halo 3: ODST]]'' [[campaign]]. Played from [[Taylor H. Miles|Dutch]]'s point of view, it takes place in the [[Uplift Nature Reserve]] in [[New Mombasa]], as Dutch regroups with [[UNSC Marine Corps|UNSC Marine]] forces and assists them in defending the park. | ||
Completing this level on [[Normal]] or above unlocks the [[ | Completing this level on [[Normal]] or above unlocks the character Taylor Miles for [[Firefight (Halo 3: ODST)|Firefight]].{{Ref/Reuse|vidoc}} | ||
The Firefight map [[Lost Platoon]] is based on this level, specifically the section where the player must assist [[Second Platoon (UNSC Marine Corps)|Second Platoon]]. | The Firefight map ''[[Lost Platoon]]'' is based on this level, specifically the section where the player must assist [[Second Platoon (UNSC Marine Corps)|Second Platoon]]. | ||
== Summary == | == Summary == | ||
30 minutes after the drop, as a [[F-99 | 30 minutes after the drop, as a [[F-99 Wombat|UAV]] observes Dutch walking on the beach of Uplift Reserve. He watches the aircraft fly overhead toward New Mombasa before proceeding to move out of the park through heavy [[Covenant Empire|Covenant]] resistance, including [[Zurdo-pattern Wraith|Wraiths]] and multiple other vehicles. Several [[UNSC Marine Corps|Marine]] [[platoon]]s are also present in the area, and at one point Dutch is tasked with finding one of them. While driving into the last section of the park, Dutch witnesses the collapse of the [[New Mombasa Orbital Elevator|Orbital Elevator]]. In the end, he manages to drive out of the park through a large gap in the perimeter wall caused by falling elevator debris and right into the streets of the city. | ||
==Transcript== | ==Transcript== | ||
| Line 76: | Line 37: | ||
'''30 minutes after drop''' | '''30 minutes after drop''' | ||
''Two [[F-99 | [[File:Dutch.jpg|300px|thumb|Dutch looks upwards to the sky at the [[F-99 Wombat]]s.]] | ||
''Two [[F-99 Wombat]]s fly toward the city over the Uplift Nature Reserve, one of the Drone's cameras zooms in on an [[SOEIV]] on the beach, and an [[Orbital Drop Shock Trooper|ODST]] walking away from it. The ODST is Dutch who watches the fighters fly overhead before putting his helmet on and polarizing it. The view then switches to Dutch's perspective. He unlimbers his [[M6 Spartan Laser|Spartan Laser]] and readies it.'' | |||
*'''[[Corporal]] [[Taylor H. Miles|Taylor "Dutch" Miles]]''': "Good hunting, boys... I'm keepin' my boots on the ground." | *'''[[Corporal]] [[Taylor H. Miles|Taylor "Dutch" Miles]]''': "Good hunting, boys... I'm keepin' my boots on the ground." | ||
| Line 82: | Line 44: | ||
'''{''Gameplay''}''' | '''{''Gameplay''}''' | ||
''Dutch heads up a hill to a clearing where a group of Marines are taking cover near an overturned Warthog, under fire from [[Covenant]] infantry. Mortar fire from several [[ | ''Dutch heads up a hill to a clearing where a group of Marines are taking cover near an overturned Warthog, under fire from [[Covenant]] infantry. Mortar fire from several [[Zurdo-pattern Wraith|Wraith]] tanks arch overhead as a group of [[M12 Warthog|Warthogs]] engage a unit of Covenant infantry and armor. One of the Marines near the flipped Warthog spots Dutch.'' | ||
*'''Marine #1''': "Trooper, over here! Help us secure this vehicle!" | *'''Marine #1''': "Trooper, over here! Help us secure this vehicle!" | ||
| Line 92: | Line 54: | ||
*'''Dutch''': "Affirmative." | *'''Dutch''': "Affirmative." | ||
''Dutch and the Marines mount up. The Warthog joins its compatriots and engage the Covenant force which includes a Wraith, [[ | ''Dutch and the Marines mount up. The Warthog joins its compatriots and engage the Covenant force which includes a Wraith, [[Barukaza Workshop Chopper|Choppers]] and [[Karo'etba-pattern Ghost|Ghosts]].'' | ||
*'''Marine #1''': "Watch that Chopper! Hit it head on, and it'll tear us to pieces." | *'''Marine #1''': "Watch that Chopper! Hit it head on, and it'll tear us to pieces." | ||
| Line 100: | Line 62: | ||
*'''Marine #1''': "Swing behind the Wraith! It's got less armor in back!" | *'''Marine #1''': "Swing behind the Wraith! It's got less armor in back!" | ||
''After defeating the first Wraith, another moves up and a [[ | ''After defeating the first Wraith, another moves up and a [[Kez'katu-pattern Phantom|Phantom]] arrives dropping off reinforcements; those are soon defeated as well.'' | ||
*'''Marine #1''': "Colonel! Sector's clear, and we found some backup!" | *'''Marine #1''': "Colonel! Sector's clear, and we found some backup!" | ||
| Line 112: | Line 74: | ||
*'''Dutch''': "Roger that, I'm Oscar Mike." | *'''Dutch''': "Roger that, I'm Oscar Mike." | ||
*'''Colonel (COM)''': "Where's the rest of your [[ | *'''Colonel (COM)''': "Where's the rest of your [[Alpha-Nine|team]], trooper?" | ||
*'''Dutch''': "Scattered, dead. I don't know." | *'''Dutch''': "Scattered, dead. I don't know." | ||
| Line 118: | Line 80: | ||
*'''Colonel (COM)''': "That's too bad. We're gonna need all the men we can get." | *'''Colonel (COM)''': "That's too bad. We're gonna need all the men we can get." | ||
''Dutch and the Marines move to another section of the park where they encounter ground troops consisting of [[Unggoy]] and [[Kig-Yar]] soldiers, as well as a [[Jiralhanae]] [[pack]] augmented by a [[ | ''Dutch and the Marines move to another section of the park where they encounter ground troops consisting of [[Unggoy]] and [[Kig-Yar]] soldiers, as well as a [[Jiralhanae]] [[pack]] augmented by a [[Pez'tk-pattern fuel rod gun|fuel rod gun]] wielding [[Unggoy Heavy]] near a [[Covenant watchtower]]. The Marines defeat these forces and advance, wiping out several Ghosts as well as strafing [[Type-26 Banshee|Banshees]]. The UNSC force come across a hill with a heavy Covenant force present, including several [[Rizsheda-pattern Shade|Shade]] turrets and more Choppers.'' | ||
*'''Jiralhanae''': "Stand firm! *Grunts* Don't let the humans breach our lines!" | |||
''They advance upwards, eliminating the Covenant forces as they go.'' | |||
*'''Jiralhanae''': "Warn the Chieftain! The enemy has breached our lines!" | *'''Jiralhanae''': "Warn the Chieftain! The enemy has breached our lines!" | ||
| Line 150: | Line 116: | ||
*'''Marine #2''': "Move your ass, trooper! Get across the bridge, now!" | *'''Marine #2''': "Move your ass, trooper! Get across the bridge, now!" | ||
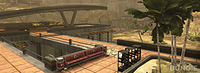
[[File:H3ODST Warthog Convoy.jpg|thumb|300px|Dutch leads a convoy of Warthogs across the bridge.]] | |||
''As Dutch and the Marines cross the bridge, the space elevator, already weakened from the Slipspace rupture, implodes in different sections and collapses, sending debris flying for miles.'' | ''As Dutch and the Marines cross the bridge, the space elevator, already weakened from the Slipspace rupture, implodes in different sections and collapses, sending debris flying for miles.'' | ||
*'''Marine #2''': "Look, the elevator! INCOMING!!!" | *'''Marine #2''': "Look, the elevator! INCOMING!!!" | ||
''A part of the elevator crashes into the building Dutch and the Marines are driving to.'' | ''A part of the elevator crashes into the building Dutch and the Marines are driving to.'' | ||
| Line 159: | Line 125: | ||
*'''Marine #2''': "Slipspace rupture! Must have weakened the support rings." | *'''Marine #2''': "Slipspace rupture! Must have weakened the support rings." | ||
''The player progresses through the building at the opposite end of the bridge. A [[Kez'katu-pattern Phantom|Phantom]] can be seen flying away from the landing zone with chains of [[Huragok|engineers]] slung underneath it.'' | |||
*'''Colonel (COM)''': "All units, ''(coughs)'' target assets are...on the move. Everyone clear the area...before more debris comes down. ''(coughs)''" | *'''Colonel (COM)''': "All units, ''(coughs)'' target assets are...on the move. Everyone clear the area...before more debris comes down. ''(coughs)''" | ||
| Line 168: | Line 136: | ||
*'''Marine #2''': "Keep driving uphill, trooper. It's the only way out!" | *'''Marine #2''': "Keep driving uphill, trooper. It's the only way out!" | ||
''Dutch and the other Marines engage more Covenant infantry and turrets, before advancing up the nearby hill. They soon | ''Dutch and the other Marines engage more Covenant infantry and turrets, before advancing up the nearby hill. They soon arrive at the assault carrier's old LZ, where a group of Marines are pinned down by more Covenant troops.'' | ||
''If Dutch hangs around the Marines, he can find Dubbo and a [[Wounded Marine]] conversing.'' | ''If Dutch hangs around the Marines, he can find Dubbo and a [[Wounded Marine]] conversing.'' | ||
| Line 192: | Line 160: | ||
*'''Dubbo''': "Only if you keep it up." | *'''Dubbo''': "Only if you keep it up." | ||
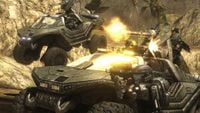
''Eventually, all Covenant units in the area are killed, and Dutch moves further up the hill. He soon reaches the top of the hill, where he encounters one final Wraith, a Jiralhanae [[War Chieftain]] and a large force of Covenant infantry.'' | [[File:H3ODST Dutch Escapes.jpg|thumb|300px|Covenant forces attacking Dutch's Warthog.]] | ||
''Eventually, all Covenant units in the area are killed, and Dutch moves further up the hill. He soon reaches the top of the hill, where he encounters one final Wraith, a Jiralhanae [[War Chieftain]] and a large force of Covenant infantry. Two more Phantoms carrying loads of Engineers leave the area near the Chieftain, one lifting off just as the player reaches the final group of Covenant near the edge of the wildlife preserve.'' | |||
*'''War Chieftain''': "Let no humans escape, to say what they have seen!" | *'''War Chieftain''': "Let no humans escape, to say what they have seen!" | ||
''Dutch engages this group of Covenant After clearing the hostiles out:'' | ''Dutch engages this group of Covenant. After clearing the hostiles out, or maneuvering around them:'' | ||
*'''Marine #2:''' "Get your vehicle over that cliff!" | *'''Marine #2:''' "Get your vehicle over that cliff!" | ||
| Line 220: | Line 189: | ||
''The view switches to a Superintendent camera that is watching as a Drone Fighter crashes into a monument. The Superintendent's avatar shows the "sad face" image. The optics detaches from the fighter and crashes to the ground, where the Rookie later finds it. Dutch gets up, helmet in one hand.'' | ''The view switches to a Superintendent camera that is watching as a Drone Fighter crashes into a monument. The Superintendent's avatar shows the "sad face" image. The optics detaches from the fighter and crashes to the ground, where the Rookie later finds it. Dutch gets up, helmet in one hand.'' | ||
*'''Dutch''': "So...was that a yes or a no?" | *'''Dutch''': "So... was that a yes or a no?" | ||
''The vehicle Dutch was driving previously explodes behind him. He turns around to face it.'' | ''The vehicle Dutch was driving previously explodes behind him. He turns around to face it.'' | ||
| Line 229: | Line 198: | ||
''Level ends.'' | ''Level ends.'' | ||
==Achievements== | |||
The following [[achievement]]s can be unlocked on Uplift Reserve across the [[Xbox 360]] and ''[[Halo: The Master Chief Collection]]'' editions of ''Halo 3: ODST''. | |||
{| class="wikitable" | |||
|- | |||
! scope="col" style="width:135px;text-align:center;" |'''''Halo: 3: ODST'' (Xbox 360)''' | |||
! scope="col" style="width:135px;text-align:center;" |'''''Halo: MCC'' (Xbox One)''' | |||
! scope="col" style="width:135px;text-align:center;" |'''''Halo: MCC'' (Steam)''' | |||
! scope="col" style="width:175px;height:20px;text-align:center;" |'''Title''' | |||
! scope="col" style="width:350px;height:20px;text-align:center;" |'''Unlock requirement''' | |||
! scope="col" style="width:200px;height:20px;text-align:center;" |'''Games''' | |||
|- | |||
|[[File:H3ODST Achievement Uplift Reserve.png|center|64px]] | |||
|[[File:HTMCC H3ODST Achievement UpliftReserve.png|center|114px]] | |||
|[[File:HTMCC H3ODST Achievement UpliftReserve Steam.jpg|center|64px]] | |||
|<center>'''[[Uplift Reserve (achievement)|Uplift Reserve]]'''</center> | |||
|Complete Uplift Reserve on [[Normal]], [[Heroic]], or [[Legendary]]. {{C|''Halo 3: ODST''}}<br/> Complete Uplift Reserve on any difficulty. {{C|''Halo: The Master Chief Collection''}} | |||
|<center>''[[Halo 3: ODST]]''<br/>''[[Halo: The Master Chief Collection]]''</center> | |||
|- | |||
|[[File:H3ODST Achievement Wraith Killer.png|center|64px]] | |||
|<center>N/A</center> | |||
|<center>N/A</center> | |||
|<center>'''[[Wraith Killer]]'''</center> | |||
|Kill all Wraiths in Uplift Reserve. | |||
|<center>''[[Halo 3: ODST]]''</center> | |||
|- | |||
|<center>N/A</center> | |||
|[[File:Floor It!.jpg|center|114px]] | |||
|[[File:HTMCC H3ODST Achievement FloorIt! Steam.jpg|center|64px]] | |||
|<center>'''[[Floor It!]]'''</center> | |||
|Beat the par time on Uplift Reserve. | |||
|<center>''[[Halo: The Master Chief Collection]]''</center> | |||
|- | |||
|<center>N/A</center> | |||
|[[File:Don't Strain Your Metaphors.jpg|center|114px]] | |||
|[[File:HTMCC H3ODST Achievement Don'tStrainYourMetaphors Steam.jpg|center|64px]] | |||
|<center>'''[[Don't Strain Your Metaphors]]'''</center> | |||
|Beat the par score on Uplift Reserve. | |||
|<center>''[[Halo: The Master Chief Collection]]''</center> | |||
|} | |||
== Trivia == | == Trivia == | ||
*This is possibly the easiest level to get [[Vidmaster Challenge: Classic]] by getting in a Ghost or Chopper and boosting until the end of the level. | *This is possibly the easiest level to get [[Vidmaster Challenge: Classic]] by getting in a Ghost or Chopper and boosting until the end of the level. | ||
*Despite the mission occurring 30 minutes after the drop, Dutch is shown just leaving his Drop pod. This could be because the landing left Dutch briefly unconscious, or his pod was briefly stuck shut like Dare's. The half-hour delay explains why the sky is not filled with the glowing blue clouds and particles, as seen by Buck immediately after the Slipspace rupture during the Tayari Plaza level. | *Despite the mission occurring 30 minutes after the drop, Dutch is shown just leaving his Drop pod. This could be because the landing left Dutch briefly unconscious, or his pod was briefly stuck shut like Dare's. The half-hour delay explains why the sky is not filled with the glowing blue clouds and particles, as seen by Buck immediately after the Slipspace rupture during the Tayari Plaza level. | ||
*In Sections A and B of the reserve, which have open beaches, [[Old Mombasa]] can be seen across the water, with barrages of anti-air fire coming from an unknown point of origin within the city. | *In Sections A and B of the reserve, which have open beaches, [[Old Mombasa]] can be seen across the water, with barrages of anti-air fire coming from an unknown point of origin within the city. | ||
*While moving into Section B of the park, just before the second major fight, allied Warthogs may stop either near the Ghost on the rock or drive around the front of the connecting tunnel. The player can move them forward, but they may drive right back to the starting area. This is probably an AI navigation error in the game code; similar idling can also occur at other narrow parts of this level. | *While moving into Section B of the park, just before the second major fight, allied Warthogs may stop either near the Ghost on the rock or drive around the front of the connecting tunnel. The player can move them forward, but they may drive right back to the starting area. This is probably an AI navigation error in the game code; similar idling can also occur at other narrow parts of this level. | ||
*When the player first encounter Shade Turrets in Section B, if | *When the player first encounter Shade Turrets in Section B, if they turns left towards the shore, they can find a dead zebra without eyeballs. Two more zebras are located near the entrance to this section. | ||
*An audio glitch occurs when the player gets a certain Checkpoint marked by a [[F-99 | *An audio glitch occurs when the player gets a certain Checkpoint marked by a [[F-99 Wombat]] passing overhead. If the player dies or reverts to that particular Checkpoint, the UAV no longer makes any noise. | ||
*Near the Covenant landing zone with the gravity lift base in Section C, [[Wounded Marine|a crazed Marine]] with a broken ankle is among the group of Marines taking cover behind a ridge. [[Chips Dubbo|Another Marine]] tries unsuccessfully to calm him down. This is a reference to the [[Paranoid Marine]] in ''[[Halo: Combat Evolved]]'' and ''[[Halo 3]]'''s [[Suicidal Marine|suicidal marine]]. | *Near the Covenant landing zone with the gravity lift base in Section C, [[Wounded Marine|a crazed Marine]] with a broken ankle is among the group of Marines taking cover behind a ridge. [[Chips Dubbo|Another Marine]] tries unsuccessfully to calm him down. This is a reference to the [[Paranoid Marine]] in ''[[Halo: Combat Evolved]]'' and ''[[Halo 3]]''{{'}}s [[Suicidal Marine|suicidal marine]]. | ||
*The Covenant landing zone appears to be an aesthetically upgraded version of the one encountered on [[ | *The Covenant landing zone appears to be an aesthetically upgraded version of the one encountered on ''[[The Truth and Reconciliation]]'' in ''Halo: Combat Evolved''. | ||
*At the level's end, whatever vehicle the player use - a Warthog, a Ghost, or a Chopper - to make the dramatic jump will appear in the ending cutscene. All will have the same speed when crashing into the wall and will explode at the same time. If the player makes the jump without a vehicle, the Warthog cutscene plays by default. Despite what vehicle the player completes in, a destroyed Warthog will always be found in the place in the square. | *At the level's end, whatever vehicle the player use - a Warthog, a Ghost, or a Chopper - to make the dramatic jump will appear in the ending cutscene. All will have the same speed when crashing into the wall and will explode at the same time. If the player makes the jump without a vehicle, the Warthog cutscene plays by default. Despite what vehicle the player completes in, a destroyed Warthog will always be found in the place in the square. | ||
*Wraiths in this level self-destruct if the pilot is killed, much like the [[ | *Wraiths in this level self-destruct if the pilot is killed, much like the [[Ogab'd-pattern anti-aircraft Wraith|Anti-Air Wraiths]] in ''Halo 3.'' However, they can be commandeered using the same [[Drive an AA Wraith|method]]. Because Wraiths were not intended for the player to use in this level, if the player drives one over the cliff using the aforementioned method, it will transform into a Warthog, a Ghost, or a Chopper. | ||
*Even if the player has a vehicle with Marines when jumping at the level's end, the end cutscene shows an empty vehicle except for Dutch. Interestingly, if the player stops his/her vehicle before the cliff, the marines will wisely exit. | *Even if the player has a vehicle with Marines when jumping at the level's end, the end cutscene shows an empty vehicle except for Dutch. Interestingly, if the player stops his/her vehicle before the cliff, the marines will wisely exit. | ||
*The player can see a section of the [[New Mombasa Coastal Highway]] while on the suspension bridge where | *The player can see a section of the [[New Mombasa Coastal Highway]] while on the suspension bridge, where they witness the collapse of the orbital elevator. The bridge itself can be spotted on a certain section of the ''[[Coastal Highway]]'' level. | ||
*The Optics Package for the Drone that crashes can be seen | *The Optics Package for the Drone that crashes can be seen at the end of the game being toyed with by Vergil. | ||
*Dutch's line "I didn't train to be a pilot" is referenced in ''[[Halo: Reach]]'' as the [[I Didn't Train to Be a Pilot|name of an achievement]]. | *Dutch's line "I didn't train to be a pilot" is referenced in ''[[Halo: Reach]]'' as the [[I Didn't Train to Be a Pilot|name of an achievement]]. | ||
==Gallery== | ==Gallery== | ||
<gallery | <gallery> | ||
File:H3ODST Menu 04 Uplift Reserve.png|Preview of the level in Halo 3: ODST menu. | |||
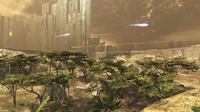
File:Warthog_charge.jpg|Part of the [[Warthog]] charge through the park. | File:Warthog_charge.jpg|Part of the [[Warthog]] charge through the park. | ||
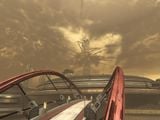
File:Reserve uplift.png|Wraith shots dominating the reserve's skyline. | |||
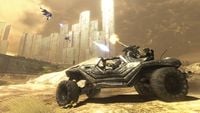
File:Reserve uplift.png|Wraith shots dominating the reserve's sky. | File:ODST UpliftReserve07.jpg|Dutch's Warthog gunner fires at Banshees in the sky. | ||
File:ohes noes.jpg|The orbital elevator collapses. | |||
File:H3ODST UpliftPhantomHuragok.jpg|A Phantom carrying Huragok flees from the park. | |||
</gallery> | </gallery> | ||
==Sources== | ==Sources== | ||
{{Ref/Sources}} | |||
{{Levels| | {{Levels|ODST}} | ||
Latest revision as of 19:43, January 30, 2024
|
Prev: |
|
|
Next: |
|
| Uplift Reserve | |
|---|---|

| |
|
Game: |
|
|
Map file name (?): |
|
|
Player: |
|
|
Date: |
October 20, 2552, 1636 hours |
|
Location: |
|
|
Objective(s): |
Lead a Warthog charge and clear hostiles from the park. |
|
Par Time: |
00:04:00 (Master Chief Collection) |
|
Par Score: |
14,000 (Master Chief Collection) |
 |
Halopedia has a walkthrough guide for this level; see Uplift Reserve/Walkthrough. |
| “ | Lead a Warthog charge, clear hostiles from the park. | ” |
Uplift Reserve is the second flashback level in the Halo 3: ODST campaign. Played from Dutch's point of view, it takes place in the Uplift Nature Reserve in New Mombasa, as Dutch regroups with UNSC Marine forces and assists them in defending the park.
Completing this level on Normal or above unlocks the character Taylor Miles for Firefight.[1]
The Firefight map Lost Platoon is based on this level, specifically the section where the player must assist Second Platoon.
Summary[edit]
30 minutes after the drop, as a UAV observes Dutch walking on the beach of Uplift Reserve. He watches the aircraft fly overhead toward New Mombasa before proceeding to move out of the park through heavy Covenant resistance, including Wraiths and multiple other vehicles. Several Marine platoons are also present in the area, and at one point Dutch is tasked with finding one of them. While driving into the last section of the park, Dutch witnesses the collapse of the Orbital Elevator. In the end, he manages to drive out of the park through a large gap in the perimeter wall caused by falling elevator debris and right into the streets of the city.
Transcript[edit]
DUTCH
Uplift Nature Reserve
30 minutes after drop

Two F-99 Wombats fly toward the city over the Uplift Nature Reserve, one of the Drone's cameras zooms in on an SOEIV on the beach, and an ODST walking away from it. The ODST is Dutch who watches the fighters fly overhead before putting his helmet on and polarizing it. The view then switches to Dutch's perspective. He unlimbers his Spartan Laser and readies it.
- Corporal Taylor "Dutch" Miles: "Good hunting, boys... I'm keepin' my boots on the ground."
{Gameplay}
Dutch heads up a hill to a clearing where a group of Marines are taking cover near an overturned Warthog, under fire from Covenant infantry. Mortar fire from several Wraith tanks arch overhead as a group of Warthogs engage a unit of Covenant infantry and armor. One of the Marines near the flipped Warthog spots Dutch.
- Marine #1: "Trooper, over here! Help us secure this vehicle!"
Together they take out the enemy infantry attacking them.
- Marine #1: "Thanks for the assist, trooper! Get this Warthog movin', our CO needs us to clear this sector."
- Dutch: "Affirmative."
Dutch and the Marines mount up. The Warthog joins its compatriots and engage the Covenant force which includes a Wraith, Choppers and Ghosts.
- Marine #1: "Watch that Chopper! Hit it head on, and it'll tear us to pieces."
- Marine #1: "Keep movin'! Don't let that Wraith take a shot at us!"
- Marine #1: "Swing behind the Wraith! It's got less armor in back!"
After defeating the first Wraith, another moves up and a Phantom arrives dropping off reinforcements; those are soon defeated as well.
- Marine #1: "Colonel! Sector's clear, and we found some backup!"
- Dutch: "ODST reporting for duty, sir!"
- Colonel (COM): "Nice of you to drop in, trooper. Head through the park to my second platoon's location! They're taking heavy casualties, need immediate assistance."
- Dutch: "Roger that, I'm Oscar Mike."
- Colonel (COM): "Where's the rest of your team, trooper?"
- Dutch: "Scattered, dead. I don't know."
- Colonel (COM): "That's too bad. We're gonna need all the men we can get."
Dutch and the Marines move to another section of the park where they encounter ground troops consisting of Unggoy and Kig-Yar soldiers, as well as a Jiralhanae pack augmented by a fuel rod gun wielding Unggoy Heavy near a Covenant watchtower. The Marines defeat these forces and advance, wiping out several Ghosts as well as strafing Banshees. The UNSC force come across a hill with a heavy Covenant force present, including several Shade turrets and more Choppers.
- Jiralhanae: "Stand firm! *Grunts* Don't let the humans breach our lines!"
They advance upwards, eliminating the Covenant forces as they go.
- Jiralhanae: "Warn the Chieftain! The enemy has breached our lines!"
A Jiralhanae tries to escape on a Ghost.
- Marine #1: "Kill that Ghost! Before it raises the alarm!"
Dutch and his allies clear the area.
- Colonel (COM): "Trooper, you're almost at second platoon's location. Give 'em a hand and push to the primary objective!"
- Dutch: "What is the objective, Colonel?"
- Colonel (COM): "You know the Covenant carrier that slipped away from the city? We need to secure its old LZ. Snatch a Tier One asset."
Dutch arrives at second platoon's location. They are under heavy fire from a number of Wraiths, along with other vehicles, Shade turrets and infantry.
- Marine #2: "Trooper, this is second platoon! See what you can do about those Wraiths!"
- Dutch: "Where's the Colonel?"
- Marine #2: "He's near the Covenant LZ! Once we clear this enemy armor, we can roll across the bridge to his location."
After a long battle, the UNSC forces begin to clear the heavy Covenant presence. Once most of the enemy force has been eliminated:
- Marine #2: "Trooper, drive toward the space elevator, it'll lead you to the bridge."
If the player takes too long:
- Marine #2: "Move your ass, trooper! Get across the bridge, now!"

As Dutch and the Marines cross the bridge, the space elevator, already weakened from the Slipspace rupture, implodes in different sections and collapses, sending debris flying for miles.
- Marine #2: "Look, the elevator! INCOMING!!!"
A part of the elevator crashes into the building Dutch and the Marines are driving to.
- Dutch: "What the hell just happened?"
- Marine #2: "Slipspace rupture! Must have weakened the support rings."
The player progresses through the building at the opposite end of the bridge. A Phantom can be seen flying away from the landing zone with chains of engineers slung underneath it.
- Colonel (COM): "All units, (coughs) target assets are...on the move. Everyone clear the area...before more debris comes down. (coughs)"
- Marine #2: "Colonel? Sir? Damn it, he's gone. Trooper, head up the hill! We gotta find a way outta this park."
If the player stops:
- Marine #2: "Keep driving uphill, trooper. It's the only way out!"
Dutch and the other Marines engage more Covenant infantry and turrets, before advancing up the nearby hill. They soon arrive at the assault carrier's old LZ, where a group of Marines are pinned down by more Covenant troops.
If Dutch hangs around the Marines, he can find Dubbo and a Wounded Marine conversing.
- Crazed Marine: "No, no, no! You're not listening! It's a zoo, okay?"
- Dubbo: "Well, technically it's a corporate-funded wildlife reserve."
- Crazed Marine: "Semantics! This whole place is one...big...cage!"
- Dubbo: "Listen, Marine. You're wounded; you need to try and relax."
- Crazed Marine: "Except we, we're the zebras. All fenced in...and ready for the slaughter!"
- Dubbo: "And the Covenant?"
- Crazed Marine: "They're the lions...RAAAR!"
- Dubbo: "Careful. I think you just strained a metaphor."
- Crazed Marine: "Oh, oh God, oh God! Is that...serious?"
- Dubbo: "Only if you keep it up."

Eventually, all Covenant units in the area are killed, and Dutch moves further up the hill. He soon reaches the top of the hill, where he encounters one final Wraith, a Jiralhanae War Chieftain and a large force of Covenant infantry. Two more Phantoms carrying loads of Engineers leave the area near the Chieftain, one lifting off just as the player reaches the final group of Covenant near the edge of the wildlife preserve.
- War Chieftain: "Let no humans escape, to say what they have seen!"
Dutch engages this group of Covenant. After clearing the hostiles out, or maneuvering around them:
- Marine #2: "Get your vehicle over that cliff!"
- Marine #2: "Found a hole in the wall, trooper! Drive right through it!"
If the player stalls:
- Marine #2: "Trooper, there's a hole! Floor it!"
If the player further stalls:
- Marine #2: "Make the jump, now!"
Dutch drives off the cliff, into the streets below.
Dutch's Warthog/Ghost/Chopper flies off the cliff and lands on the streets below, bouncing once, then crashes into a building. Dutch falls out after the bounce, and his helmet falls off.
- Dutch: "Uh, Lord? I didn't train to be a pilot. Tell me I don't have any more flying to do today."
The view switches to a Superintendent camera that is watching as a Drone Fighter crashes into a monument. The Superintendent's avatar shows the "sad face" image. The optics detaches from the fighter and crashes to the ground, where the Rookie later finds it. Dutch gets up, helmet in one hand.
- Dutch: "So... was that a yes or a no?"
The vehicle Dutch was driving previously explodes behind him. He turns around to face it.
- Dutch: "Amen."
Fades to black.
Level ends.
Achievements[edit]
The following achievements can be unlocked on Uplift Reserve across the Xbox 360 and Halo: The Master Chief Collection editions of Halo 3: ODST.
| Halo: 3: ODST (Xbox 360) | Halo: MCC (Xbox One) | Halo: MCC (Steam) | Title | Unlock requirement | Games |
|---|---|---|---|---|---|
 |
 |
 |
Complete Uplift Reserve on Normal, Heroic, or Legendary. (Halo 3: ODST) Complete Uplift Reserve on any difficulty. (Halo: The Master Chief Collection) |
Halo: The Master Chief Collection | |
 |
Kill all Wraiths in Uplift Reserve. | ||||
 |
 |
Beat the par time on Uplift Reserve. | |||
 |
 |
Beat the par score on Uplift Reserve. |
Trivia[edit]
- This is possibly the easiest level to get Vidmaster Challenge: Classic by getting in a Ghost or Chopper and boosting until the end of the level.
- Despite the mission occurring 30 minutes after the drop, Dutch is shown just leaving his Drop pod. This could be because the landing left Dutch briefly unconscious, or his pod was briefly stuck shut like Dare's. The half-hour delay explains why the sky is not filled with the glowing blue clouds and particles, as seen by Buck immediately after the Slipspace rupture during the Tayari Plaza level.
- In Sections A and B of the reserve, which have open beaches, Old Mombasa can be seen across the water, with barrages of anti-air fire coming from an unknown point of origin within the city.
- While moving into Section B of the park, just before the second major fight, allied Warthogs may stop either near the Ghost on the rock or drive around the front of the connecting tunnel. The player can move them forward, but they may drive right back to the starting area. This is probably an AI navigation error in the game code; similar idling can also occur at other narrow parts of this level.
- When the player first encounter Shade Turrets in Section B, if they turns left towards the shore, they can find a dead zebra without eyeballs. Two more zebras are located near the entrance to this section.
- An audio glitch occurs when the player gets a certain Checkpoint marked by a F-99 Wombat passing overhead. If the player dies or reverts to that particular Checkpoint, the UAV no longer makes any noise.
- Near the Covenant landing zone with the gravity lift base in Section C, a crazed Marine with a broken ankle is among the group of Marines taking cover behind a ridge. Another Marine tries unsuccessfully to calm him down. This is a reference to the Paranoid Marine in Halo: Combat Evolved and Halo 3's suicidal marine.
- The Covenant landing zone appears to be an aesthetically upgraded version of the one encountered on The Truth and Reconciliation in Halo: Combat Evolved.
- At the level's end, whatever vehicle the player use - a Warthog, a Ghost, or a Chopper - to make the dramatic jump will appear in the ending cutscene. All will have the same speed when crashing into the wall and will explode at the same time. If the player makes the jump without a vehicle, the Warthog cutscene plays by default. Despite what vehicle the player completes in, a destroyed Warthog will always be found in the place in the square.
- Wraiths in this level self-destruct if the pilot is killed, much like the Anti-Air Wraiths in Halo 3. However, they can be commandeered using the same method. Because Wraiths were not intended for the player to use in this level, if the player drives one over the cliff using the aforementioned method, it will transform into a Warthog, a Ghost, or a Chopper.
- Even if the player has a vehicle with Marines when jumping at the level's end, the end cutscene shows an empty vehicle except for Dutch. Interestingly, if the player stops his/her vehicle before the cliff, the marines will wisely exit.
- The player can see a section of the New Mombasa Coastal Highway while on the suspension bridge, where they witness the collapse of the orbital elevator. The bridge itself can be spotted on a certain section of the Coastal Highway level.
- The Optics Package for the Drone that crashes can be seen at the end of the game being toyed with by Vergil.
- Dutch's line "I didn't train to be a pilot" is referenced in Halo: Reach as the name of an achievement.
Gallery[edit]
Preview of the level in Halo 3: ODST menu.
Part of the Warthog charge through the park.
Wraith shots dominating the reserve's skyline.
Dutch's Warthog gunner fires at Banshees in the sky.
The orbital elevator collapses.
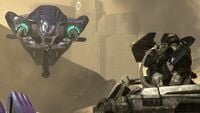
A Phantom carrying Huragok flees from the park.


Sources[edit]
| |||||||||||||||||


