Derelict: Difference between revisions
From Halopedia, the Halo wiki
(Naded? Head for an overshield) |
|||
| (65 intermediate revisions by 49 users not shown) | |||
| Line 1: | Line 1: | ||
{{ | {{Status|Gameplay}} | ||
{{Multiplayer map infobox | |||
{{Multiplayer | |||
|name=Derelict | |name=Derelict | ||
|image=[[ | |image=[[File:Halo CE Derelict.jpg|300px]] | ||
|game=''[[Halo: Combat Evolved]]'' | |game=''[[Halo: Combat Evolved]]'' | ||
|location= | |map= | ||
|terrain=2-level [[Forerunner]] | |location=Soell system, near Threshold | ||
| | |terrain=2-level [[Forerunner]] structure | ||
|symmetry= | |||
|playernumber=4-8 | |||
|gametypes= | |gametypes= | ||
*[[Slayer]] | *[[Slayer]] | ||
*[[Oddball]] | *[[Oddball]] | ||
| | *[[Capture the Flag]] | ||
|pagegamelabel=CE | |||
}} | }} | ||
{{Center|{{Article quote|Deep Space Anomaly #0198.}}}} | |||
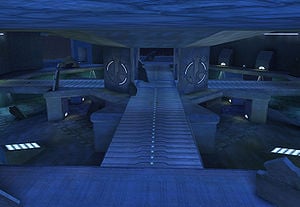
'''Derelict''' is a [[multiplayer]] map in ''[[Halo: Combat Evolved]]''. It is set aboard a Forerunner space station apparently in orbit around [[Threshold]], as the planet is visible through the windows, as well as the moon [[Basis]]. It is cataloged by the [[United Nations Space Command|UNSC]] as [[Deep-Space Anomaly 0198|Deep-Space Anomaly #0198]]. It is a very small level that is best suited for 10 or less players, as more can become extremely chaotic unless that is the desired effect. | |||
Derelict was remade as [[Desolation]] for the [[Xbox]] version of ''[[Halo 2]]''. | |||
==Summary== | |||
[[File:Derelict.jpg|left|200px||thumb|An overview of the map]] | |||
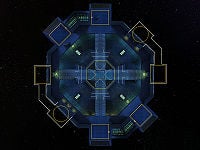
Derelict is a small symmetrical map where battle is fast and furious. The four pillars near the center of the map support a cross-shaped system of catwalks. These catwalks are accessible only by teleporter. The catwalks make excellent sniping or grenade-throwing positions, though standing still at any place on this map means inviting a swift death. | |||
In the center, on the upper level is an [[overshield]], on the lower level is a [[Health Pack]]. The [[active camouflage]] is on the upper level between two lights. The [[SRS99C-S2 AM sniper rifle|sniper rifle]] is on the area exactly opposite the Active camo before three lights. | |||
== | ==Strategies== | ||
*Players ''must'' keep a watchful eye on their HUD and radar to prevent charging into a trap, and getting attacked from behind or flanked. | |||
*[[ | *If you get stuck with a plasma grenade, head for a teleporter as fast as you can, run into the middle and grab an overshield. This way you may survive, but unfortunately, you will be stuck with 0% shields. | ||
*Grenades (especially [[M9 fragmentation grenade|frag grenades]]) are very useful on this map. In such a small map, players tend to clump together in bunches that just scream for a well-placed grenade. | |||
* | *Most combat takes place on the first floor. Jumping into a teleporter puts one on the catwalk system, which means a slight reprieve from the action. As stated above, the catwalks are good for picking enemies off from a safe distance, especially with weapons such as the pistol. Beware, though—after a few shots (or grenades), players will notice you, and a least one will probably join you on the catwalk. Start moving as soon as the enemy begins to return fire. | ||
*[[ | *Keep moving throughout the whole battle. Players who stop moving, or stop to type on Derelict die very quickly. | ||
* | *Using the side tunnels and picking up the [[M7057 flamethrower|flamethrower]] at their entrances can really help in objective based games, as everyone usually runs straight down the middle. | ||
* | *Grabbing the Overshield and dropping down into the raging battles below can be a quick and easy way to earn some kills, as the individual players will be concentrating on their opponents. Use your Radar to track enemies attempting to assassinate you. | ||
*If one should walk into a teleporter and walk backwards as they spawn, then they should walk into a small alcove behind the teleporter. If used in conjunction with the Active Camo and Sniper Rifle, this makes for an excellent hiding/sniping spot. Just remember that if you see your screen turn white, run out of the teleporter, switch to a weapon better suited to close combat, and turn around. | |||
== | ==Trivia== | ||
*[[ | *This map, along with [[Boarding Action]], are the only multiplayer maps in ''[[Halo: Combat Evolved]]'' that are set in orbit. | ||
*In the game data this map is called "Carousel" possibly because of its circular shape and the physical appearance from the top resembles a carousel as the name suggests and could have been its original name. | |||
*[[ | *The architecture of the level resembles the architecture of the containment facility in the ''Halo: Combat Evolved'' level ''[[343 Guilty Spark (level)|343 Guilty Spark]]''. | ||
*The map [[Assembly]] in ''[[Halo 3]]'' is very similar in layout to Derelict. | |||
== | ==Gallery== | ||
{{Linkbox|gallery=yes}} | |||
<gallery> | |||
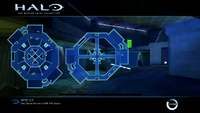
File:HMCC HCE Derelict Map.png|Derelict Map. | |||
</gallery> | |||
{{Levels|H1|mode=yes}} | |||
{{Levels}} | |||
Latest revision as of 05:17, January 20, 2024
| Derelict | |
|---|---|

| |
| Map overview | |
|
Game: |
|
| Lore information | |
|
Location: |
Soell system, near Threshold |
| Gameplay overview | |
|
Terrain: |
2-level Forerunner structure |
|
Recommended number of players: |
4-8 |
|
Recommended gametype(s): |
|
| “ | Deep Space Anomaly #0198. | ” |
Derelict is a multiplayer map in Halo: Combat Evolved. It is set aboard a Forerunner space station apparently in orbit around Threshold, as the planet is visible through the windows, as well as the moon Basis. It is cataloged by the UNSC as Deep-Space Anomaly #0198. It is a very small level that is best suited for 10 or less players, as more can become extremely chaotic unless that is the desired effect.
Derelict was remade as Desolation for the Xbox version of Halo 2.
Summary[edit]
Derelict is a small symmetrical map where battle is fast and furious. The four pillars near the center of the map support a cross-shaped system of catwalks. These catwalks are accessible only by teleporter. The catwalks make excellent sniping or grenade-throwing positions, though standing still at any place on this map means inviting a swift death.
In the center, on the upper level is an overshield, on the lower level is a Health Pack. The active camouflage is on the upper level between two lights. The sniper rifle is on the area exactly opposite the Active camo before three lights.
Strategies[edit]
- Players must keep a watchful eye on their HUD and radar to prevent charging into a trap, and getting attacked from behind or flanked.
- If you get stuck with a plasma grenade, head for a teleporter as fast as you can, run into the middle and grab an overshield. This way you may survive, but unfortunately, you will be stuck with 0% shields.
- Grenades (especially frag grenades) are very useful on this map. In such a small map, players tend to clump together in bunches that just scream for a well-placed grenade.
- Most combat takes place on the first floor. Jumping into a teleporter puts one on the catwalk system, which means a slight reprieve from the action. As stated above, the catwalks are good for picking enemies off from a safe distance, especially with weapons such as the pistol. Beware, though—after a few shots (or grenades), players will notice you, and a least one will probably join you on the catwalk. Start moving as soon as the enemy begins to return fire.
- Keep moving throughout the whole battle. Players who stop moving, or stop to type on Derelict die very quickly.
- Using the side tunnels and picking up the flamethrower at their entrances can really help in objective based games, as everyone usually runs straight down the middle.
- Grabbing the Overshield and dropping down into the raging battles below can be a quick and easy way to earn some kills, as the individual players will be concentrating on their opponents. Use your Radar to track enemies attempting to assassinate you.
- If one should walk into a teleporter and walk backwards as they spawn, then they should walk into a small alcove behind the teleporter. If used in conjunction with the Active Camo and Sniper Rifle, this makes for an excellent hiding/sniping spot. Just remember that if you see your screen turn white, run out of the teleporter, switch to a weapon better suited to close combat, and turn around.
Trivia[edit]
- This map, along with Boarding Action, are the only multiplayer maps in Halo: Combat Evolved that are set in orbit.
- In the game data this map is called "Carousel" possibly because of its circular shape and the physical appearance from the top resembles a carousel as the name suggests and could have been its original name.
- The architecture of the level resembles the architecture of the containment facility in the Halo: Combat Evolved level 343 Guilty Spark.
- The map Assembly in Halo 3 is very similar in layout to Derelict.
Gallery[edit]

|
Browse more images in this article's gallery page. |
| |||||||||||||||||||||||

