Release: Difference between revisions
From Halopedia, the Halo wiki
m (moved Release (level) to Release) |
BaconShelf (talk | contribs) |
||
| (12 intermediate revisions by 8 users not shown) | |||
| Line 1: | Line 1: | ||
{{ | {{Status|Gameplay}} | ||
{{ | {{Center|Not to be confused with [[Released]].}} | ||
{{Multiplayer map infobox | |||
{{Multiplayer | |||
|name=Release | |name=Release | ||
|image=[[File:Release3D.jpg|300px]] | |image=[[File:Release3D.jpg|300px]] | ||
|game=''[[Halo Wars]]'' | |game=''[[Halo Wars]]'' | ||
|location= [[ | |location= Presumably [[Trove]] surface | ||
|terrain=*Flood Biomass | |terrain=*Flood Biomass | ||
*Wreckage | |||
|gametypes= | |gametypes= | ||
|playernumber= 2 players | |playernumber= 1v1 (2 players) | ||
}} | }} | ||
{{Article quote|The Flood threatens to overrun this dangerous but crucially important region. Send units to activate the console near enemy's base to unleash a nasty surprise.}} | |||
'''Release''' is a [[multiplayer]] map for ''[[Halo Wars]]''.<ref>[https://www.halowars.com/GameInfo/Maps.aspx '''Official Halo Wars Community Site''': ''Skirmish Maps'']</ref> | |||
Release takes place in a Flood-dominated environment, featuring wreckage and numerous Food structures. Notably, there is a crashed {{Pattern|Mjern|agricultural support ship}} in the southwest corner of the map. The map has two [[Relic (Halo Wars)|control panels]] that players can garrison infantry units in and activated to unleash Flood units on the enemy for 600 resources. Both Flood spawn points are located near the starting base locations, but the released Flood units could attack both players. | |||
== | ==Tactics== | ||
* | * The control panel to release the Flood is on the same side as the doorway they will exit from. If the player want to maximise the chances that the Flood will attack the enemy, activate the control panel closest to the opponent's base. | ||
* | * The base location at the center of the map is defended by a [[Flood launcher]], which launches a green cloud that quickly infects most infantry. | ||
* Activating the controls takes increasing amounts of resources and can be used as many times as desired but with a short wait time of two minutes between each wave. | |||
* The first three times the control panel is activated, the swarm has more forms and the preexisting forms in greater numbers. The first swarm has infected marines and carrier forms, the second has the same along with thrasher forms, and the third has the same along with many flood swarm forms. Continued releases result in a repeat of the third wave. | |||
* The most opportune time to use them is early in a battle as infantry are easily infected, but late-game vehicles easily combat most Flood forms. | |||
* With [[leader]]s [[Ripa 'Moramee|Arbiter]] or the [[Prophet of Regret]], using the Ghastly Vision upgrade for the Arbiter or the Cloak upgrade for the Elite Honor Guard allows the player to sneak past the Flood Colonies to the other containment panel for quick occupation of the unit. | |||
==Gallery== | ==Gallery== | ||
{{Linkbox|gallery=yes}} | |||
<gallery widths="150" orientation="landscape"> | <gallery widths="150" orientation="landscape"> | ||
File:Release.jpg|A strategic map of Release. | File:Release.jpg|A strategic map of Release. | ||
File:HW1.jpg|UNSC forces engaging Flood | File:HW1.jpg|UNSC forces engaging Flood. | ||
File:HW_DSCWreck.png|The wreckage of the downed ''Mjern''-pattern support ship. | |||
File:HW Release DSCShip Full.png|A full look at the ''Mjern''-pattern vessel geometry. | |||
</gallery> | </gallery> | ||
==List of appearances== | ==List of appearances== | ||
*''[[Halo Wars]]'' | *''[[Halo Wars]]'' {{1st}} | ||
==Sources== | ==Sources== | ||
{{Ref/Sources}} | |||
{{Levels}} | {{Levels|HW|mode=yes}} | ||
Latest revision as of 08:35, February 24, 2023
| Release | |
|---|---|

| |
| Map overview | |
|
Game: |
|
| Lore information | |
|
Location: |
Presumably Trove surface |
| Gameplay overview | |
|
Terrain: |
|
|
Recommended number of players: |
1v1 (2 players) |
| “ | The Flood threatens to overrun this dangerous but crucially important region. Send units to activate the console near enemy's base to unleash a nasty surprise. | ” |
Release is a multiplayer map for Halo Wars.[1]
Release takes place in a Flood-dominated environment, featuring wreckage and numerous Food structures. Notably, there is a crashed Mjern-pattern agricultural support ship in the southwest corner of the map. The map has two control panels that players can garrison infantry units in and activated to unleash Flood units on the enemy for 600 resources. Both Flood spawn points are located near the starting base locations, but the released Flood units could attack both players.
Tactics[edit]
- The control panel to release the Flood is on the same side as the doorway they will exit from. If the player want to maximise the chances that the Flood will attack the enemy, activate the control panel closest to the opponent's base.
- The base location at the center of the map is defended by a Flood launcher, which launches a green cloud that quickly infects most infantry.
- Activating the controls takes increasing amounts of resources and can be used as many times as desired but with a short wait time of two minutes between each wave.
- The first three times the control panel is activated, the swarm has more forms and the preexisting forms in greater numbers. The first swarm has infected marines and carrier forms, the second has the same along with thrasher forms, and the third has the same along with many flood swarm forms. Continued releases result in a repeat of the third wave.
- The most opportune time to use them is early in a battle as infantry are easily infected, but late-game vehicles easily combat most Flood forms.
- With leaders Arbiter or the Prophet of Regret, using the Ghastly Vision upgrade for the Arbiter or the Cloak upgrade for the Elite Honor Guard allows the player to sneak past the Flood Colonies to the other containment panel for quick occupation of the unit.
Gallery[edit]

|
Browse more images in this article's gallery page. |
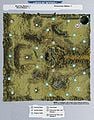
A strategic map of Release.
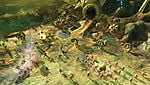
UNSC forces engaging Flood.
The wreckage of the downed Mjern-pattern support ship.

A full look at the Mjern-pattern vessel geometry.


List of appearances[edit]
- Halo Wars (First appearance)
Sources[edit]
| ||||||||||||||||||||


