Battle of the Silent Cartographer: Difference between revisions
From Halopedia, the Halo wiki
m (→Aftermath) |
(While incredibly well-written and very comprehensive, there’s a lot of details that could be condensed so the page is more of a lore page on the battle rather than a plot synopsis of the events from Halo: The Flood.) Tag: Mobile edit |
||
| Line 53: | Line 53: | ||
== The battle == | == The battle == | ||
{{Summarize}} | |||
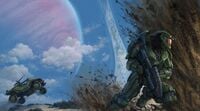
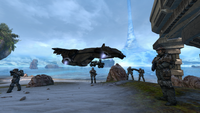
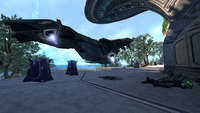
[[File:HCEA WallerBeachAssault.png|thumb|left|300px|Sergeant Waller and his Marines engaging Covenant troops on the beach.]] | [[File:HCEA WallerBeachAssault.png|thumb|left|300px|Sergeant Waller and his Marines engaging Covenant troops on the beach.]] | ||
The UNSC launched their assault on the island the following day, November 20. [[D77-TC Pelican|Pelican]]s ''[[Echo 419]]'' and ''[[Bravo 022]]'', carrying John-117 and a full squad of Marines led by [[Gunnery Sergeant]] [[Waller]], approached the island. The dropships performed at least one pass over the intended drop zone, with ''Echo 419'''s pilot, [[Carol Rawley]] using her the last of her dropship's [[M370 autocannon]]'s ammunition to kill a [[Sangheili]] before the two ships landed on the beach downwind from where the panicked Covenant soldiers waited, allowing the Master Chief and the Marines to begin their attack. In an unexpected twist, the UNSC assault force outnumbered the Covenant and within ten minutes, all of the Covenant troops on the beach were wiped out. Once the [[landing zone]] was secure, ''Echo 419'' returned, delivering an [[M12 Chaingun Warthog]]. John-117 quickly took the wheel, and along with a Marine passenger and gunner, left the beach in search of the Cartographer facility while Sergeant | The UNSC launched their assault on the island the following day, November 20. [[D77-TC Pelican|Pelican]]s ''[[Echo 419]]'' and ''[[Bravo 022]]'', carrying John-117 and a full squad of Marines led by [[Gunnery Sergeant]] [[Waller]], approached the island. The dropships performed at least one pass over the intended drop zone, with ''Echo 419'''s pilot, [[Carol Rawley]] using her the last of her dropship's [[M370 autocannon]]'s ammunition to kill a [[Sangheili]] before the two ships landed on the beach downwind from where the panicked Covenant soldiers waited, allowing the Master Chief and the Marines to begin their attack. In an unexpected twist, the UNSC assault force outnumbered the Covenant and within ten minutes, all of the Covenant troops on the beach were wiped out. Once the [[landing zone]] was secure, ''Echo 419'' returned, delivering an [[M12 Chaingun Warthog]]. John-117 quickly took the wheel, and along with a Marine passenger and gunner, left the beach in search of the Cartographer facility while Sergeant Waller and the rest of the Marines remained behind to secure the beach.{{Ref/Novel|Id=tf5|TF|Chapter=5}} | ||
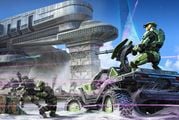
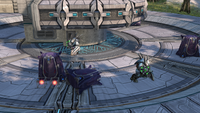
[[File:HCEA CartographerWarthog.png|thumb|right|300px|John-117's Warthog assaulting the Cartographer facility.]] | [[File:HCEA CartographerWarthog.png|thumb|right|300px|John-117's Warthog assaulting the Cartographer facility.]] | ||
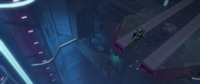
John took the Warthog around the headland and through an open area, wiping out a patrol of [[Unggoy]] and a [[Kig-Yar]] before driving uphill, spotting the entrance to the Cartographer facility once they reached the top. They witnessed a {{Pattern|Dextro Xur|Spirit}} departing from the facility. The Warthog's gunner tracked the dropship as it left but knew better than to open fire and attract its attention. John opted to leave the Warthog, motioning for the Marines to remain behind before taking cover behind a fallen log. He used his [[M6D magnum]] to take down a group of four Unggoy and a Sangheili from his vantage point, before retreating when the surviving Covenant troops spotted him and returned fire. With the opposition whittled down, he returned to the Warthog, telling the Marines to clean up the remaining forces. John drove the Warthog straight into the front of the complex, running one of the Covenant troops down while his gunner and passenger eliminated the rest of the defenders. With the outer part of the structure clear, the Master Chief left the Warthog parked in a position where the Marines could cover him before dismounting and heading deeper inside the structure, with Cortana assuring him that her analysis indicated that the map room was at the bottom floor of the facility. He passed through darkened corridors leading underground before arriving in an antechamber full of Covenant soldiers including an [[Unidentified energy sword pattern|energy sword]]-wielding Sangheili [[Sangheili Zealot|Zealot]]. John | John took the Warthog around the headland and through an open area, wiping out a patrol of [[Unggoy]] and a [[Kig-Yar]] before driving uphill, spotting the entrance to the Cartographer facility once they reached the top. They witnessed a {{Pattern|Dextro Xur|Spirit}} departing from the facility. The Warthog's gunner tracked the dropship as it left but knew better than to open fire and attract its attention. John opted to leave the Warthog, motioning for the Marines to remain behind before taking cover behind a fallen log. He used his [[M6D magnum]] to take down a group of four Unggoy and a Sangheili from his vantage point, before retreating when the surviving Covenant troops spotted him and returned fire. With the opposition whittled down, he returned to the Warthog, telling the Marines to clean up the remaining forces. John drove the Warthog straight into the front of the complex, running one of the Covenant troops down while his gunner and passenger eliminated the rest of the defenders. With the outer part of the structure clear, the Master Chief left the Warthog parked in a position where the Marines could cover him before dismounting and heading deeper inside the structure, with Cortana assuring him that her analysis indicated that the map room was at the bottom floor of the facility. He passed through darkened corridors leading underground before arriving in an antechamber full of Covenant soldiers including an [[Unidentified energy sword pattern|energy sword]]-wielding Sangheili [[Sangheili Zealot|Zealot]]. John threw a [[M9 fragmentation grenade|fragmentation grenade]] into the group of enemies and followed it with gunfire from his [[MA5B assault rifle|assault rifle]]. Before he could face off with the Zealot, the Covenant managed to seal a security door, separating the Spartan from the Zealot and halting John from proceeding further.{{Ref/Reuse|tf5}}{{Ref/Level|Id=tsc|CE|[[The Silent Cartographer]]}} | ||
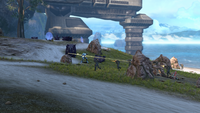
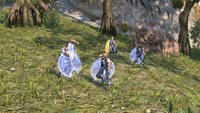
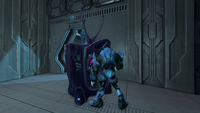
[[File:HCEA WarthogKillingCovies.png|thumb|left|300px|UNSC Marines attacking Covenant near the path leading to the security substation.]] | [[File:HCEA WarthogKillingCovies.png|thumb|left|300px|UNSC Marines attacking Covenant near the path leading to the security substation.]] | ||
After clearing out the last of the Covenant in the antechamber and confirming that the door was indeed locked, John hastily made his way back up to the surface while Cortana made contact with Captain Keyes, informing him of the situation and reported that they would have to disable the installation's security systems. The Captain, who was currently leading [[Outbreak at the Containment Facility|a separate mission]] to locate a supposed Covenant weapons cache, ordered the Master Chief and Cortana to use any means necessary to force their way into the Cartographer, as it was imperative that the UNSC secured Halo's [[Control Room (Installation 04)|control room]] before the Covenant. ''Echo 419'' reported that she was still on-station and on the lookout for Covenant aircraft while Gunnery Sergeant Waller communicated that his men were ready to roll once everybody was back on the surface. John took the Warthog around the island, passing through the LZ as he went. Cortana soon located a path leading up into the island that was defended by Covenant troops. The Master Chief quickly positioned the Warthog where it had a clear line of sight on the enemy troops and left it, quipping to Cortana that she would always tell him where to go but without mentioning the enemy forces inhabiting these locations. As he moved up the ravine, he was quickly engaged by a trio of Unggoy and their Sangheili [[Sangheili Minor|Minor]] superior, killing them within minutes. He reached the top of the ravine, pausing to allow his armor's [[energy shielding]] to recharge before a pair of [[Mgalekgolo]] burst from cover, opening fire with their [[assault cannon]]s. The first shot struck the Spartan in the chest and knocked him backwards, injuring him while the second cannon blast was stopped by a nearby tree. He managed to roll to the left, narrowly avoiding a third shot. He threw a fragmentation grenade at the Mgalekgolo, briefly confusing them while he peppered their armor with gunfire. Using the cover of a second grenade, John managed to flank around the Hunters and opened fire into the gaps in their armor at close range, killing them. He passed by a circular structure in the middle of the depression and continued down the slope towards the security station, eliminating a brace of sentries as he went. Eventually reaching the entrance to the station, the Spartan made his way into the darkened facility.{{Ref/Reuse|tf5}} | After clearing out the last of the Covenant in the antechamber and confirming that the door was indeed locked, John hastily made his way back up to the surface while Cortana made contact with Captain Keyes, informing him of the situation and reported that they would have to disable the installation's security systems. The Captain, who was currently leading [[Outbreak at the Containment Facility|a separate mission]] to locate a supposed Covenant weapons cache, ordered the Master Chief and Cortana to use any means necessary to force their way into the Cartographer, as it was imperative that the UNSC secured Halo's [[Control Room (Installation 04)|control room]] before the Covenant. ''Echo 419'' reported that she was still on-station and on the lookout for Covenant aircraft while Gunnery Sergeant Waller communicated that his men were ready to roll once everybody was back on the surface. John took the Warthog around the island, passing through the LZ as he went. Cortana soon located a path leading up into the island that was defended by Covenant troops. The Master Chief quickly positioned the Warthog where it had a clear line of sight on the enemy troops and left it, quipping to Cortana that she would always tell him where to go but without mentioning the enemy forces inhabiting these locations. As he moved up the ravine, he was quickly engaged by a trio of Unggoy and their Sangheili [[Sangheili Minor|Minor]] superior, killing them within minutes. He reached the top of the ravine, pausing to allow his armor's [[energy shielding]] to recharge before a pair of [[Mgalekgolo]] burst from cover, opening fire with their [[assault cannon]]s. The first shot struck the Spartan in the chest and knocked him backwards, injuring him while the second cannon blast was stopped by a nearby tree. He managed to roll to the left, narrowly avoiding a third shot. He threw a fragmentation grenade at the Mgalekgolo, briefly confusing them while he peppered their armor with gunfire. Using the cover of a second grenade, John managed to flank around the Hunters and opened fire into the gaps in their armor at close range, killing them. He passed by a circular structure in the middle of the depression and continued down the slope towards the security station, eliminating a brace of sentries as he went. Eventually reaching the entrance to the station, the Spartan made his way into the darkened facility.{{Ref/Reuse|tf5}} | ||
Revision as of 10:31, November 27, 2022
|
Previous: |
|||||||||||||||||||
|
Concurrent: |
|||||||||||||||||||
|
Next: |
|||||||||||||||||||
| Battle of the Silent Cartographer | |||||||||||||||||||
|---|---|---|---|---|---|---|---|---|---|---|---|---|---|---|---|---|---|---|---|

| |||||||||||||||||||
|
Conflict: |
|||||||||||||||||||
|
Date: |
|||||||||||||||||||
|
Location: |
Installation 04, Silent Cartographer Island | ||||||||||||||||||
|
Outcome: |
Tactical UNSC victory
| ||||||||||||||||||
| |||||||||||||||||||
- "It's Halo: Combat Evolved's Normandy moment"
- — Halo: The Great Journey: The Art of Building Worlds[1]
The Battle of the Silent Cartographer was a brief conflict within the larger Battle of Installation 04, in which UNSC forces spearheaded by John-117 attacked the Covenant-held island that housed the installation's Cartographer facility, in order to locate the ring's control room. The mission was a success, but at the cost of all of the Marine personnel.[Note 1]
Prelude
On the evening of September 19, John-117, alongside a unit of Marines led by Sergeant Parker, successfully raided the Ket-pattern battlecruiser Truth and Reconciliation, rescuing Captain Jacob Keyes who had been captured by the Covenant earlier that day. During his time as a prisoner, Keyes had overheard members of the Covenant discussing Halo and it's true purpose as an incredibly powerful weapon. Cortana corroborated this with information she had acquired through her infiltration of the Covenant proselytization network and they learned that the Covenant were searching for the installation's control room. Keyes declared that the ring must be prevented from falling into the hands of the Covenant, who they feared would use it to wipe out the entire human race. To this end, Keyes ordered John-117 and Cortana on a new mission; they were to locate the Silent Cartographer, an underground facility located on an island that contained a map room that would provide the location of the control room.[2][3]
Covenant Special Operations Officer Zuka 'Zamamee was granted permission to hunt down and kill the Spartan by the Council of Masters following the raid on the Truth and Reconciliation, a request he had previously been denied. Soha 'Rolamee informed 'Zamamee that it was believed that the Master Chief was the last of his kind, believing the rest to have been slain during the Fall of Reach, and he granted the officer permission to use whatever resources he needed to in order to kill the Spartan.[3] 'Zamamee studied the human raid on the Covenant cruiser, identifying Cortana's infiltration of the proselytization network and used this information to deduce the Master Chief's likely next course of action, concluding that the Spartan would likely assault the Cartographer island next. In order to kill the human, he laid a trap inside the security substation on the island; an ambush with the aid of his assistant, Yayap and a team of other Unggoy as well as a Mgalekgolo pair inside the darkened room adjacent to the security center.[4]
The battle
| This article may be too long and overly detailed. You can help by summarizing the material. |

The UNSC launched their assault on the island the following day, November 20. Pelicans Echo 419 and Bravo 022, carrying John-117 and a full squad of Marines led by Gunnery Sergeant Waller, approached the island. The dropships performed at least one pass over the intended drop zone, with Echo 419's pilot, Carol Rawley using her the last of her dropship's M370 autocannon's ammunition to kill a Sangheili before the two ships landed on the beach downwind from where the panicked Covenant soldiers waited, allowing the Master Chief and the Marines to begin their attack. In an unexpected twist, the UNSC assault force outnumbered the Covenant and within ten minutes, all of the Covenant troops on the beach were wiped out. Once the landing zone was secure, Echo 419 returned, delivering an M12 Chaingun Warthog. John-117 quickly took the wheel, and along with a Marine passenger and gunner, left the beach in search of the Cartographer facility while Sergeant Waller and the rest of the Marines remained behind to secure the beach.[4]

John took the Warthog around the headland and through an open area, wiping out a patrol of Unggoy and a Kig-Yar before driving uphill, spotting the entrance to the Cartographer facility once they reached the top. They witnessed a Dextro Xur-pattern Spirit departing from the facility. The Warthog's gunner tracked the dropship as it left but knew better than to open fire and attract its attention. John opted to leave the Warthog, motioning for the Marines to remain behind before taking cover behind a fallen log. He used his M6D magnum to take down a group of four Unggoy and a Sangheili from his vantage point, before retreating when the surviving Covenant troops spotted him and returned fire. With the opposition whittled down, he returned to the Warthog, telling the Marines to clean up the remaining forces. John drove the Warthog straight into the front of the complex, running one of the Covenant troops down while his gunner and passenger eliminated the rest of the defenders. With the outer part of the structure clear, the Master Chief left the Warthog parked in a position where the Marines could cover him before dismounting and heading deeper inside the structure, with Cortana assuring him that her analysis indicated that the map room was at the bottom floor of the facility. He passed through darkened corridors leading underground before arriving in an antechamber full of Covenant soldiers including an energy sword-wielding Sangheili Zealot. John threw a fragmentation grenade into the group of enemies and followed it with gunfire from his assault rifle. Before he could face off with the Zealot, the Covenant managed to seal a security door, separating the Spartan from the Zealot and halting John from proceeding further.[4][5]

After clearing out the last of the Covenant in the antechamber and confirming that the door was indeed locked, John hastily made his way back up to the surface while Cortana made contact with Captain Keyes, informing him of the situation and reported that they would have to disable the installation's security systems. The Captain, who was currently leading a separate mission to locate a supposed Covenant weapons cache, ordered the Master Chief and Cortana to use any means necessary to force their way into the Cartographer, as it was imperative that the UNSC secured Halo's control room before the Covenant. Echo 419 reported that she was still on-station and on the lookout for Covenant aircraft while Gunnery Sergeant Waller communicated that his men were ready to roll once everybody was back on the surface. John took the Warthog around the island, passing through the LZ as he went. Cortana soon located a path leading up into the island that was defended by Covenant troops. The Master Chief quickly positioned the Warthog where it had a clear line of sight on the enemy troops and left it, quipping to Cortana that she would always tell him where to go but without mentioning the enemy forces inhabiting these locations. As he moved up the ravine, he was quickly engaged by a trio of Unggoy and their Sangheili Minor superior, killing them within minutes. He reached the top of the ravine, pausing to allow his armor's energy shielding to recharge before a pair of Mgalekgolo burst from cover, opening fire with their assault cannons. The first shot struck the Spartan in the chest and knocked him backwards, injuring him while the second cannon blast was stopped by a nearby tree. He managed to roll to the left, narrowly avoiding a third shot. He threw a fragmentation grenade at the Mgalekgolo, briefly confusing them while he peppered their armor with gunfire. Using the cover of a second grenade, John managed to flank around the Hunters and opened fire into the gaps in their armor at close range, killing them. He passed by a circular structure in the middle of the depression and continued down the slope towards the security station, eliminating a brace of sentries as he went. Eventually reaching the entrance to the station, the Spartan made his way into the darkened facility.[4]

Zuka 'Zamamee, lurking within a cargo module along with Yayap and other Unggoy inside the substation, was listening to the radio chatter from other Covenant troops in the area as they were overwhelmed by the Spartan and he knew that the human was on its way and he prepared his forces to ambush the Master Chief. John-117 was on edge as he entered the room, rightly suspecting an ambush from enemy soldiers hidden within the maze of Covenant supply cases. Suddenly, a Mgalekgolo charged out of the darkness, attempting to smash the Spartan with its arm-mounted shield. John retaliated with a steam of fire from his assault rifle, slowing the alien's advance. 'Zamamee chose that moment to emerge from cover alongside his team of Unggoy, frightened but determined to conceal it. He attempted to aim at the Master Chief but he was unable to fire because the Mgalekgolo was in his line of fire, and a moment later the second Hunter charged in, knocking the Sangheili warrior to the floor. One of the Unggoy in the unit, Linglin, panicked and fired a bolt from his plasma pistol into the second Mgalekgolo's back, killing it and causing it to collide with its bond brother, knocking it to the floor. John took advantage of this and killed the first Hunter while it was down before killing Linglin with another burst of fire. Yayap was saved by 'Zamamee, who pulled the Grunt inside an open cargo module and told him that the battle was over and that they needed to live to fight another and the two hid as the Master Chief passed their hiding place.[4]
With the area clear but his nerves still on edge, John-117 made his way through the room and to the holographic controls for the installation's security systems. He found himself struck by his near-familiarity with the glowing controls; similarly to his interaction with the light bridge control panel during his initial actions on Installation 04.[6] With the security door leading to the Cartographer now open, the Sangheili Zealot rushed out in surprise with its energy sword at the ready.[5] As John-117 left the room, he received a desperate transmission from Pelican Bravo 022, which was under heavy enemy fire. The dropship soon crashed into a mesa opposite the security substation, and the surviving personnel were soon executed by Unggoy and Kig-Yar forces. As John passed back through the room where he had been ambushed by Zuka 'Zamamee's troops, he came under sudden attack from an active camouflaged Sangheili. Quickly recovering from the unexpected attack, the Spartan put the alien warrior down with a sustained burst of gunfire. He felt a pang of embarrassment for his tactical error of rushing into the room which he had previously cleared and had assumed was still clear, a feeling exacerbated by Cortana's presence in his suit. He quickly made his way out of the structure and made his way down the slope, killing the Unggoy and Kig-Yar patrolling the nearby mesa. He soon located Bravo 022's wreckage half-buried in the side of the mesa. He quickly discovered the bodies of UNSC personnel nearby, many bearing plasma burns from their executions by the enemy which angered the Spartan. Cortana reported that Bravo 022 had been ferrying in heavy weapons in response to the presence of Mgalekgolo troops on the island, and urged the Spartan to take a rocket launcher, which he did. He also flipped the dropship's Warthog over which had come loose during the Pelican's final moments of flight and took it back to the landing zone.[4][5]

During his incursions into the island, Gunnery Sergeant Waller and his men had endured two separate Covenant assaults on the landing zone but they still held control of the area and remained undeterred. A Marine corporal took the Warthog's gunner position while Private Hosky took the passenger seat, carrying a captured plasma rifle. The three then set off for the opened Cartographer facility. During this time, the Covenant had reinforced the Cartographer's perimeter, stationing several troops including the Mgalekgolo bonded pair Igido Nosa Hurru and Ogada Nosa Fasu. Zuka 'Zamamee had warned them that the Spartan had already killed two of their fellow Hunters and was on his way to attack their position next, something that Hurru was eagerly anticipating, seeking the honor of killing the human.[4][7]
As the Spartan's Warthog approached, Fasu fired a blast from his assault cannon, knocking the Warthog over and throwing all three of its occupants free. Fasu dropped down from the platform and approached the humans. The corporal, who had never faced a Hunter before, recklessly began to attack the beast even as John yelled at the two Marines to fall back. Fasu charged straight through an exploding grenade thrown by the corporal and slammed into Hosky with its shield, shattering half of the bones in the man's body before finishing him off with a stomp from its armored boot. John had readied his launcher by then and was preparing to fire but his line of sight was blocked by the corporal, who was immediately killed by another shot from the Mgalekgolo's assault cannon. John fired but Fasu managed to dodge the rocket before charging the Spartan. As the Hunter closed in, John fired the second rocket. This time, the Covenant warrior was unable to dodge and the rocket exploded against his chest, killing him. Hurru, still stationed up at the Cartographer's entrance, instantly felt the loss of its bond brother and yelled in anguish. John felt an immediate pang of sorrow for the two dead Marines, blaming himself for not warning them about the possibility of facing Hunters, to which Cortana attempted to reassure him that the fault wasn't his. The Spartan made his way up to the entrance, killing several small groups of Unggoy as he went. Hurru heard him coming, and fired his assault cannon as fast as he could at the human in a mix of rage, sorrow and self-pity. As the Spartan targeted him with his rocket launcher, Hurru felt a feeling of warm relief, knowing that he was going to join his bond brother. The Spartan's rocket struck Hurru in the head, blowing it off and leaving the perimeter of the facility secure once again.[4]

John pressed into the facility, with the deaths of the two Marines still burdening his mind, and made his way through the now opened security door. He made his way down through the subterranean structure, soon coming into conflict with more Covenant troops. As he fought his way through the opposition, Cortana remarked that it seemed as though someone was tracking his progress. He soon came upon another Mgalekgolo pair defending the only way forward and he instantly blew one apart with his rocket launcher. The second Hunter hit him with splash damage from its assault cannon before taking cover behind a wall before John could target it. Suddenly, the Hunter surged forward, cutting into his armor's shoulder joint with its shield. He managed to get clear of the Mgalekgolo, and used his greater mobility to circle around the alien, putting it down with a burst of fire from his assault rifle before using a grenade to wipe out several Kig-Yar which attempted to attack him. With the area clear, John-117 disengaged the shoulder plates of his MJOLNIR armor and administered biofoam into the wound and applied a dressing to prevent blood loss from jeopardizing the mission, before popping a wake-up stim and continuing. As he pressed deeper, Echo 419 reported that two Covenant dropships were inbound to the landing zone. Gunnery Sergeant Waller ordered his men to prepare for the attack. Cortana suggested that they fall back into the structure which was more defensible but Waller replied that the Covenant were approaching too fast, and he declared that they would hold the Covenant off for as long as they could.[4] It is presumed that Sergeant Waller and his men all perished in the following firefight.[5][Note 1]

John-117 continued downwards to the bottom level of the facility, killing all of the Covenant soldiers he encountered until he found the map room itself. He gunned down a final Sangheili guard before accessing the display, once again instinctively knowing how to interact with it. Cortana quickly identified the location of the installation's control room but when she tried to inform Captain Keyes, she was unable to establish contact. Echo 419 cut in, informing Cortana and John that the Captain had dropped out of contact. Cortana replied, telling her to keep trying to contact him, asking Rawley to tell him that her and John had located the Halo's control room, and that they would be heading there as soon as they returned to the surface.[4] With that, the Master Chief made his way back up through the Cartographer facility, battling through newly-arrived Covenant reinforcements as he went. As he approached the security door he had unlocked earlier, he was confronted by the Sangheili Zealot, who he managed to kill after a short battle. Upon reaching the surface, a Spirit dropship deployed a final group of Stealth Sangheili before departing. John fought through the camouflaged Elites and made his way to the exterior platform in time for Echo 419 to arrive to extract him.[5]
John boarded the Pelican and as it lifted off from the platform, Cortana gave Rawley the coordinates to the control center, which to the pilot's shock, were underground. Cortana replied that using data she had acquired from the Covenant Proselytization network, she had learned that Halo's interior was honeycombed with large tunnels that covered the entire ring. Despite her reservations about the AI's plan, Rawley piloted Echo 419 towards the entrance to one such tunnel, which was in fact the large circular structure where John had first fought Mgalekgolo on the island. The structure slid aside, revealing a deep vertical tunnel stretching underground. Echo 419 descended into the tunnel, which sealed back up after her.[5] While she was still uncomfortable with Cortana's plan, she managed to traverse her way through the tunnels, with some reassurance from John-117, and eventually brought him to an underground platform in the vicinity of the control center.[8][9]
Aftermath
With the coordinates of Installation 04's control room acquired, John-117 successfully performed an aerial insertion from underground, catching Covenant forces by surprise and eventually battled his way to the control room itself. There, he inserted Cortana into the installation's core systems, where she quickly realized the truth about the supposed "weapons cache" that Captain Keyes was searching for. Realising the peril that Keyes was in, she had John immediately make his way to the captains last known location.[8]
Following his failure to kill the Master Chief, Zuka 'Zamamee returned to the Council of Masters on board the Truth and Reconciliation. The Prophet of Stewardship presented him with 'Rolamee's severed head; the Prophet having executed him for failing to keep the Flood parasite contained. He threatened 'Zamamee with a similar fate should he fail to kill the Spartan. 'Zamamee successfully convinced the Prophet that he had a new plan to kill the human and was permitted to leave alive.[10]
Trivia
- It is not stated in Halo: The Flood how many factual Marines participated in the battle, but in the game you are given a varying number depending on the difficulty you are on. Easy will give you nine, but Heroic will give you seven.
- The book only mentions two Warthogs and not the wrecked one you find by the beach in the game.
- The fate of the two squads that accompanied the Chief to the island is unknown, although they are believed to have suffered heavy casualties in both the initial beach assault and in assisting the Chief on his daredevil insertions underground. However, if the player heads back to where the Marines previously were, they will find their bodies scattered on the beach head.
- The iconic beach landing inspired the Warzone simulation Raid on Apex 7 in Halo 5: Guardians.[11]
Gallery

Pelicans drop John-117 and Marines into hot combat.
John-117 storms the beach.
John-117 mounts the gunner seat of the Warthog during the battle.
Gunnery Sergeant Waller and his men on board Echo 419.
UNSC Marines engaging Covenant on the beach.
Echo 419 deploying a Warthog.
A group of Kig-Yar near the security substation.
A pair of Mgalekgolo stationed along the path leading to the security substation.
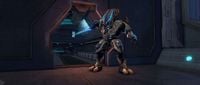
A Sangheili Zealot guarding the doorway leading into the Cartographer facility.
John-117 kicks an Unggoy rebreather down the seemingly bottomless shaft.
A Sangheili Minor operating a Covenant comm node within the Cartographer facility.
Echo 419 arriving at the facility to extract the Master Chief.


List of appearances
- Halo: Combat Evolved (First appearance)
- Halo: The Flood
- Halo: Combat Evolved Anniversary
Notes
- ^ a b c While the fate of the Marines stationed on the beach is never elaborated on in Halo: Combat Evolved or it's novelization, if the player returns to the original landing zone at the end of The Silent Cartographer level, they can find all of the Marines there dead, so it is presumed that they were all killed.
Sources
- ^ Halo: The Great Journey: The Art of Building Worlds, page 45
- ^ Halo: Combat Evolved, campaign level The Truth and Reconciliation
- ^ a b Halo: The Flood, chapter 4
- ^ a b c d e f g h i j Halo: The Flood, chapter 5
- ^ a b c d e f Halo: Combat Evolved, campaign level The Silent Cartographer
- ^ Halo: The Flood, chapter 3
- ^ Halo Waypoint, Canon Fodder - High Value Histories (Retrieved on Sep 6, 2022) [archive]
- ^ a b Halo: Combat Evolved, campaign level Assault on the Control Room
- ^ Memory Agent, episode Chapter 3: We Deliver
- ^ Halo: The Flood, chapter 7
- ^ Halo Waypoint: San-Diego Comic-Con and A Hero Reborn ViDoc released
| ||||||||||||||


