Kizingo Boulevard: Difference between revisions
From Halopedia, the Halo wiki
| (142 intermediate revisions by 64 users not shown) | |||
| Line 1: | Line 1: | ||
{{ | {{Title|Kizingo Boulevard}} | ||
{{ | {{Status|Gameplay}} | ||
{{disambig header|the level|other uses|Kizingo Boulevard (disambiguation)}} | |||
{{Level infobox | {{Level infobox | ||
|image=[[ | |pagegamelabel=ODST | ||
|prev= [[ | |image=[[File:H3ODST KizingoBoulevard Loadscreen.png|300px]] | ||
|next= [[ | |prev= ''[[Uplift Reserve]]'' | ||
|next= ''[[ONI Alpha Site]]'' | |||
|game=''[[Halo 3: ODST]]'' | |game=''[[Halo 3: ODST]]'' | ||
|devname=<code>sc120</code> | |||
|name='''''Kizingo Boulevard''''' | |name='''''Kizingo Boulevard''''' | ||
|player=[[Michael Crespo|Mickey]] | |player=[[Michael Crespo|Mickey]] | ||
|date=[[2552 #October|October 20, 2552]] | |date=[[2552#October|October 20, 2552]], 1736 hours | ||
|place=[[Kizingo]] [[Kizingo Boulevard ( | |place=[[Kizingo]] [[Kizingo Boulevard (location)|Boulevard]], [[New Mombasa]], [[Earth]] | ||
| | |objective=Drive the Scorpion through the city and escort Marines to the rally point. | ||
| | |partime=00:09:00 {{C|''Master Chief Collection''}} | ||
|parscore=18,000 {{C|''Master Chief Collection''}}<br/>75,000 {{C|''Halo 3: ODST''}} | |||
}} | }} | ||
{{Article quote|Scorpion rampage through the heart of the city.}} | |||
'''Kizingo Boulevard''' is | '''Kizingo Boulevard''' is the third [[campaign]] flashback level in ''[[Halo 3: ODST]]''. The level takes place in the [[Kizingo|Kizingo District]] of [[New Mombasa]], on the [[Kizingo Boulevard (location)|Kizingo Boulevard]], during daytime. This is the only level where the player takes the role of [[Michael Crespo|Michael "Mickey" Crespo]]. | ||
Completing the level on [[Normal]] or higher unlocks [[Michael Crespo|Mickey]] for use in [[Firefight (Halo 3: ODST)|Firefight]]. | |||
The [[Firefight (Halo 3: ODST)|Firefight]] level ''[[Rally Point]]'' is based on the end of this level. | |||
== Summary == | == Summary == | ||
90 minutes after the drop, | 90 minutes after the drop, Crespo finds himself in the middle of a fierce battle between the [[Covenant]] and the [[United Nations Space Command|UNSC]]. He commandeers a [[M808C Scorpion|Scorpion Tank]] and fights his way along the Kizingo Boulevard with the aid of other [[UNSC Marine Corps|UNSC Marines]]. Eventually, he and [[Taylor H. Miles|Dutch]] meet up at a [[Rally Point|rally point]] at the entrance to the [[ONI Alpha Site (location)|ONI Alpha Site]], where they defend the area against waves of Covenant attackers. After the battle, Mickey proposes that they hole up and wait for backup, before an [[New Mombasa Police Department|NMPD]] officer comes asking if they know how to use explosives. Mickey and Dutch decide to follow the officer into the [[Office of Naval Intelligence|ONI]] facility. | ||
== Transcript == | |||
[http://youtu.be/RgCd4X1kO20 '''{''Cutscene''}'''] | |||
'''MICKEY''' | |||
'''Kizingo Boulevard''' | |||
''90 Minutes after drop'' | |||
''[[Mickey]] is seen running down a street littered with the debris of recent combat. Overturned and smoking vehicles litter the street while the corpse of a [[Jiralhanae]] lies with its arm dangling down from an overhead pedestrian walkway. Just as he reaches a junction, a [[M808 Main Battle Tank|Scorpion Tank]] is seen backing up at high speed, knocking a civilian truck aside. Several Marines follow.'' | |||
*'''[[Private First Class]] [[Michael Crespo|Michael "Mickey" Crespo]]''': "Hey! Where's the fight at?" | |||
[[ | *'''Marine''': "Take a guess, genius!" | ||
''Mickey walks out into the street, confused, passing by a wall riddled with [[Paegaas Workshop Spiker|Spiker]] projectiles. A [[Zurdo-pattern Wraith|Wraith]] suddenly appears from around a building. It fires a plasma mortar as its gunner fires at Mickey, who runs for cover. The mortar strikes the area that Mickey was a moment ago, destroying a civilian vehicle. The blast knocks Mickey off his feet, and causes one of the destroyed car's wheel rims to hit him in the head.'' | |||
*'''Mickey''': "Ah!" | |||
''Mickey gets back up.'' | |||
*'''Mickey''': "Son of a gun!" | |||
''As the camera cuts to a first-person viewpoint from Mickey's helmet, the Marines take cover under a building. The Scorpion continues backing up, the secondary gunner opens fire, trading shots with the Wraith's gunner.'' | |||
*'''[[Chips Dubbo]]''' ''(fires semi-automatic bursts from assault rifle)'': "Wanna live? Then get your ass out of the street!" | |||
''The Scorpion fires a shell right past Mickey's ear. He ducks and then signals the Marines''. | |||
''' | *'''Mickey''': "Wait for me!" | ||
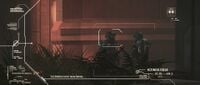
''' | '''{''Gameplay''}''' | ||
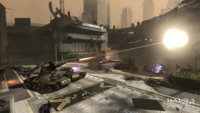
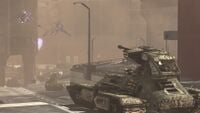
'' | [[File:ODST Campaign Kizingo01.jpg|thumb|300px|Marines regroup with the Scorpion as Covenant forces descend upon them.]] | ||
''Mickey makes his way toward the Marines and Scorpion tank, while the Wraith maneuvers into a position to fire. As he advances, a massive group of Covenant infantry engage them.'' | |||
''If the player doesn't make their way to the tank the Marines will start yelling at them.'' | |||
''' | *'''Dubbo''': "Get in the tank, before it's destroyed!" | ||
''' | ''or'' | ||
*'''Dubbo''': "Get to the Scorpion tank, trooper, before the Wraith takes it out!" | |||
''' | ''If the player still doesn't get in the tank:'' | ||
*'''Dubbo''': "Come on trooper, don't let the Wraith kill our tank!" | |||
'' | ''If player stalls more and does not get into the tank:'' | ||
*'''Dubbo''': "Trooper, get into the tank and start shooting or we're screwed!" | |||
''' | ''As Mickey reaches the tank, a [[Kez'katu-pattern Phantom|Phantom]] lands down the road, and drops off a [[Karo'etba-pattern Ghost|Ghost]]. Another Wraith emerges from the street near the Phantoms landing zone, along with a [[pack]] of Jiralhanae.'' | ||
''If the player goes to the tank after they stalls too long:'' | |||
''' | *'''Dubbo''': "This Wraith is killing us, knock them dead!" | ||
''or'' | |||
'' | *'''Dubbo''': "That Wraith is killing us! Blow it to pieces!" | ||
'' | ''With the help of the tank, the UNSC forces manage to defeat all Covenant units in the area.'' | ||
*'''Marine #2''': "All right, good work, trooper! Covenant's been rollin' us back block by block. Every Marine in the city is heading for a rally point near the Naval Intelligence building. You oughta come with us." | |||
''' | *'''Mickey''': "Sure, as long as I get to drive the tank!" | ||
'' | ''The tank makes its way through the streets, engaging more Covenant troops including Ghosts and infantry ambushing from the rooftops. They soon make it to a plaza, where a massive contingent of Covenant troops including Ghosts, [[Rizsheda-pattern Shade|Shade]] turrets, infantry and a [[Deployable Lookout Tower|deployable lookout tower]] have a squad of Marines pinned.'' | ||
'' | *'''Marine #2''': "We got a squad of Marines pinned down, far corner in the next plaza. It's packed with Covenant, trooper, so once you come in, don't stop movin'." | ||
'' | ''After a pitched battle, in which the Covenant are reinforced by a Phantom dropship, the UNSC eventually emerge victorious. Mickey makes contact with the new squad of Marines.'' | ||
''' | *'''Marine #2''': "Everyone pile on, we're pushin' to the rally point!" | ||
'' | *'''Female Marine''': "I spotted a whole column of Covenant armor headed in that direction." | ||
'''Marine''': | *'''Marine #2''': "Don't worry, this ODST we got - he's an artist with high explosives." | ||
'' | ''Mickey and the Marines make their way through the streets, engaging another mass of Covenant forces in another plaza. Another Phantom swoops into the area, deploying a Ghost on the road, then [[Kig-Yar Sniper]]s and [[Unggoy]] wielding [[Pez'tk-pattern fuel rod gun|fuel rod guns]] on the rooftops.'' | ||
'''Marine | *'''Female Marine''': "Snipers! Watch those rooftops!" | ||
''' | ''or'' | ||
'''Marine | *'''Female Marine''': "Fuel-rod cannon! Up high!" | ||
'' | ''With the help of Mickey's Scorpion tank, Covenant here are defeated as well:'' | ||
'''Marine | *'''Female Marine''': "Trooper, head through the doors to Kizingo Boulevard, fastest way to the rally point! Placin' a beacon on the door, let's move, trooper!" | ||
''or'' | ''or'' | ||
'''Marine | *'''Female Marine''': "Trooper, go through the doors to Kizingo Boulevard, it's the fastest way to the rally point! Somebody get a beacon on the door!" | ||
''Mickey approaches the door.'' | |||
*'''Female Marine''': "Trooper, door's unlocked, roll on through." | |||
''Mickey drives onto the boulevard, and sees two Gauss Turrets overlooking the street, one at ground level and the other at the top of a building. The turret on the roof - that the Rookie later finds - has already been disabled. A Marine trains the remaining turret down the street, where large numbers of Covenant are congregated, including a pair of Wraith tanks.'' | |||
'' | *'''Marine #3''': "Gauss Turret's hot, ready to fire!" | ||
''' | *'''[[Corporal]] [[Taylor H. Miles|Taylor "Dutch" Miles]] (COM)''': "Relax, Marine, wait 'till they're in the kill zone!" | ||
'' | ''Two Ghosts enter the roundabout.'' | ||
'''Marine #3''': | *'''Marine #3''': "Ghosts! They'll see me for sure, I-I gotta take the shot!" | ||
'''Dutch''': | *'''Dutch (COM)''': "I said hold your fire! Concentrate on the Wraiths at the end of the-" | ||
'' | ''The Marine opens fire on the Ghosts. One of the Wraiths further down the road takes notice and fires a mortar at the turret, destroying it.'' | ||
'''Dutch''': | *'''Dutch (COM)''': "Ah, hell. Back blast clear, let 'em have it!" | ||
'' | ''Dutch fires his Rocket Launcher at one of the Ghosts before discarding the emptied weapon. He then retreats to an elevated position behind a series of barriers. One of the Wraith tanks advances towards him. Mickey and the Marines engage the Covenant, who pour out of nearby buildings, and flood the streets. A [[Pek-pattern plasma cannon|plasma cannon]], Ghosts and even several [[Type-26 Banshee|Banshees]] attack Mickey and accompanying Marines. More Phantoms drop reinforcements into the area and one of the Wraith tanks takes on the Scorpion. Despite their numerical advantage, Mickey manages to wipe out these forces and drives towards Dutch's position.'' | ||
'' | *'''Mickey''': "Dutch! What are you doing up there?!" | ||
'' | ''The second Wraith, which had been focusing on Dutch, turns its attention to Mickey's tank, and drives out from behind the building to engage him.'' | ||
'' | *'''Dutch (COM)''': "I'm outta rockets! Kill that Wraith!" | ||
'' | ''If the player stalls:'' | ||
'' | *'''Dutch (COM)''': "Mickey! Shoot the Wraith, for god's sake!" | ||
''' | ''Mickey quickly destroys the tank, heads up the street, and is forced to leave the Scorpion behind due to a couple of barricades.'' | ||
'' | *'''Dutch (COM)''': "Okay, dismount, get up to my position." | ||
'' | ''Mickey dismounts and heads up the ramp on foot.'' | ||
'''Dutch''': Mickey! Over here! | *'''Dutch''': "Mickey! Over here!" | ||
''As Mickey reaches Dutch the door opens and Covenant troops pour out.'' | ''As Mickey reaches Dutch the door opens and Covenant troops pour out.'' | ||
'''Dutch''': Aw crap! Watch the door! | *'''Dutch''': "Aw crap! Watch the door!" | ||
---- | |||
''From this point on, if the player stares at Dutch, the two exchanges dialogue randomly chosen from the following lists:'' | |||
*'''Dutch''': | |||
**"Mickey, you can't have my awesome skull, but if we make it out of this, I will paint you a nice pretty pony." | |||
**"I'm ready to meet my maker, Mickey. How about you?" | |||
**"No looky-loo when there's fighting to do!" | |||
**"Well, I'm not going to hold your hand right now, Mickey." | |||
*'''Mickey''': | |||
**"Dutch, this ain't time to kid around!" | |||
**"Seriously, Dutch! Be serious!" | |||
**"Real funny, Dutch!" | |||
**"Well, you're a ball of laughs!" | |||
---- | |||
''Together Mickey and Dutch defeat the Covenant | ''Together Mickey and Dutch defeat the Covenant, and help a group of Marines further up the road clear out more Covenant troops.'' | ||
'''Dutch''': Those Covenant dropped in behind us, they must know this is our rally point! | *'''Dutch''': "Those Covenant dropped in behind us, they must know this is our rally point!" | ||
'''Mickey''': Terrific! | *'''Mickey''': "Terrific!" | ||
'''Dutch''': Come on, we got weapons and ammo on the high ground | *'''Dutch''': "Come on, we got weapons and ammo on the high ground. Move it! Move it!" | ||
''Soon more Phantoms arrive dropping off Covenant reinforcements, including a Wraith.'' | ''Soon more Phantoms arrive dropping off Covenant reinforcements, including a Wraith.'' | ||
'''Dutch''': Phantoms! Everyone find some cover! | *'''Dutch''': "Phantoms! Everyone, find some cover!" | ||
*'''Mickey''': "We got any heavy weapons for that Wraith?" | |||
---- | |||
''If the player has given Dutch a rocket launcher:'' | |||
*'''Dutch''': "I'll draw its fire, you try and board it!" | |||
''If the player did not give Dutch a rocket launcher:'' | |||
*'''Dutch''': "Negative, I'll draw its fire, you try and board it!" | |||
---- | |||
'''Dutch''': | *'''Dutch''': "Fire an overcharged plasma shot at it, then stick it with grenades!" | ||
'' | ''While the bulk of the attacking Covenant troops assault the UNSC position head-on, a group of [[Kig-Yar]] head over one of the bridges, intending to get behind the humans.'' | ||
'''Dutch''': Kill those runners, Mickey, they're tryin to flank us! | *'''Dutch''': "Kill those runners, Mickey, they're tryin' to flank us!" | ||
''After | ''After most of the Covenant troops are killed.'' | ||
'''Dutch''': Keep it up Mickey! We almost got 'em beat! | *'''Dutch''': "Keep it up, Mickey! We almost got 'em beat!" | ||
''After a hard fought battle, the Covenant troops are defeated and Mickey destroys the Wraith.'' | ''After a hard fought battle, the Covenant troops are defeated and Mickey destroys the Wraith.'' | ||
'''Dutch''': That's all of 'em | *'''Dutch''': "That's all of 'em. Way to go, Mickey! Come to my position." | ||
''Once the player arrives at Dutch's position the level ends.'' | ''Once the player arrives at Dutch's position the level ends.'' | ||
''{Cutscene}'' | [http://youtu.be/Ol_tAYZQZ6U '''{''Cutscene''}'''] | ||
''Mickey and Dutch clasp hands'' | [[File:H3ODST Mickey&Dutch.jpg|300px|thumb|Mickey and Dutch rendezvous at the rally point.]] | ||
''Mickey and Dutch clasp hands at the door to ONI Alpha Site.'' | |||
'''Dutch''': You heard from Gunny? | *'''Dutch''': "You heard from Gunny?" | ||
'''Mickey''': No | *'''Mickey''': "No. Romeo neither." | ||
''View switches to a Superintendent camera, whose avatar shows a happy face at the sight of ODSTs.'' | ''View switches to a Superintendent camera, whose avatar shows a happy face at the sight of ODSTs.'' | ||
'''Dutch''': Huh, guess it's just you and me. | *'''Dutch''': "Huh, guess it's just you and me." | ||
'''Mickey''': My vote | *'''Mickey''': "My vote? Hole up, wait for back up." | ||
''The | ''The Superintendent's avatar shows an angry face at Mickey's vote.'' | ||
''The view switches back to the ODSTs, | ''The view switches back to the ODSTs, who aim their guns at the door as it opens, an NMPD officer emerges from behind it.'' | ||
'''NMPD Officer''': Thank God! Does one of you know how to use explosives? | *'''NMPD Officer''': "Thank God! Does one of you know how to use explosives?" | ||
'''Dutch''': Your vote | *'''Dutch''': "Your vote? Just got overruled." | ||
'' | ''Dutch heads inside the tunnel. Mickey follows.'' | ||
'' | *'''Mickey''': "Ohh..." | ||
'' | ''The camera pans up to show the Office of Naval Intelligence sign.'' | ||
''Level ends.'' | |||
==Achievements== | |||
The following [[achievement]]s can be unlocked on Kizingo Boulevard across the [[Xbox 360]] and ''[[Halo: The Master Chief Collection]]'' editions of ''Halo 3: ODST''. | |||
{| class="wikitable" | |||
|- | |||
! scope="col" style="width:135px;text-align:center;" |'''''Halo: 3: ODST'' (Xbox 360)''' | |||
! scope="col" style="width:135px;text-align:center;" |'''''Halo: MCC'' (Xbox One)''' | |||
! scope="col" style="width:135px;text-align:center;" |'''''Halo: MCC'' (Steam)''' | |||
! scope="col" style="width:175px;height:20px;text-align:center;" |'''Title''' | |||
! scope="col" style="width:350px;height:20px;text-align:center;" |'''Unlock requirement''' | |||
! scope="col" style="width:200px;height:20px;text-align:center;" |'''Games''' | |||
|- | |||
|[[File:H3ODST Achievement Kizingo Boulevard.png|center|64px]] | |||
|[[File:HTMCC H3ODST Achievement KizingoBoulevard.png|center|114px]] | |||
|[[File:HTMCC H3ODST Achievement KizingoBoulevard Steam.jpg|center|64px]] | |||
|<center>'''[[Kizingo Boulevard (achievement)|Kizingo Boulevard]]'''</center> | |||
|Complete Kizingo Boulevard on [[Normal]], [[Heroic]], or [[Legendary]]. {{C|''Halo 3: ODST''}}<br/> Complete Kizingo Boulevard on any difficulty. {{C|''Halo: The Master Chief Collection''}} | |||
|<center>''[[Halo 3: ODST]]''<br/>''[[Halo: The Master Chief Collection]]''</center> | |||
|- | |||
|[[File:H3ODST Achievement Both Tubes.png|center|64px]] | |||
|<center>N/A</center> | |||
|<center>N/A</center> | |||
|<center>'''[[Both Tubes]]'''</center> | |||
|Get 10 Rocket kills on Kizingo Boulevard. | |||
|<center>''[[Halo 3: ODST]]''</center> | |||
|- | |||
|<center>N/A</center> | |||
|[[File:An Artist's Canvas.jpg|center|114px]] | |||
|[[File:HTMCC H3ODST Achievement AnArtist'sCanvas Steam.jpg|center|64px]] | |||
|<center>'''[[An Artist's Canvas]]'''</center> | |||
|Beat the par time on Kizingo Boulevard. | |||
|<center>''[[Halo: The Master Chief Collection]]''</center> | |||
|- | |||
|<center>N/A</center> | |||
|[[File:Son of a Gun.jpg|center|114px]] | |||
|[[File:HTMCC H3ODST Achievement SonofaGun Steam.jpg|center|64px]] | |||
|<center>'''[[Son of a Gun]]'''</center> | |||
|Beat the par score on Kizingo Boulevard. | |||
|<center>''[[Halo: The Master Chief Collection]]''</center> | |||
|} | |||
== | == Trivia == | ||
*According to Bungie, the main difference of this Scorpion-based mission as compared to those in the previous games is that "it's more of a close-range city fight," and the time the player controls the tank is slightly shorter. | |||
*The beacon to start this level is a ruined [[M68 Gauss Cannon|Gauss Turret]]. Though this turret is slagged automatically, a second Gauss turret is found on the lower level. The player can actually save this second turret from damage and use it to their advantage in the ensuing fight. | |||
*In the opening cutscene the Wraith comes around the street corner, but if the player quickly turn right to look behind they at the start of gameplay, the Wraith has not rounded the corner yet. | |||
*At the beginning of the level, although the Marines yell at the player to save their Scorpion from being destroyed by Wraith fire, a second, unmanned tank is also in the plaza. It is likely available for Co-op purposes and is completely ignored by the enemy unless the player or a friendly is nearby. | |||
*Players can ride on the side of the tank, unlike in ''Halo 2'' and ''3'' in which only NPCs can ride on the sides. This change reflects the fact that the player is an ODST and provides gameplay balance. | |||
*Sometimes the Marine who places the beacon on the door to Kizingo Boulevard says the two different comments at once. | |||
*It is possible, though extremely difficult, to hijack a Banshee in this level through [http://www.youtube.com/watch?v=XgY-rAQWKXk a glitch]. When the player gets inside the Banshee and fly over the wall with the 4 on it, go right and fly straight for a bit and the player will see something like a Da Vinci Egg texture on the ground (like from the eggs in Sandtrap and Sandbox). The player can also go exploring and see the 2D-render of the apparent 3D structure of the space tether and 3D buildings that are out of play zone. The player can even get inside the "blocked off" Kizingo Boulevard on the other side of the district (the area behind the plasma shield barrier). | |||
*Upon entering the area where the player meets up with Dutch, exit the Scorpion just past the blast doors and go through the open door leading into the building with the Gauss Turret that serves as this level's beacon. Both inside this building and on the ledge next to the turret are extra Rocket Launcher ammo and Frag Grenades. The former is useful for getting the [[Both Tubes]] achievement. | |||
*Although the game intends for the player to abandon the Scorpion in order to meet Dutch, the player can destroy enough of the first line of roadblocks to drive the player's tank directly up to Dutch and, to a limited extent, shell enemy forces beyond the blast doors. However, if Dutch boards an available spot on the tank, he will remain there and cannot assist him/her in the coming fight. | |||
*If a player captures a [[Karo'etba-pattern Ghost|Ghost]], they can drive it up to the rally point, where an invisible barrier will prevent them from entering the next area unless they exit the vehicle. However, it is possible to carefully melee the vehicle past the invisible barrier, where it will be possible to mount it and freely drive it for the remainder of the level. | |||
< | ==Gallery== | ||
<gallery> | |||
File:H3ODST Sector10 Rally Concept.jpg|Concept art of Marines gathering at the rally point. | |||
File:MickeyKizingoConcept.jpg|Concept art of Mickey fighting alongside Marines during the level. | |||
File:H3ODST Menu 05 Kizingo Boulevard.png|Preview of the level in ''Halo 3: ODST'' menu. | |||
File:H3ODST-KizingoBoulevardScorpionFires.png|Mickey fires the Scorpion's main cannon. | |||
File:H3ODST KizingoBoulevardBattle1.jpg|The Gauss turret fires at a Ghost in the boulevard. | |||
File:H3ODST KizingoBoulevardBattle2.jpg|Two Banshees approach Mickey's Scorpion. | |||
File:H3ODST KizingoBoulevardBattle3.jpg|Mickey's Scorpion fires at a Phantom deploying reinforcements. | |||
File:H3ODST Rally Point Combat.jpg|Mickey and Dutch firing their M7S SMGs. | |||
File:H3ODST Stacker.jpg|A Marine Sergeant leading Marines at the rally point | |||
File:Super's View.jpg|Mickey and Dutch being observed by the Superintendent. | |||
</gallery> | |||
{{Levels}} | {{Levels|ODST}} | ||
Latest revision as of 13:53, August 24, 2023
|
Prev: |
|
|
Next: |
|
| Kizingo Boulevard | |
|---|---|

| |
|
Game: |
|
|
Map file name (?): |
|
|
Player: |
|
|
Date: |
October 20, 2552, 1736 hours |
|
Location: |
|
|
Objective(s): |
Drive the Scorpion through the city and escort Marines to the rally point. |
|
Par Time: |
00:09:00 (Master Chief Collection) |
|
Par Score: |
18,000 (Master Chief Collection) |
 |
Halopedia has a walkthrough guide for this level; see Kizingo Boulevard/Walkthrough. |
| “ | Scorpion rampage through the heart of the city. | ” |
Kizingo Boulevard is the third campaign flashback level in Halo 3: ODST. The level takes place in the Kizingo District of New Mombasa, on the Kizingo Boulevard, during daytime. This is the only level where the player takes the role of Michael "Mickey" Crespo.
Completing the level on Normal or higher unlocks Mickey for use in Firefight.
The Firefight level Rally Point is based on the end of this level.
Summary[edit]
90 minutes after the drop, Crespo finds himself in the middle of a fierce battle between the Covenant and the UNSC. He commandeers a Scorpion Tank and fights his way along the Kizingo Boulevard with the aid of other UNSC Marines. Eventually, he and Dutch meet up at a rally point at the entrance to the ONI Alpha Site, where they defend the area against waves of Covenant attackers. After the battle, Mickey proposes that they hole up and wait for backup, before an NMPD officer comes asking if they know how to use explosives. Mickey and Dutch decide to follow the officer into the ONI facility.
Transcript[edit]
MICKEY
Kizingo Boulevard
90 Minutes after drop
Mickey is seen running down a street littered with the debris of recent combat. Overturned and smoking vehicles litter the street while the corpse of a Jiralhanae lies with its arm dangling down from an overhead pedestrian walkway. Just as he reaches a junction, a Scorpion Tank is seen backing up at high speed, knocking a civilian truck aside. Several Marines follow.
- Private First Class Michael "Mickey" Crespo: "Hey! Where's the fight at?"
- Marine: "Take a guess, genius!"
Mickey walks out into the street, confused, passing by a wall riddled with Spiker projectiles. A Wraith suddenly appears from around a building. It fires a plasma mortar as its gunner fires at Mickey, who runs for cover. The mortar strikes the area that Mickey was a moment ago, destroying a civilian vehicle. The blast knocks Mickey off his feet, and causes one of the destroyed car's wheel rims to hit him in the head.
- Mickey: "Ah!"
Mickey gets back up.
- Mickey: "Son of a gun!"
As the camera cuts to a first-person viewpoint from Mickey's helmet, the Marines take cover under a building. The Scorpion continues backing up, the secondary gunner opens fire, trading shots with the Wraith's gunner.
- Chips Dubbo (fires semi-automatic bursts from assault rifle): "Wanna live? Then get your ass out of the street!"
The Scorpion fires a shell right past Mickey's ear. He ducks and then signals the Marines.
- Mickey: "Wait for me!"
{Gameplay}

Mickey makes his way toward the Marines and Scorpion tank, while the Wraith maneuvers into a position to fire. As he advances, a massive group of Covenant infantry engage them.
If the player doesn't make their way to the tank the Marines will start yelling at them.
- Dubbo: "Get in the tank, before it's destroyed!"
or
- Dubbo: "Get to the Scorpion tank, trooper, before the Wraith takes it out!"
If the player still doesn't get in the tank:
- Dubbo: "Come on trooper, don't let the Wraith kill our tank!"
If player stalls more and does not get into the tank:
- Dubbo: "Trooper, get into the tank and start shooting or we're screwed!"
As Mickey reaches the tank, a Phantom lands down the road, and drops off a Ghost. Another Wraith emerges from the street near the Phantoms landing zone, along with a pack of Jiralhanae.
If the player goes to the tank after they stalls too long:
- Dubbo: "This Wraith is killing us, knock them dead!"
or
- Dubbo: "That Wraith is killing us! Blow it to pieces!"
With the help of the tank, the UNSC forces manage to defeat all Covenant units in the area.
- Marine #2: "All right, good work, trooper! Covenant's been rollin' us back block by block. Every Marine in the city is heading for a rally point near the Naval Intelligence building. You oughta come with us."
- Mickey: "Sure, as long as I get to drive the tank!"
The tank makes its way through the streets, engaging more Covenant troops including Ghosts and infantry ambushing from the rooftops. They soon make it to a plaza, where a massive contingent of Covenant troops including Ghosts, Shade turrets, infantry and a deployable lookout tower have a squad of Marines pinned.
- Marine #2: "We got a squad of Marines pinned down, far corner in the next plaza. It's packed with Covenant, trooper, so once you come in, don't stop movin'."
After a pitched battle, in which the Covenant are reinforced by a Phantom dropship, the UNSC eventually emerge victorious. Mickey makes contact with the new squad of Marines.
- Marine #2: "Everyone pile on, we're pushin' to the rally point!"
- Female Marine: "I spotted a whole column of Covenant armor headed in that direction."
- Marine #2: "Don't worry, this ODST we got - he's an artist with high explosives."
Mickey and the Marines make their way through the streets, engaging another mass of Covenant forces in another plaza. Another Phantom swoops into the area, deploying a Ghost on the road, then Kig-Yar Snipers and Unggoy wielding fuel rod guns on the rooftops.
- Female Marine: "Snipers! Watch those rooftops!"
or
- Female Marine: "Fuel-rod cannon! Up high!"
With the help of Mickey's Scorpion tank, Covenant here are defeated as well:
- Female Marine: "Trooper, head through the doors to Kizingo Boulevard, fastest way to the rally point! Placin' a beacon on the door, let's move, trooper!"
or
- Female Marine: "Trooper, go through the doors to Kizingo Boulevard, it's the fastest way to the rally point! Somebody get a beacon on the door!"
Mickey approaches the door.
- Female Marine: "Trooper, door's unlocked, roll on through."
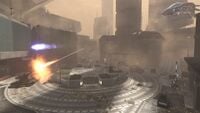
Mickey drives onto the boulevard, and sees two Gauss Turrets overlooking the street, one at ground level and the other at the top of a building. The turret on the roof - that the Rookie later finds - has already been disabled. A Marine trains the remaining turret down the street, where large numbers of Covenant are congregated, including a pair of Wraith tanks.
- Marine #3: "Gauss Turret's hot, ready to fire!"
- Corporal Taylor "Dutch" Miles (COM): "Relax, Marine, wait 'till they're in the kill zone!"
Two Ghosts enter the roundabout.
- Marine #3: "Ghosts! They'll see me for sure, I-I gotta take the shot!"
- Dutch (COM): "I said hold your fire! Concentrate on the Wraiths at the end of the-"
The Marine opens fire on the Ghosts. One of the Wraiths further down the road takes notice and fires a mortar at the turret, destroying it.
- Dutch (COM): "Ah, hell. Back blast clear, let 'em have it!"
Dutch fires his Rocket Launcher at one of the Ghosts before discarding the emptied weapon. He then retreats to an elevated position behind a series of barriers. One of the Wraith tanks advances towards him. Mickey and the Marines engage the Covenant, who pour out of nearby buildings, and flood the streets. A plasma cannon, Ghosts and even several Banshees attack Mickey and accompanying Marines. More Phantoms drop reinforcements into the area and one of the Wraith tanks takes on the Scorpion. Despite their numerical advantage, Mickey manages to wipe out these forces and drives towards Dutch's position.
- Mickey: "Dutch! What are you doing up there?!"
The second Wraith, which had been focusing on Dutch, turns its attention to Mickey's tank, and drives out from behind the building to engage him.
- Dutch (COM): "I'm outta rockets! Kill that Wraith!"
If the player stalls:
- Dutch (COM): "Mickey! Shoot the Wraith, for god's sake!"
Mickey quickly destroys the tank, heads up the street, and is forced to leave the Scorpion behind due to a couple of barricades.
- Dutch (COM): "Okay, dismount, get up to my position."
Mickey dismounts and heads up the ramp on foot.
- Dutch: "Mickey! Over here!"
As Mickey reaches Dutch the door opens and Covenant troops pour out.
- Dutch: "Aw crap! Watch the door!"
From this point on, if the player stares at Dutch, the two exchanges dialogue randomly chosen from the following lists:
- Dutch:
- "Mickey, you can't have my awesome skull, but if we make it out of this, I will paint you a nice pretty pony."
- "I'm ready to meet my maker, Mickey. How about you?"
- "No looky-loo when there's fighting to do!"
- "Well, I'm not going to hold your hand right now, Mickey."
- Mickey:
- "Dutch, this ain't time to kid around!"
- "Seriously, Dutch! Be serious!"
- "Real funny, Dutch!"
- "Well, you're a ball of laughs!"
Together Mickey and Dutch defeat the Covenant, and help a group of Marines further up the road clear out more Covenant troops.
- Dutch: "Those Covenant dropped in behind us, they must know this is our rally point!"
- Mickey: "Terrific!"
- Dutch: "Come on, we got weapons and ammo on the high ground. Move it! Move it!"
Soon more Phantoms arrive dropping off Covenant reinforcements, including a Wraith.
- Dutch: "Phantoms! Everyone, find some cover!"
- Mickey: "We got any heavy weapons for that Wraith?"
If the player has given Dutch a rocket launcher:
- Dutch: "I'll draw its fire, you try and board it!"
If the player did not give Dutch a rocket launcher:
- Dutch: "Negative, I'll draw its fire, you try and board it!"
- Dutch: "Fire an overcharged plasma shot at it, then stick it with grenades!"
While the bulk of the attacking Covenant troops assault the UNSC position head-on, a group of Kig-Yar head over one of the bridges, intending to get behind the humans.
- Dutch: "Kill those runners, Mickey, they're tryin' to flank us!"
After most of the Covenant troops are killed.
- Dutch: "Keep it up, Mickey! We almost got 'em beat!"
After a hard fought battle, the Covenant troops are defeated and Mickey destroys the Wraith.
- Dutch: "That's all of 'em. Way to go, Mickey! Come to my position."
Once the player arrives at Dutch's position the level ends.

Mickey and Dutch clasp hands at the door to ONI Alpha Site.
- Dutch: "You heard from Gunny?"
- Mickey: "No. Romeo neither."
View switches to a Superintendent camera, whose avatar shows a happy face at the sight of ODSTs.
- Dutch: "Huh, guess it's just you and me."
- Mickey: "My vote? Hole up, wait for back up."
The Superintendent's avatar shows an angry face at Mickey's vote.
The view switches back to the ODSTs, who aim their guns at the door as it opens, an NMPD officer emerges from behind it.
- NMPD Officer: "Thank God! Does one of you know how to use explosives?"
- Dutch: "Your vote? Just got overruled."
Dutch heads inside the tunnel. Mickey follows.
- Mickey: "Ohh..."
The camera pans up to show the Office of Naval Intelligence sign.
Level ends.
Achievements[edit]
The following achievements can be unlocked on Kizingo Boulevard across the Xbox 360 and Halo: The Master Chief Collection editions of Halo 3: ODST.
| Halo: 3: ODST (Xbox 360) | Halo: MCC (Xbox One) | Halo: MCC (Steam) | Title | Unlock requirement | Games |
|---|---|---|---|---|---|
 |
 |
 |
Complete Kizingo Boulevard on Normal, Heroic, or Legendary. (Halo 3: ODST) Complete Kizingo Boulevard on any difficulty. (Halo: The Master Chief Collection) |
Halo: The Master Chief Collection | |
 |
Get 10 Rocket kills on Kizingo Boulevard. | ||||
 |
 |
Beat the par time on Kizingo Boulevard. | |||
 |
 |
Beat the par score on Kizingo Boulevard. |
Trivia[edit]
- According to Bungie, the main difference of this Scorpion-based mission as compared to those in the previous games is that "it's more of a close-range city fight," and the time the player controls the tank is slightly shorter.
- The beacon to start this level is a ruined Gauss Turret. Though this turret is slagged automatically, a second Gauss turret is found on the lower level. The player can actually save this second turret from damage and use it to their advantage in the ensuing fight.
- In the opening cutscene the Wraith comes around the street corner, but if the player quickly turn right to look behind they at the start of gameplay, the Wraith has not rounded the corner yet.
- At the beginning of the level, although the Marines yell at the player to save their Scorpion from being destroyed by Wraith fire, a second, unmanned tank is also in the plaza. It is likely available for Co-op purposes and is completely ignored by the enemy unless the player or a friendly is nearby.
- Players can ride on the side of the tank, unlike in Halo 2 and 3 in which only NPCs can ride on the sides. This change reflects the fact that the player is an ODST and provides gameplay balance.
- Sometimes the Marine who places the beacon on the door to Kizingo Boulevard says the two different comments at once.
- It is possible, though extremely difficult, to hijack a Banshee in this level through a glitch. When the player gets inside the Banshee and fly over the wall with the 4 on it, go right and fly straight for a bit and the player will see something like a Da Vinci Egg texture on the ground (like from the eggs in Sandtrap and Sandbox). The player can also go exploring and see the 2D-render of the apparent 3D structure of the space tether and 3D buildings that are out of play zone. The player can even get inside the "blocked off" Kizingo Boulevard on the other side of the district (the area behind the plasma shield barrier).
- Upon entering the area where the player meets up with Dutch, exit the Scorpion just past the blast doors and go through the open door leading into the building with the Gauss Turret that serves as this level's beacon. Both inside this building and on the ledge next to the turret are extra Rocket Launcher ammo and Frag Grenades. The former is useful for getting the Both Tubes achievement.
- Although the game intends for the player to abandon the Scorpion in order to meet Dutch, the player can destroy enough of the first line of roadblocks to drive the player's tank directly up to Dutch and, to a limited extent, shell enemy forces beyond the blast doors. However, if Dutch boards an available spot on the tank, he will remain there and cannot assist him/her in the coming fight.
- If a player captures a Ghost, they can drive it up to the rally point, where an invisible barrier will prevent them from entering the next area unless they exit the vehicle. However, it is possible to carefully melee the vehicle past the invisible barrier, where it will be possible to mount it and freely drive it for the remainder of the level.
Gallery[edit]
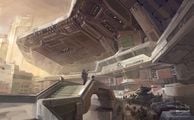
Concept art of Marines gathering at the rally point.
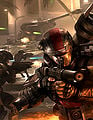
Concept art of Mickey fighting alongside Marines during the level.

Preview of the level in Halo 3: ODST menu.
Mickey fires the Scorpion's main cannon.
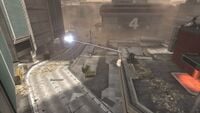
The Gauss turret fires at a Ghost in the boulevard.
Two Banshees approach Mickey's Scorpion.
Mickey's Scorpion fires at a Phantom deploying reinforcements.
Mickey and Dutch firing their M7S SMGs.
A Marine Sergeant leading Marines at the rally point
Mickey and Dutch being observed by the Superintendent.


| |||||||||||||||||


