Second Squad: Difference between revisions
From Halopedia, the Halo wiki
m (→Battle of Mombasa: Link cleanup, replaced: [[Type-47A Scarab → [[Protos-pattern Scarab) |
|||
| (37 intermediate revisions by 21 users not shown) | |||
| Line 1: | Line 1: | ||
{{ | {{Status|Canon}} | ||
'''Second Squad''' is a generic name for small UNSC military units during operations. | '''Second Squad''' is a generic name for small [[United Nations Space Command|UNSC]] military units during operations. The name was employed by several UNSC units during the [[Human-Covenant War]]. | ||
==Battle of the Silent Cartographer== | ==Known units== | ||
===Battle of the Silent Cartographer=== | |||
{{Main|Battle of the Silent Cartographer}} | |||
During the [[Battle of the Silent Cartographer]] in the [[Battle of Installation 04|Halo Conflict]] on September 20, 2552, Sergeant [[Waller]] was in command of a Second Squad. Second Squad took part in the initial beach assault on the island, and held the beach while John-117 searched for the Cartographer. After John-117 gained access to the Cartographer facility, Second Squad fought off Covenant reinforcements, but they were eventually killed.{{Ref/Level|CE|The Silent Cartographer|Quote=Second Squad! Ready to roll, soon as everybody's topside!|Quotee=Waller}} | |||
===Outbreak at the Containment Facility=== | |||
{{Main|Outbreak at the Containment Facility|Second squad (Pillar of Autumn)}} | |||
A Second Squad, led by Corporal [[Lovik]], was part of the UNSC forces that went to a [[Flood containment facility]], with [[Captain (Navy)|Captain]] [[Jacob Keyes]]. The squad may have been part of [[Fire Team Charlie]], which was led by Staff Sergeant [[Avery Johnson]]. While Keyes, Johnson, and a group of Marines descended into the facility, Second Squad were ambushed by the [[Flood]] elsewhere in the facility. Corporal Lovik attempted to warned Keyes and Johnson over radio, but the transmission was cut off. Any survivors from the squad likely joined the Marines that were eventually found by John-117, but all of the marines in the group succumbed to the Flood when they were fighting to reach the extraction point designated by ''[[Echo 419]]''{{'}}s pilot Captain [[Carol Rawley]].{{Ref/Level|CE|343 Guilty Spark (level)|343 Guilty Spark|Quote=Mendoza, get your ass back up to Second Squad's position, and find out what the hell is goin' on.|Quotee=Avery Johnson}}{{Ref/Novel|TF|Chapter=9}} | |||
== | ===Battle of Mombasa=== | ||
{{Main|Second Squad ( | {{Main|Battle of Mombasa}} | ||
[[Gunnery Sergeant]] [[Marcus Stacker]] led a Second Squad, comprised of [[ODST]]s [[Walpole]], [[O'Brien (Mombasa)|O'Brien]], [[Butkus]], and [[Fones]], during the [[Battle of Mombasa]].{{Ref/Generic|[[Another Day at the Beach]]}} The squad was part of the forces sent by the {{UNSCShip|In Amber Clad}} to support [[John-117]] in boarding the Covenant {{Class|CAS|assault carrier}} ''[[Solemn Penance]]'', which held its position over the [[Uplift Nature Reserve]] in [[New Mombasa]].{{Ref/Level|ODST|Uplift Reserve}} However, the Pelicans were shot down by a [[Protos-pattern Scarab|Scarab]] in [[Old Mombasa]] [[Sector 0-5]]. Second Squad's Pelican crashed on the [[Old Mombasa]] beach, from where the squad fought their way to the nearby [[Hotel Zanzibar]]. The hotel soon came under attack by the Covenant, but John-117 was able to intervene in time. The squad then helped the Spartan push back to the beach to clear a path to the [[New Mombasa|City Center]].{{Ref/Level|H2|Outskirts|Quote=Second Squad, this is Cortana. What's your status, over?|Quotee=Cortana}} | |||
===Recovering John-117=== | |||
{{Main|Recovery of John-117}} | |||
During the opening stages of the [[Battle of Kenya]] on November 17, 2552, after finding and recovering John-117, Johnson led a Second Squad to the landing zone where they were to be extracted by ''[[Echo 51]]'' and another [[D77H-TCI Pelican Dropship|Pelican]]. However, the Pelicans were shot down by [[Type-26 Banshee]] fighters and ''Echo 051'' crashed on a nearby cliff. Johnson and the survivors of Second Squad were then captured by a [[Jiralhanae Chieftain]]. They were held captive at [[A2 Hydroelectric Facility]], where they were later rescued by John-117 and airlifted out by ''[[Kilo 023]]''.{{Ref/Level|H3|Sierra 117|Quote=We stick together and we're gonna get spotted. Let's split up, meet back at the LZ. Chief, go with the Arbiter, head toward the river. Second Squad, you're with me.|Quotee=Avery Johnson}} | |||
== | ===Attack on Crow's Nest=== | ||
{{Main|Attack on Crow's Nest}} | |||
Following the Covenant assault on Crow's Nest on November 17, 2552, a Second Squad was stationed as a perimeter patrol for above ground vehicular hangars GG and HH. After the base's destruction, the squad was attacked by a group of Covenant. Another marine squad, led by John-117 and Sergeant [[Reynolds]], repelled the Covenant forces with [[M12 Warthog|Warthogs]] and picked the remnants of the squad up to join them in their way to [[Voi]].{{Ref/Level|H3|Tsavo Highway|Quote=Second Squad? Coming through!|Quotee=Reynolds}} | |||
==Gallery== | |||
<gallery> | |||
File:HCE-MasterChief-Wallpaper.jpg|John-117 leading Waller and his Second Squad at the Cartographer island of Installation 04. | |||
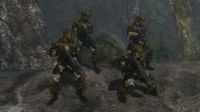
File:H2A Beach - Taking Cover.jpg|ODSTs of the Second Squad taking cover from sniper fire during Battle of Mombasa. | |||
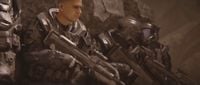
File:HTMCC - H3 Second Squad.jpg|Second Squad and Johnson preparing to move out after recovering John-117. | |||
File:H3 Tsavo Second Squad.jpg|Second Squad prepare to board a Warthog at Crow's Nest. | |||
</gallery> | |||
==List of appearances== | |||
*''[[Halo: Combat Evolved]]'' {{1st}} | |||
*''[[Halo 2]]'' | |||
*''[[Halo 3]]'' | |||
*''[[Halo: Combat Evolved Anniversary]]'' | |||
*''[[Halo 2: Anniversary]]'' | |||
==Sources== | ==Sources== | ||
{{Ref/Sources}} | |||
[[Category:UNSC | [[Category:UNSC Marine Corps squads]] | ||
Revision as of 15:43, April 13, 2022
Second Squad is a generic name for small UNSC military units during operations. The name was employed by several UNSC units during the Human-Covenant War.
Known units
Battle of the Silent Cartographer
- Main article: Battle of the Silent Cartographer
During the Battle of the Silent Cartographer in the Halo Conflict on September 20, 2552, Sergeant Waller was in command of a Second Squad. Second Squad took part in the initial beach assault on the island, and held the beach while John-117 searched for the Cartographer. After John-117 gained access to the Cartographer facility, Second Squad fought off Covenant reinforcements, but they were eventually killed.[1]
Outbreak at the Containment Facility
- Main articles: Outbreak at the Containment Facility, Second squad (Pillar of Autumn)
A Second Squad, led by Corporal Lovik, was part of the UNSC forces that went to a Flood containment facility, with Captain Jacob Keyes. The squad may have been part of Fire Team Charlie, which was led by Staff Sergeant Avery Johnson. While Keyes, Johnson, and a group of Marines descended into the facility, Second Squad were ambushed by the Flood elsewhere in the facility. Corporal Lovik attempted to warned Keyes and Johnson over radio, but the transmission was cut off. Any survivors from the squad likely joined the Marines that were eventually found by John-117, but all of the marines in the group succumbed to the Flood when they were fighting to reach the extraction point designated by Echo 419's pilot Captain Carol Rawley.[2][3]
Battle of Mombasa
- Main article: Battle of Mombasa
Gunnery Sergeant Marcus Stacker led a Second Squad, comprised of ODSTs Walpole, O'Brien, Butkus, and Fones, during the Battle of Mombasa.[4] The squad was part of the forces sent by the UNSC In Amber Clad to support John-117 in boarding the Covenant CAS-class assault carrier Solemn Penance, which held its position over the Uplift Nature Reserve in New Mombasa.[5] However, the Pelicans were shot down by a Scarab in Old Mombasa Sector 0-5. Second Squad's Pelican crashed on the Old Mombasa beach, from where the squad fought their way to the nearby Hotel Zanzibar. The hotel soon came under attack by the Covenant, but John-117 was able to intervene in time. The squad then helped the Spartan push back to the beach to clear a path to the City Center.[6]
Recovering John-117
- Main article: Recovery of John-117
During the opening stages of the Battle of Kenya on November 17, 2552, after finding and recovering John-117, Johnson led a Second Squad to the landing zone where they were to be extracted by Echo 51 and another Pelican. However, the Pelicans were shot down by Type-26 Banshee fighters and Echo 051 crashed on a nearby cliff. Johnson and the survivors of Second Squad were then captured by a Jiralhanae Chieftain. They were held captive at A2 Hydroelectric Facility, where they were later rescued by John-117 and airlifted out by Kilo 023.[7]
Attack on Crow's Nest
- Main article: Attack on Crow's Nest
Following the Covenant assault on Crow's Nest on November 17, 2552, a Second Squad was stationed as a perimeter patrol for above ground vehicular hangars GG and HH. After the base's destruction, the squad was attacked by a group of Covenant. Another marine squad, led by John-117 and Sergeant Reynolds, repelled the Covenant forces with Warthogs and picked the remnants of the squad up to join them in their way to Voi.[8]
Gallery
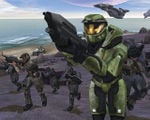
John-117 leading Waller and his Second Squad at the Cartographer island of Installation 04.
ODSTs of the Second Squad taking cover from sniper fire during Battle of Mombasa.
Second Squad and Johnson preparing to move out after recovering John-117.
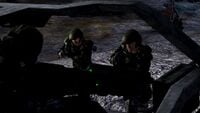
Second Squad prepare to board a Warthog at Crow's Nest.


List of appearances
- Halo: Combat Evolved (First appearance)
- Halo 2
- Halo 3
- Halo: Combat Evolved Anniversary
- Halo 2: Anniversary
Sources
- ^ Halo: Combat Evolved, campaign level The Silent Cartographer: "Second Squad! Ready to roll, soon as everybody's topside!" - Waller
- ^ Halo: Combat Evolved, campaign level 343 Guilty Spark: "Mendoza, get your ass back up to Second Squad's position, and find out what the hell is goin' on." - Avery Johnson
- ^ Halo: The Flood, chapter 9
- ^ Another Day at the Beach
- ^ Halo 3: ODST, campaign level Uplift Reserve
- ^ Halo 2, campaign level Outskirts: "Second Squad, this is Cortana. What's your status, over?" - Cortana
- ^ Halo 3, campaign level Sierra 117: "We stick together and we're gonna get spotted. Let's split up, meet back at the LZ. Chief, go with the Arbiter, head toward the river. Second Squad, you're with me." - Avery Johnson
- ^ Halo 3, campaign level Tsavo Highway: "Second Squad? Coming through!" - Reynolds


